Today I’ll be talking about the process of making a very ruffly full length petticoat!
I really love petticoats with cotton ruffles because they seem so much fluffier than ones made entirely from tulle or netting. They bounce back into shape really well, even if you store them in tiny balls crammed into plastic bins (which I do). And on top of that they are softer and more comfortable.
My favorite petticoat i’ve ever made is actually a short one made from organza with cotton ruffles, which can be seen here!
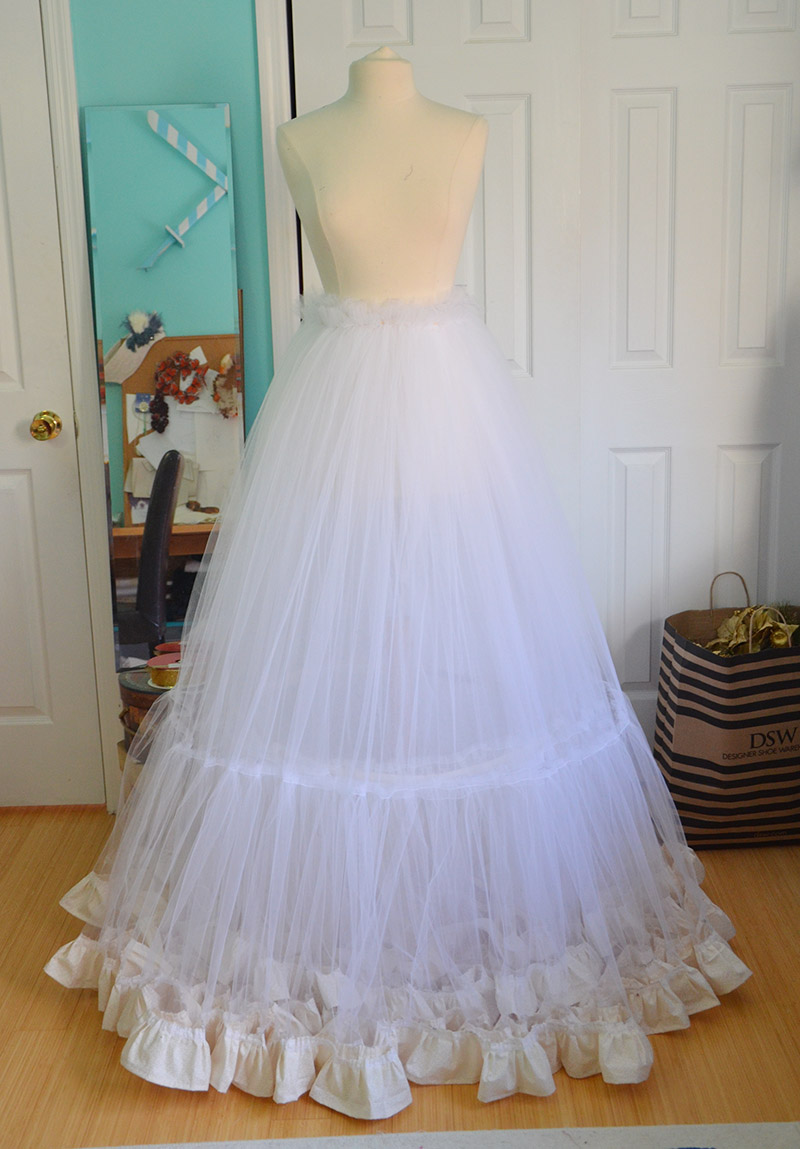
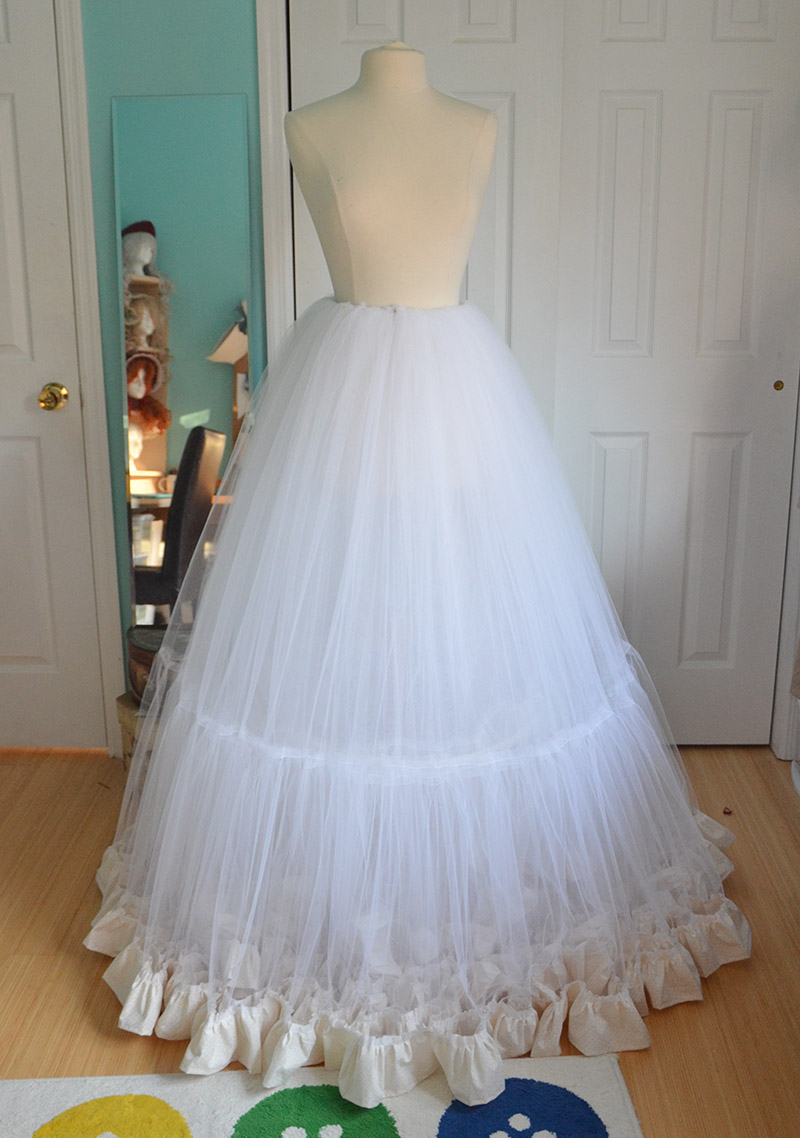
I’ve been working on a full length dress that is partially sheer and I wanted a very full, visually pleasing petticoat to wear underneath it. I decided making one with cotton ruffles was a great idea – unfortunately it didn’t turn out as planned. I didn’t have petticoat netting or organza around, so I used tulle instead. I had hoped the tulle would build up well and eventually give the volume I wanted, but that didn’t really happen.
I do like how it turned out, but whenever I get a bolt of petticoat netting i’ll definitely be adding to it to create the shape I wanted it to have. Anyway, onward with how I did it!
…
I started by making a sheet that listed all the things I needed to cut out. I decided to make the petticoat six layers, with a small hoop/netting base layer to prevent the layers from falling flat around my legs.
Each layer is made up of three pieces of fabric – the cotton ruffle, a strip of tulle, and a larger piece of tulle. The cotton gets gathered and sewn onto the strip of tulle, then the tulle gets gathered and attached to the larger piece of tulle, which eventually gets gathered at the waist.
Each layer gets gathered in half – so if the cotton is a ten yard strip it will be sewed onto a piece of tulle that is five yards long, which will be sewed onto a piece of tulle that is two and a half yards long. Then it’s gathered at the waist.
The layers vary in size but each one is between half an inch and one inch longer than the one before it.
It’s kind of confusing.

Once I cut out all my cotton strips I sorted them into piles and labeled them. The process is confusing enough when everything is organized well – if you lose track of any strips or have the wrong amount it turns into a nightmare!

The fabric strips were sewn together to created really long strips.

Then they got hemmed, each one has a double hem, which means they get hemmed twice.
The first time the edge gets turned over a quarter inch.

Then it gets turned over again to create a fully finished edge.

When all the strips were hemmed they were sorted and labeled (again) because as I said, it’s confusing enough with things organized!


I set my strips aside and began focusing on the base layer. The goal of this layer was just to create something that would prevent the layers from getting tangled in my legs. This makes it easier to wear and walk in and adds a bit of extra volume!
To make it I cut a piece of petticoat netting that was three yards wide. I also cut small strips of fabric which were used to finish the edge of the netting and create a channel to thread the hooping wire through.

The edge of the netting was finished, then gathered and stitched to a piece of organza.

Then the wire got added and the waist was gathered. I sewed it up the back with a french seam and left a ten inch slit at the top so I can get in and out of it.

When that was finished I cut out all the tulle. I ended up misreading my sheet of paper and cutting everything out wrong, so I had to redo most of it which was great.
The tulle also got labeled.


Then it was time to start ruffling things! The method I used for this isn’t one I would really recommend, since it isn’t very safe or precise or pretty. But it’s really fast and easy, so for things like petticoats it works amazingly well.
To do it the fabric you want to gather needs to be on the bottom.

Lay your fingers over the fabric and push it towards the feed dogs until the fabric is the way you want it. Make sure your foot is NOT on the pedal during this part!

Lay the tulle over your fingers with your other hand, then remove your fingers. The tulle should keep the gathers in place long enough for you to sew over them.
Overall it’s really not the best method but I wanted to gather over a hundred yards of fabric in a few hours and this does a good job of accomplishing that.

After the ruffles are gathered and attached I top stitched them in place. Then that tier of tulle (or for this layer, netting, it’s the only layer with netting) gets gathered down and attached to the larger layer of tulle. The process repeats itself over and over until you get the right amount of volume or run out of fabric – the latter happened in my case!

This is one layer.

Two layers.

Three layers…
Five layers.

And six layers!
When all the layers were done and the tops were gathered I stitched them together. Then I made and stitched on the waistband – I swear I had photos of this but I can’t find them anywhere! I ended up using the same pattern and process as shown here so I won’t even try to explain it.
So that’s that! It will work for the project I had in mind but it’s not as fantastically full as I wanted. Especially when you put a heavy skirt over it, it sort of collapses.
Thanks for reading – and thank you so much for all the kind comments on my last post! If you celebrated, I hope you enjoyed your holidays!

Your work is fantastic! Its so much fun to see!
I know what you need for Christmas…a ruffler foot. I saw one in action the other day. Nothing short of amazing. Especially for the work you do. Now tell me. Is this something you’ve conjured up or did women actually wear this many petticoats?
I’m familiar with them! My problem with ruffler foots is they don’t gather the fabric, they pleat it, which is visually appealing but doesn’t create as much volume since pleats lay flat. I also haven’t seen one made for my machine model (a newer industrial one).
I do own a gathering foots but it creates really loose ruffles and I don’t like how they look.
Probably not one that resembled this! I didn’t make it for a historical project, but yes they did. In a lot of time periods they would wear underskirts structured with hoops, and have a petticoat layered over that.
Oooh! So pretty! You are much more organized than I am. I created a similar petticoat with just 2 layers of tulle, and it was close to the most frustrating experience of my life 😉
http://www.cosplaycents.com
When we made a petticoat for my wedding dress, we attached many tiers if gathered fabric to the same base, each tier attached about halfway down the width of the first and using fuller (longer pieces gathered to the same length) layers as we went down the skirt. By doing it that way we were able to give it more lift than just multiple layers at the hem area. Not sure if this explanation makes sense to anyone just reading it, but I am not sure how to explain it better. I hope this can somehow help you if you can understand what I mean. 🙂
Lovely petticoat. I made one recently too, with tulle. I used my ruffler foot for one layer where I wanted maximum fullness – but I had it set to the gathering setting rather than the pleating setting, and fiddled with the stitch length to maximize the ruffles. I ended up doing 18 meters of tulle on that one layer alone, and don’t think I could have done it just with drawing the threads to gather.
I’m in love!! But how many yards of tulle and organza did you use? It looks like 20 yards!!
I am looking to make a similar petticoat, and I want to use yours as inspiration, but I had a question. What is hooping wire?
Please make elsa dress for kids and send it to me
Hello Angela! My name is Mika. I know this was really long ago but I just love what you do and you’re a big inspiration:) I’m thinking of making a petticoat and I just wonder how much tulle you used for this petticoat so I can buy it all at once and don’t need to go back and buy more after each layer!
Keep doing what you do because you can be something huge❤ Thanks:)))