A Taffeta Turn of the Century Gown | The Pumpkin Project 2020, Photos

Hello everyone! Today I’m carrying on the tradition of posting about my yearly “Pumpkin Project”!

I’ve been making a “pumpkin project” every year, for the past five years or so. These projects always have an autumn themed color palette, and historical inspiration behind them. Though the levels of historical accuracy vary from year to year.

These are always some of my favorite projects I make throughout the year. For me, they mark when the weather starts to get cooler and when I start to feel more inspired. I think that shows in the outcome, and I certainly feel it when working on them!

Though the “pumpkin project” looks different each year, they all have one thing in common: They are photographed in a local pumpkin patch, and the photos are posted here at the end of October.

I don’t have as many, or as varied of photos this year. I ended up feeling quite sick during the shoot, so it was cut short. And due to scheduling conflicts and a LOT of rain, we photographed this midday when the lighting was very harsh. I tried to jazz them up with editing, but they still aren’t my favorite.

However I do really love the costume itself. It consists of a bright orange jacquard dot taffeta skirt, and a heavily beaded mesh blouse. You can see the process of constructing this ensemble from start to finish in these two videos.

Making the Blouse

Making the Skirt

And now for the photos!

And that is it! I feel like some of the details in the blouse were lost in these photos, which stinks. But I still know they are there, and I think it still looks lovely, so I’m relatively happy.

It feels condescending to say I hope your year is going well, given what a dumpster fire it has been. But I do hope that you are well, and thank you for reading!

Angela

A 1630s Satin Gown & Velvet Robe : Christmas Costume 2019

Hello everyone! It’s that time of the year again where I make a dramatic holiday themed gown, and photograph it at a local Christmas Tree Farm.

This year I was inspired by a beautiful green velvet I found at joanns – I knew it needed to be turned into an elaborate velvet robe or cloak of some sort, and paired with an equally striking dress.

I raided my stash for fabrics to match it, and came across a seven yard cut of silk satin. The sheen and contrast of the white satin against the green was lovely. So then there was the matter of what I should make with it. I ended up turning to the 17th century for inspiration, and came up with a relatively simple dress design based on paintings from the 1630s.

Or at least a design that looks quite simple. Dresses from the 1630s were worn without foundation garments, instead the structure was built into the bodice of the dresses. Meaning making one is sort of like making a set of stays…and also making a dress. Plus dresses from this era had cartridge pleats and hidden closures which are always more time consuming than the alternatives.

To prevent the dress from being boring, I decided to decorate it with jeweled details. These were made by sewing glass montees, pearls, and brass cameo frames masquerading as gold settings onto organza ribbon. The ribbon drapes over the shoulders of the dress and is supported by the volume of the sleeves, and a pin at the centerfront.

I made a matching necklace as well, and a coordinating waistband. I think the end result is quite lovely! I don’t have photos of the construction process, but a video showing all the steps can be found below, along with photos of the finished garment.

christmas 1630 resize-10christmas 1630 resize-5christmas 1630 resize-6christmas 1630 resize-13christmas 1630 resize-15

christmas 1630 resize-16christmas 1630 resize-14christmas 1630 resize-15christmas 1630 resize-13christmas 1630 resize-12christmas 1630 resize-17

christmas 1630 resize-19christmas 1630 resize-20christmas 1630 resize-21

Now for the robe! As I said, this was made from a velvet I found at joanns, and served as the main inspiration for this project…even though I couldn’t start on it until finishing the dress that goes underneath it!

Because the dress was so time consuming to construct, it was kind of a mad dash to get this done in the end. But I managed!

Like the dress, this was self drafted. The bodice pattern was draped over top of the finished gown, and is a single piece with a separate panel at the front that forms a lapel. I had this vision from the very start of a lapel or collar turning into a hood – which is created by sewing the hood in between the layers of the collar by hand.

The hood was the most challenging part of this project, it went through six different mockups, with lots of changes between them. I started by making it a heavily gathered rectangle with sloped sides, but thought it would be too bulky in the collar. Then it was shaped with darts. Then the darts were combined and replaced with a single seam. Then it was taken in by a lot. Then more darts were added for further shaping. And it was taken in some more. And here we are!

The brim of the hood is reinforced with three layers of ban-roll and two pieces of plastic boning so it holds itself open.

For once, the sleeves were the easy part. Their pattern was based on the one used for the satin dress, but altered to have more volume and more of a bell shape. The sleeves are split at the shoulder seam of the robe, revealing the satin sleeves worn underneath it. The bottom edge has a drawstring in it to allow for adjustments.

I intended on having the robe tie at the waist, revealing the dress beneath it. But I added closures all the way to the neck to allow for more options. And I actually love how it looks all buttoned up! It causes the hood to sit so nicely over the shoulders.

Also it’s not technically buttoned up. It actually closes with rhinestone encrusted clasps, that were set alongside pearls to make them look more fancy. Speaking of fancy, the robe has a belt sewn to the waist with beading similar to that featured on the dress, made up of pearls and glass montees.

The video below goes through the construction process in detail.

christmas 1630 resize-22

christmas 1630 resize-26christmas 1630 resize-25christmas 1630 resize-34christmas 1630 resize-29christmas 1630 resize-20

christmas 1630 resize-9christmas 1630 resize-5christmas 1630 resize-2

christmas 1630 resize-3christmas 1630 resize-6christmas 1630 resize-7christmas 1630 resize-8christmas 1630 resize-10christmas 1630 resize-11

Overall, I’m very happy with this project! I hope you like it too, and thanks so much for reading. I hope you have a wonderful holiday~!

A Spooky Striped Early 1880s Ensemble

For my second post of the day, I have something completely different, but with a similar Halloween inspiration.

And much like my robe a la polonaise, this dress is also made from a Wilmington “Gone Batty” fabric. Except for this piece, I bought the black and white stripe print fabric. Fifteen yards of it, to be exact.

I didn’t use any references for this project, I just had an idea in mind and I wanted to make it a reality. And that idea evolved and changed as I worked on the project. I didn’t take a lot of photos while constructing this, since it came together very quickly. But I’ll do my best to explain my thought process.

halloween resize-25

The project is made from three pieces – a skirt, dress, and hat. It’s worn over a 1881 style false rump made from dense rows of cotton organdy, and a corset made following a pattern in Norah Waugh’s “Corsets and Crinolines”.

I had the foundations done ahead of time, so the first piece I started making for this project was the skirt.

I was originally going to make the skirt entirely out of vertically cut strips of the striped fabric. But when I actually got to starting on it, that seemed awfully boring. So I ended up alternating strips that were cut horizontally and vertically for a more intricate effect.

halloween resize-6

I draped the top panels to fit nicely over the false rump, so they taper in towards the waist and have some shaping to them. The rest of the skirt is made from rectangles that were seamed together and gathered down.

It kind of does wonky things to your eyes when you look at it. But I think that’s part of its charm.

halloween resize-5

I had three design ideas I wanted to incorporate into the dress:

  1. I wanted it to button down the entire front.
  2. I didn’t want it to have a waist seam – the bodice and skirt would be continuous from shoulder to hem.
  3. The skirt would be bustled with glittery skeleton hands.

Easy enough right? I also had a sketch to work off of, but the finished dress doesn’t really resemble it.

I usually don’t bother draping skirts since they are somewhat simplistic in shape and require a ton of fabric. But since this was a new era and silhouette for me, I thought it was important to drape it and do a full mockup.

Here is my first mockup fitting.

A few tweaks hat to be made but I was pleasantly surprised with the shape and fit! I also played around with bustling the back while featuring glittery skeleton hands.

halloween resize

And then I made the dress. Yeah, I wasn’t kidding when I said I was bad about photographing the construction process.

halloween resize-8

halloween resize-10

The dress was actually very simple to construct once I had it drafted. It was assembled completely by machine. And the hem of each panel was turned outward and covered with pleated satin trim from my stash, which was also sewn on by machine.

I didn’t stitch down the seam allowance, or add boning or a waist stay like 1880s dresses traditionally had. Nor did I bother with lining. The neckline is finished with a facing and that’s about it. The inner edge of the facing isn’t even tacked down – all that secures it is some lace trim which was (shocker) also sewn on by machine.

halloween resize-7

The only hand sewing involved was stitching on all the buttons, and securing skeleton hands to the front of the bodice. It kind of looks like they are cupping the chest, which I think is hilarious.

I used bows sewn from striped fabric and matching lace trim to cover the end of the hands, and make them a bit cuter.

halloween resize-9

halloween resize-11

The same method was used on the back of the skirt, where there are more hands. Except these are positioned to look like they are gathering the fabric that shapes the dress.

halloween resize-13

halloween resize-12

The actual shaping of the dress comes from gathers sewn before seaming the pieces together. Along with a carefully placed tacking stitch and twill tape ties.

halloween resize-14

All of that is hidden by another draped panel.

halloween resize-15

And that’s the dress! It was paired with a hat I made from interfacing and corduroy, with matching lining.

The construction of this is pretty on par with the dress…and by that I mean, it’s pretty crap. But looks decent from the outside.

I was so frustrated the day I worked on it, I didn’t even have the patience to pin the wire in place before sewing it on….which led to me breaking four needles whilst constructing it. Yeah. Don’t sew when agitated, it can be dangerous!

It’s trimmed with some dyed goose feathers, more skeleton hands, and a fake dragon skull I bought at Michaels. The glittery hands came from Michaels too, they were in the floral decor section – originally attached to sticks and meant to be part of Halloween bouquets! But I think my usage of them is superior.

halloween resize-17

The shoes were from American Duchess, simple black pumps called “Tissot” and appropriate for the era.

halloween resize-16

And here it is all finished!

Compared to my Robe a la Polonaise which had so much hand work invested in the construction process, this is practically a pile of garbage. But I think I like it just as much as the polonaise, just for completely different reasons.

I’m a big believe in that things don’t have to be perfect to be worth making, or worth appreciating.

And even if you’re capable of superior construction, sometimes it’s nice to focus more on the the creative and artistic aspect of sewing, rather than what the inside of a garment looks like.

Sort of like how an artist might slave over a painting for months, that they are really proud of. But also bang out a beautiful sketch in ten minutes. Both can be appreciated even if the quality (and quantity) of work put into them is very different. Who’s to say that can’t be the case with historical costumes too? Or at least that’s my justification for it!

I think this is one of the most visually striking things I’ve made in a long time, if not ever. And I’m proud of it because of that. I hope you like it too – though I’m sorry about the lack of progress shots!

halloween resize-28halloween resize-23halloween resize-24halloween resize-29halloween resize-26halloween resize-30halloween resize-27halloween resize-25halloween resize-22

Thanks for reading! I hope you have a wonderful Halloween (or just a wonderful day, if you don’t celebrate) and hopefully I’ll be back with another post sometime soon!

Photos : 1780s Robe a la Polonaise + Pumpkin Hat

As promised, here are the worn photos of my 1780s Robe a la Polonaise and the coordinating pumpkin hat! I feel like I should have taken the opportunity to call this project the Pumpkin Polonaise – unfortunately it’s a little too late for that.

But even without the catchy name, I think it’s a pretty great costume!

If you are interested in how I made it, the construction notes can be found here.

I also wanted to give a big thank you to Lenny Bruno Farms who were nice enough to let us take pictures in their beautiful pumpkin patch!


halloween resize-4halloween resize-9halloween resize-10halloween resize-6halloween resize-5halloween resize-8halloween resize-7halloween resize-12halloween resize-13halloween resize-15halloween resize-14halloween resize-17halloween resize-16halloween resize-19halloween resize-20halloween resize-21

Thanks for reading! And keep an eye out for another post coming later today, that features another Halloween themed project! 🙂

Making a 1780s Robe a la Polonaise + The Pumpkin Hat

Hello everyone! So, it’s been a while. And when I say a while, I mean a year. Technically it’s only been 364 days, but I think I can justifiably round that up to a year.

I don’t have a good excuse for my absence. But I will say that up until recently it’s taken all of my energy just to keep up with my Patreon commitments and a somewhat regular video schedule on youtube. And pretty much everything else – including this blog, has fallen to the wayside. I elaborate a bit on the reasons behind that here.

But for the first time in a long while I’m feeling optimistic about the future and more like my old self. And my old self blogged regularly. So here I am!

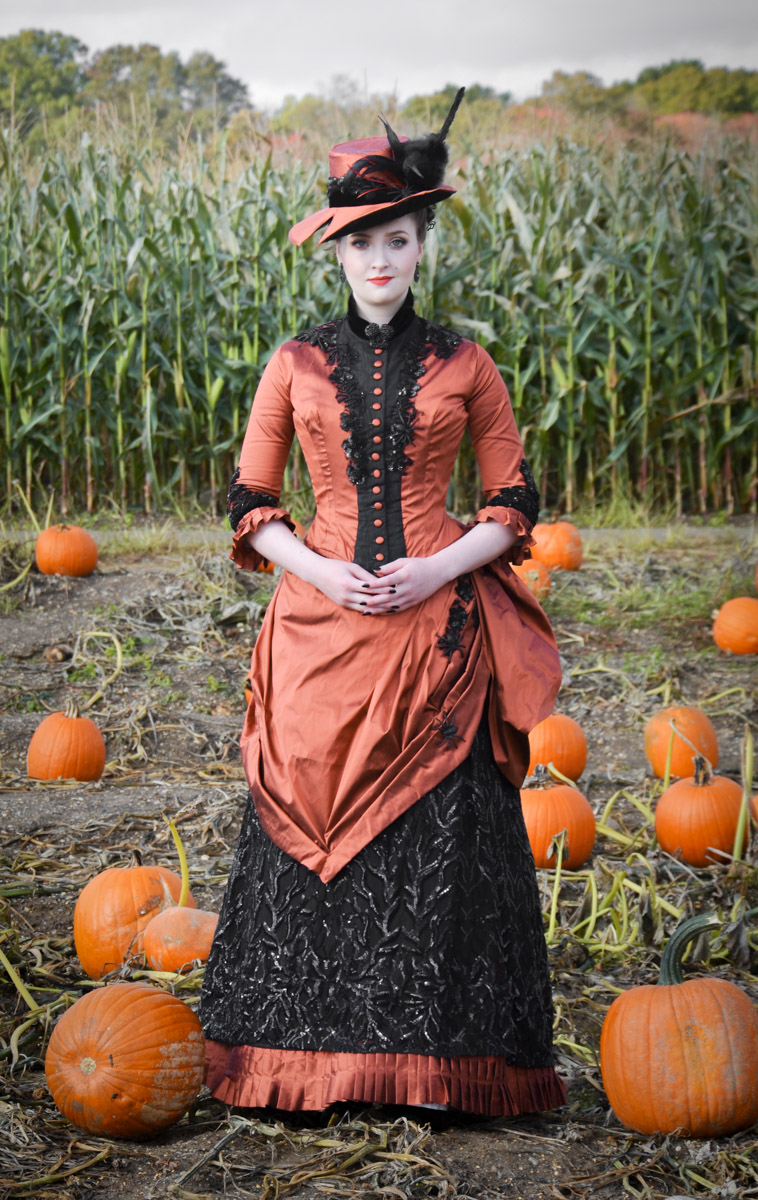
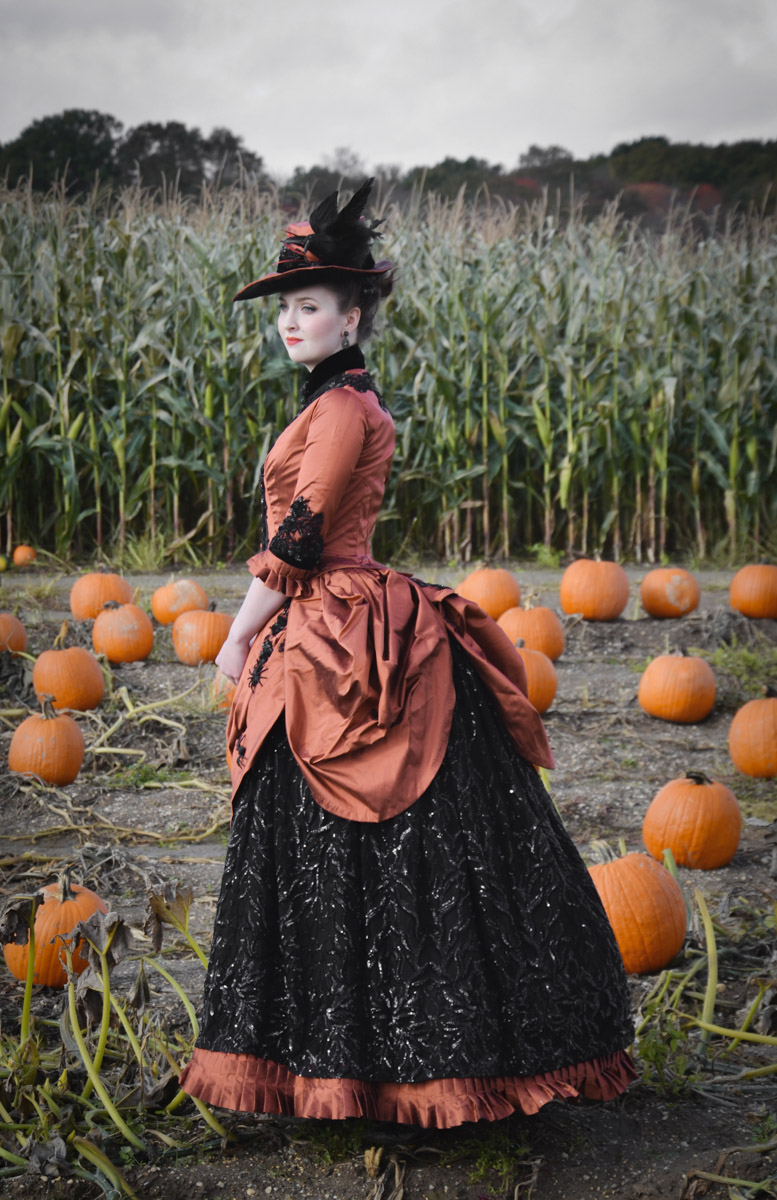
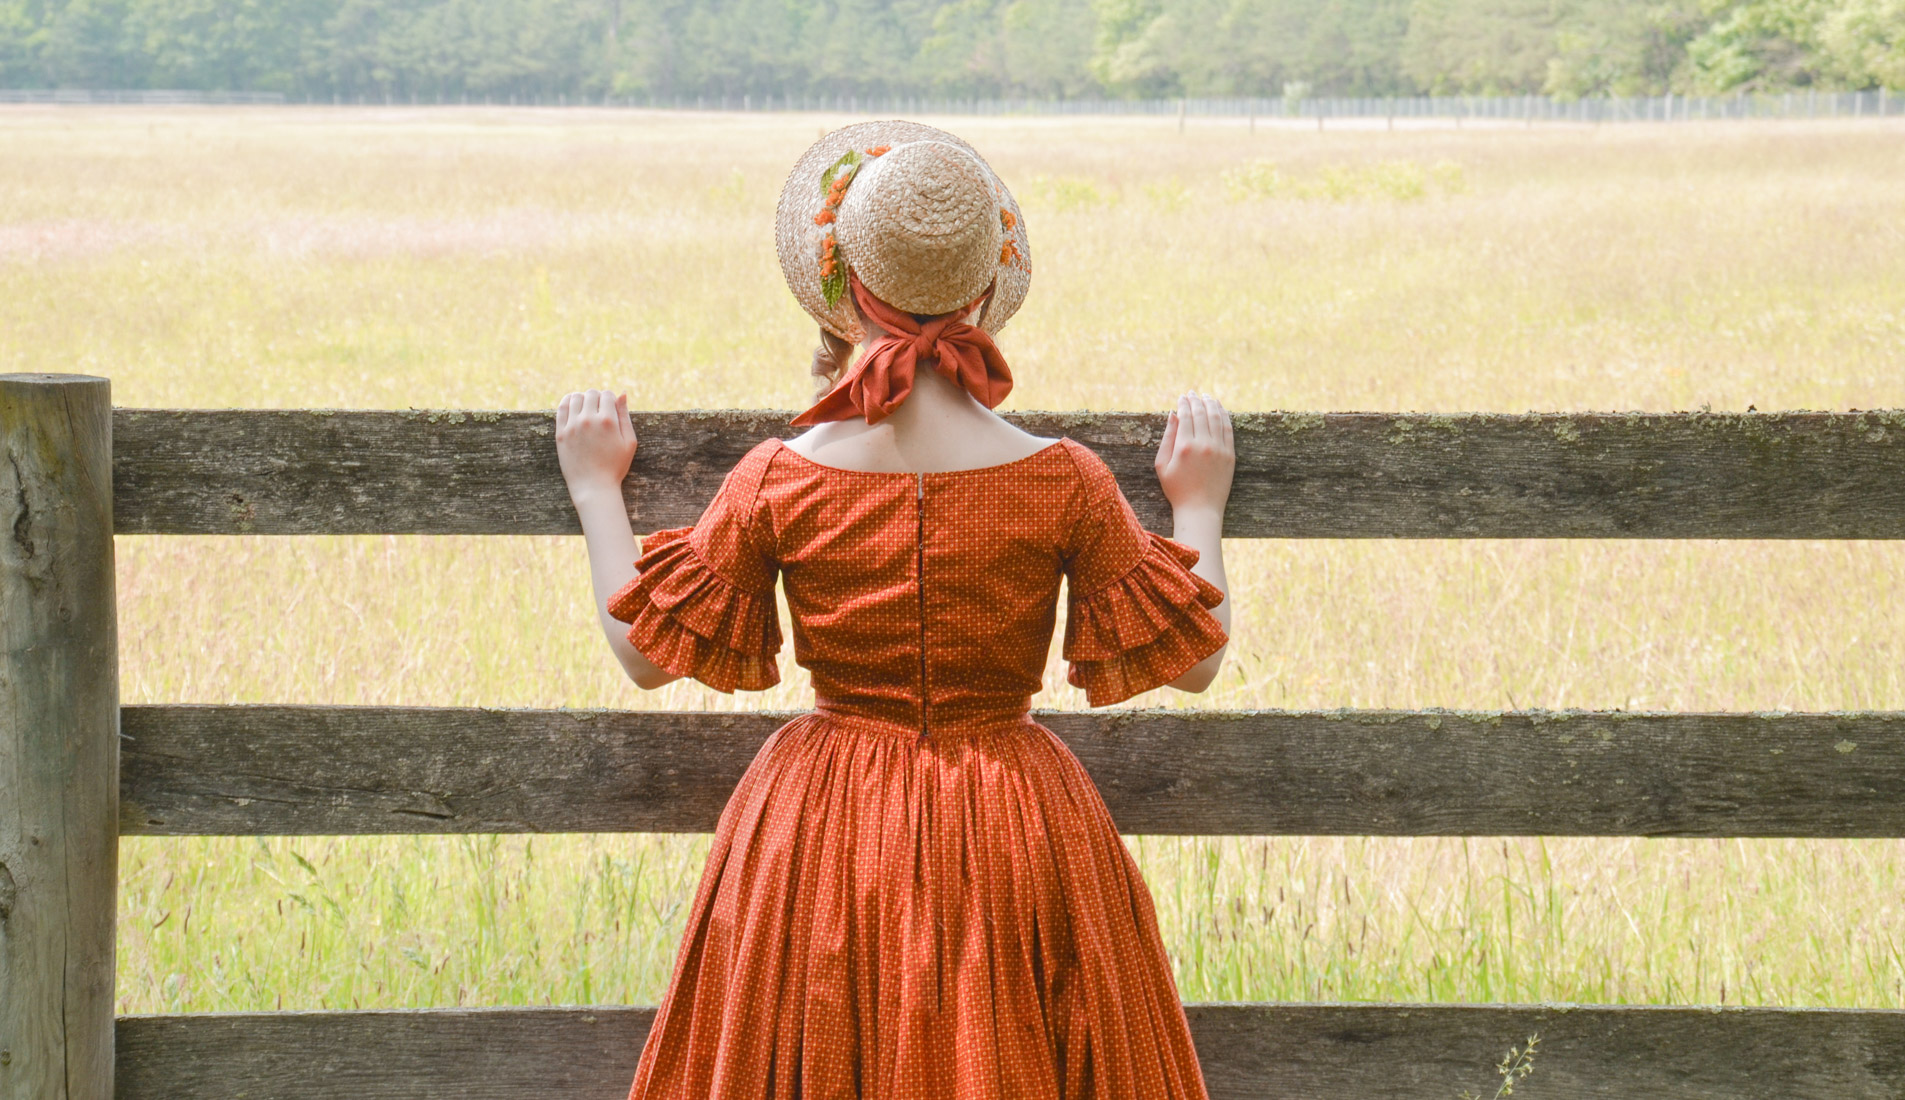
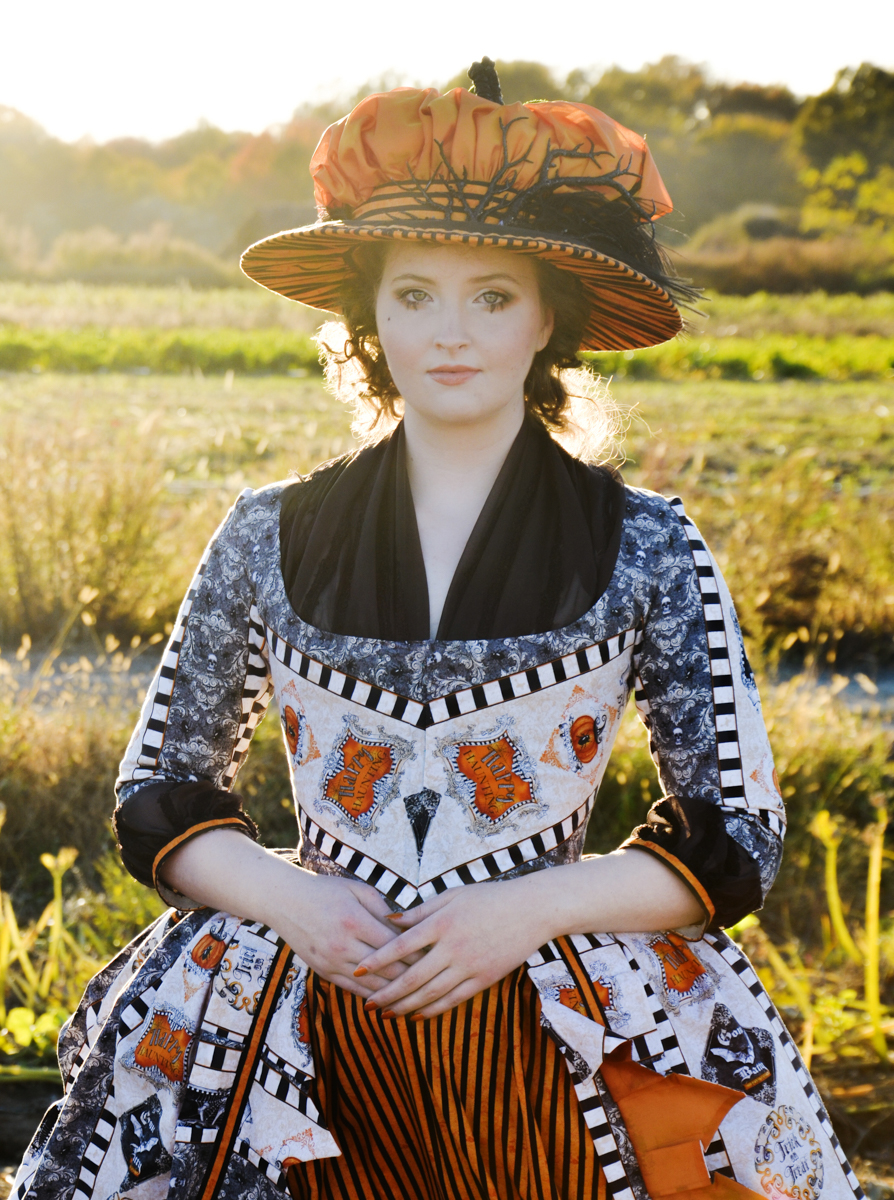
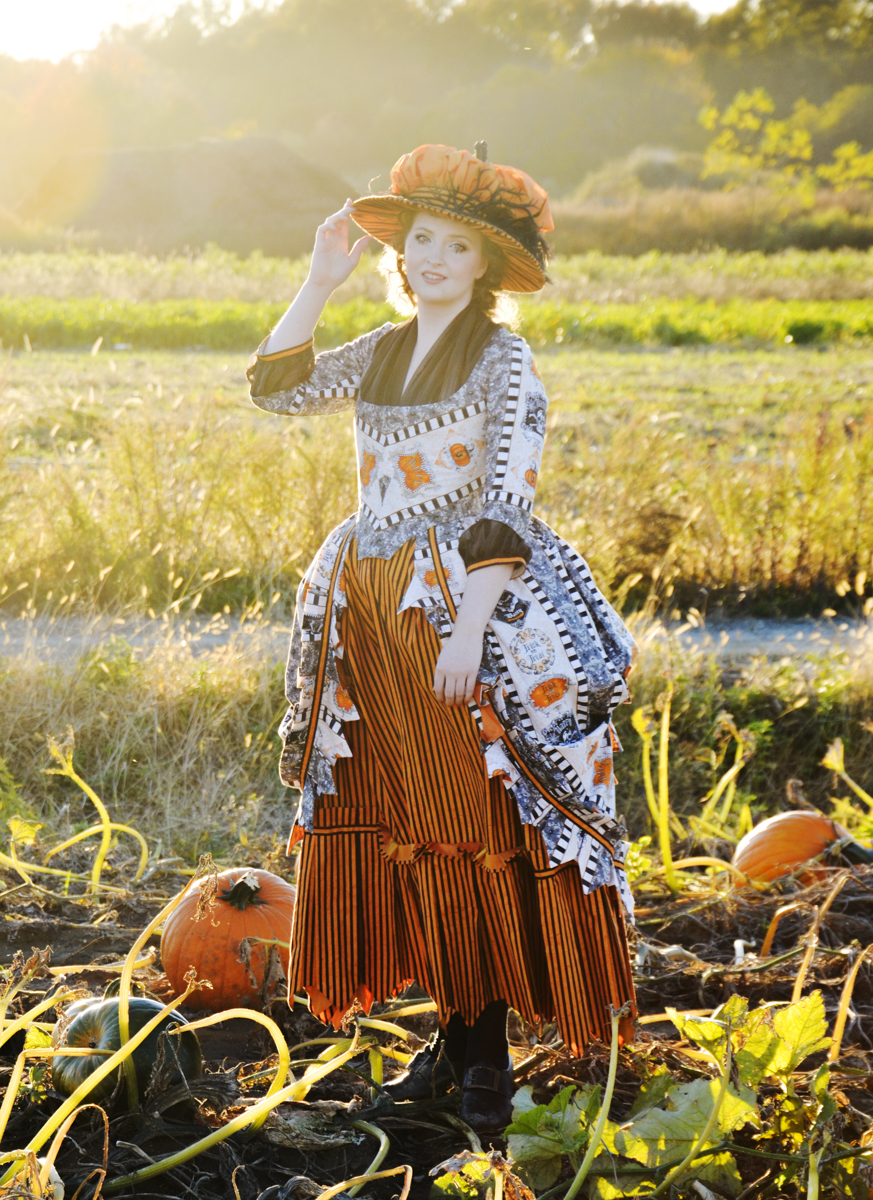
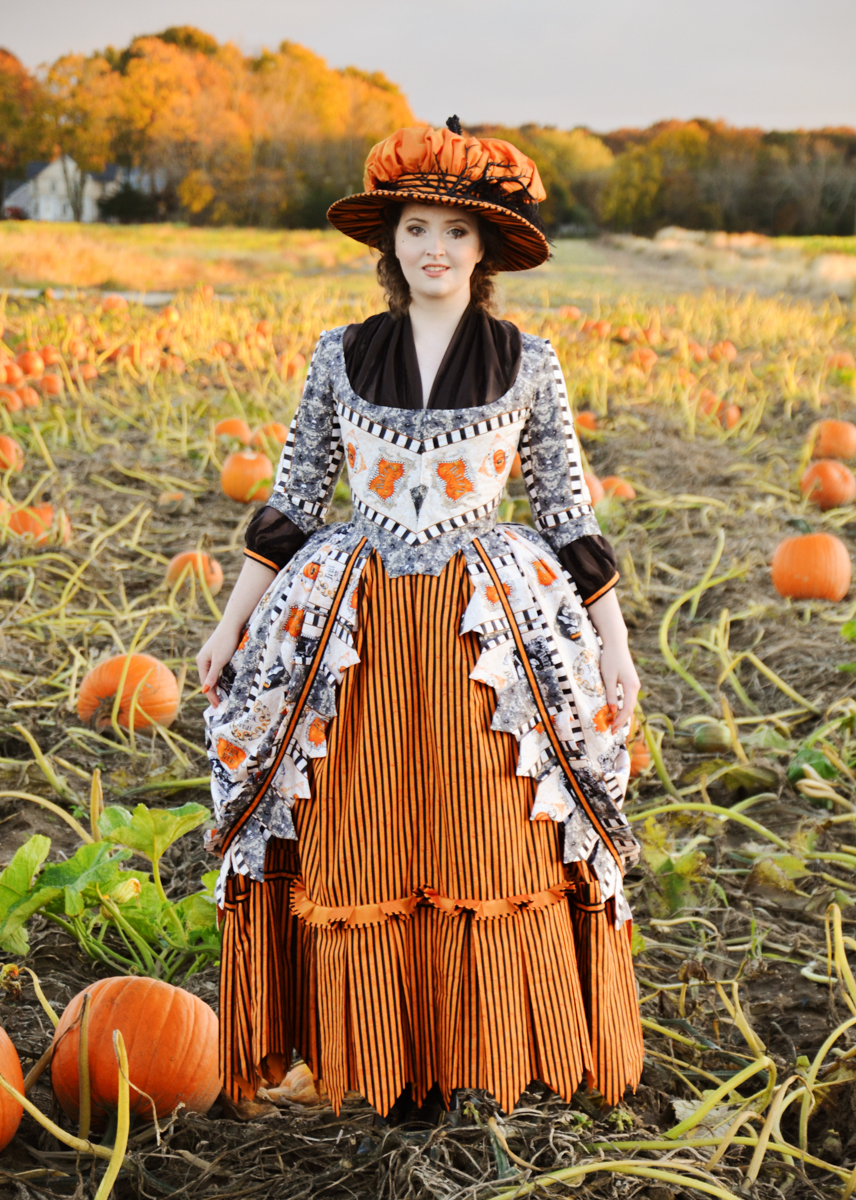
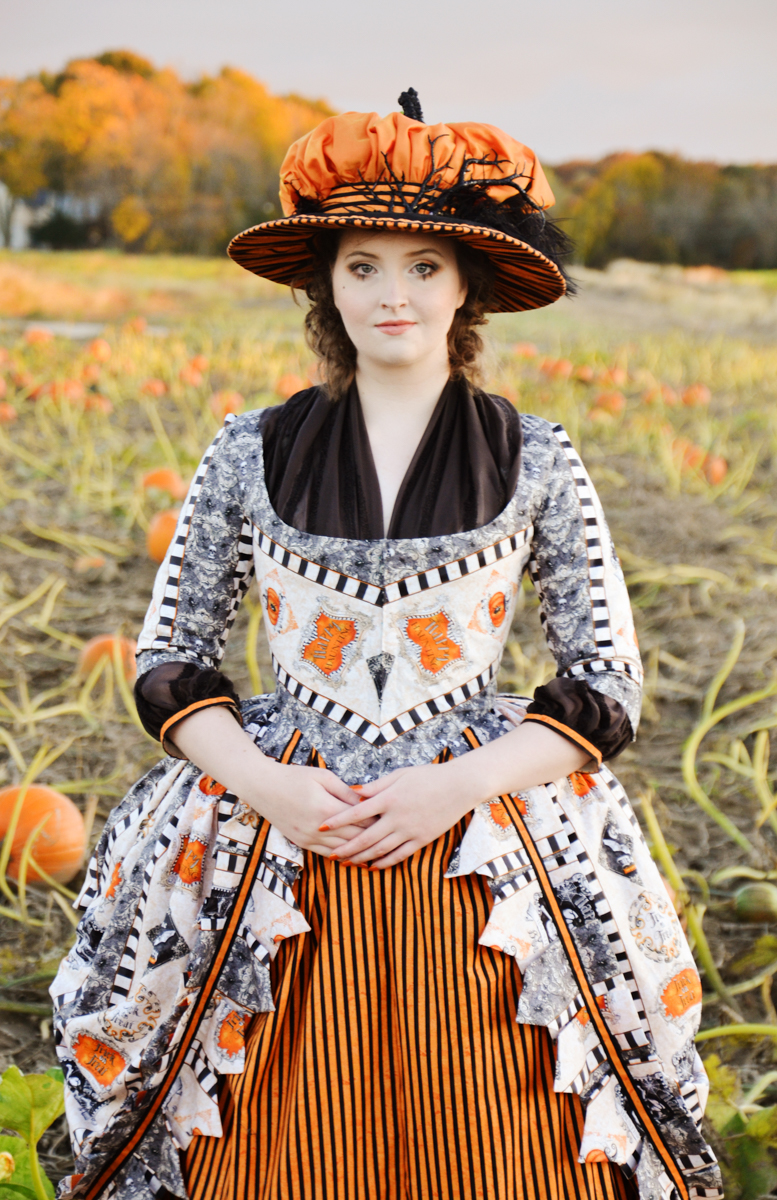
Today I’m writing about my fourth annual pumpkin patch project. If you’ve been following me for a while, you might be familiar with this tradition. It consists of me making an autumnal or halloween inspired historical costume, and photographing it at a local pumpkin patch.

These projects are some of my favorites, since they allow me to take inspiration from the cooler weather and falling leaves…and add a spooky twist, by embracing some halloween influences!

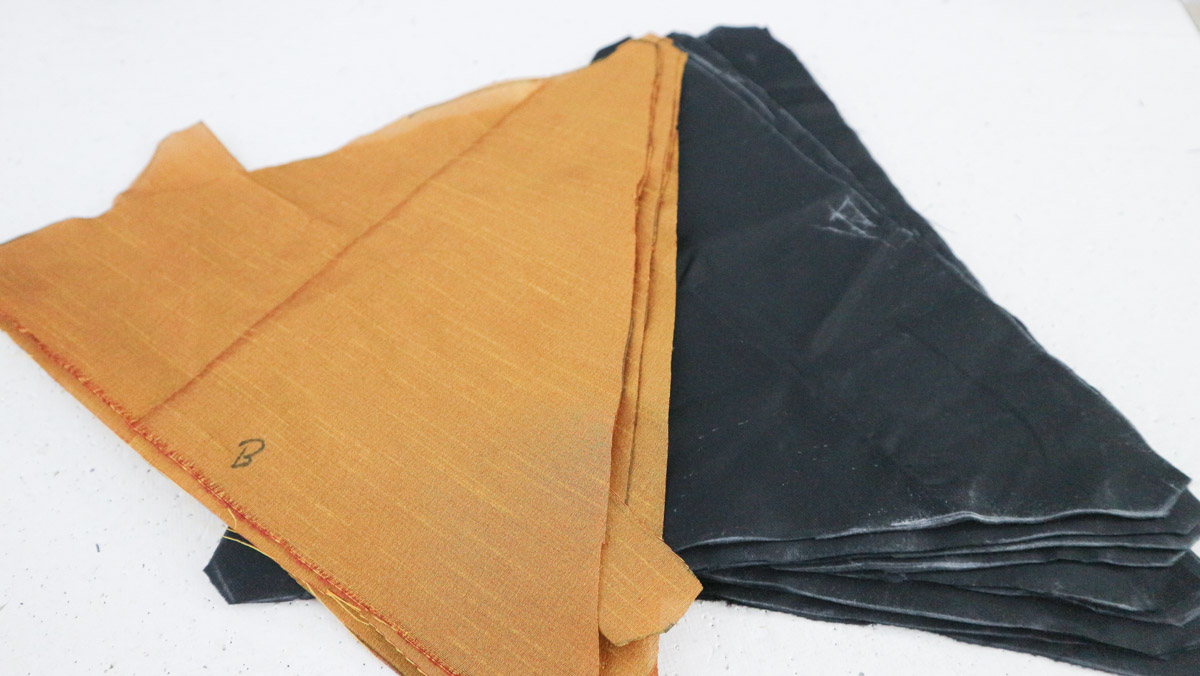
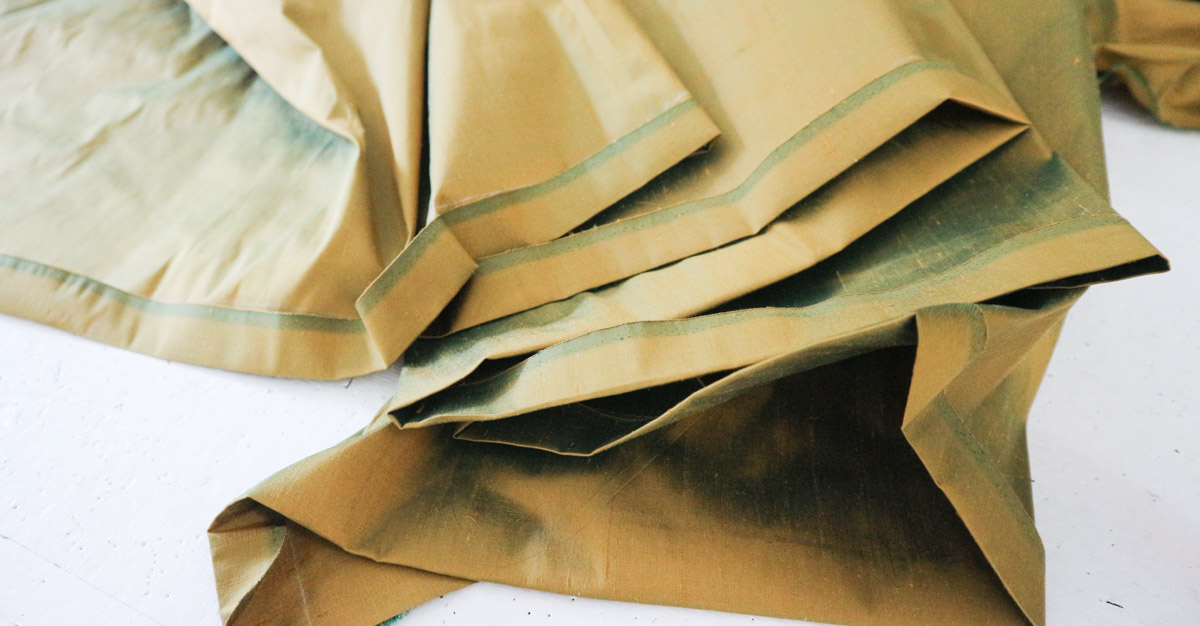
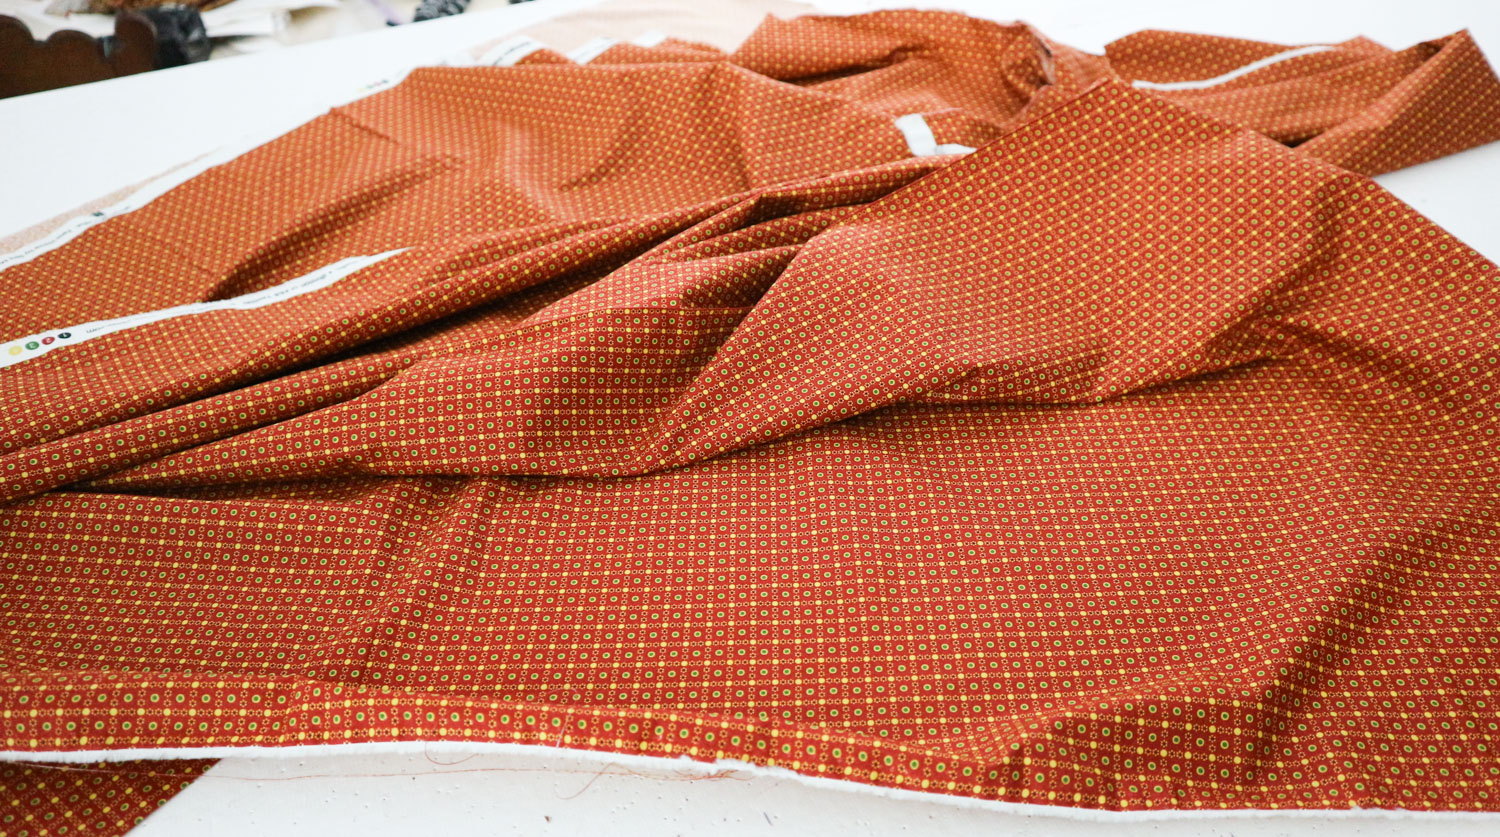
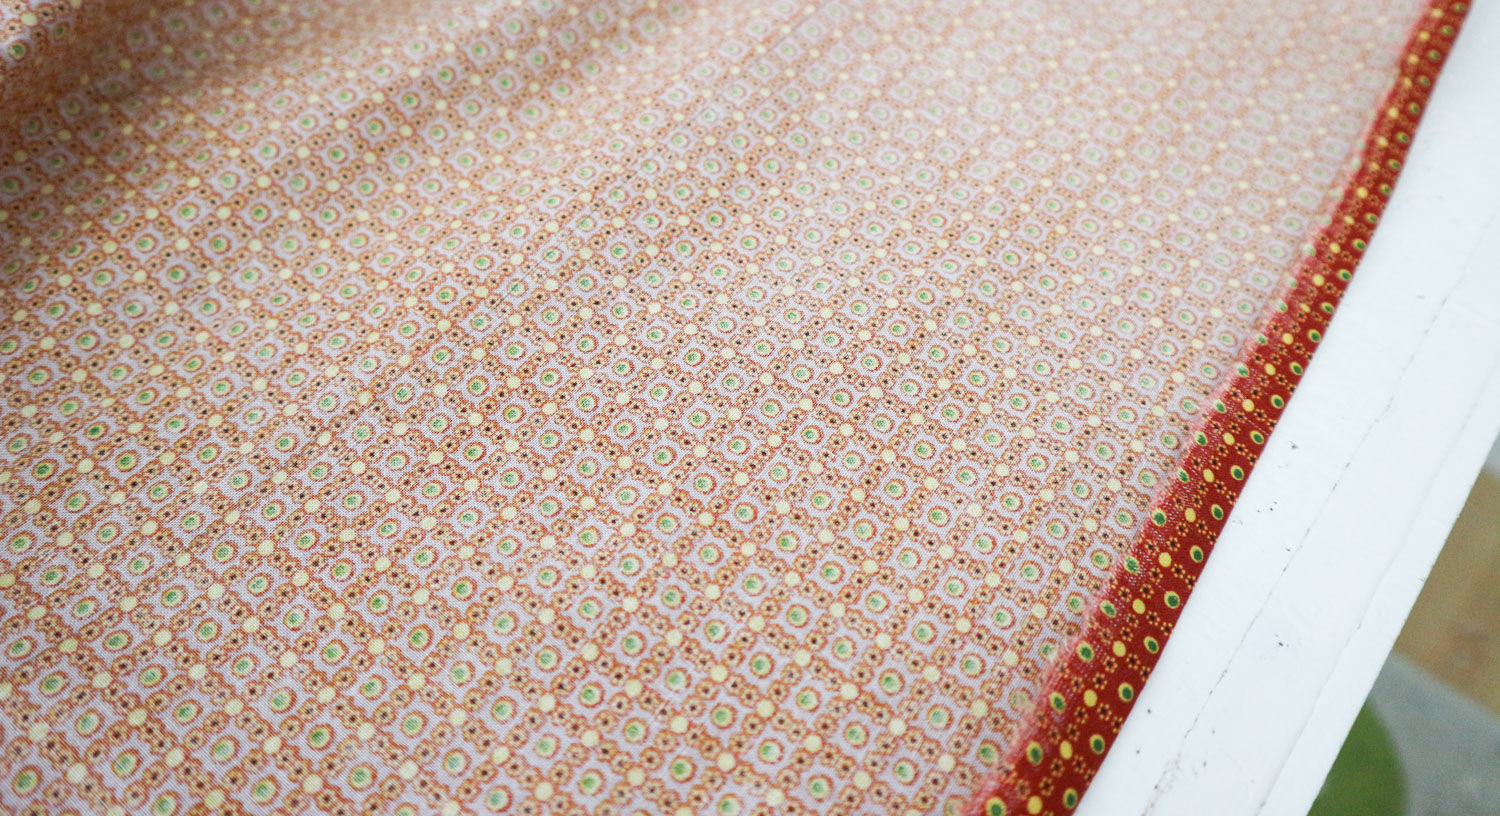
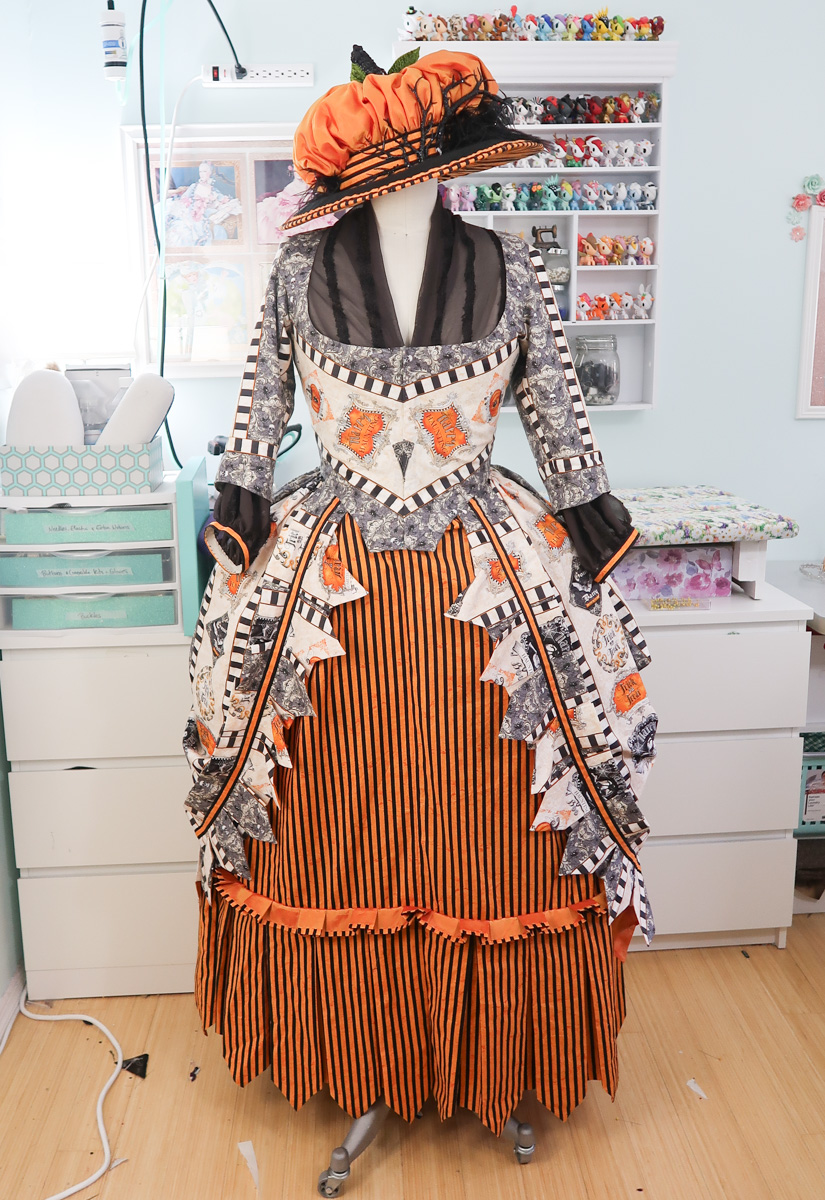
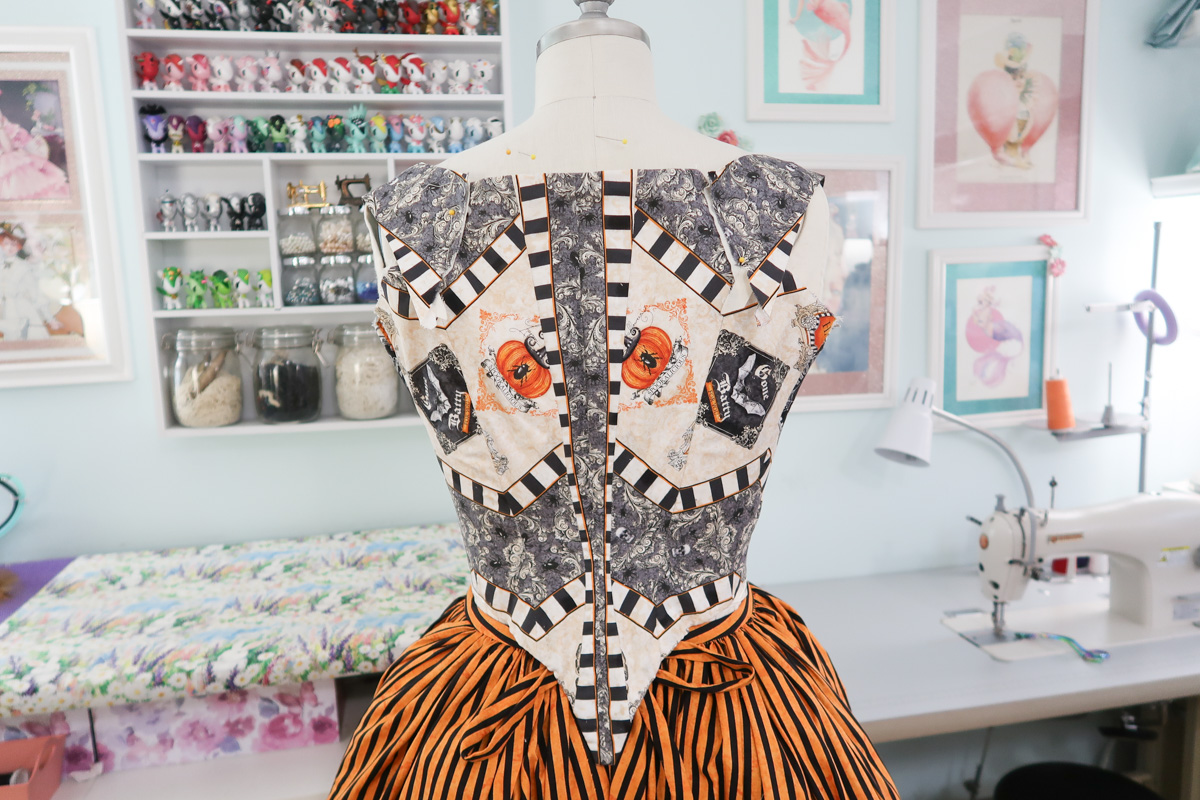
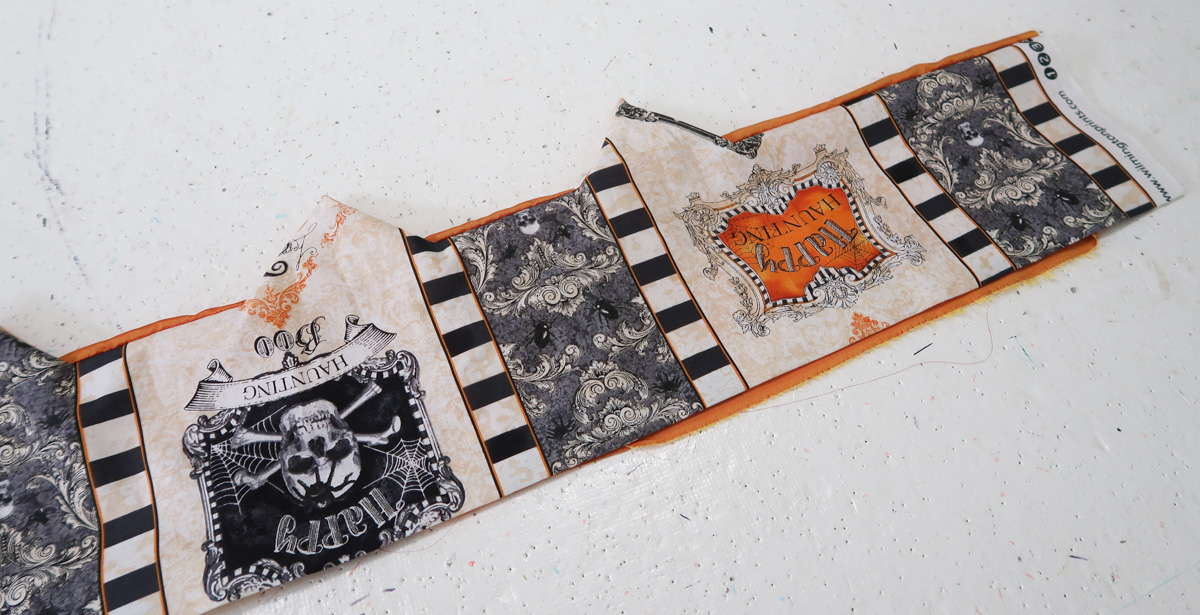
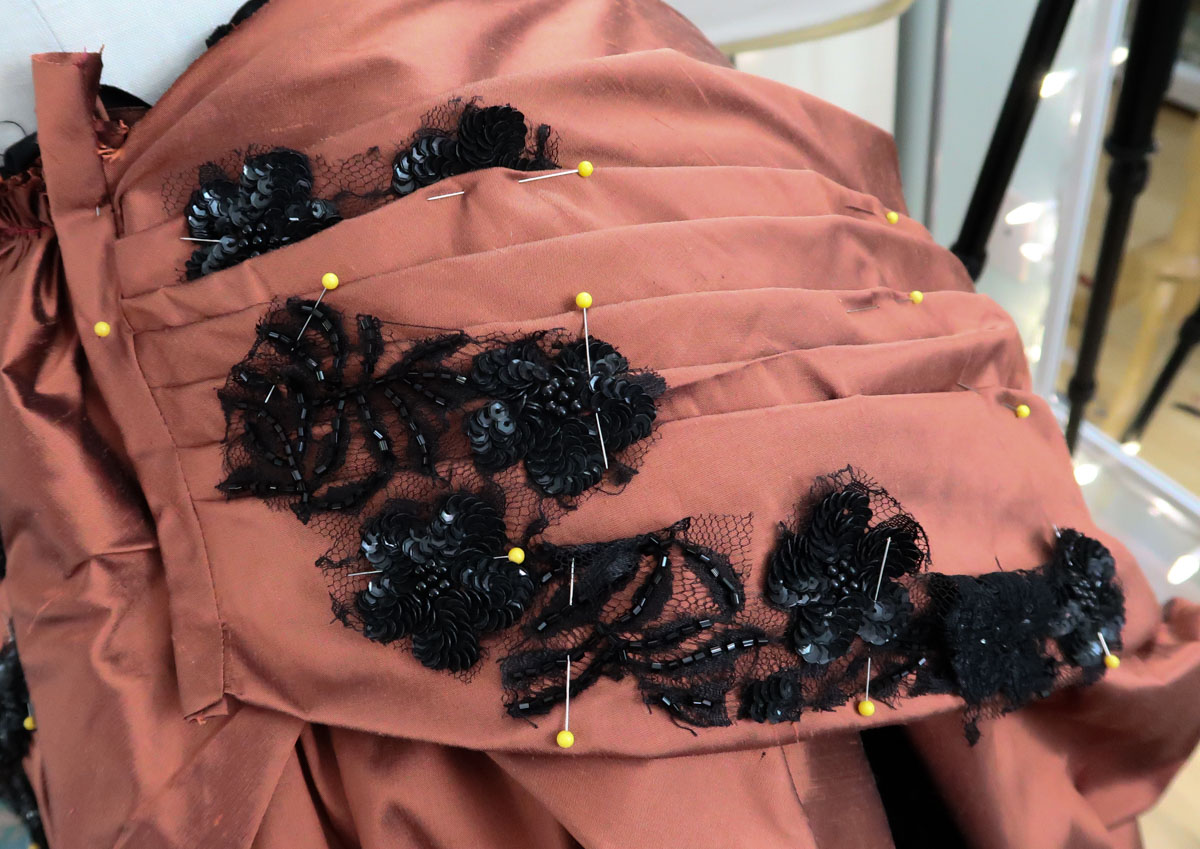
This year I found myself inspired by a material that was very seasonally appropriate…but far from historically accurate. This fabric is by Wilmington and part of their “Gone Batty” collection. I ended up buying three fabrics from the collection, but this one is what really sparked my interest.

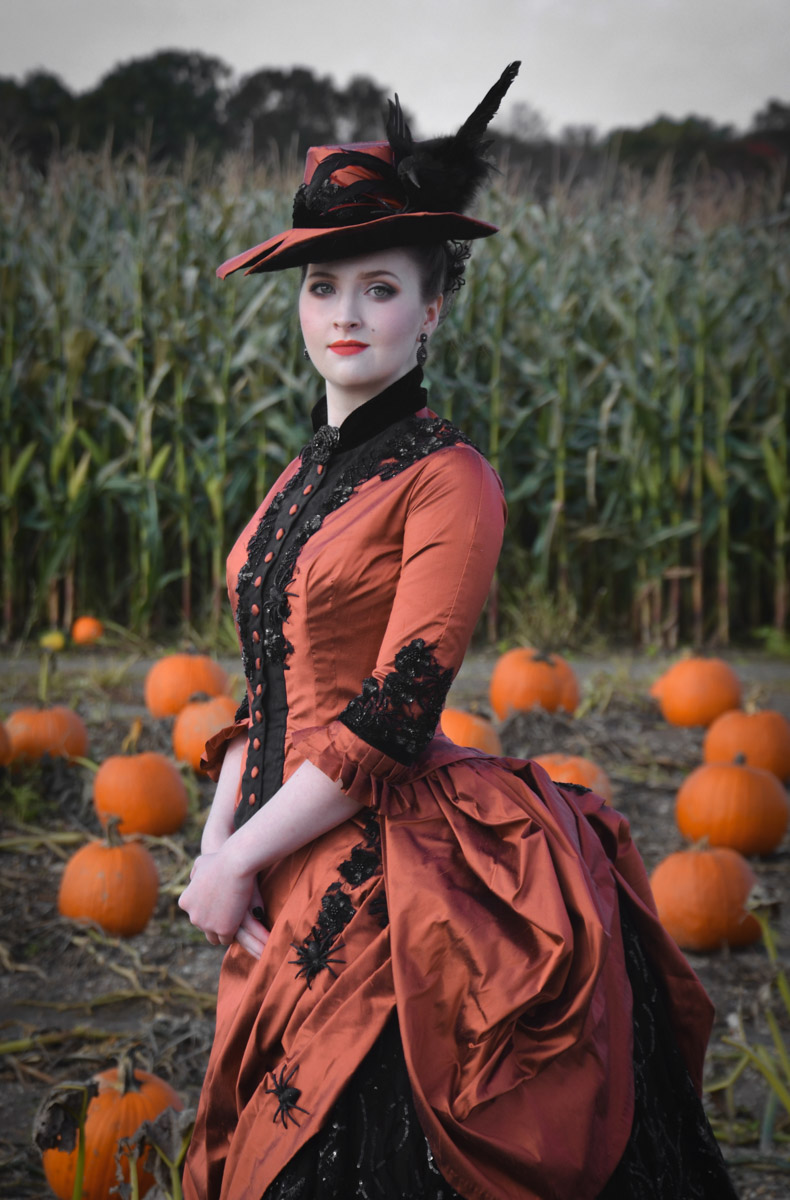
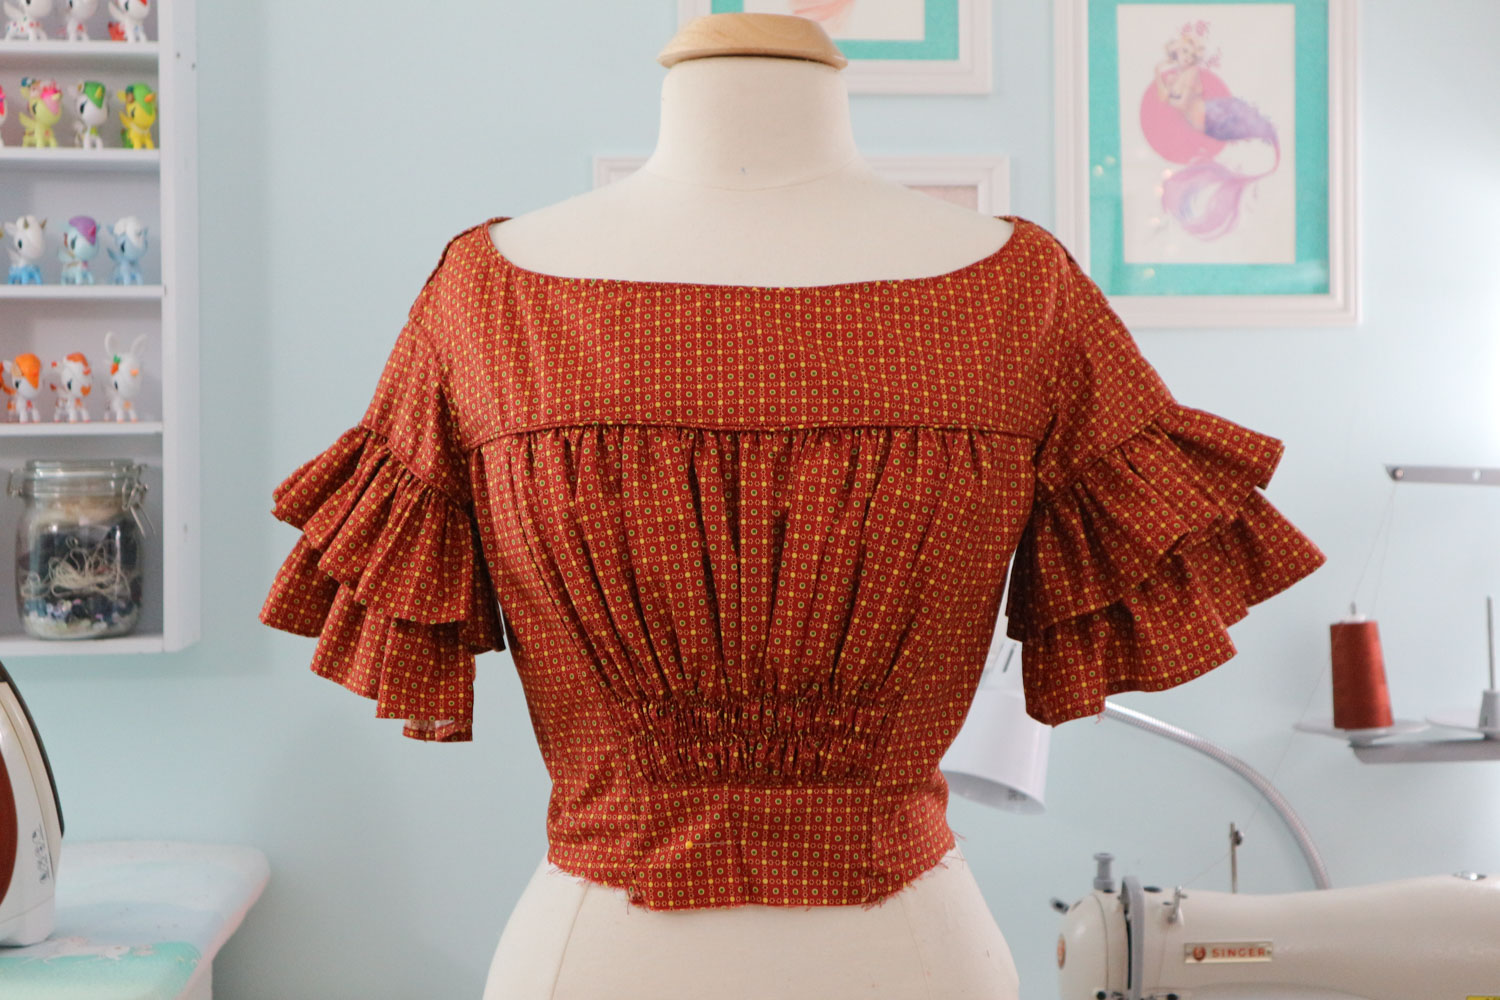
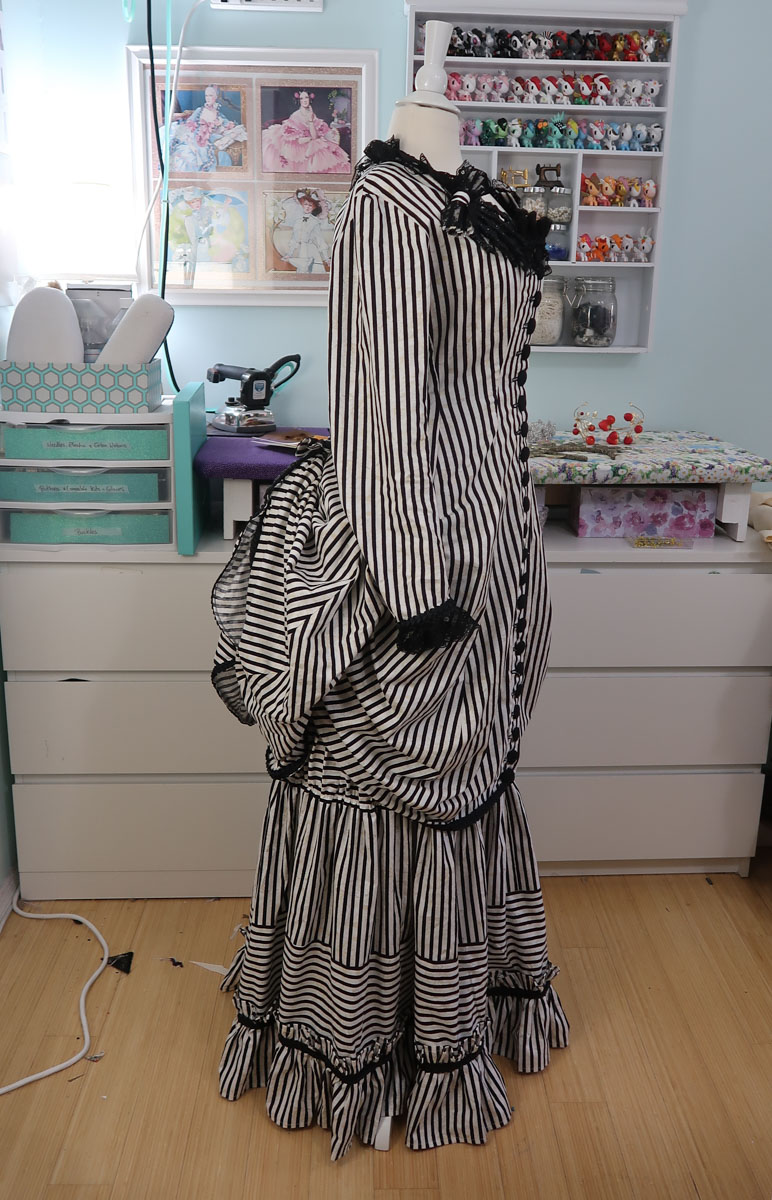
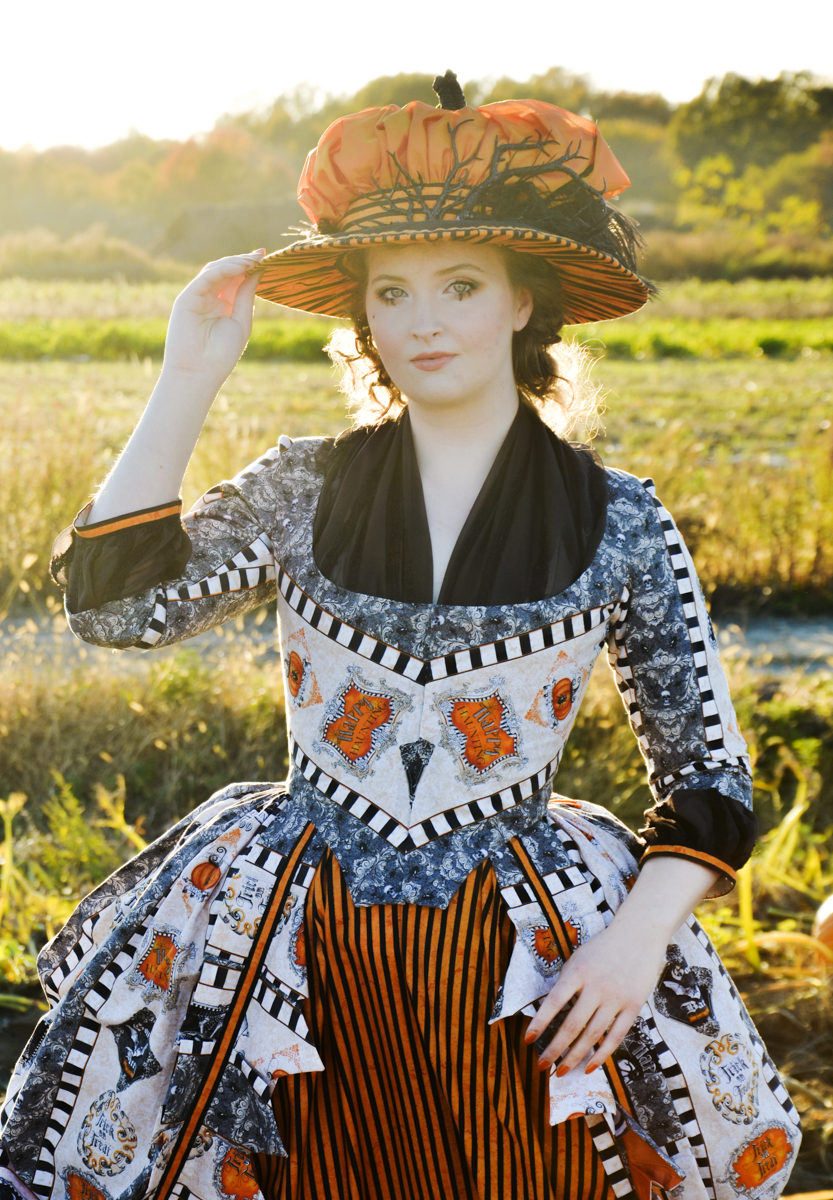
Though the print is wild with skulls, bats, pumpkins and beetles, the actual scale and striped pattern of the print reminded me of fabrics that were popular in the mid 1700s. I’ve made a lot of 18th century gowns before, but one style I’ve never attempted is a Robe a la Polonaise. So I decided to combine that fabric with that idea, and this is the end result!

halloween-60

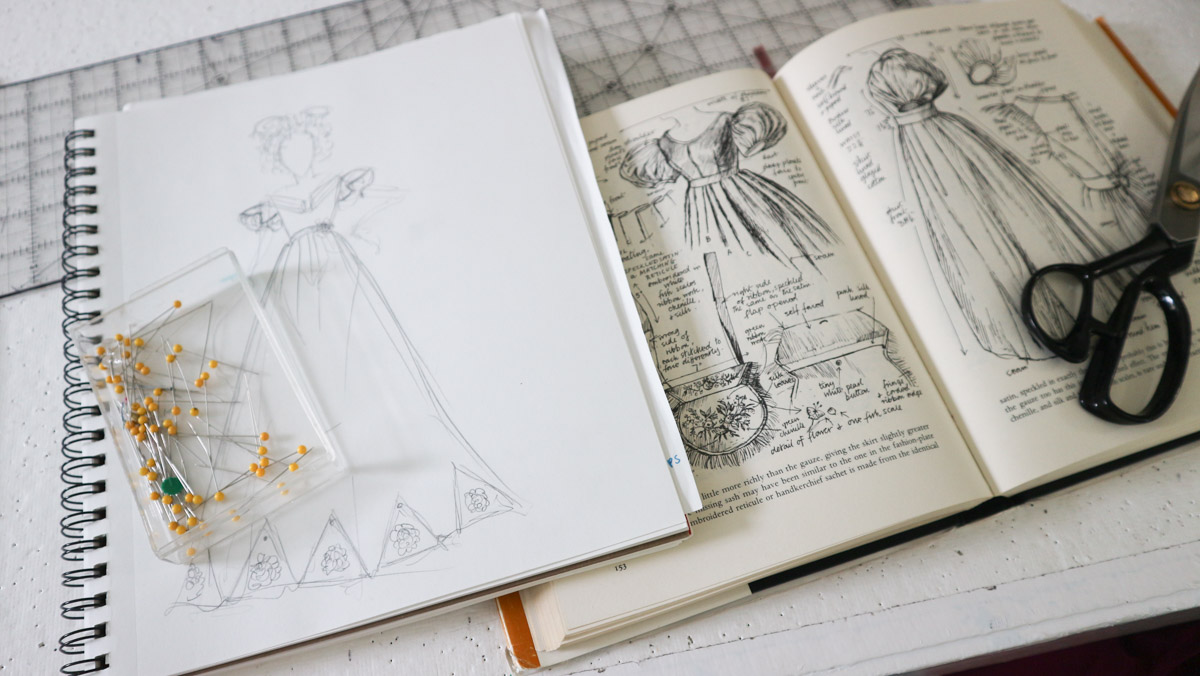
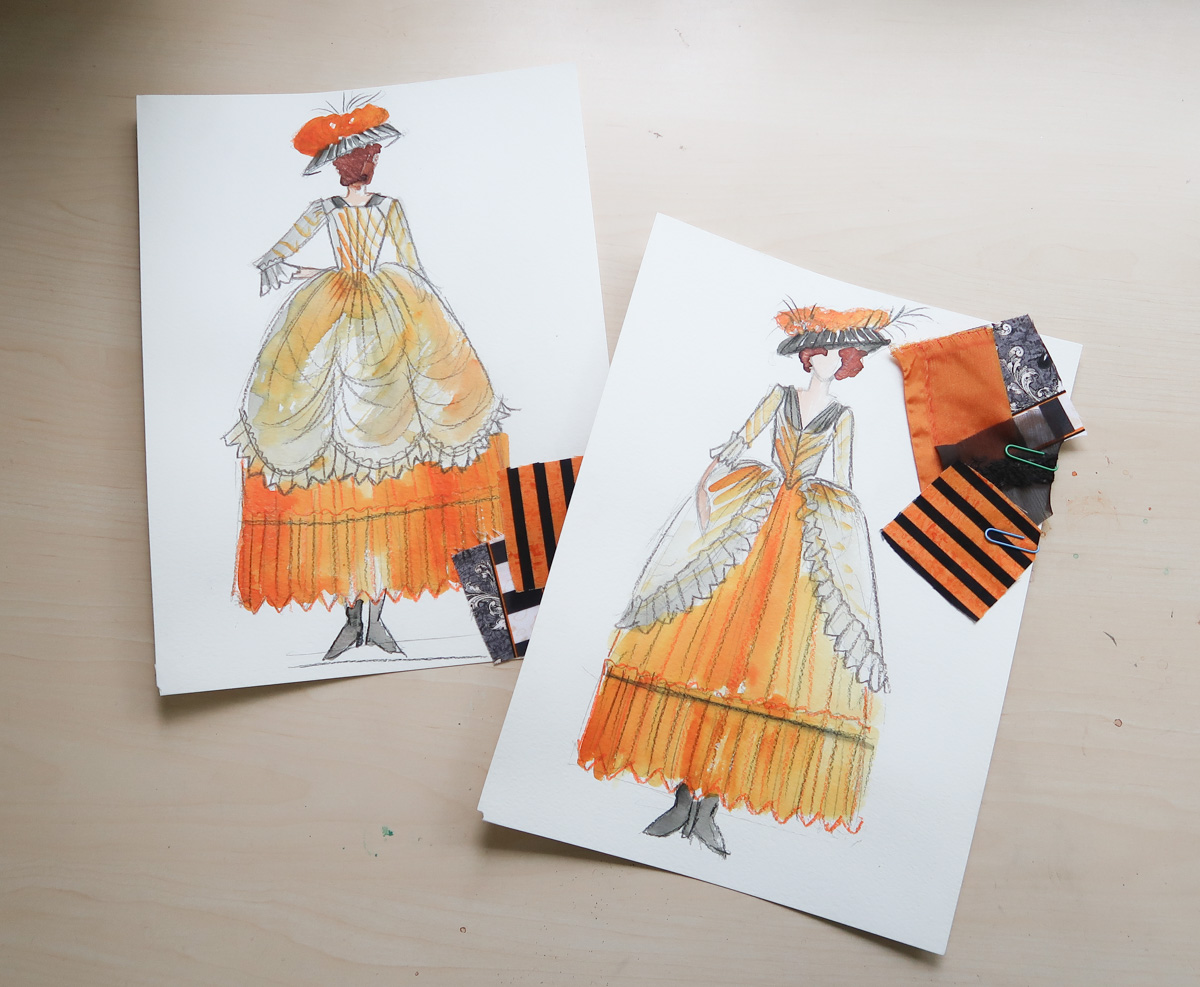
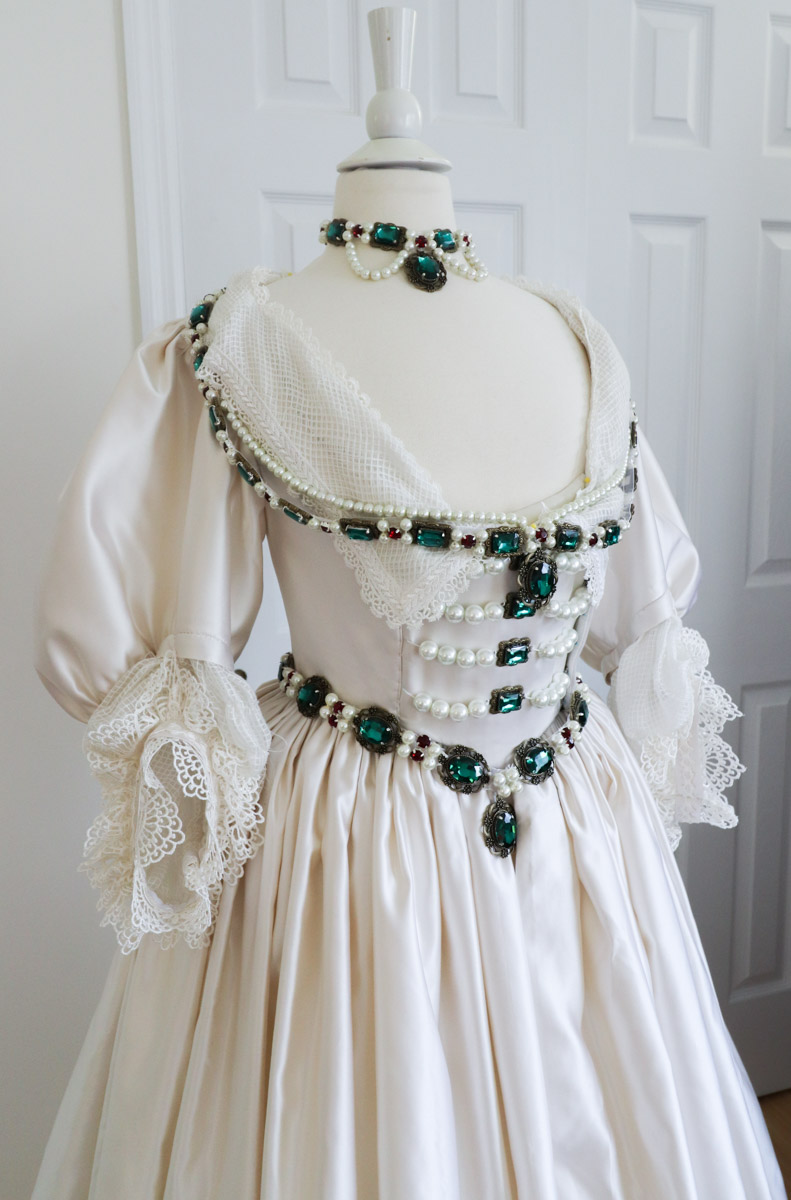
Though I went in with a solid idea of what I wanted to make, I still searched the internet for references so I could accurately piece the back of the bodice. I ended up finding this robe a la polonaise from The Metropolitan Museum of Art which was very similar to what I had envisioned, and served as a major influence on this design.

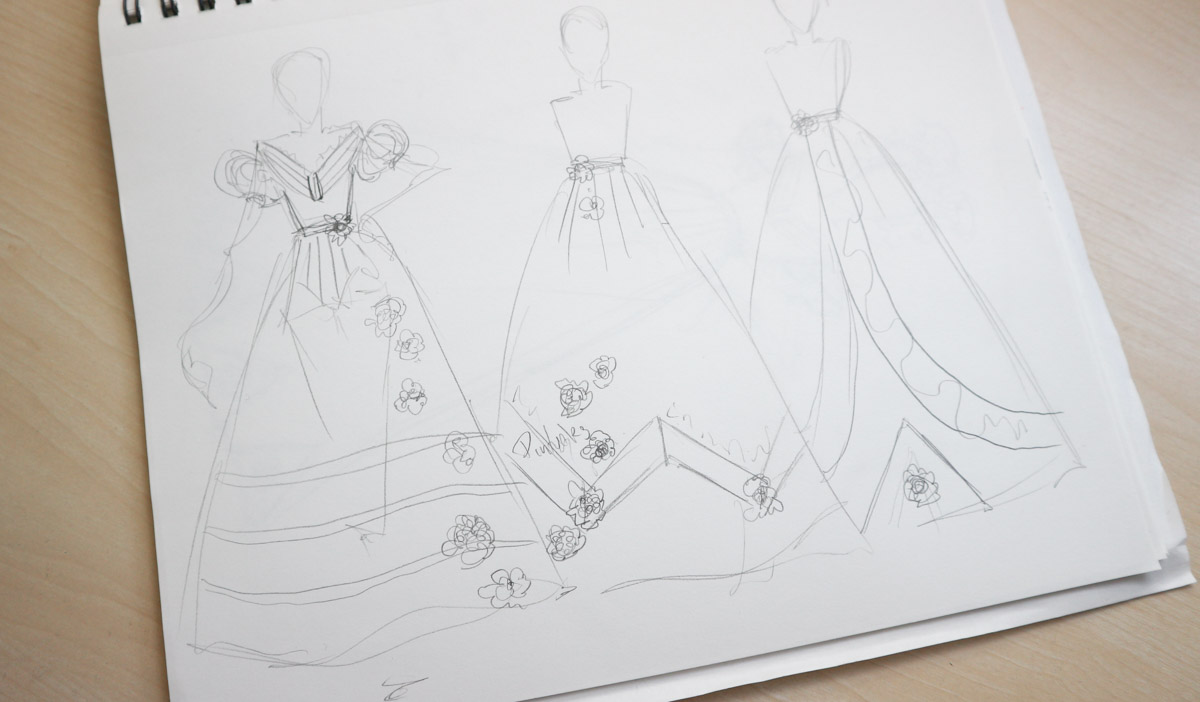
I also took some inspiration from the hat they modeled that extant garment with. I thought the stiff brim and slouchy cap kind of resembled a pumpkin. And that a pumpkin themed lunardi would be a fun twist on a popular 18th century style of hat. So with all that in mind, I got to sketching my final design!

halloween-61

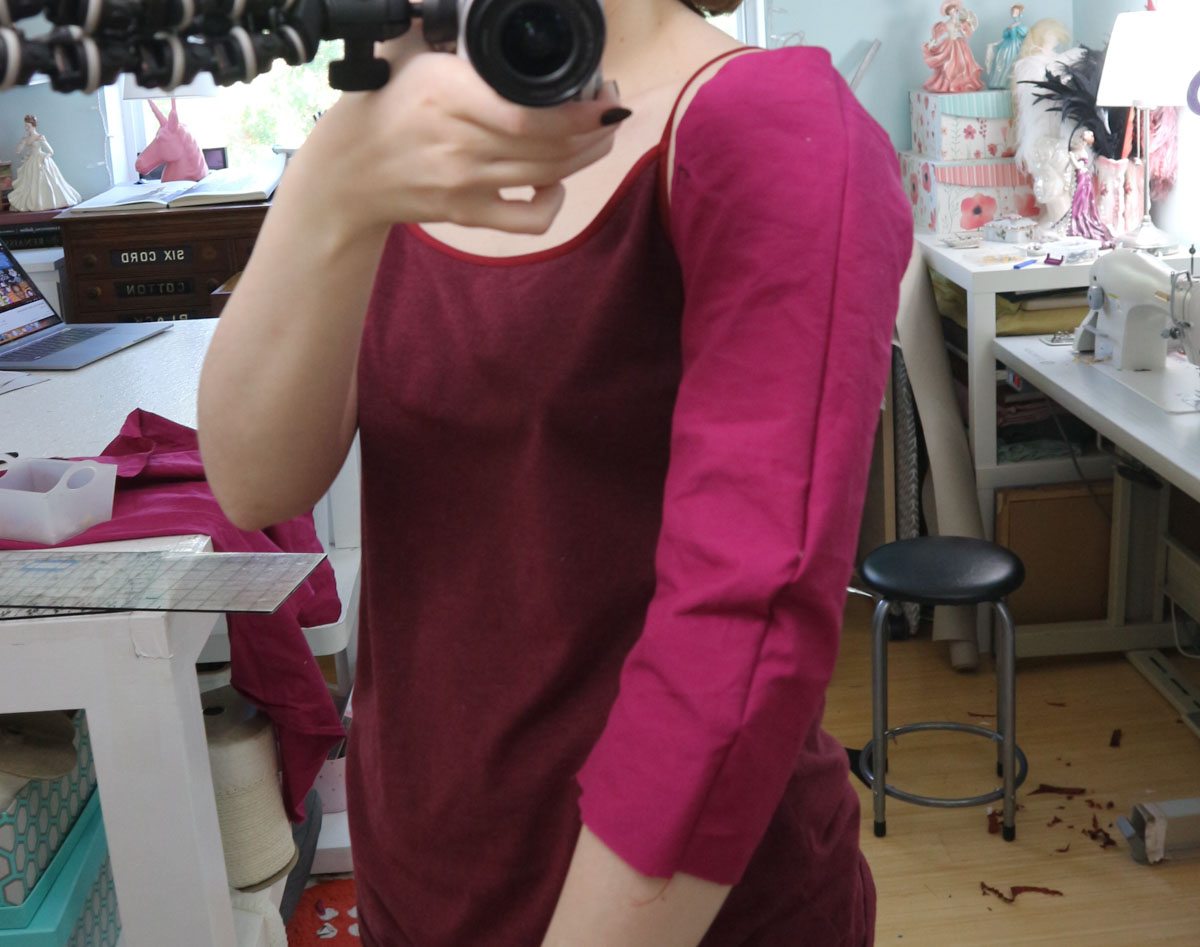
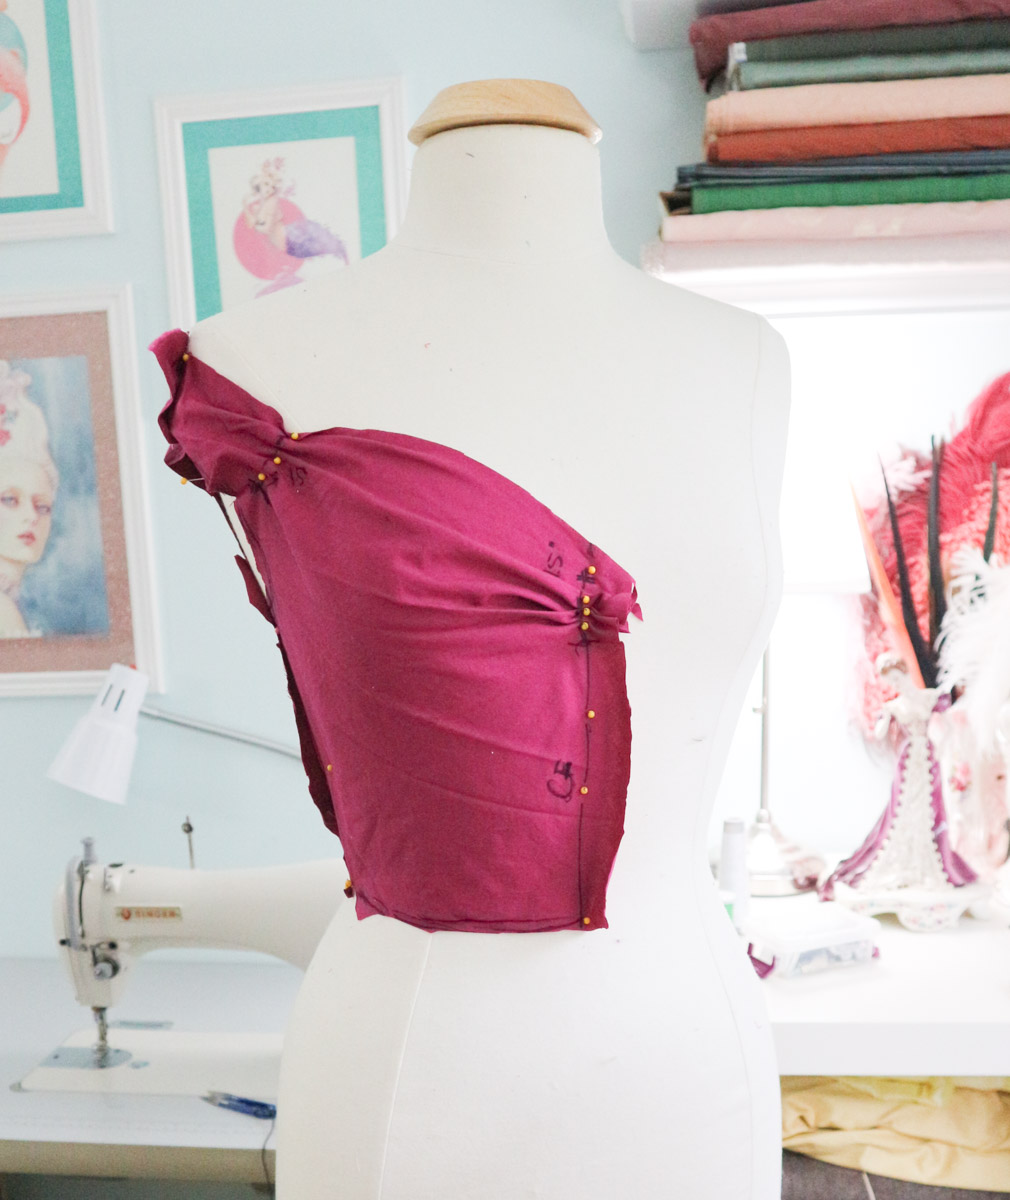
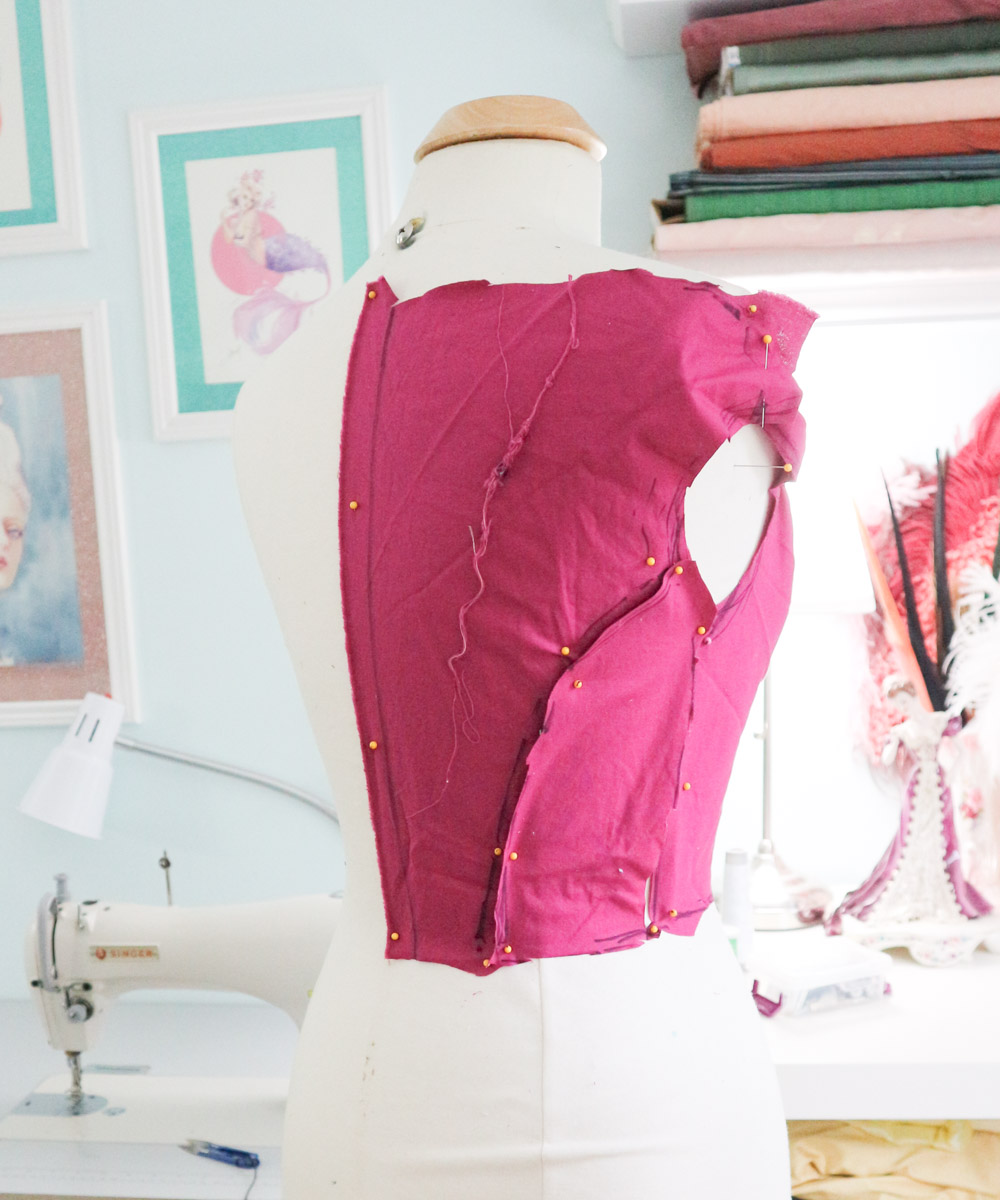
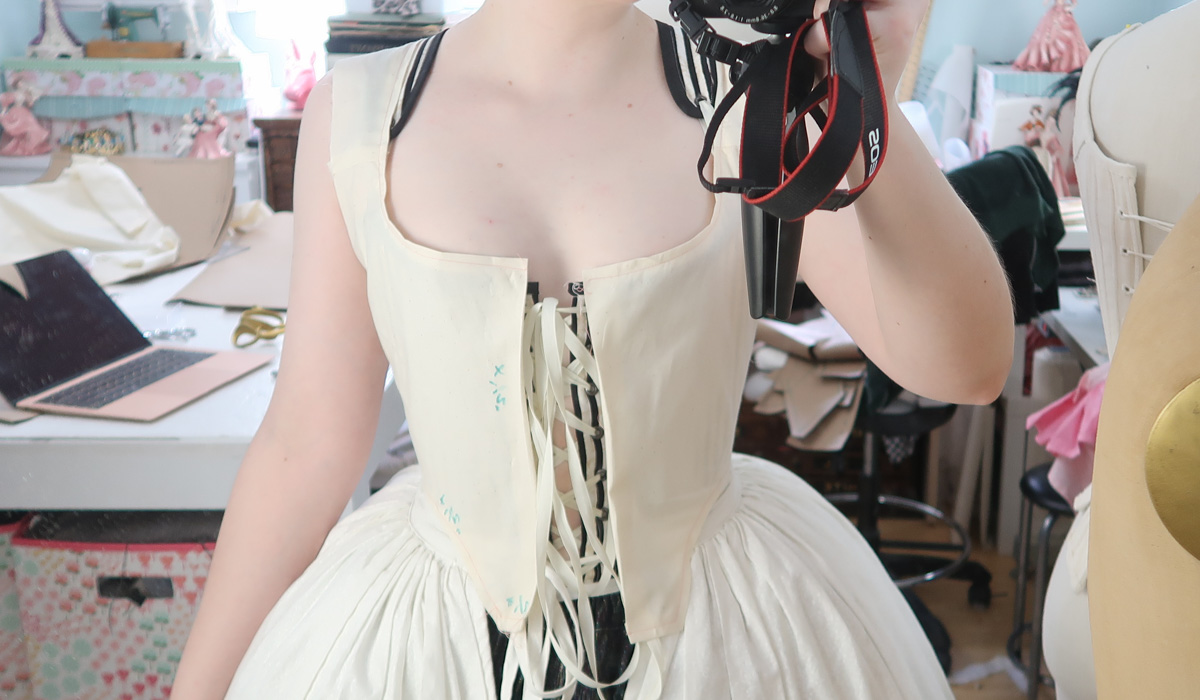
And with a sketch to go off of, I could get right to draping! I didn’t photograph the draped bodice, but it was draped overtop of a pair of stays and a pannier to ensure the shape of the pieces would suit my figure when worn with the proper foundation garments.

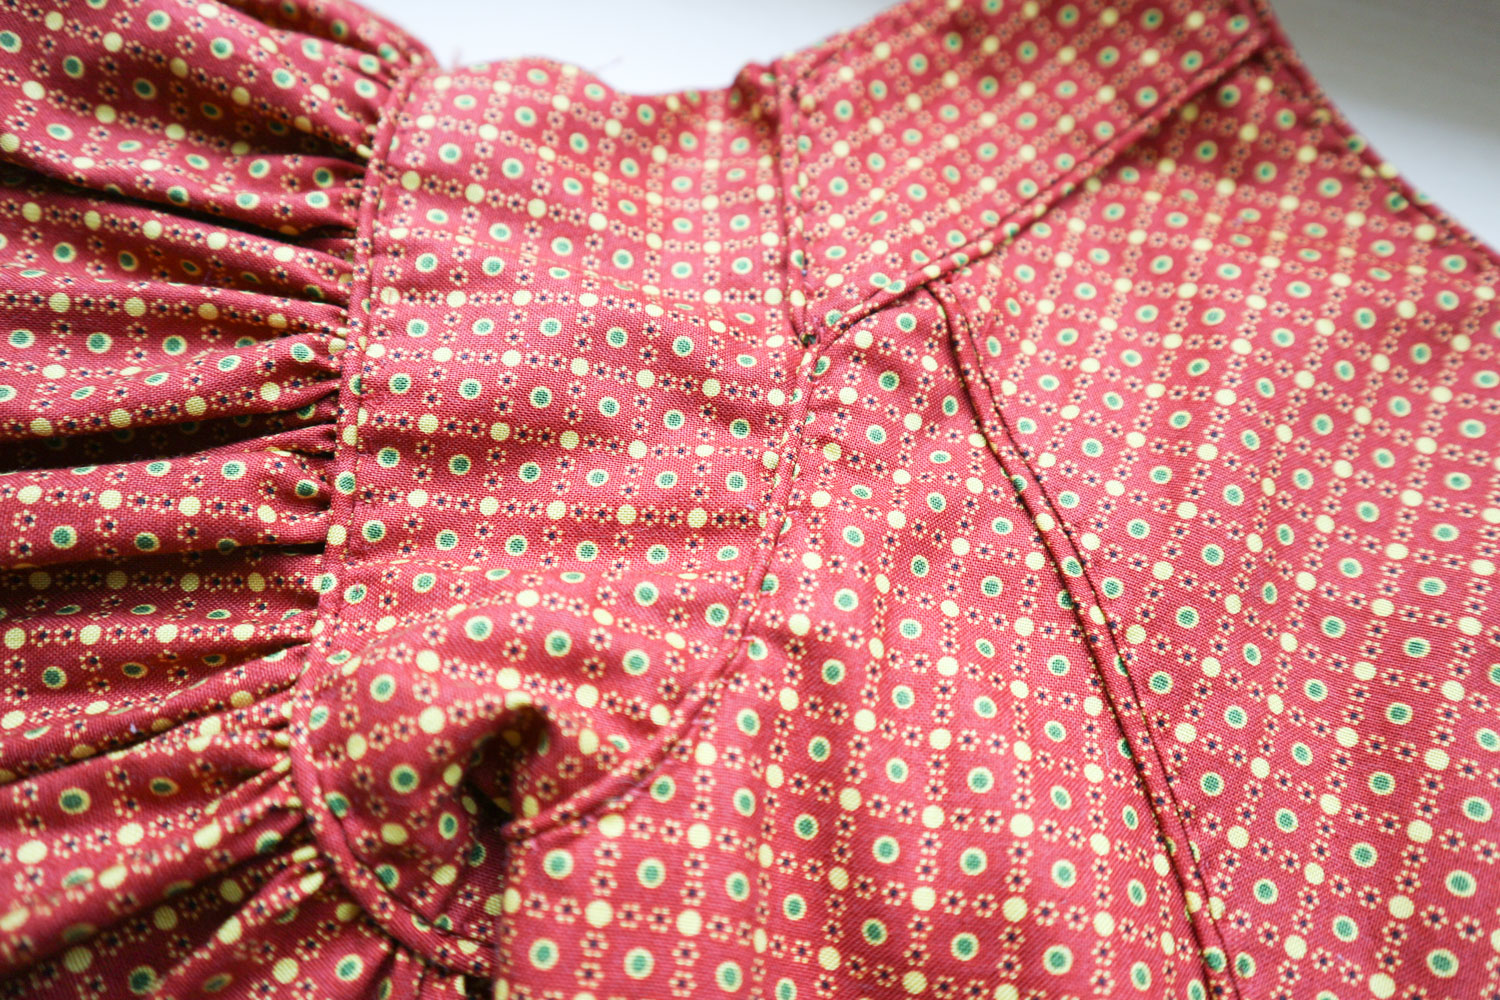
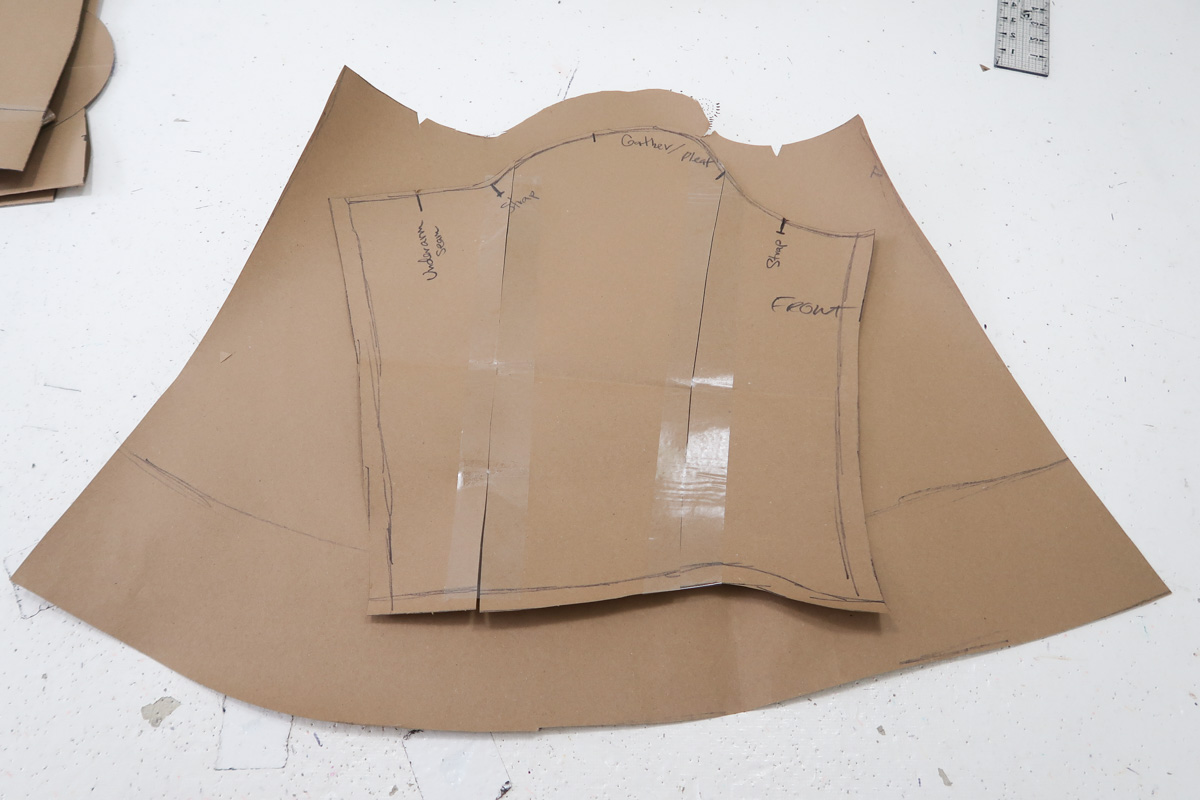
My first mockup was an inch too small, but otherwise very nicely fitted at the back and shoulders. I liked the shape of the neckline a lot too.

halloween

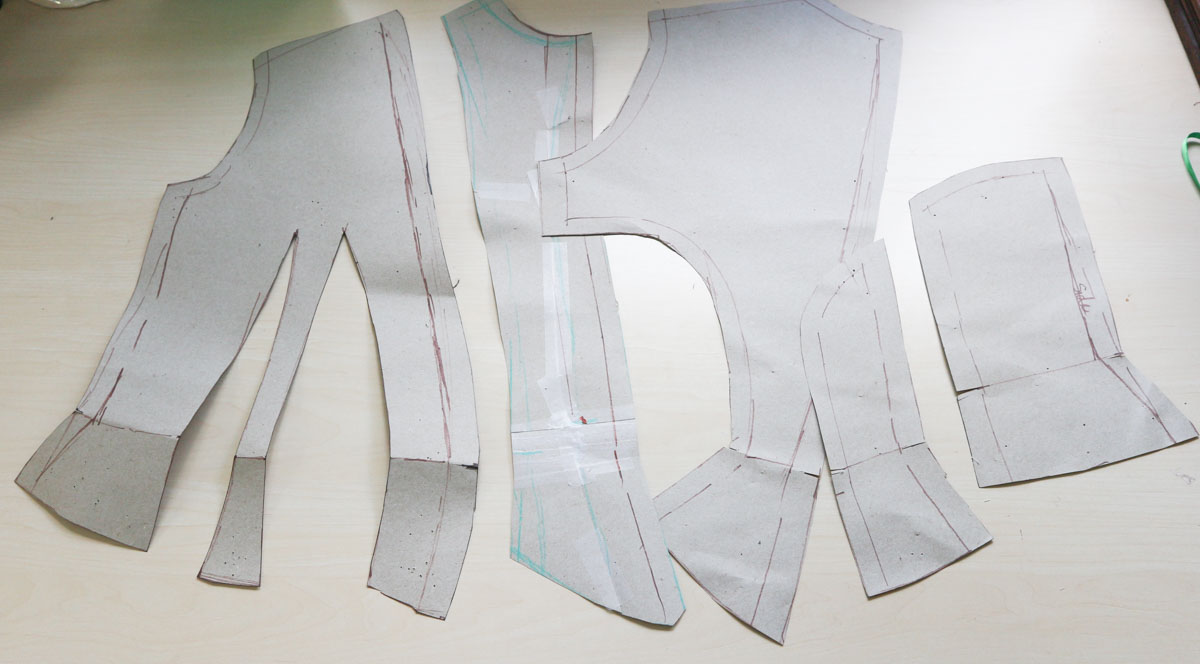
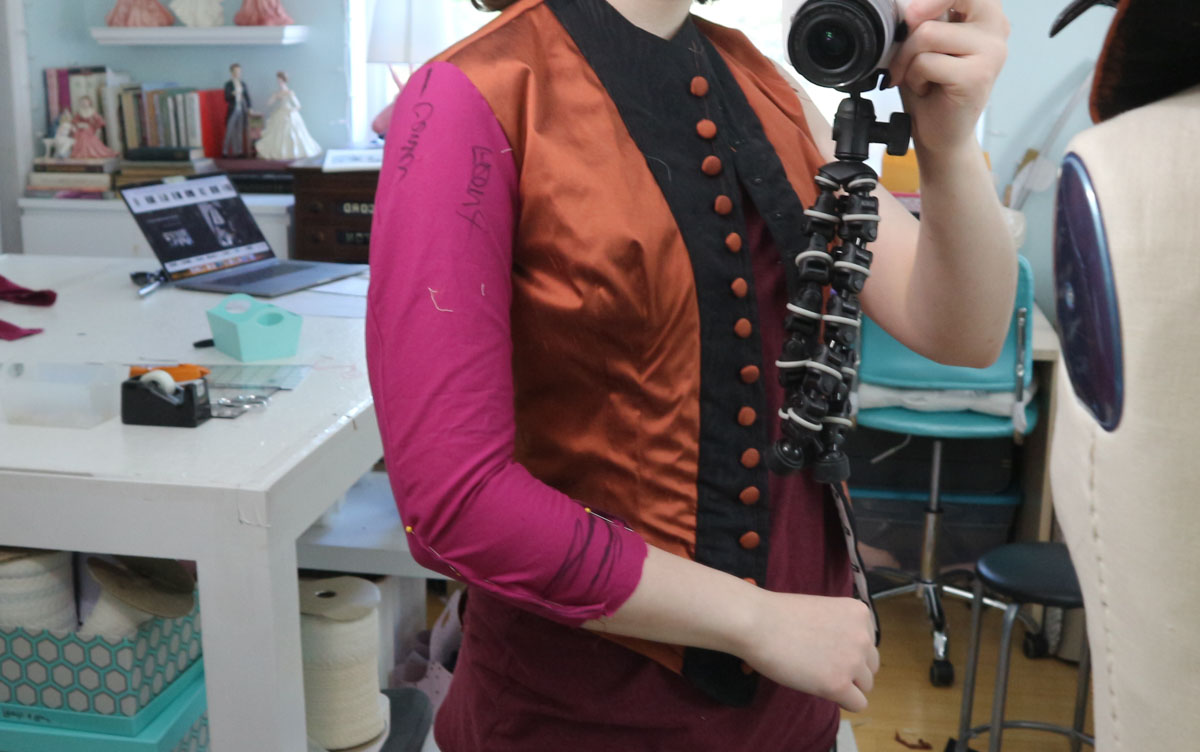
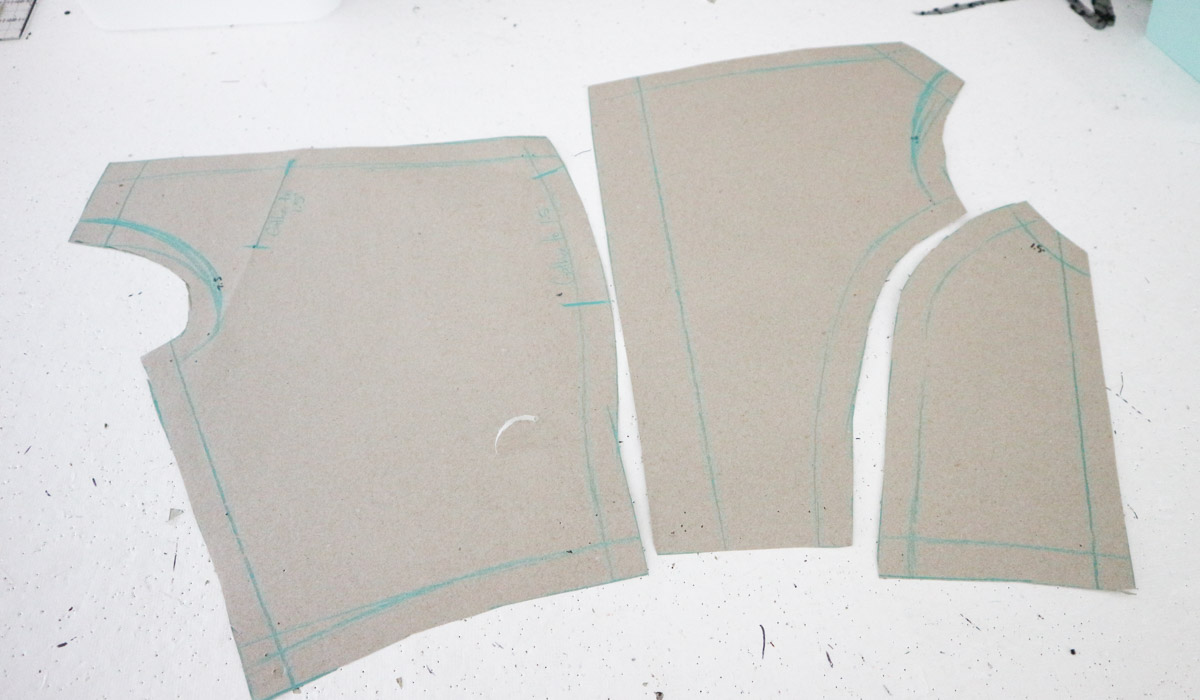
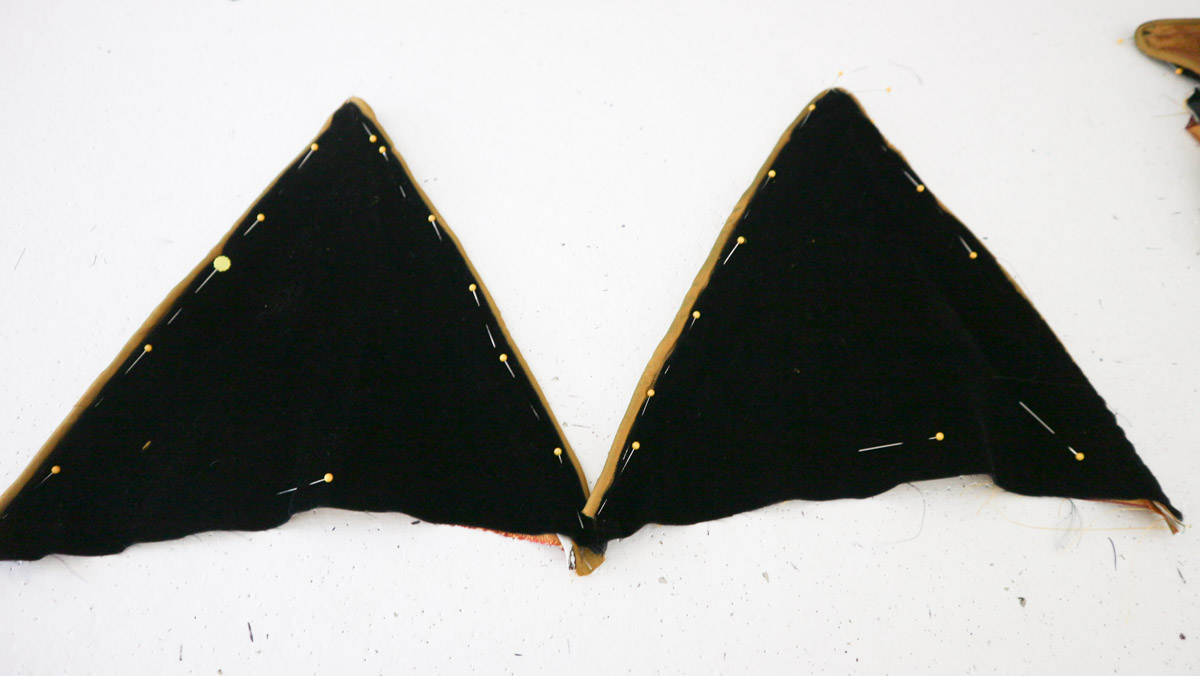
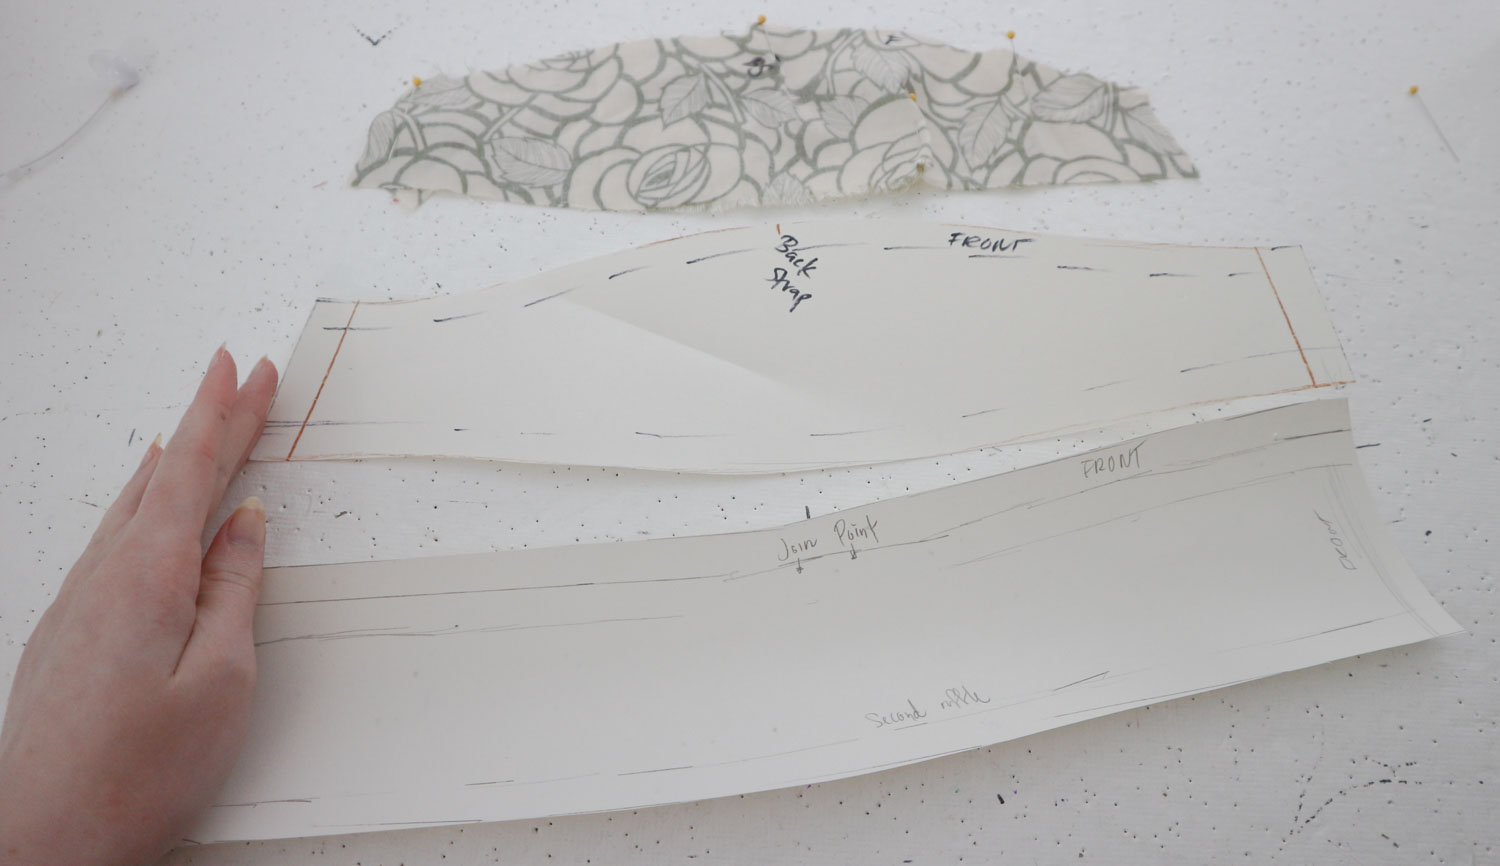
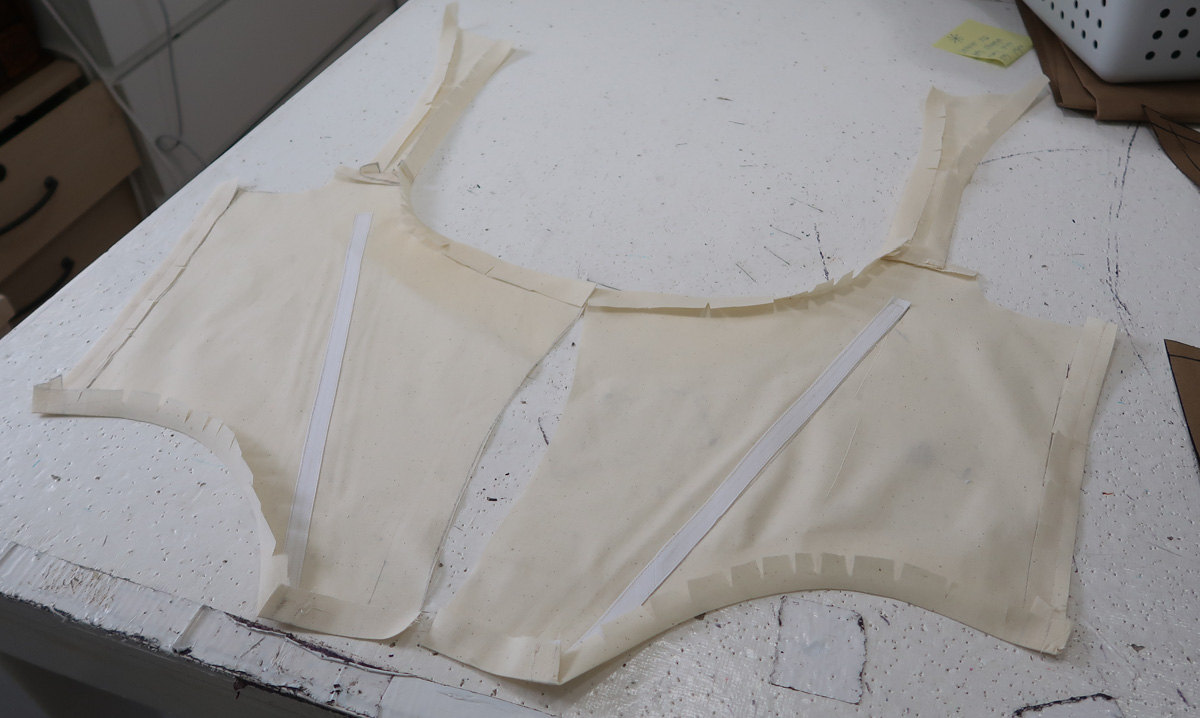
So I made a few minor alterations, then moved ahead with the finalized pattern, which looked like this!

halloween-52

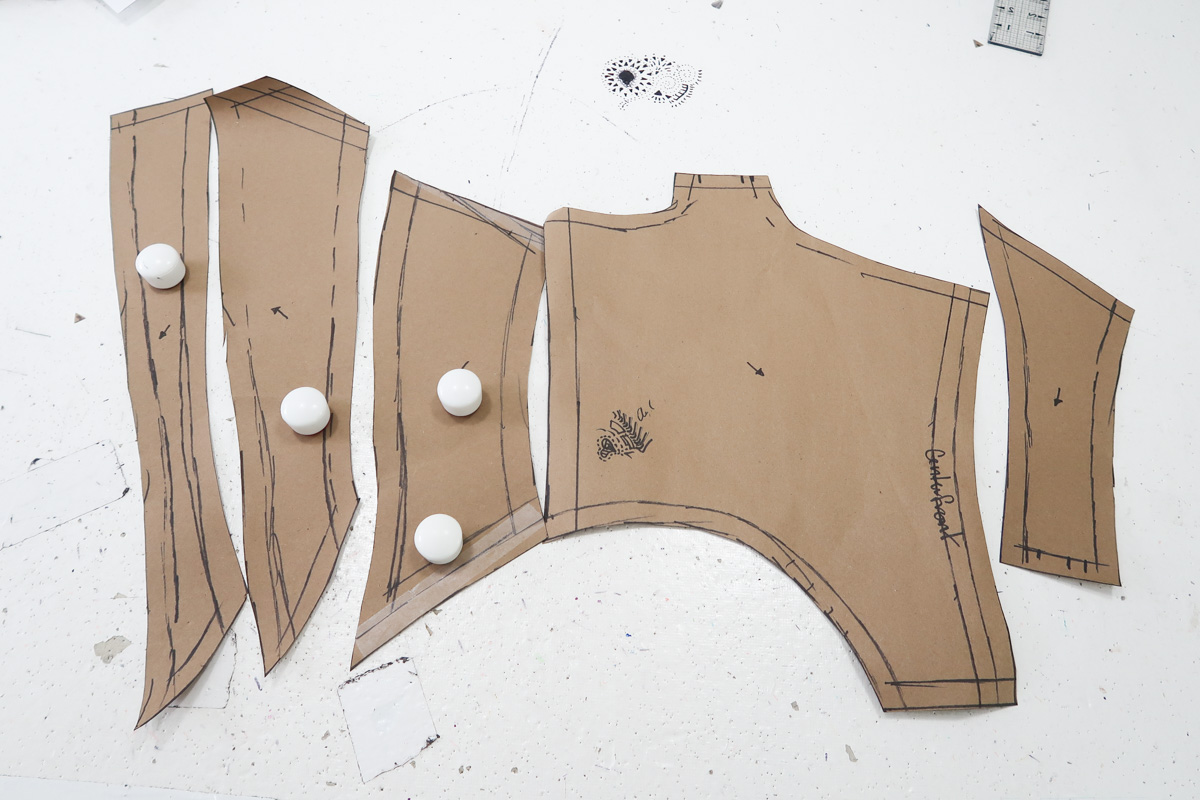
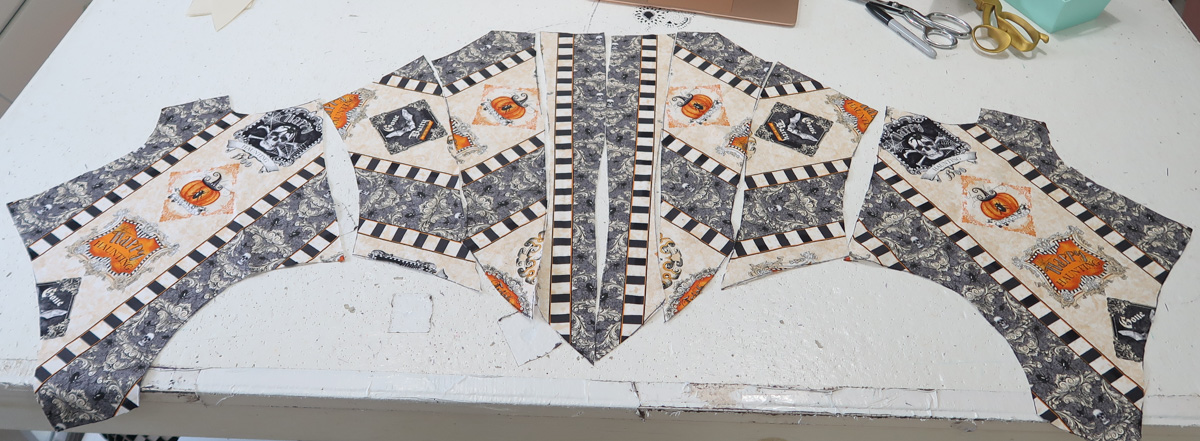
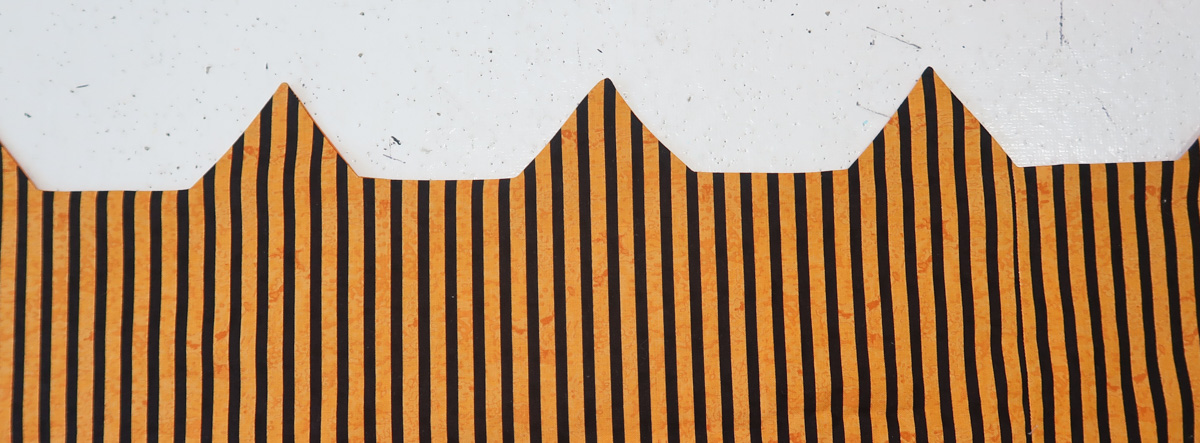
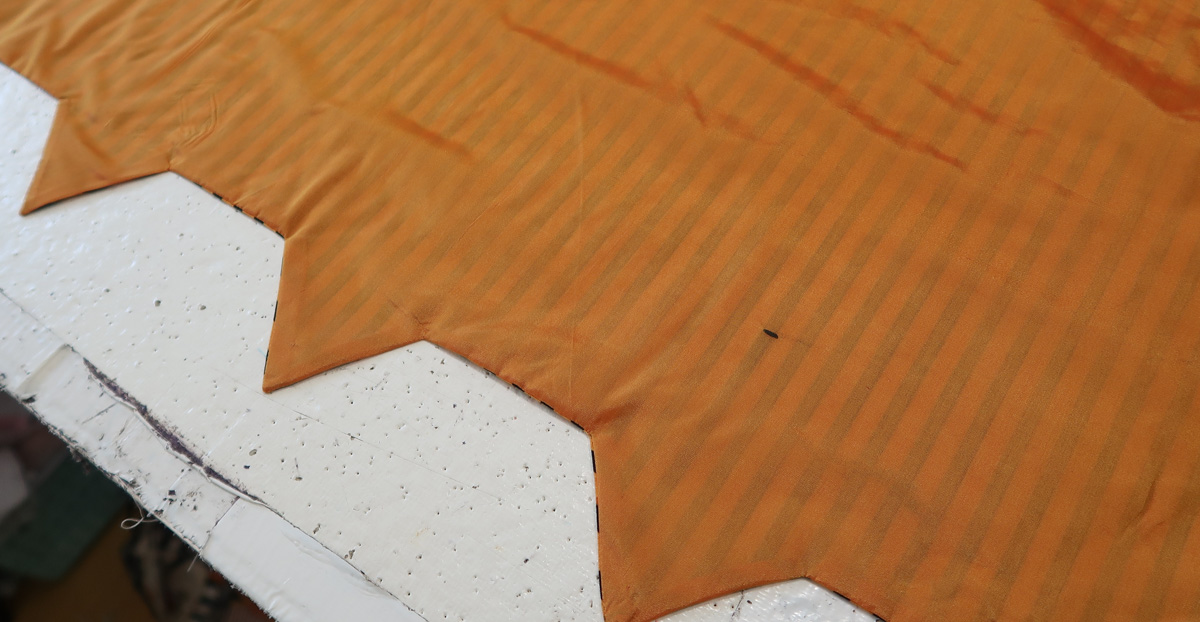
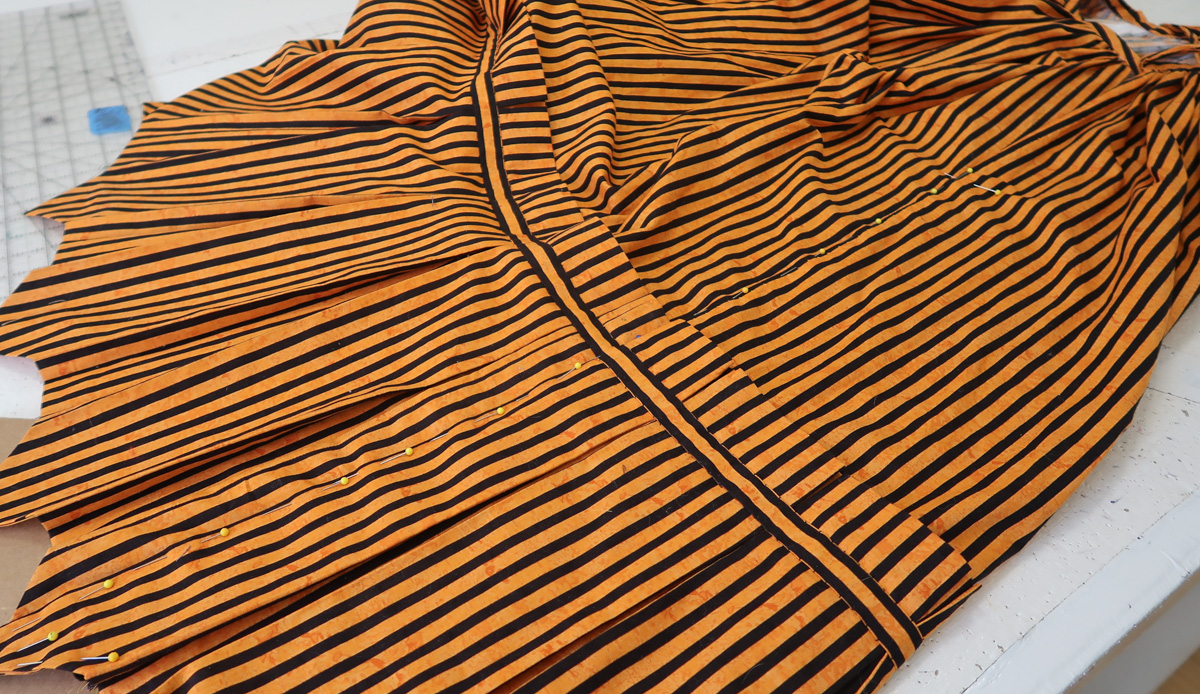
The arrows on the pattern signify the grain line they should be cut on. Since I was working with a striped fabric I just had to take advantage of the print and cut the bodice on the bias, so it would form a zig zag design when sewn together.

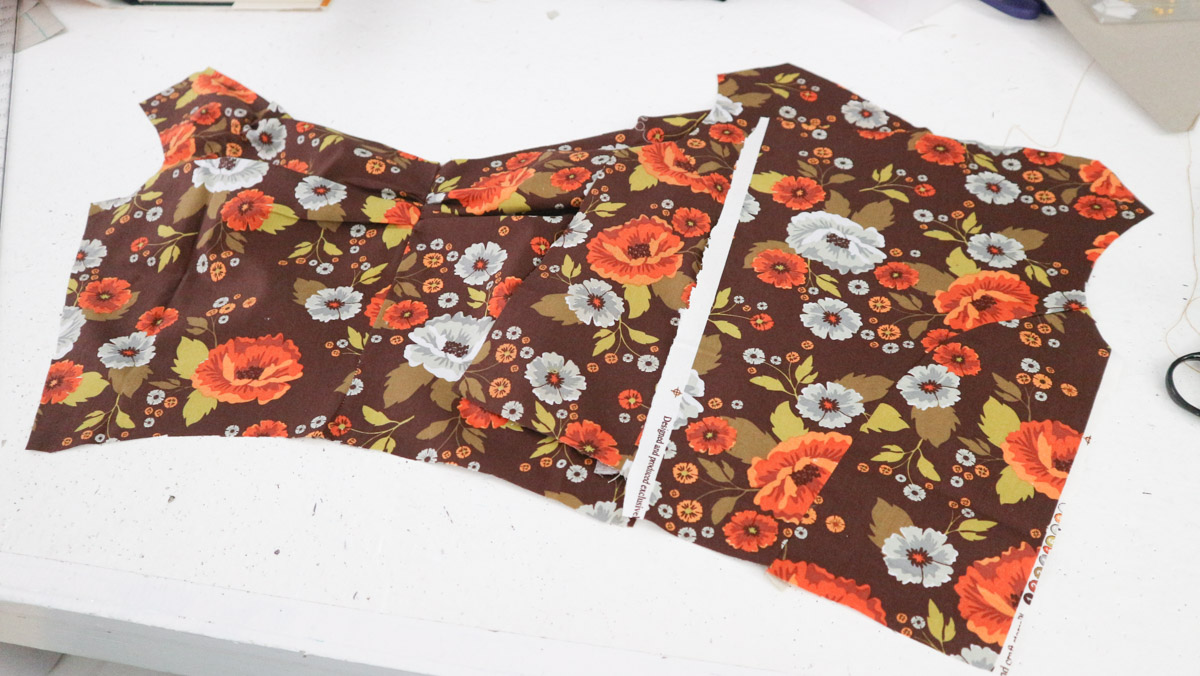
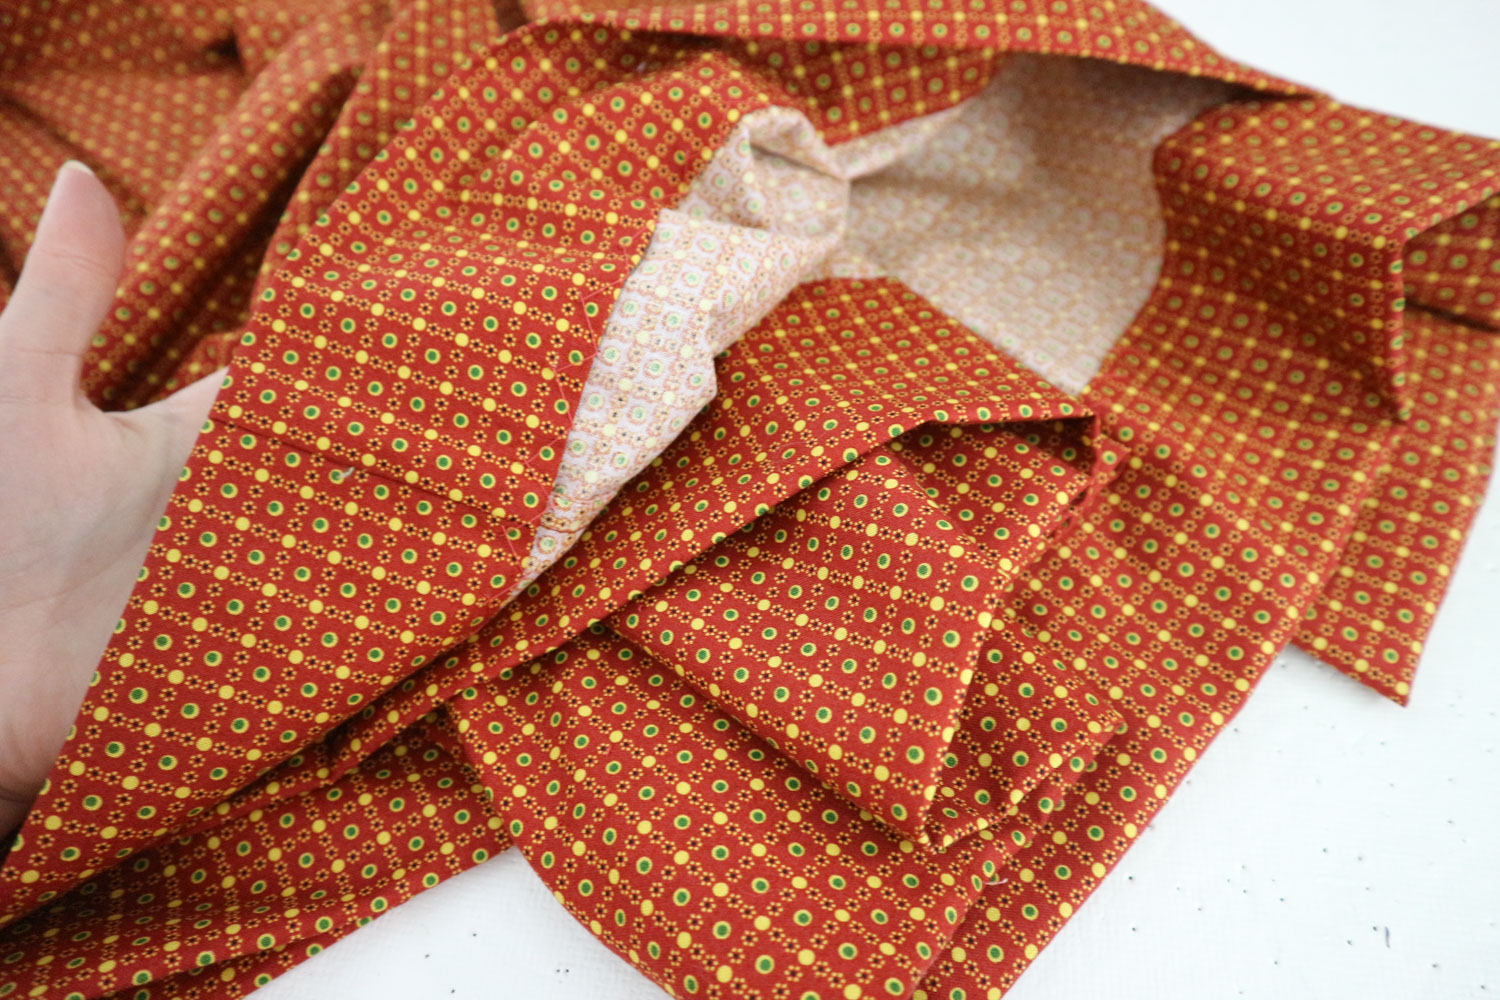
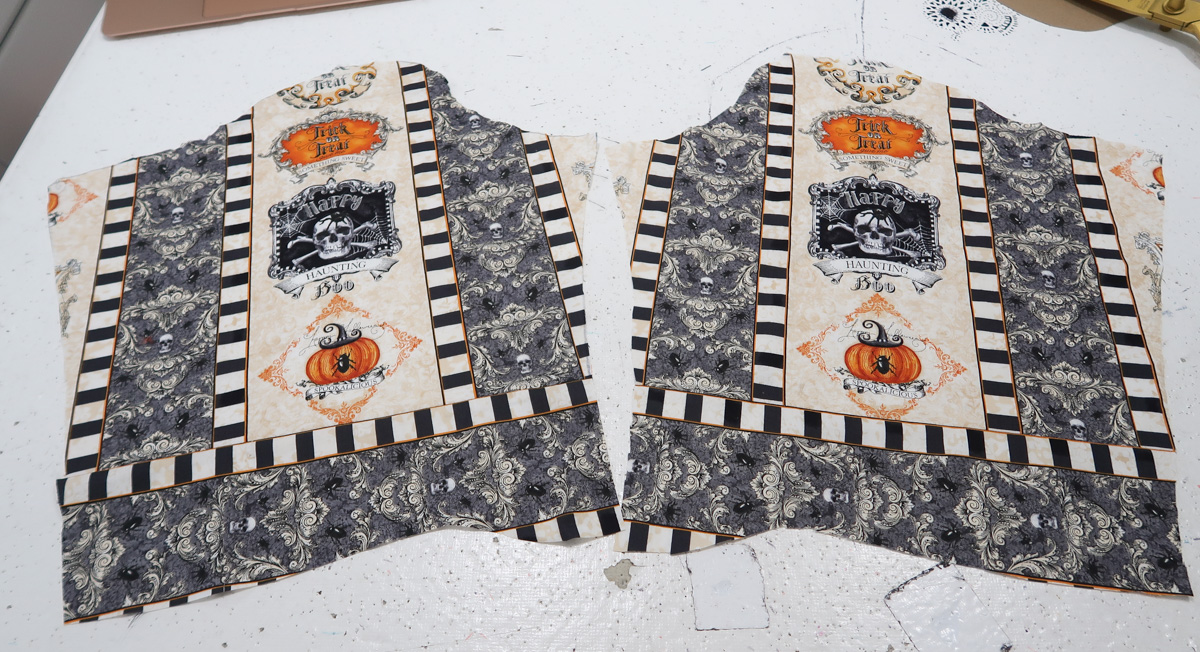
I messed up more than I would care to admit during this process, and probably wasted a yard of fabric. Which led to some mild panic later on when I didn’t have enough fabric left to cut out the skirt and sleeves. That was unfortunate, but doesn’t this look fabulous?!

halloween-2

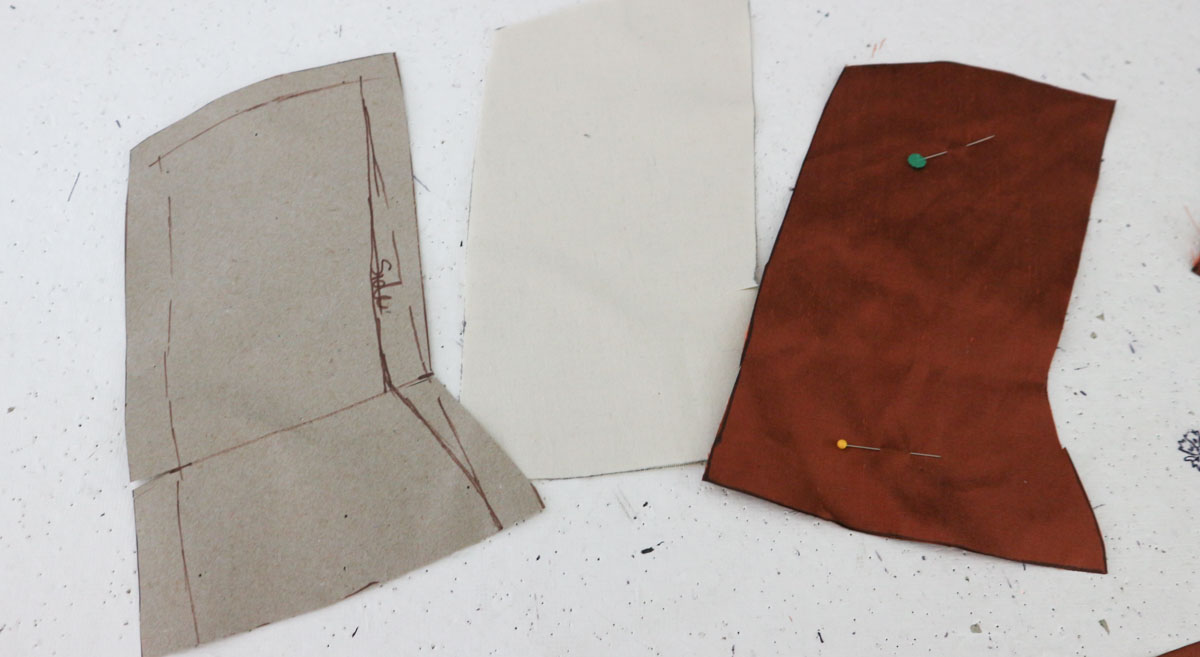
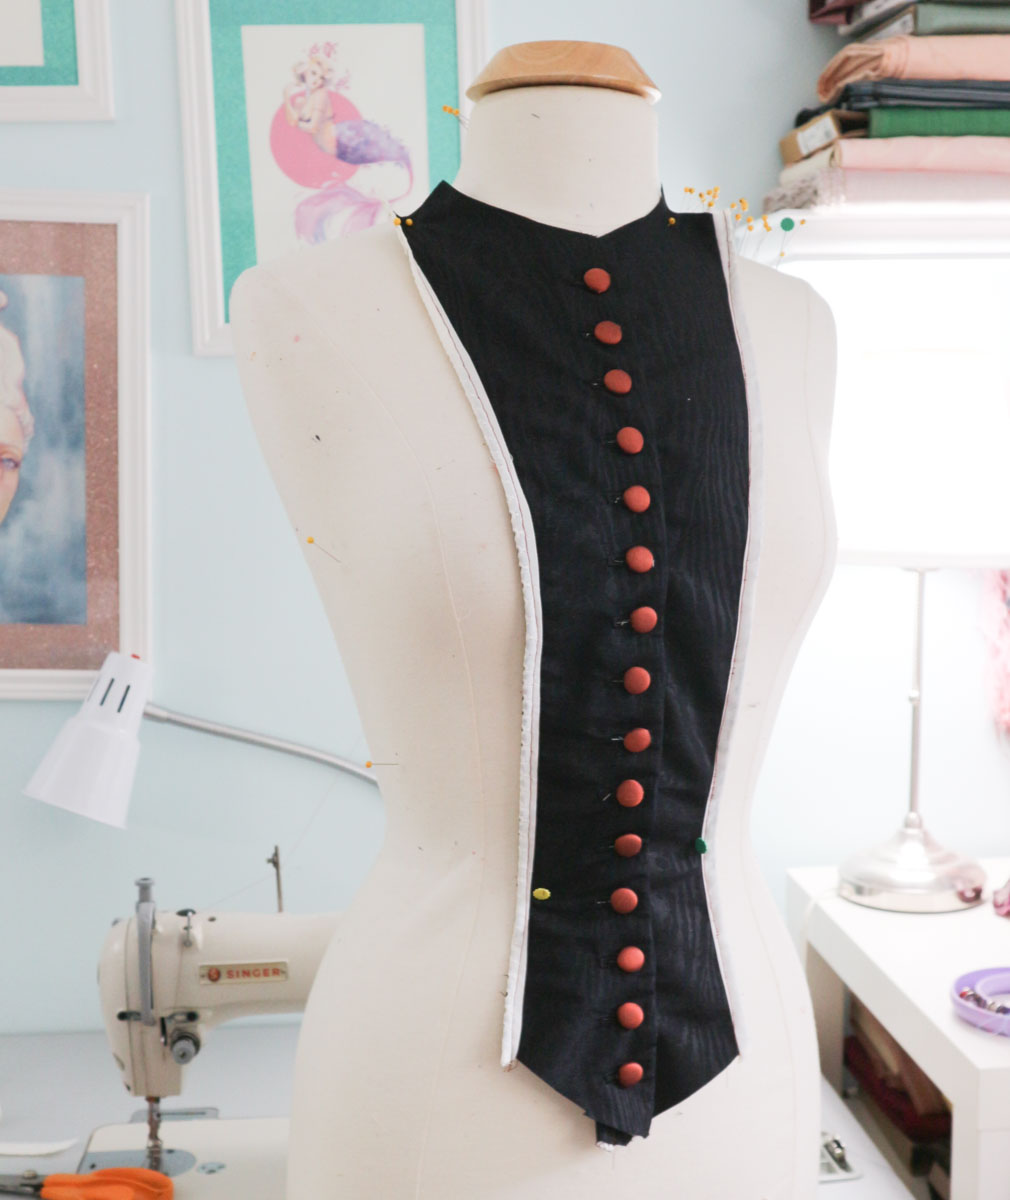
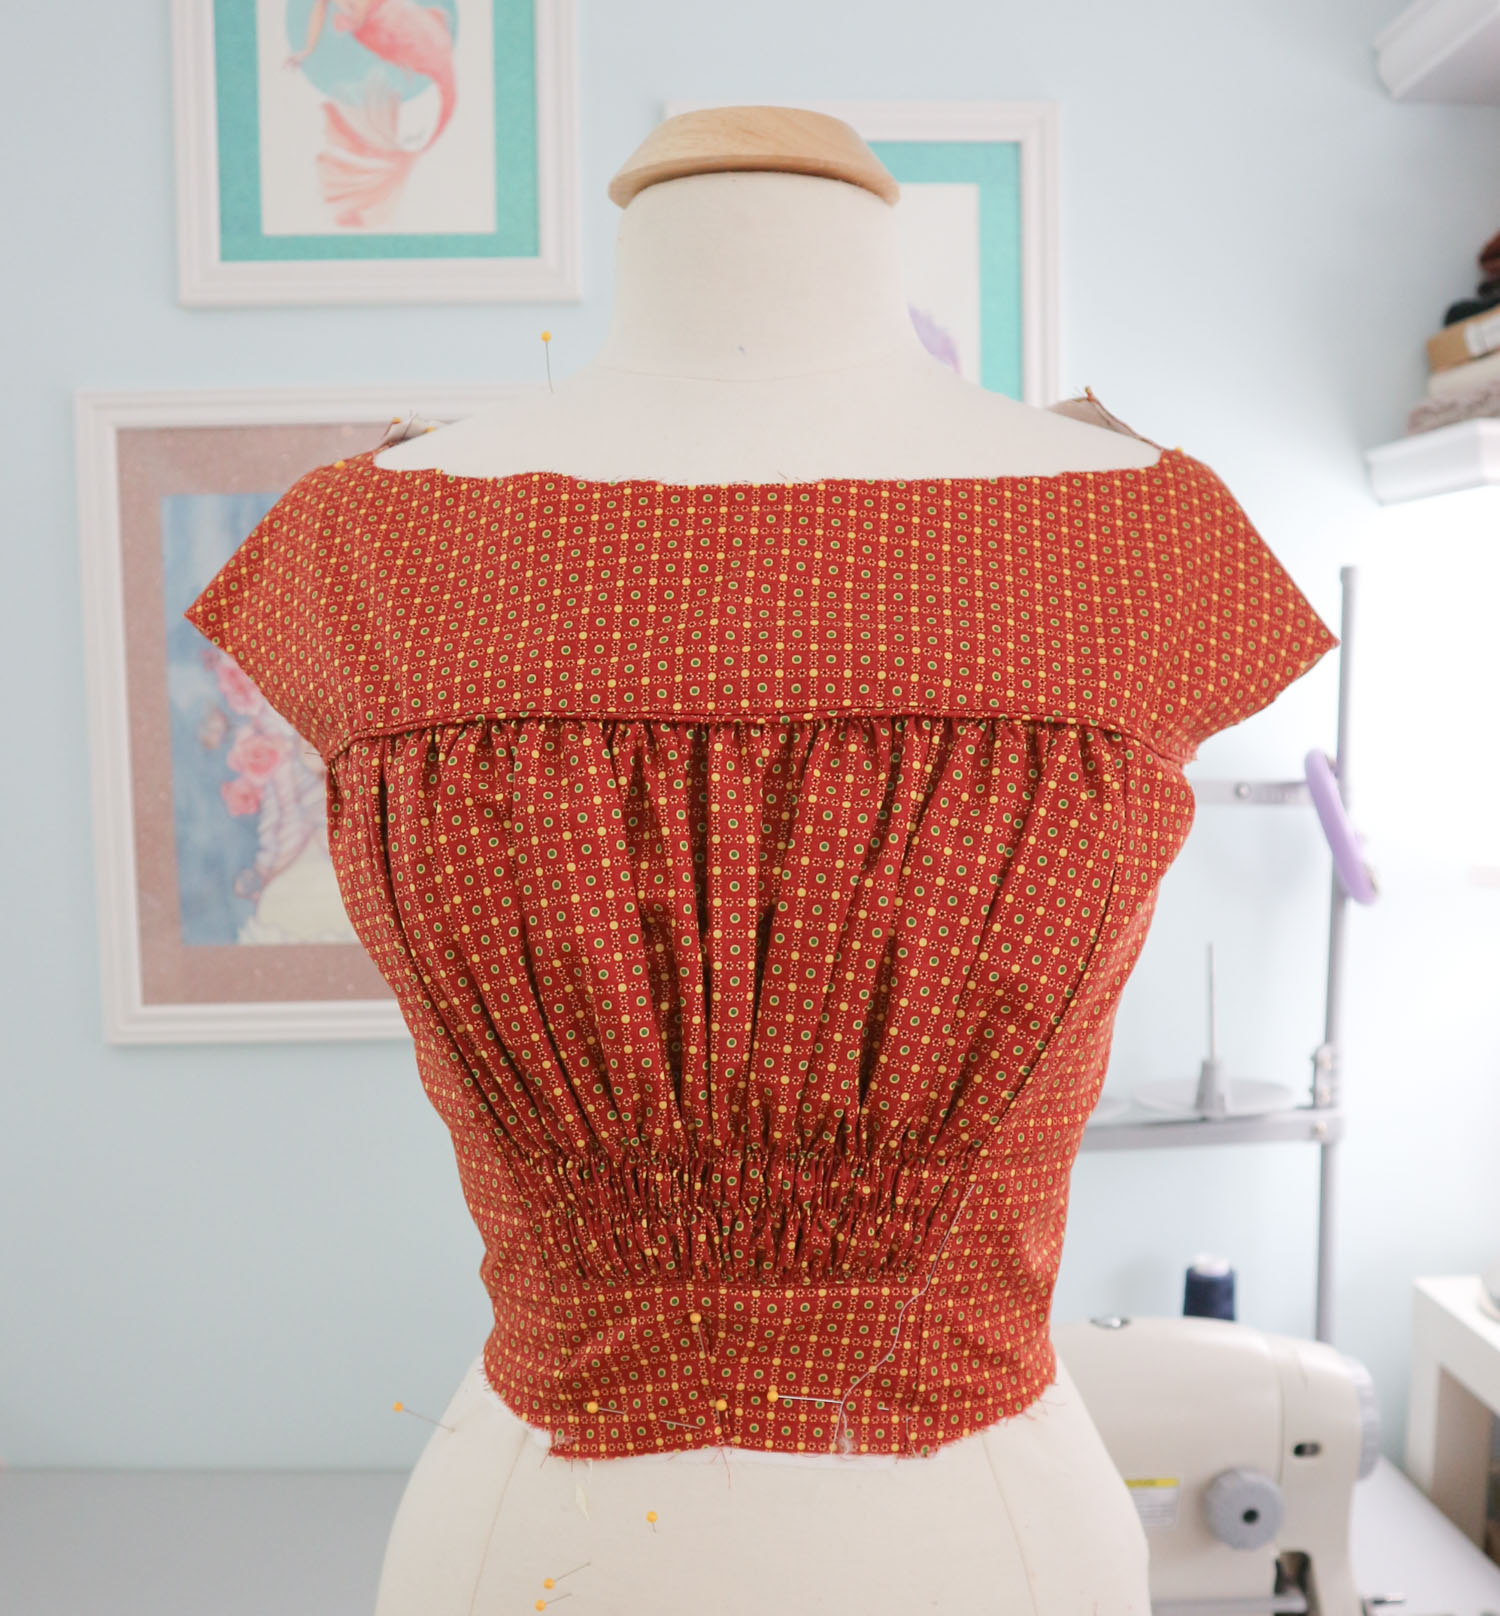
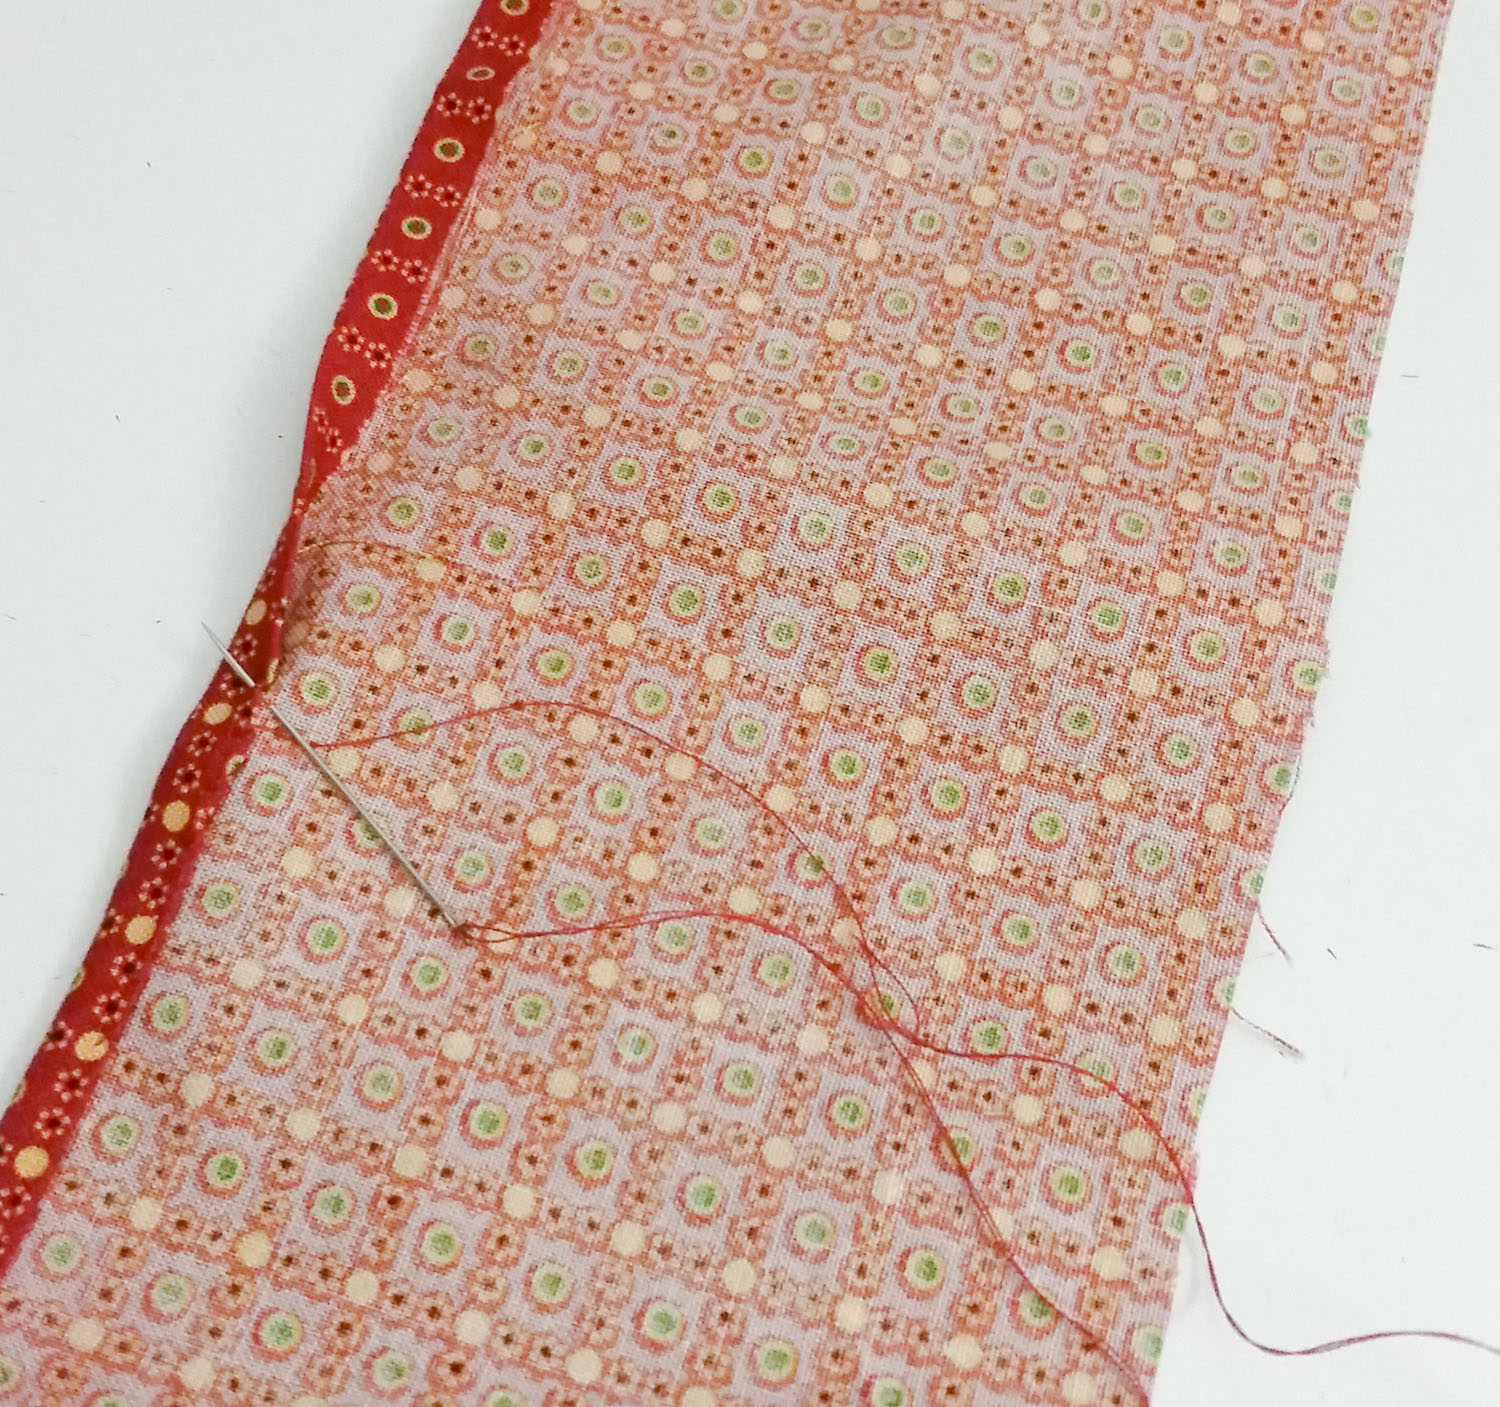
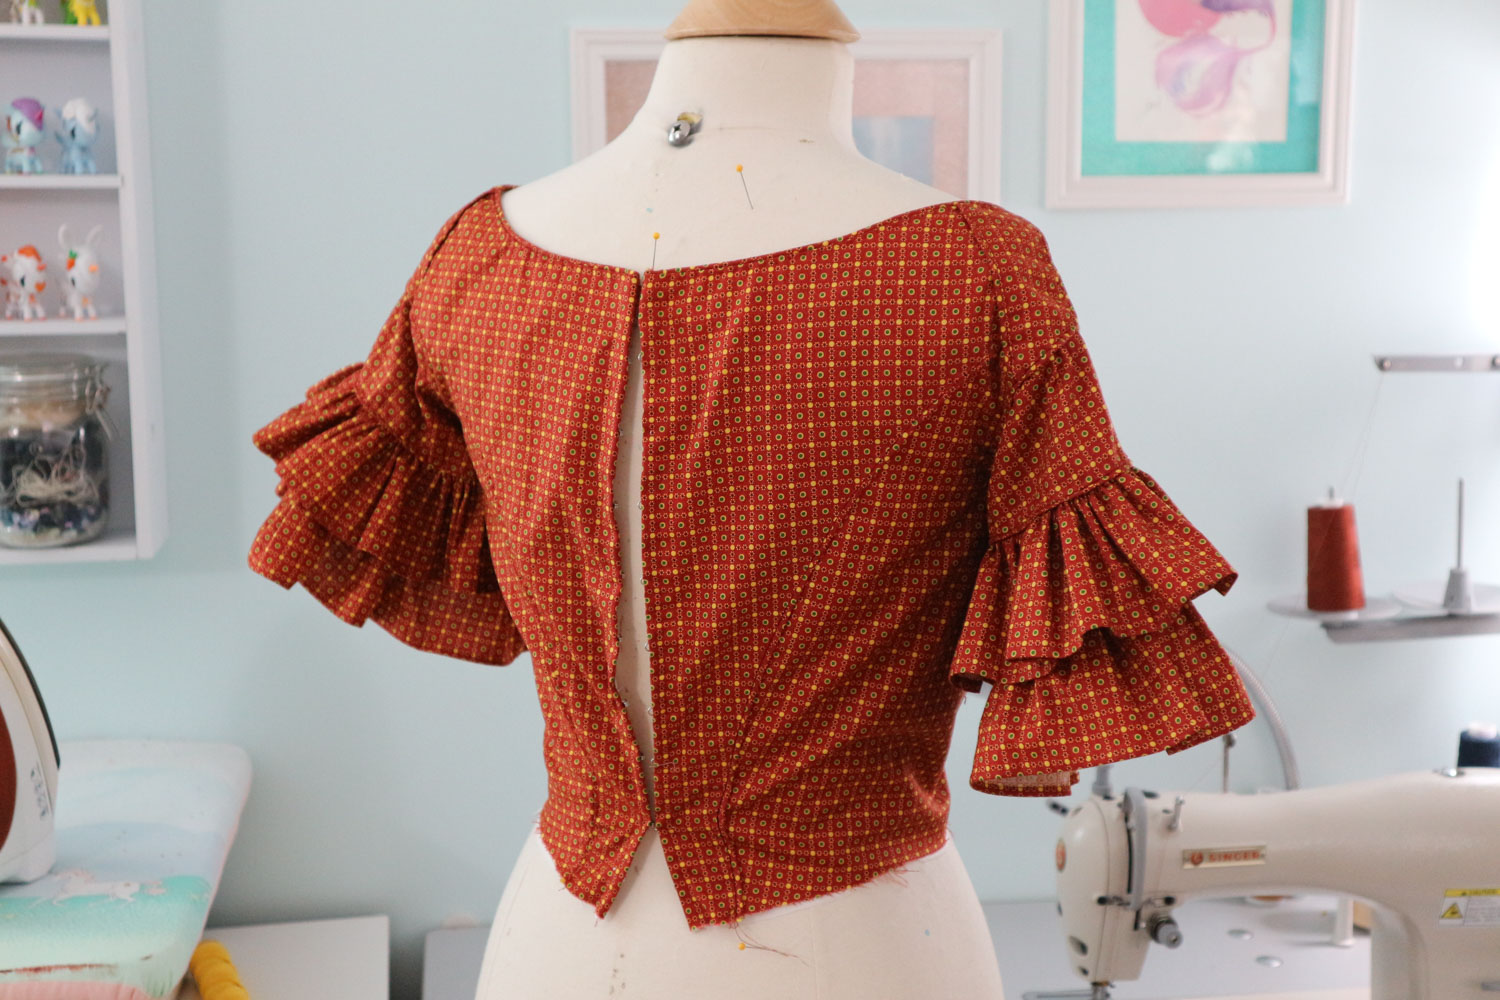
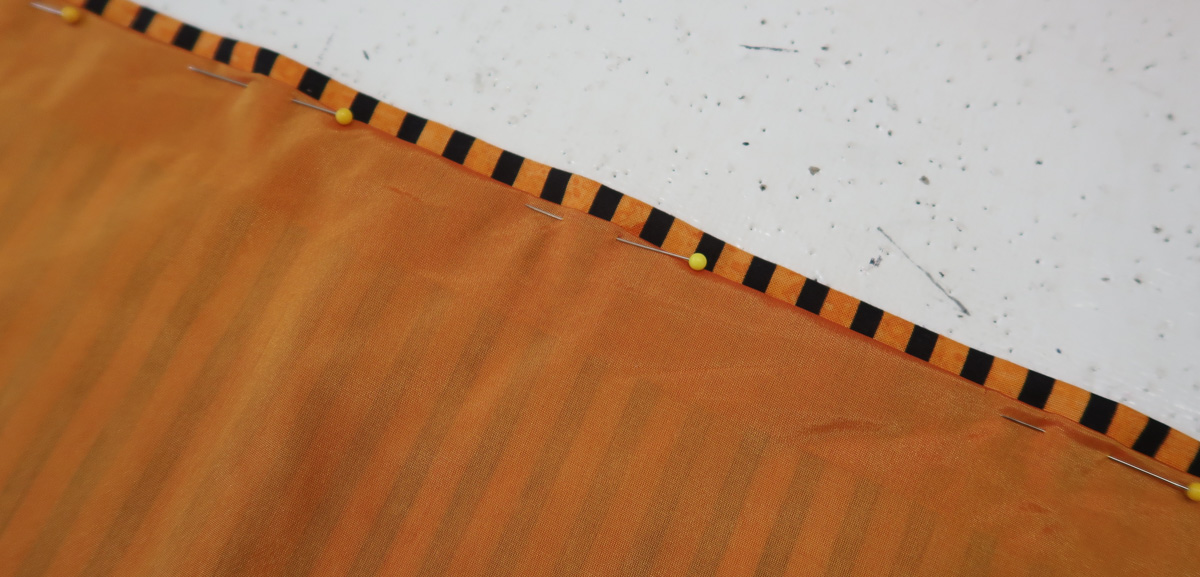
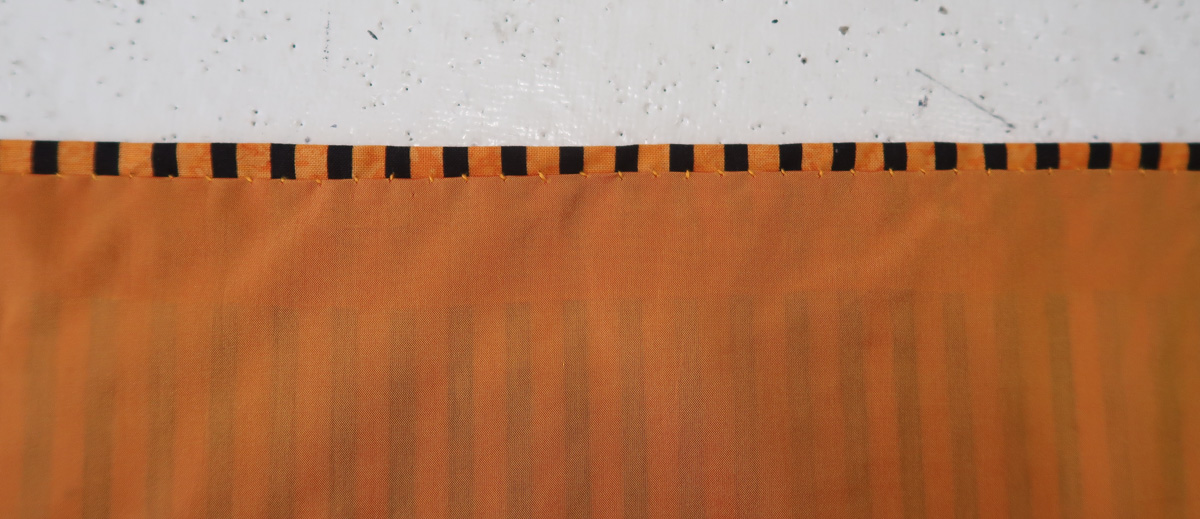
I used a pencil to mark the seam allowance on each piece, then carefully pinned and sewed them together.

halloween-3

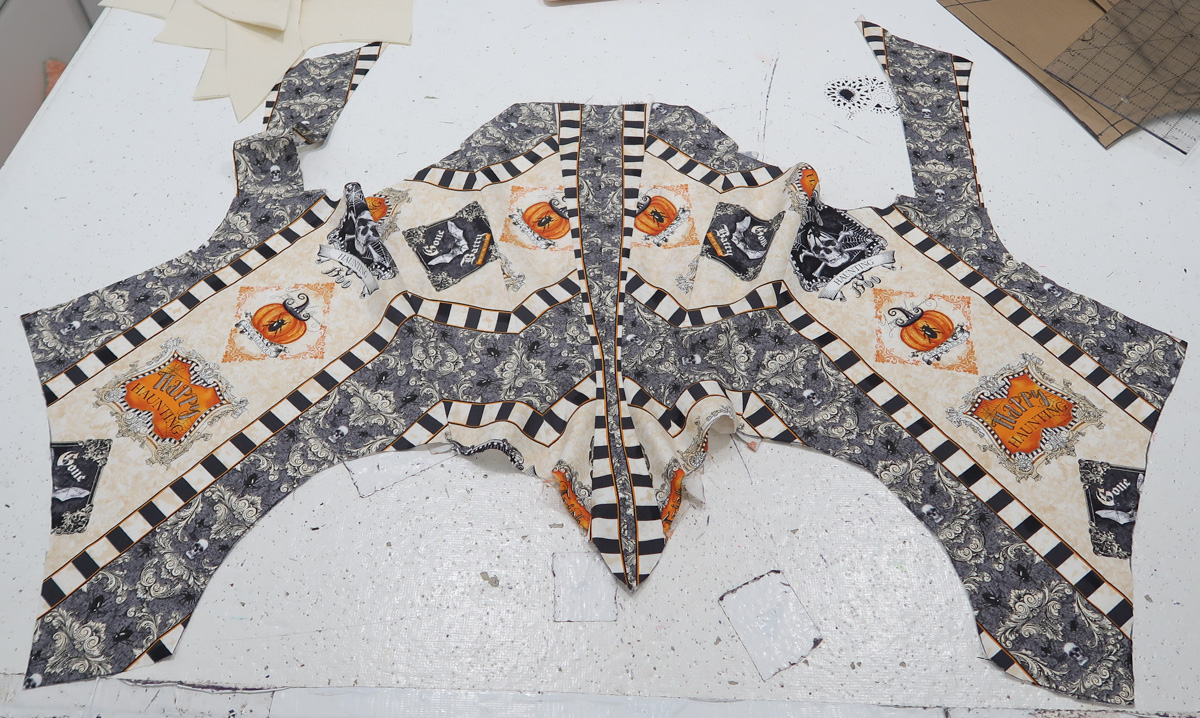
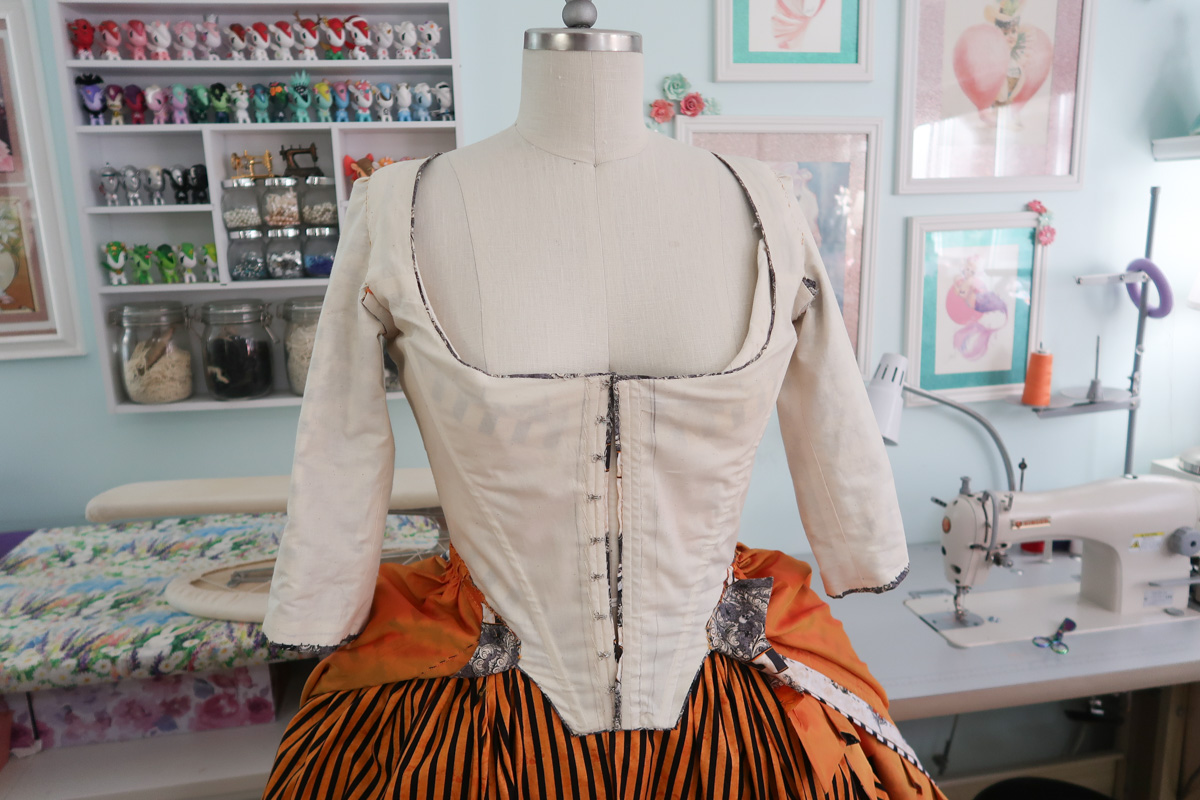
All the edges were turned inward by a half inch – except for the center front edge. I waited to finish that until a later fitting.

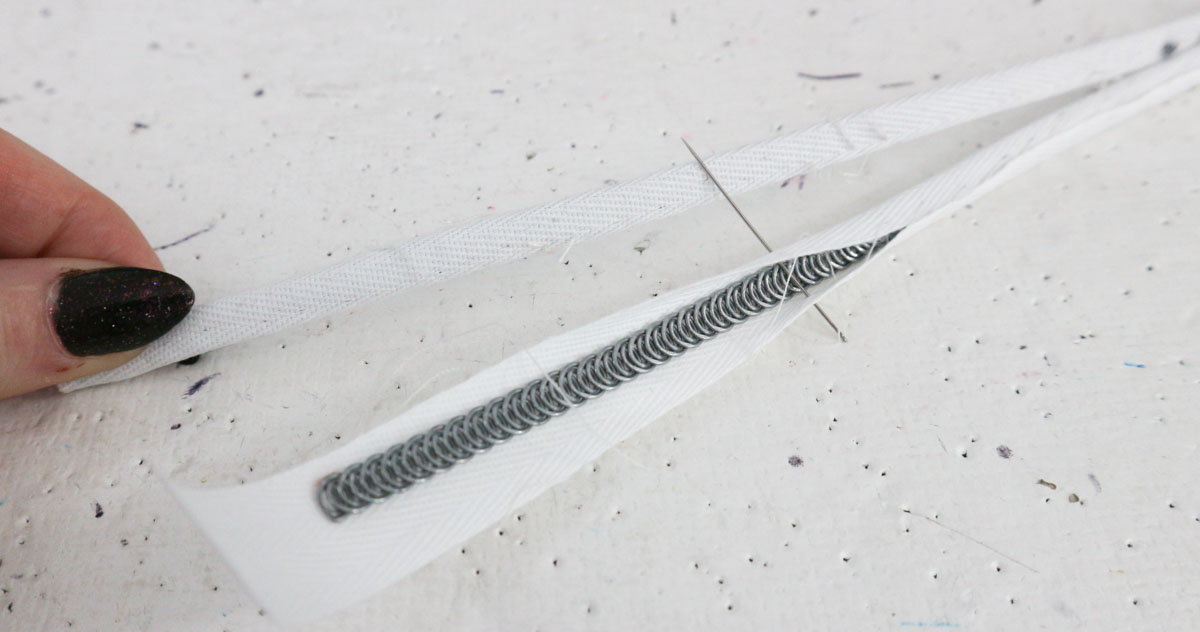
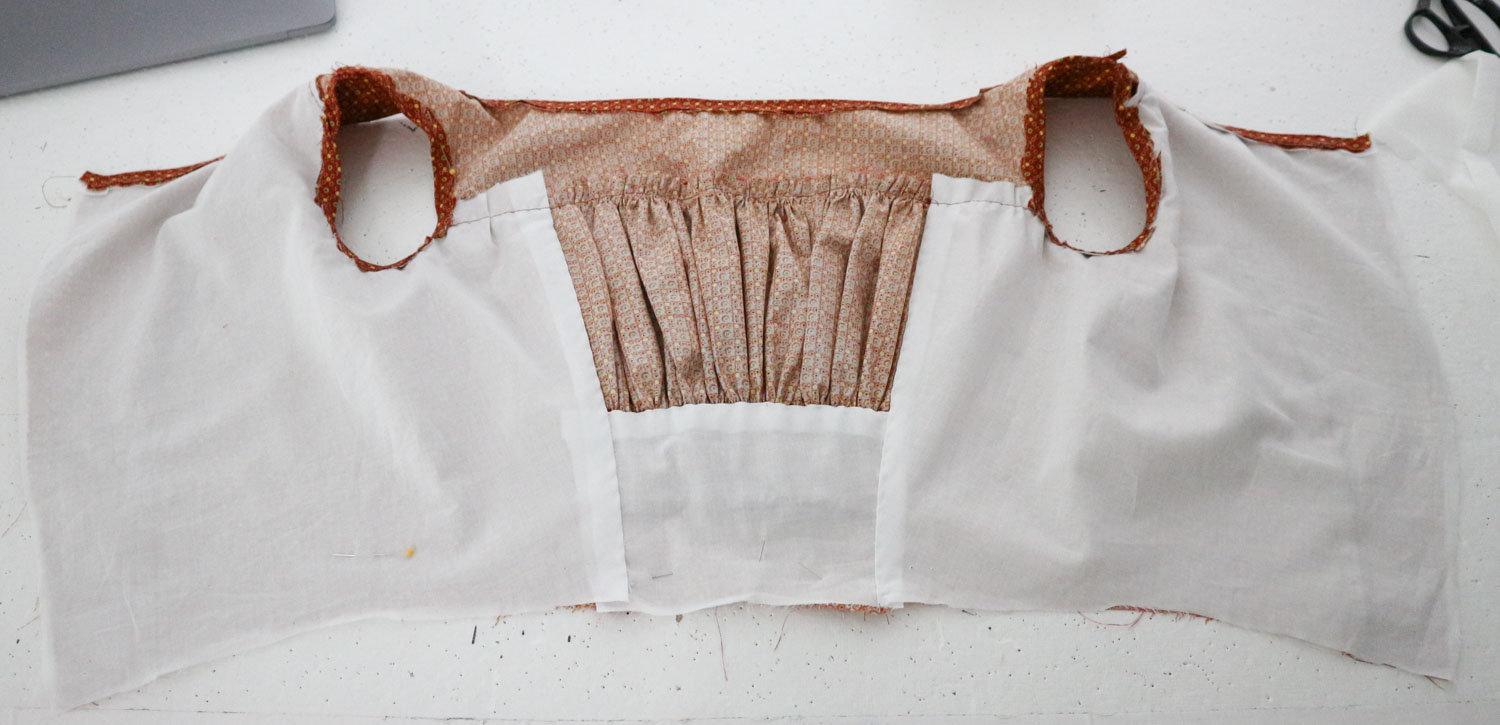
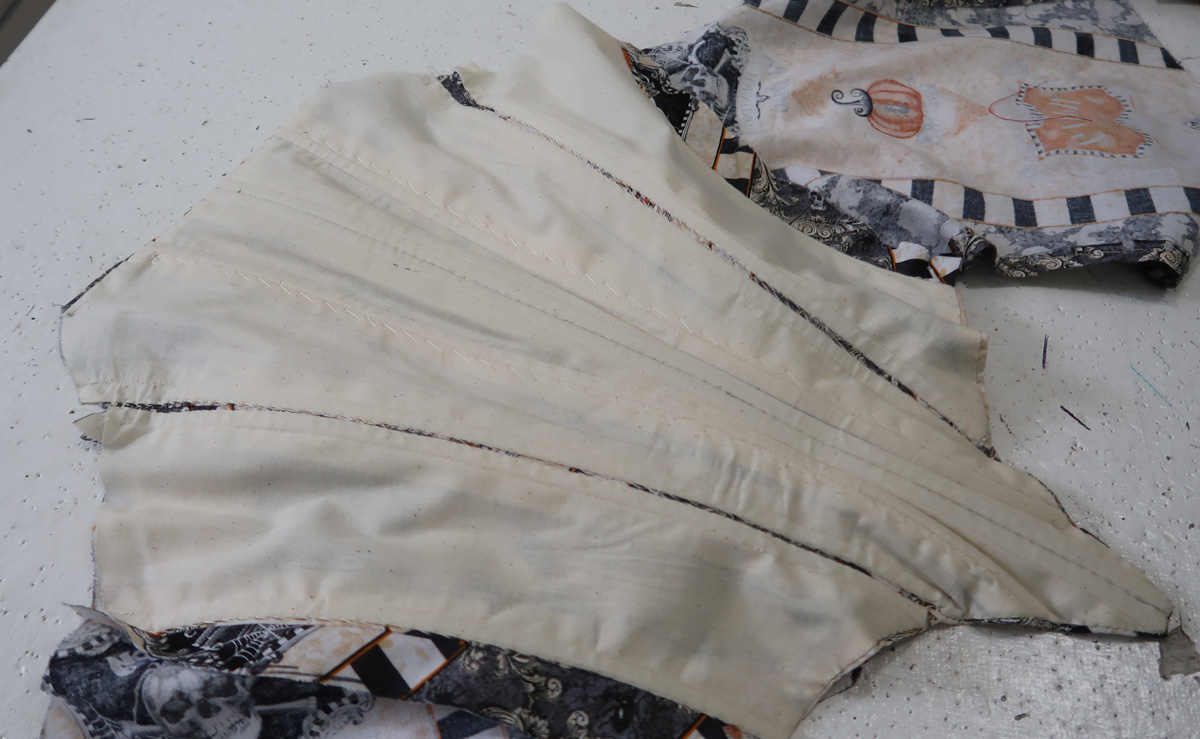
Then I turned my focus to the bodice lining, which was made from the same pattern. However instead of sewing all the lining pieces together, I decided to turn the seam allowance of each piece inward, then sew a boning channel into each edge.

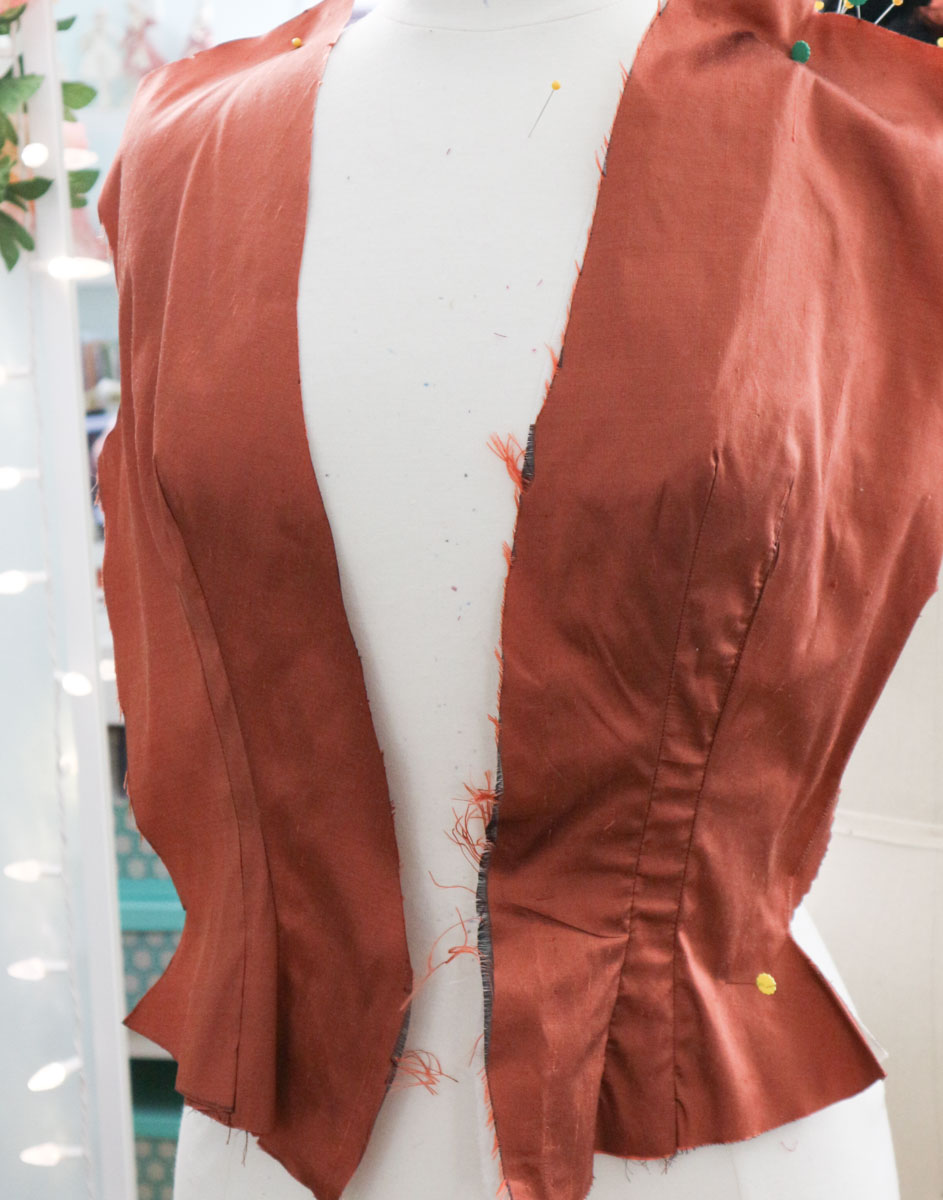
I matched the edges of each piece of lining up with seam allowances of the outer layer of fabric. Then the edges were whip stitched in place, and boning was added.

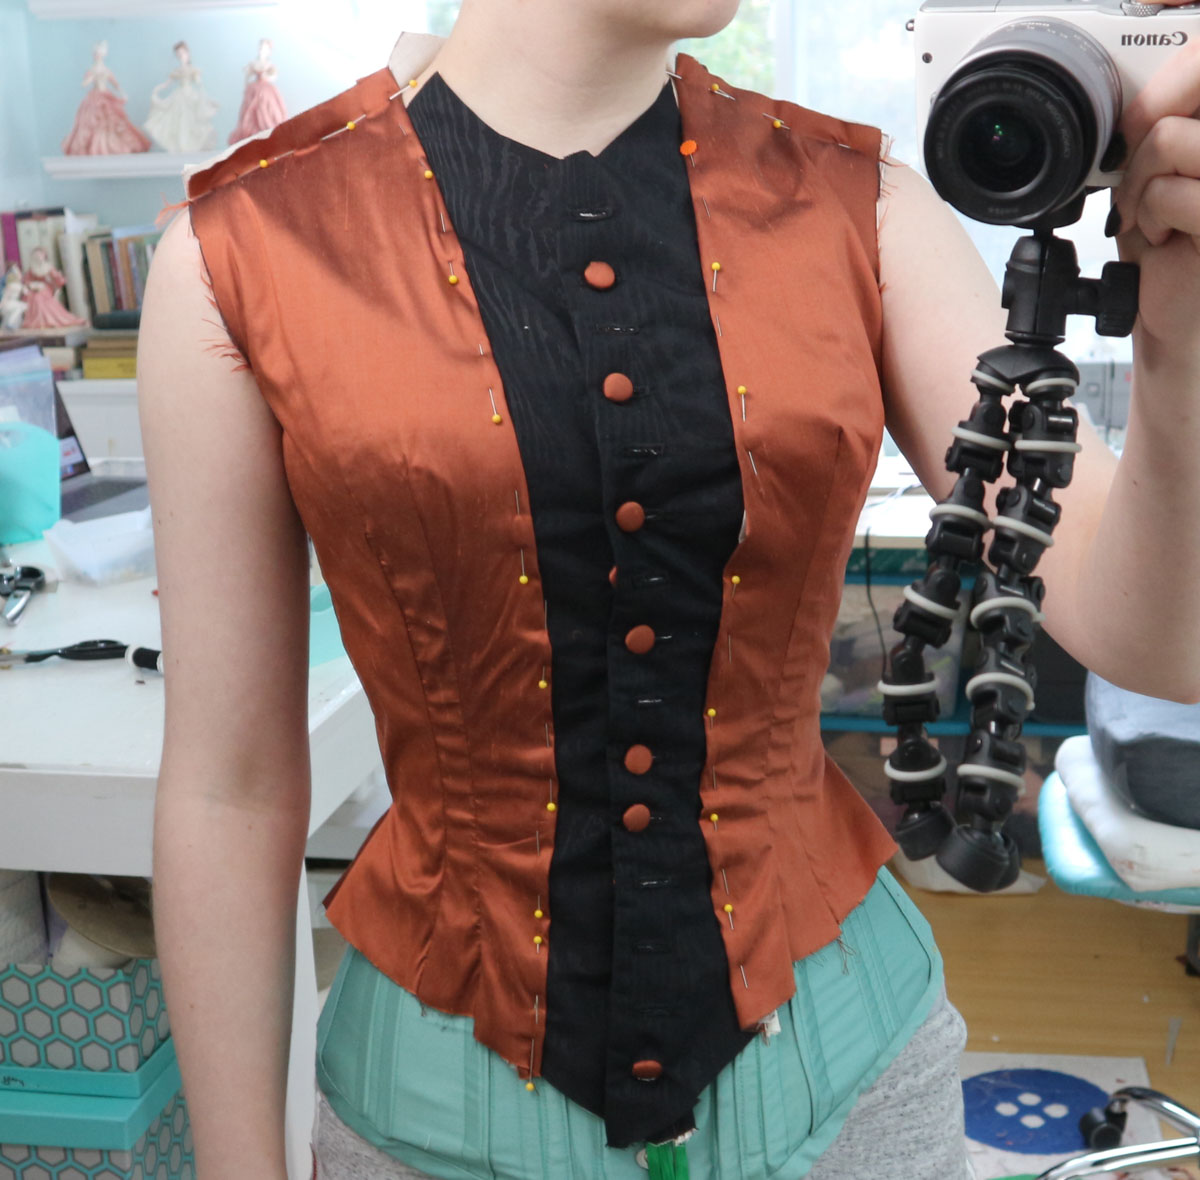
I lined the back and side back panels first, then did a fitting before lining the fronts of the bodice.

I’ve had a few projects recently that shrunk when I added the lining – okay, they didn’t shrink, but the lining reduced the ease of the garment, which altered the fit dramatically. So just to be safe, I did a fitting after the partial lining was added.

halloween-5

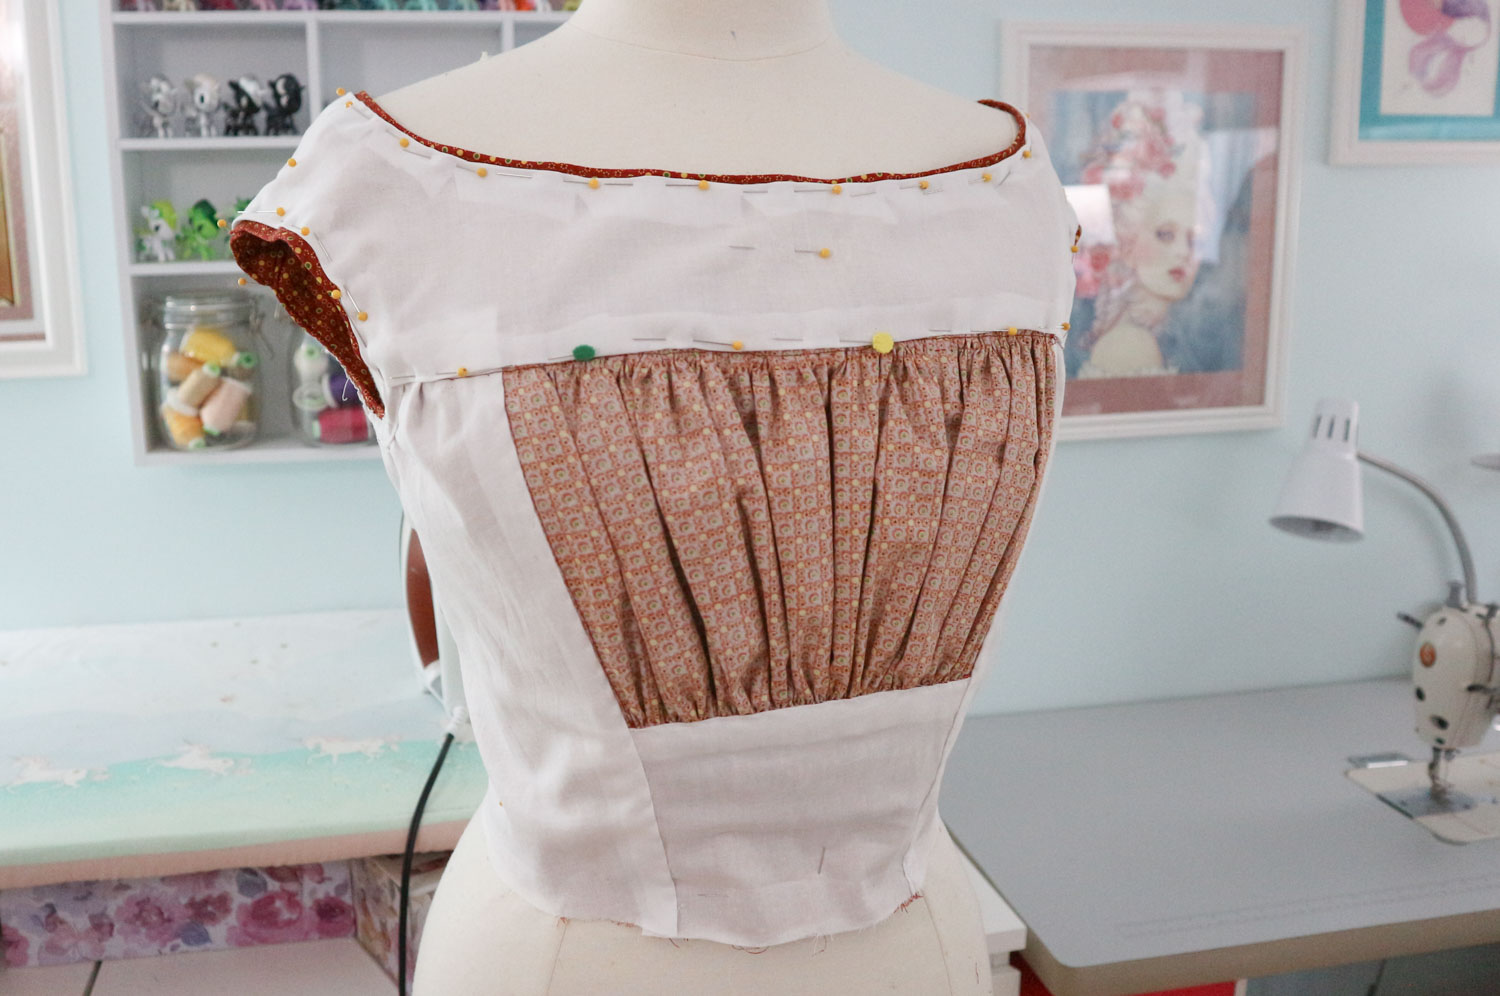
Thankfully, it still fit. So I cut the lining for the fronts of the bodice, and stitched a boning channel into each panel.

halloween-4

This was pinned, then whip stitched in place. I did yet another fitting before finishing the center front edge and adding closures.

halloween-41

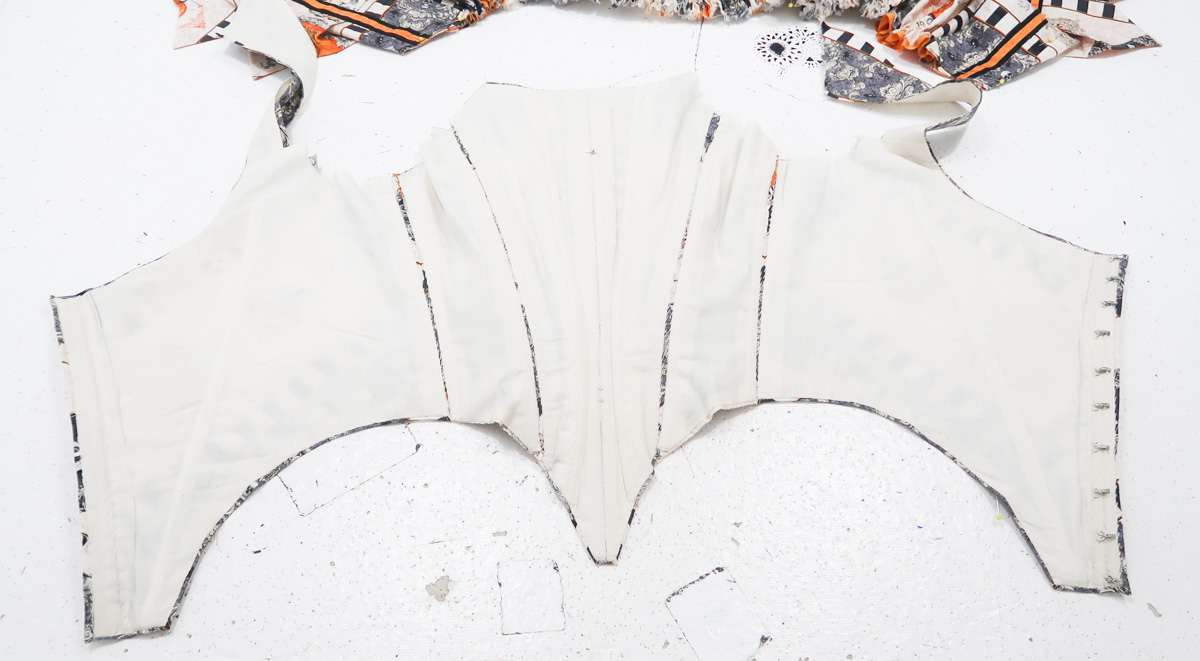
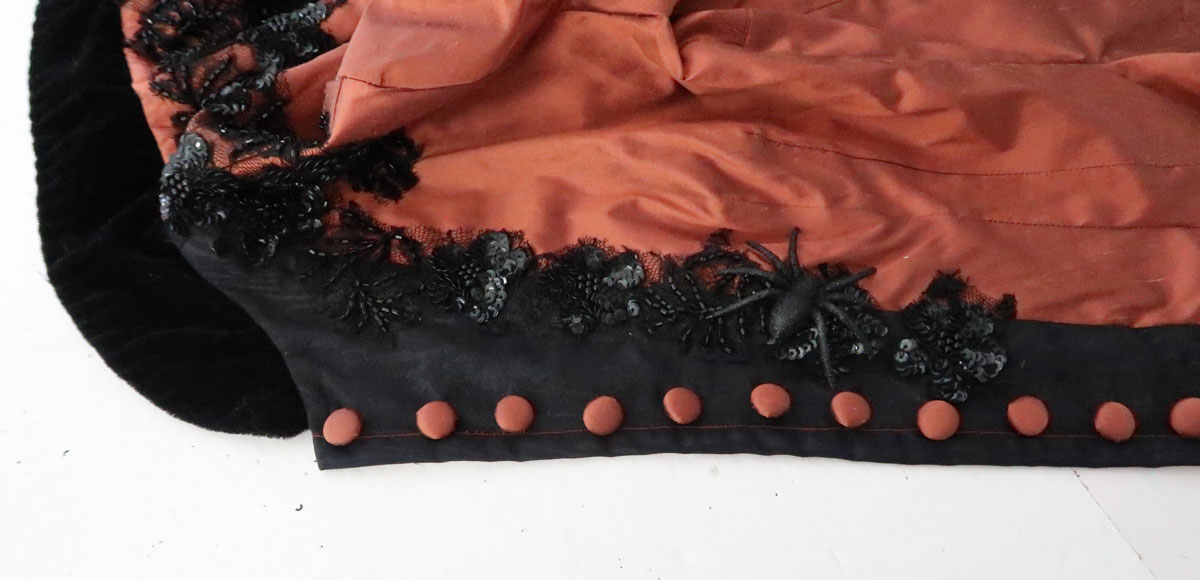
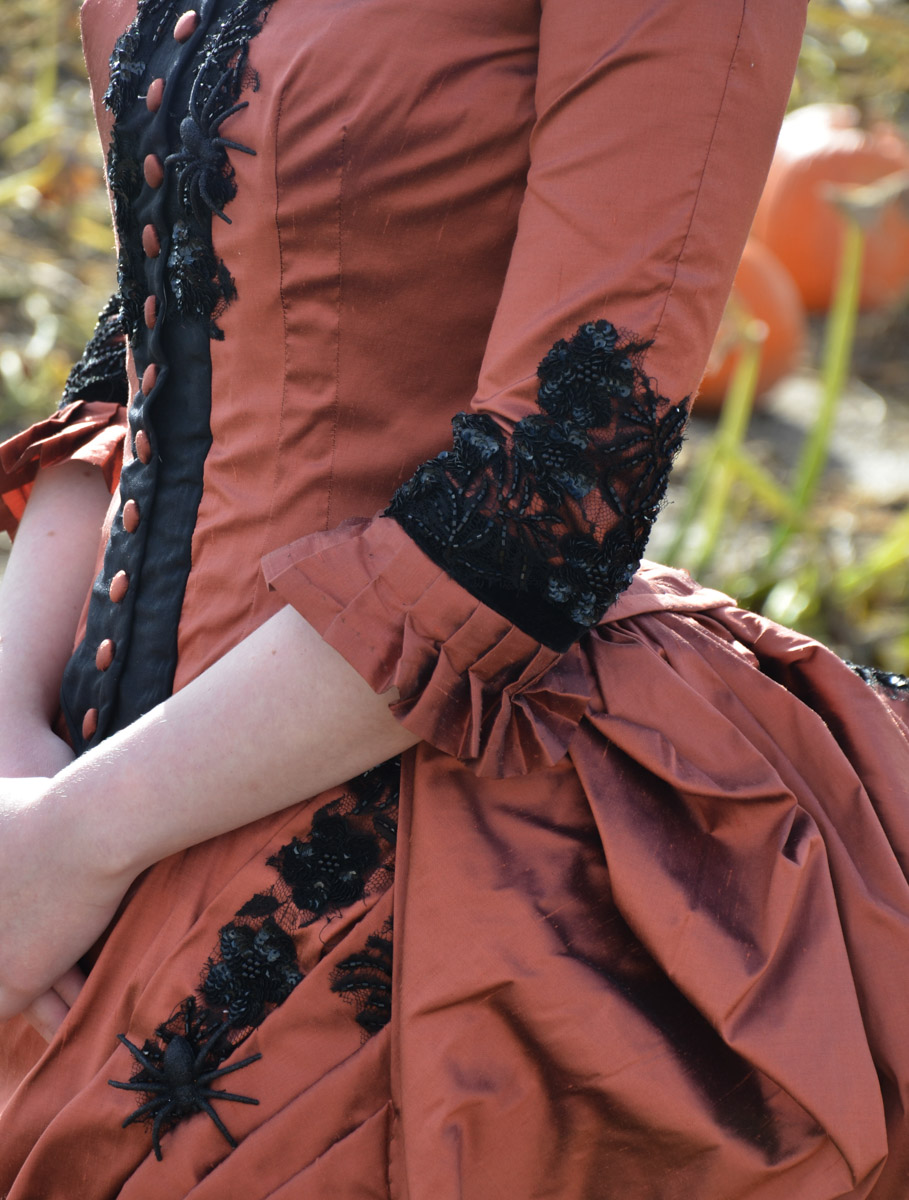
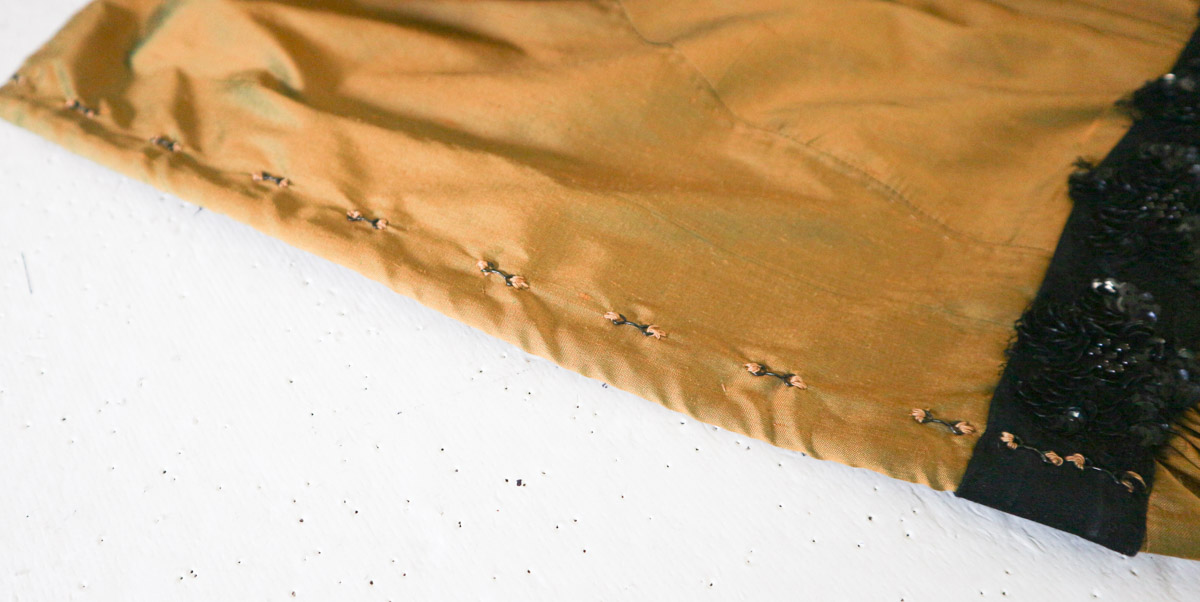
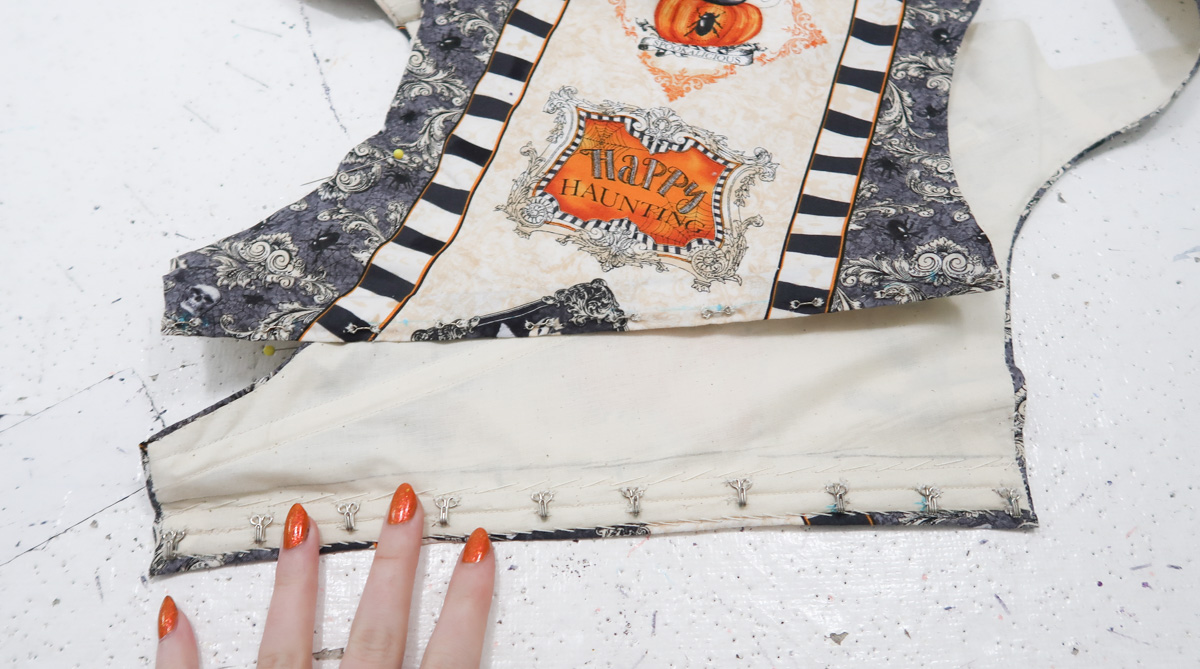
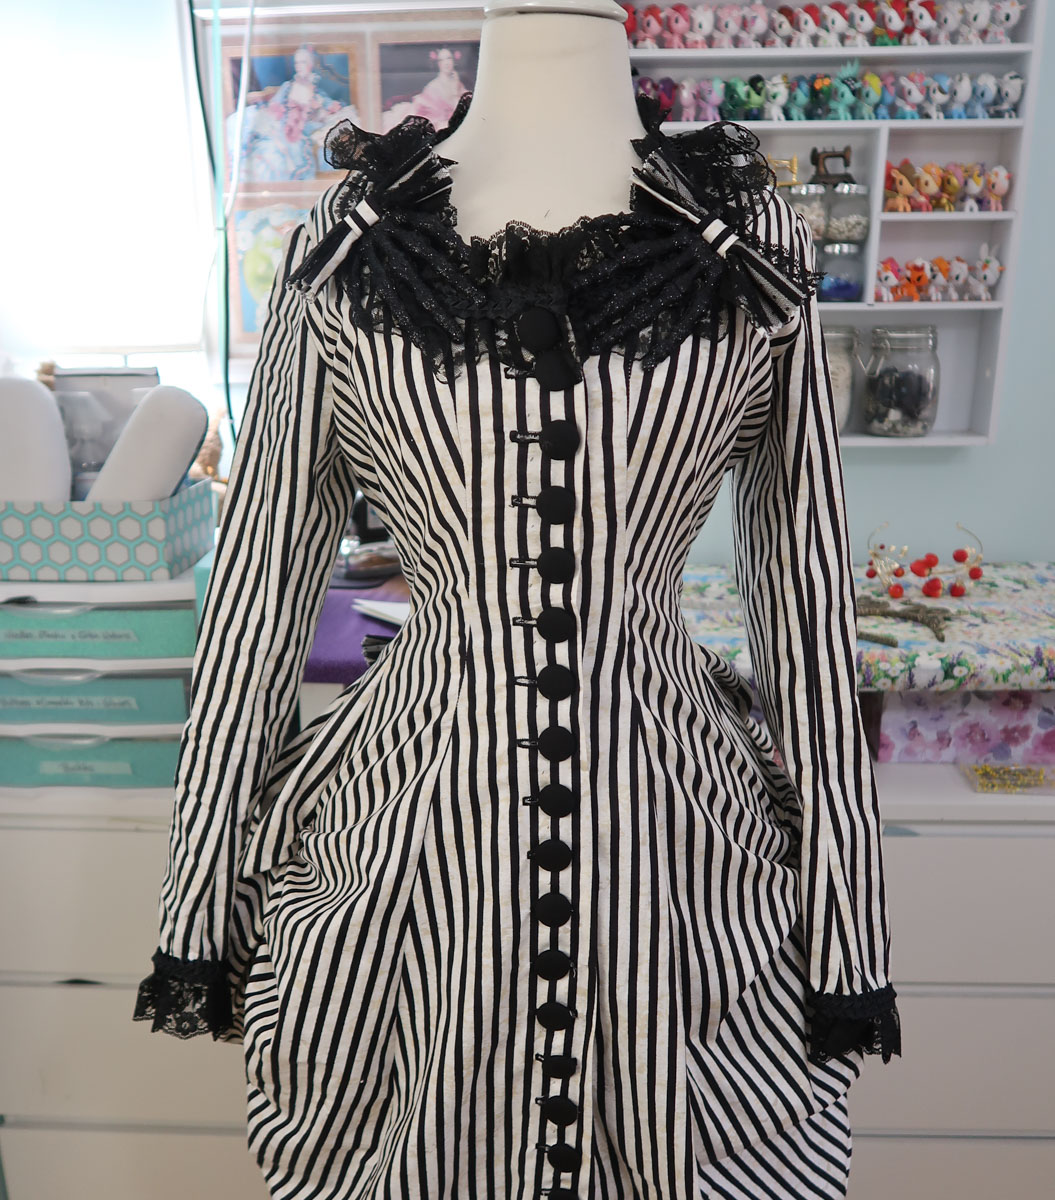
The fronts of the bodice overlap by a quarter inch, and close with hooks and bars.

halloween-40

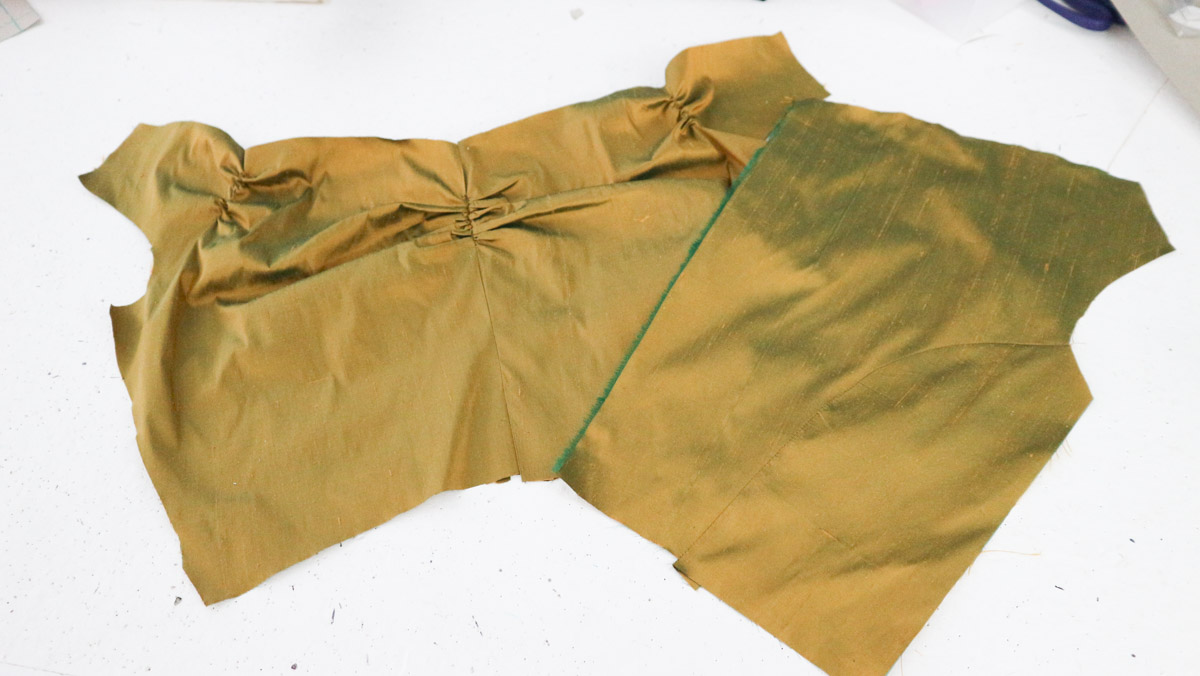
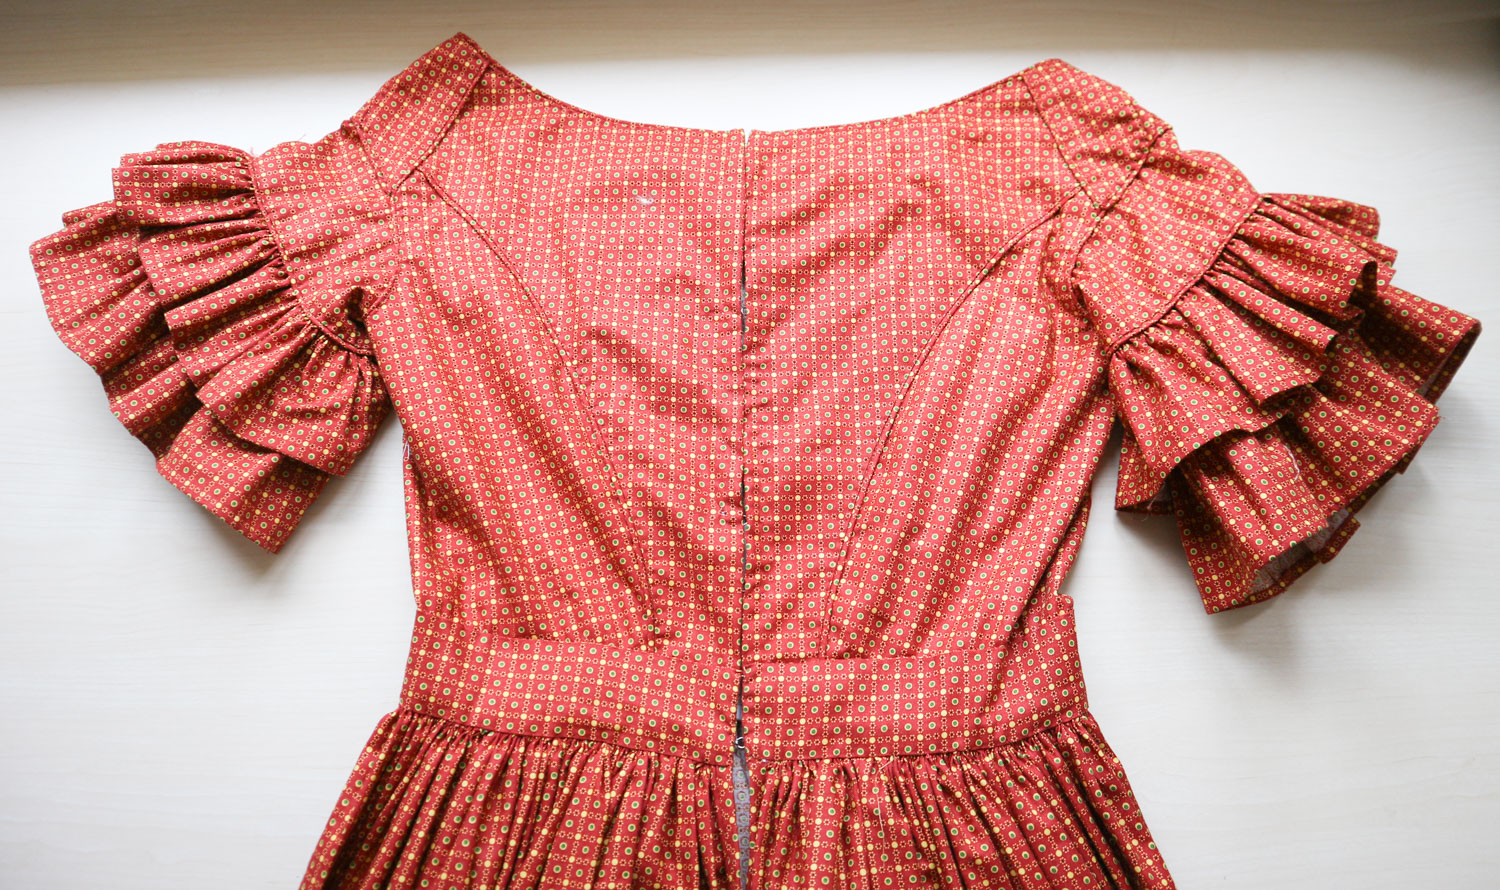
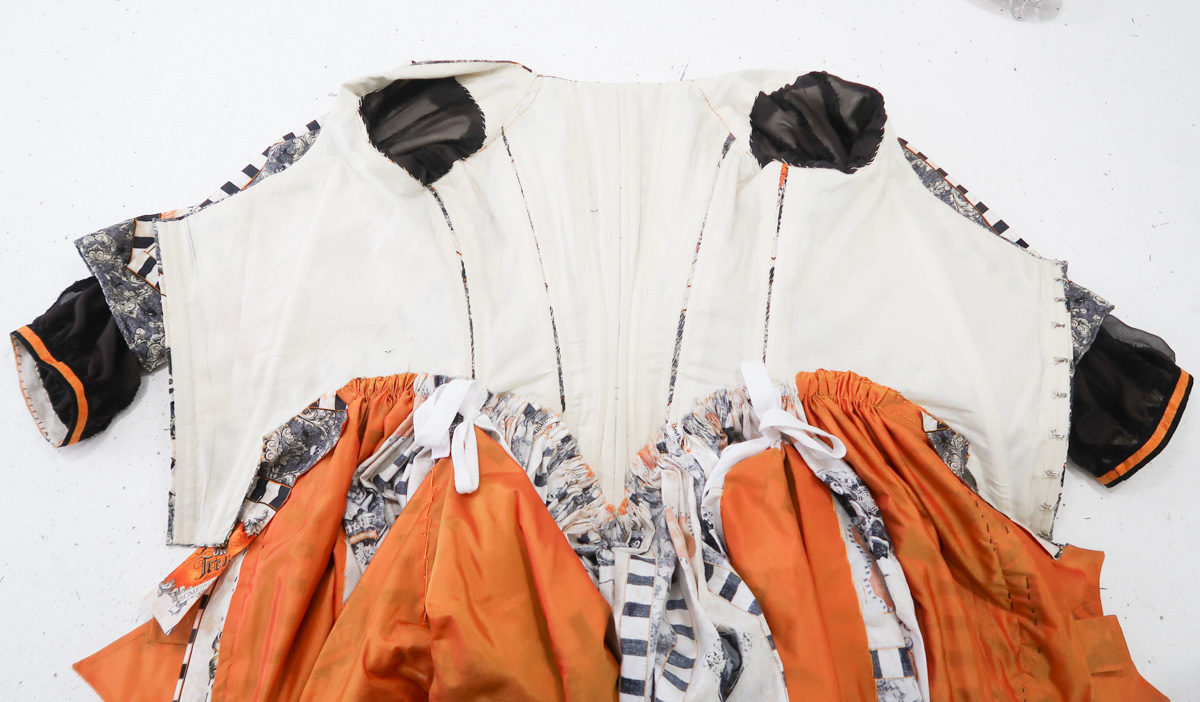
Here is how it looked from the outside.

halloween-42

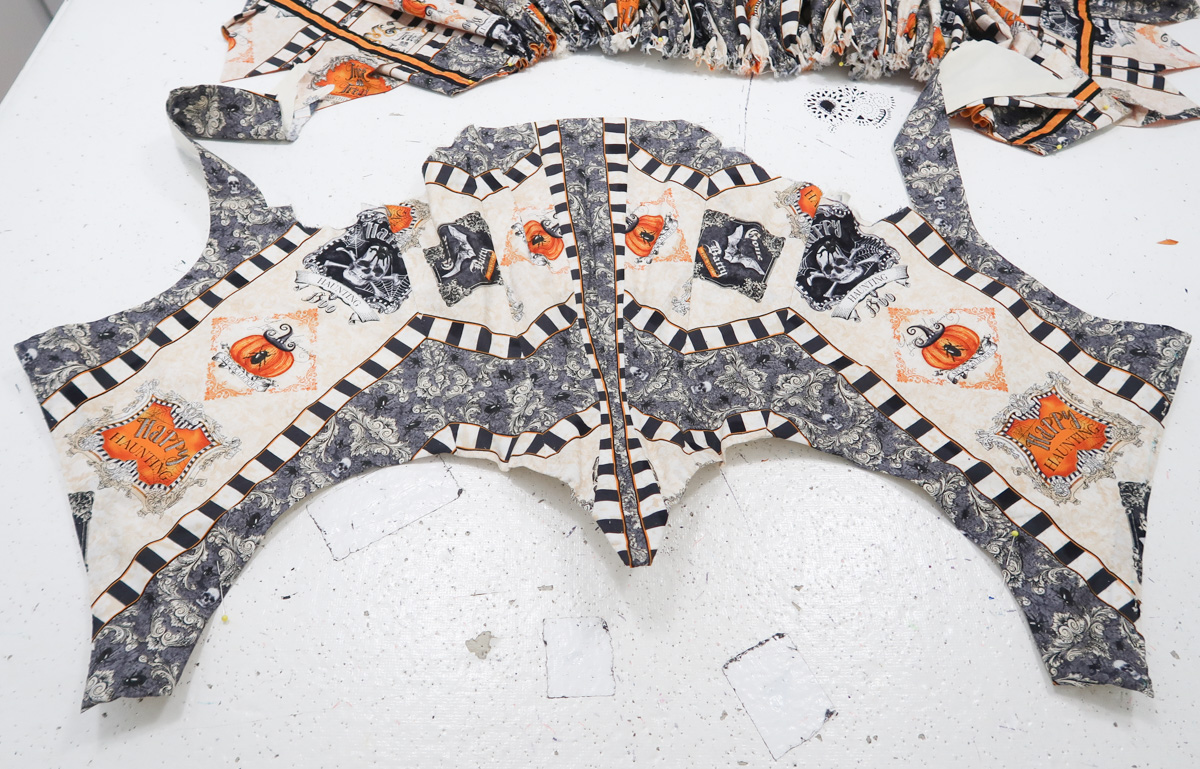
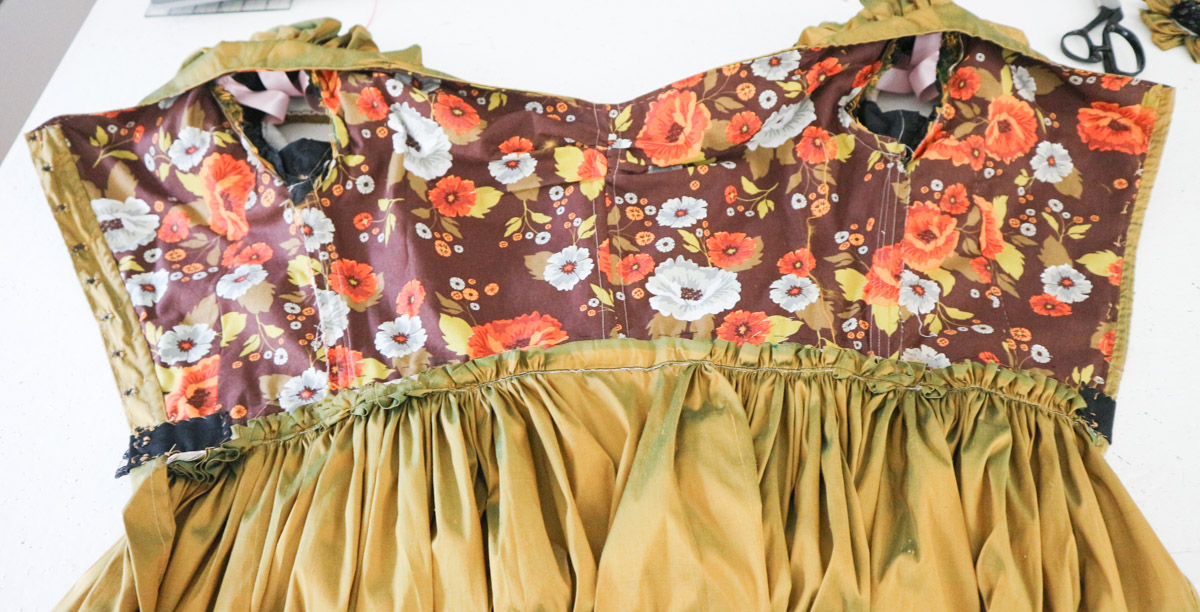
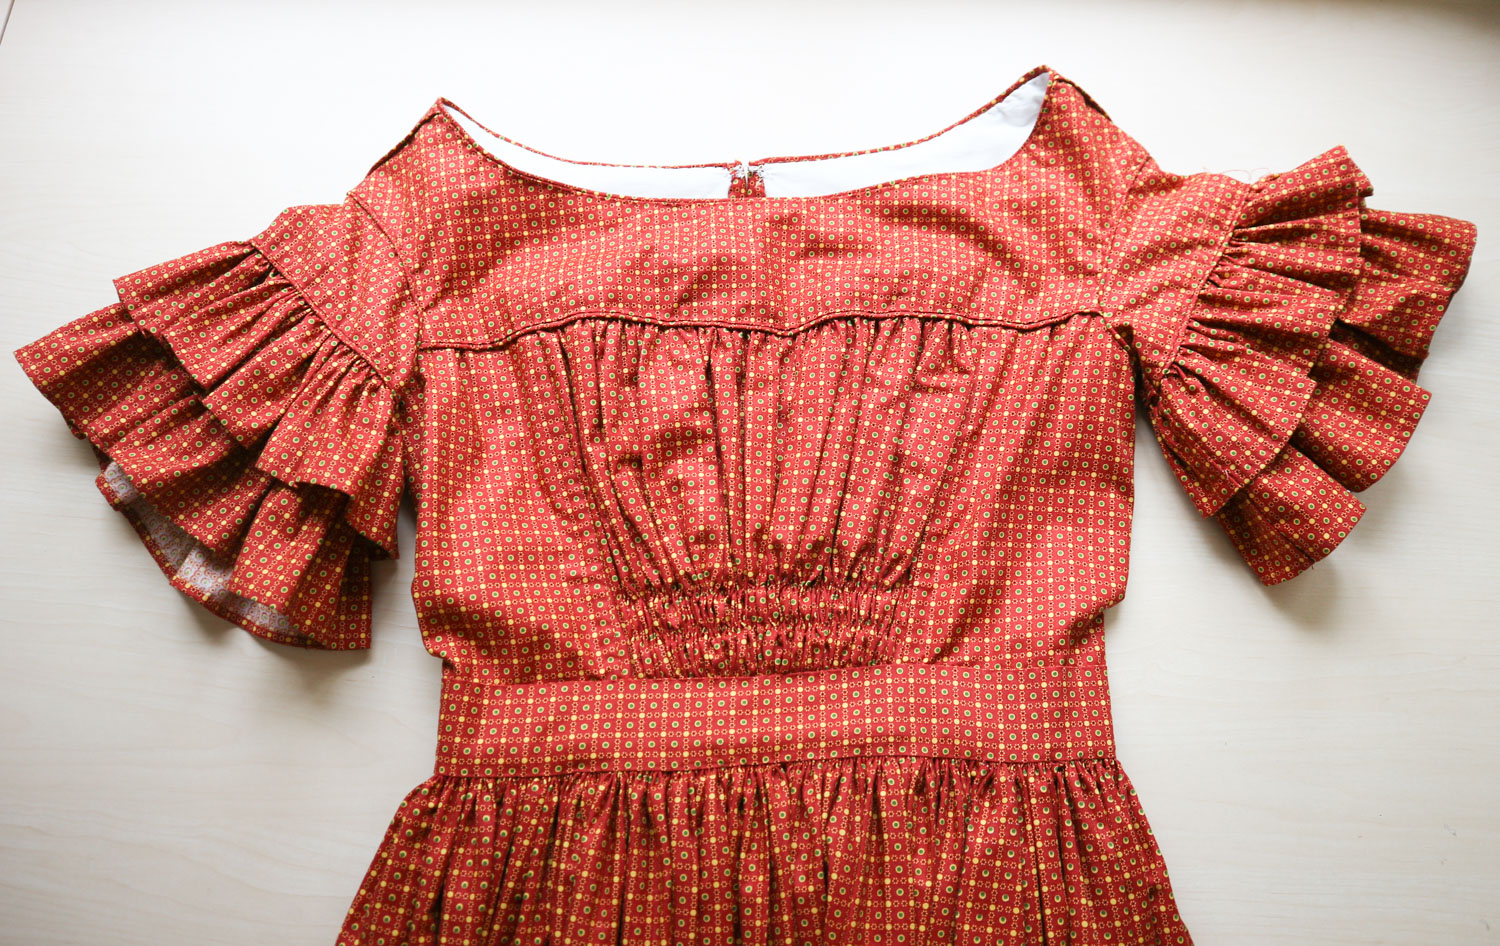
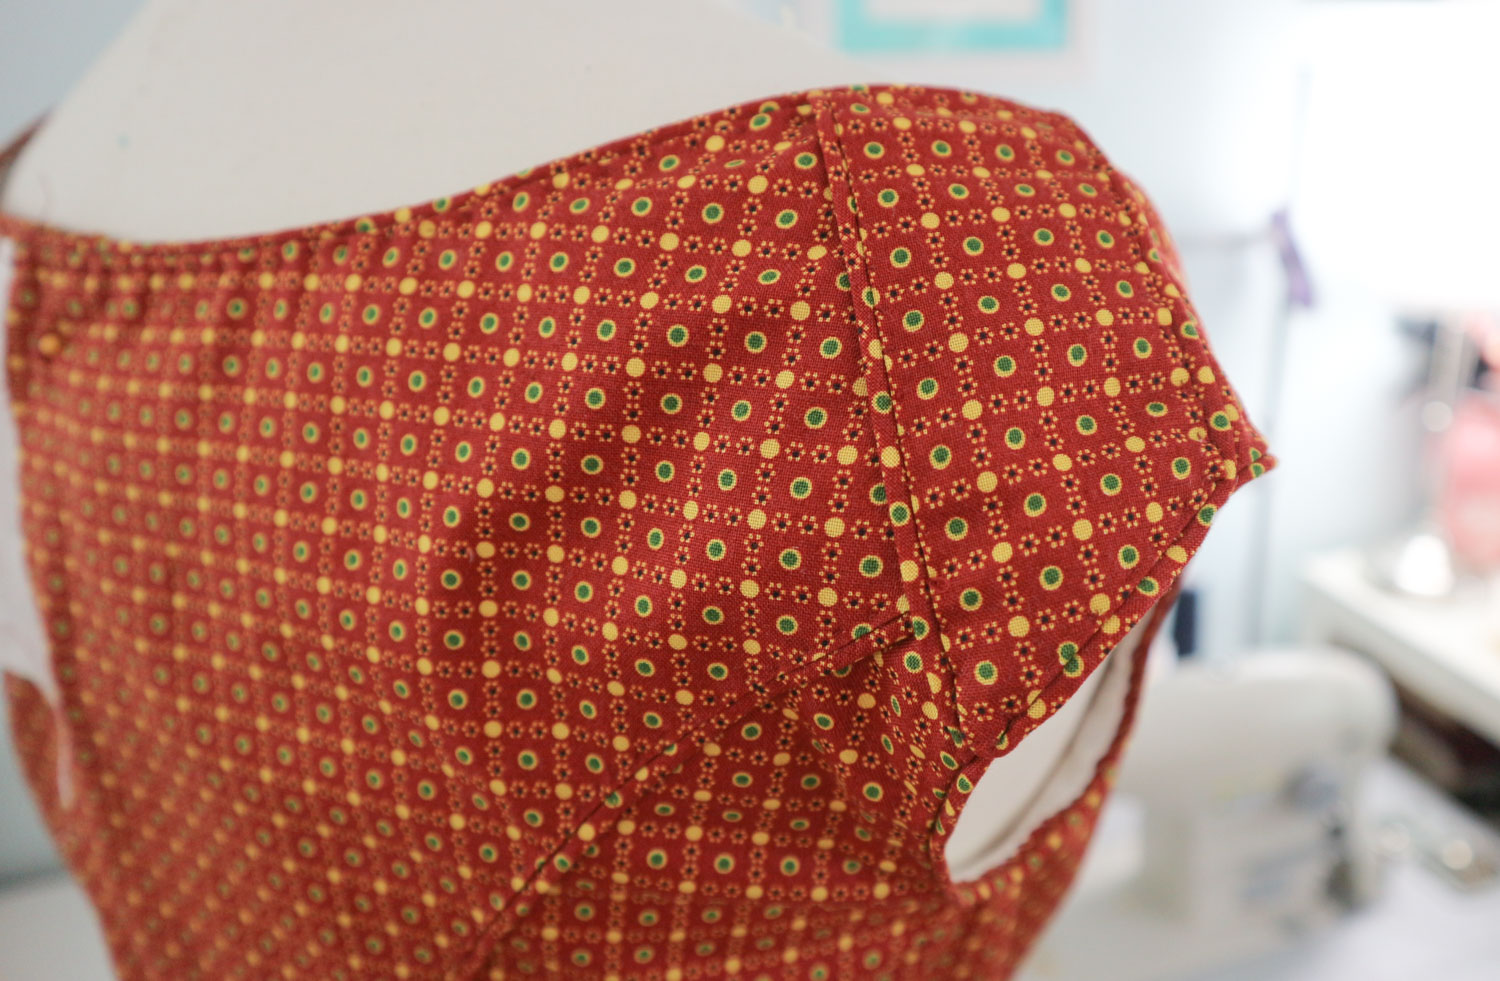
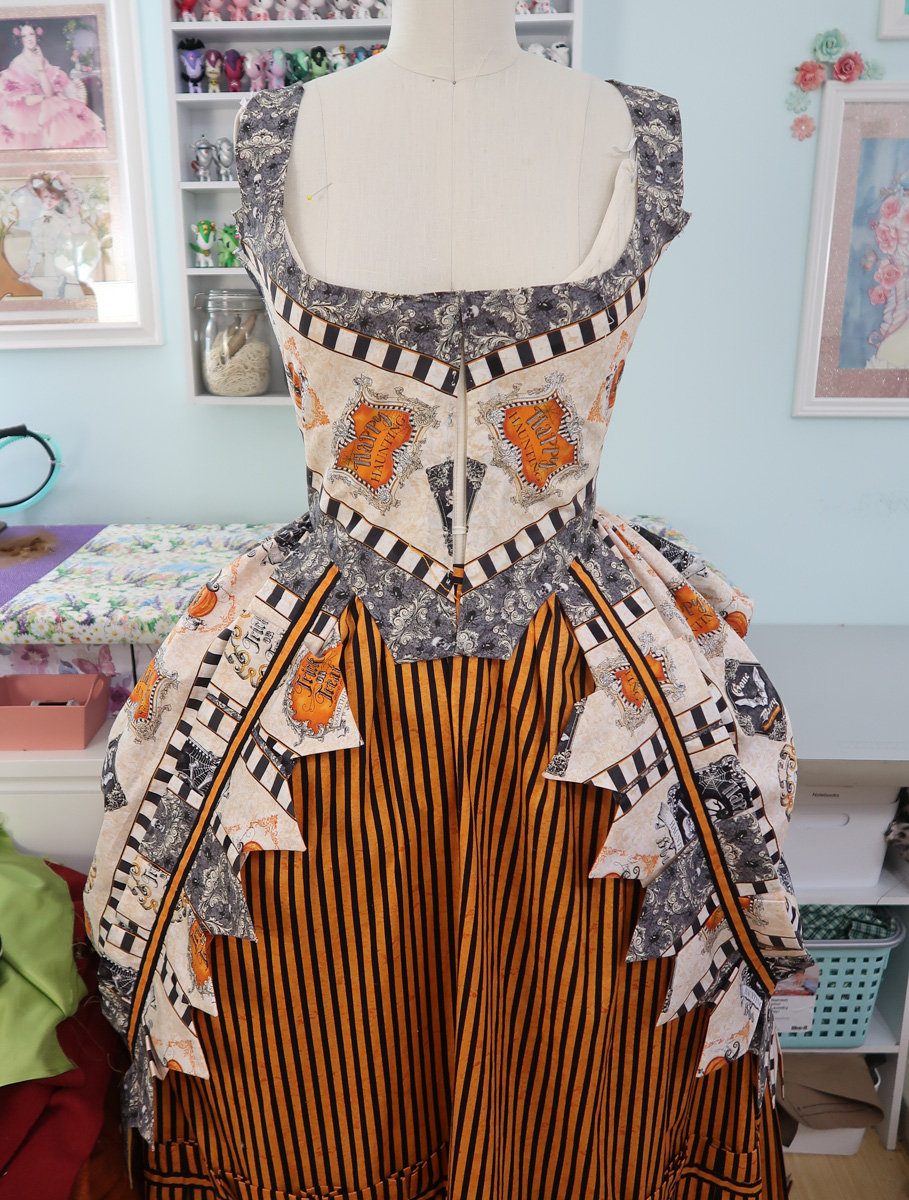
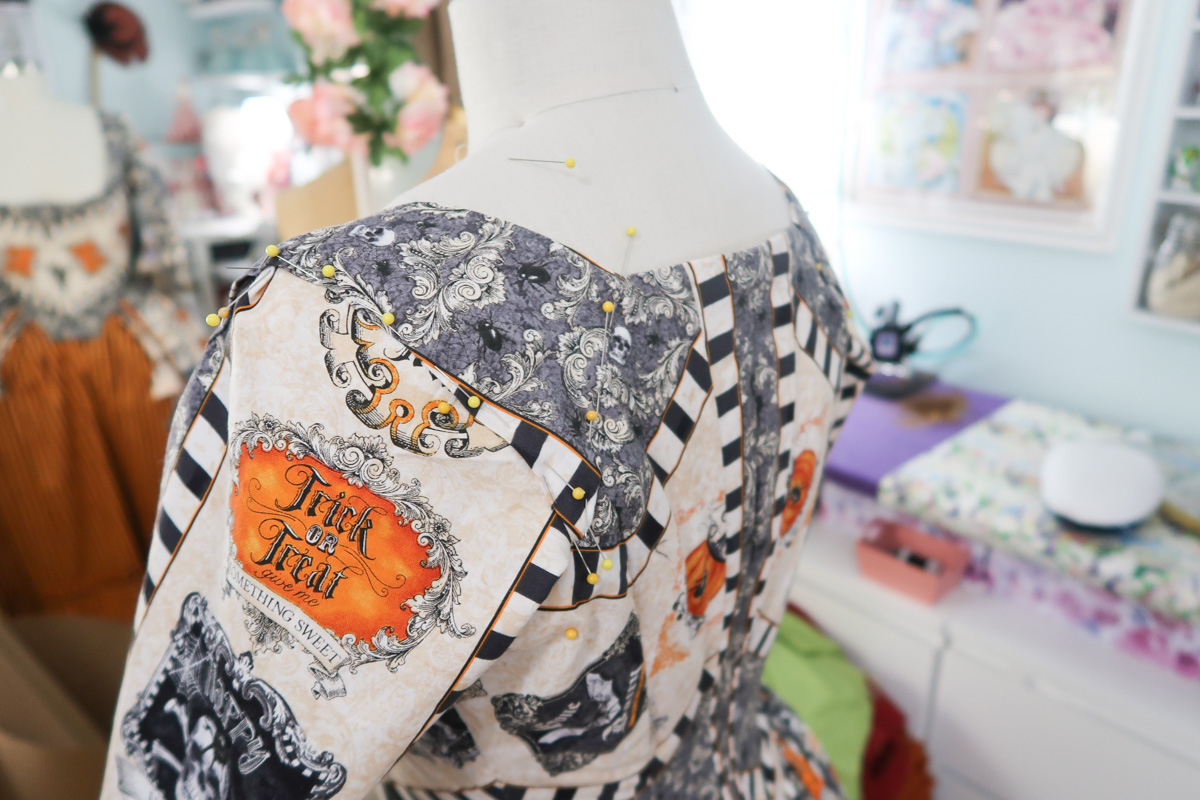
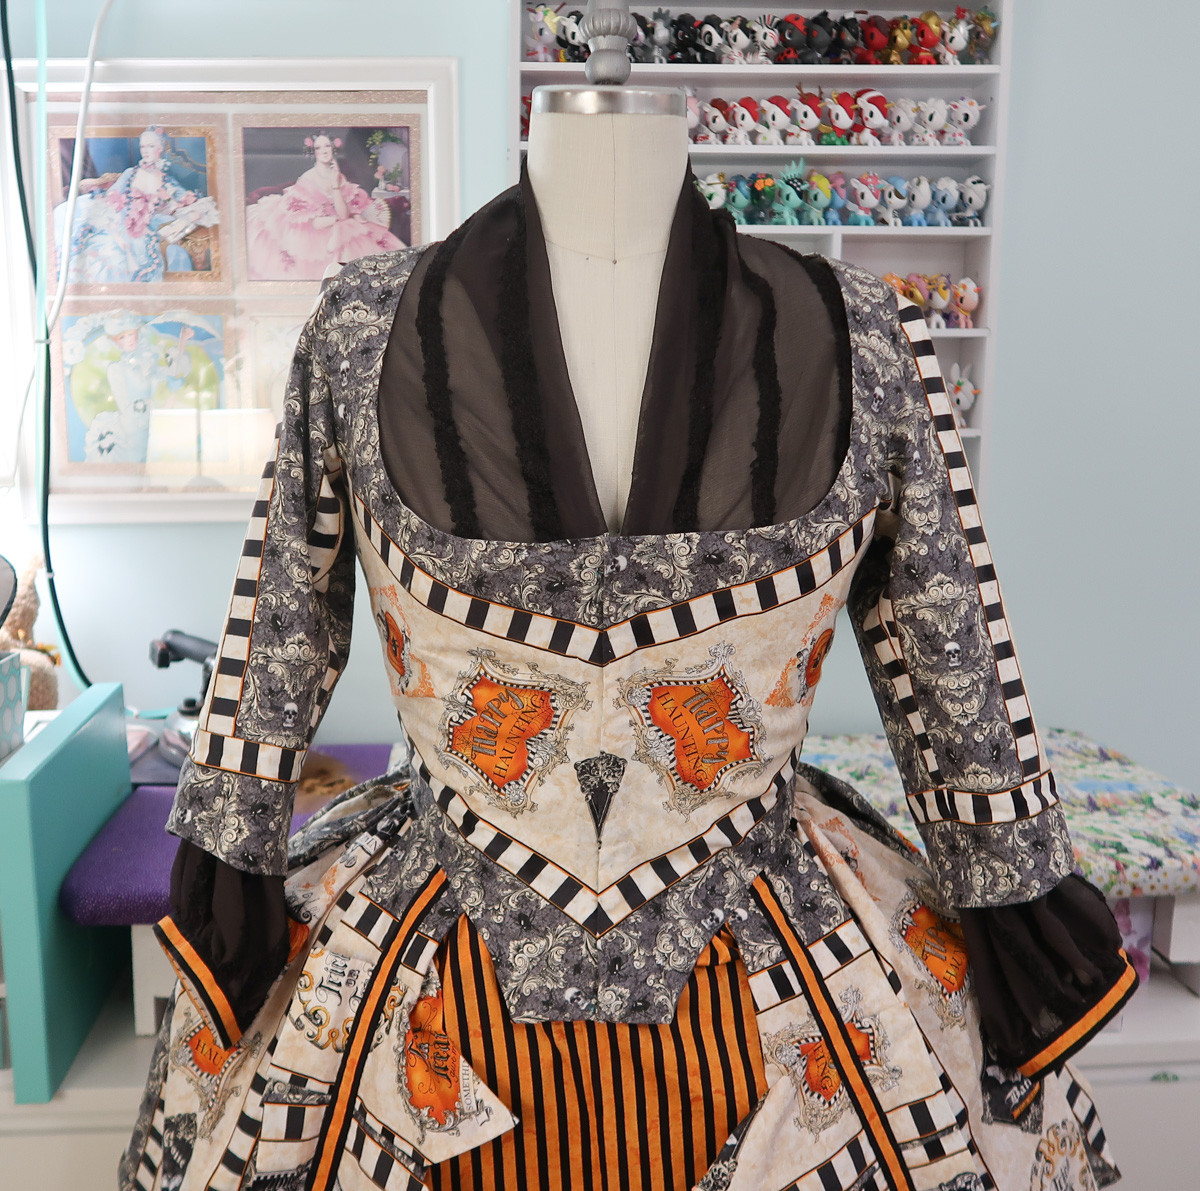
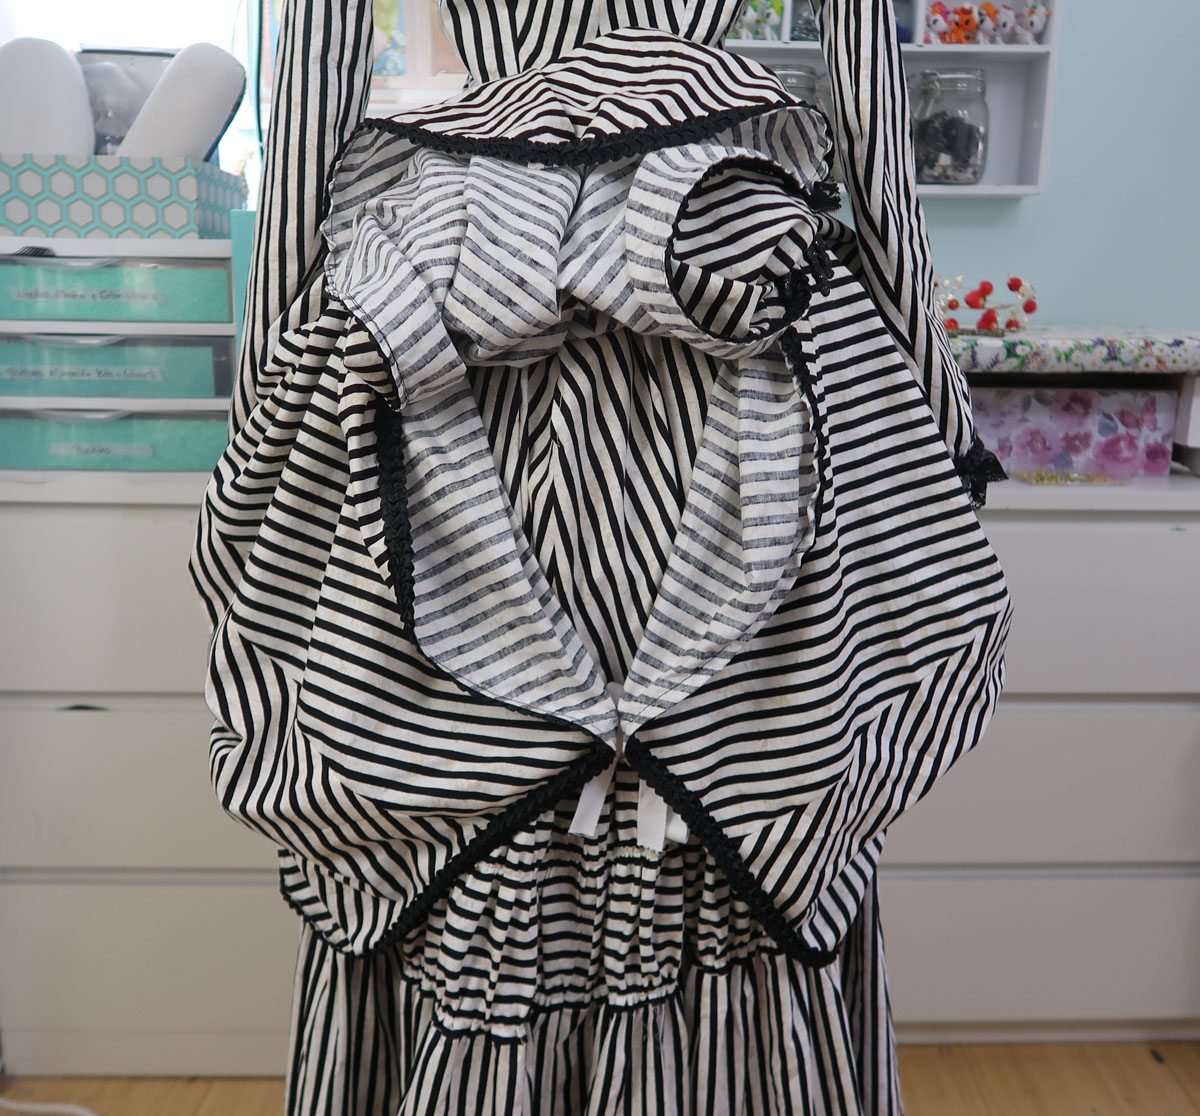
And on my dress form! I’m so pleased with the print placement at the front. And how the strap was cut so it seamlessly blends in with the top stripe of the bodice – that was very intentional, and I think it looks very good!

halloween-37

halloween-38

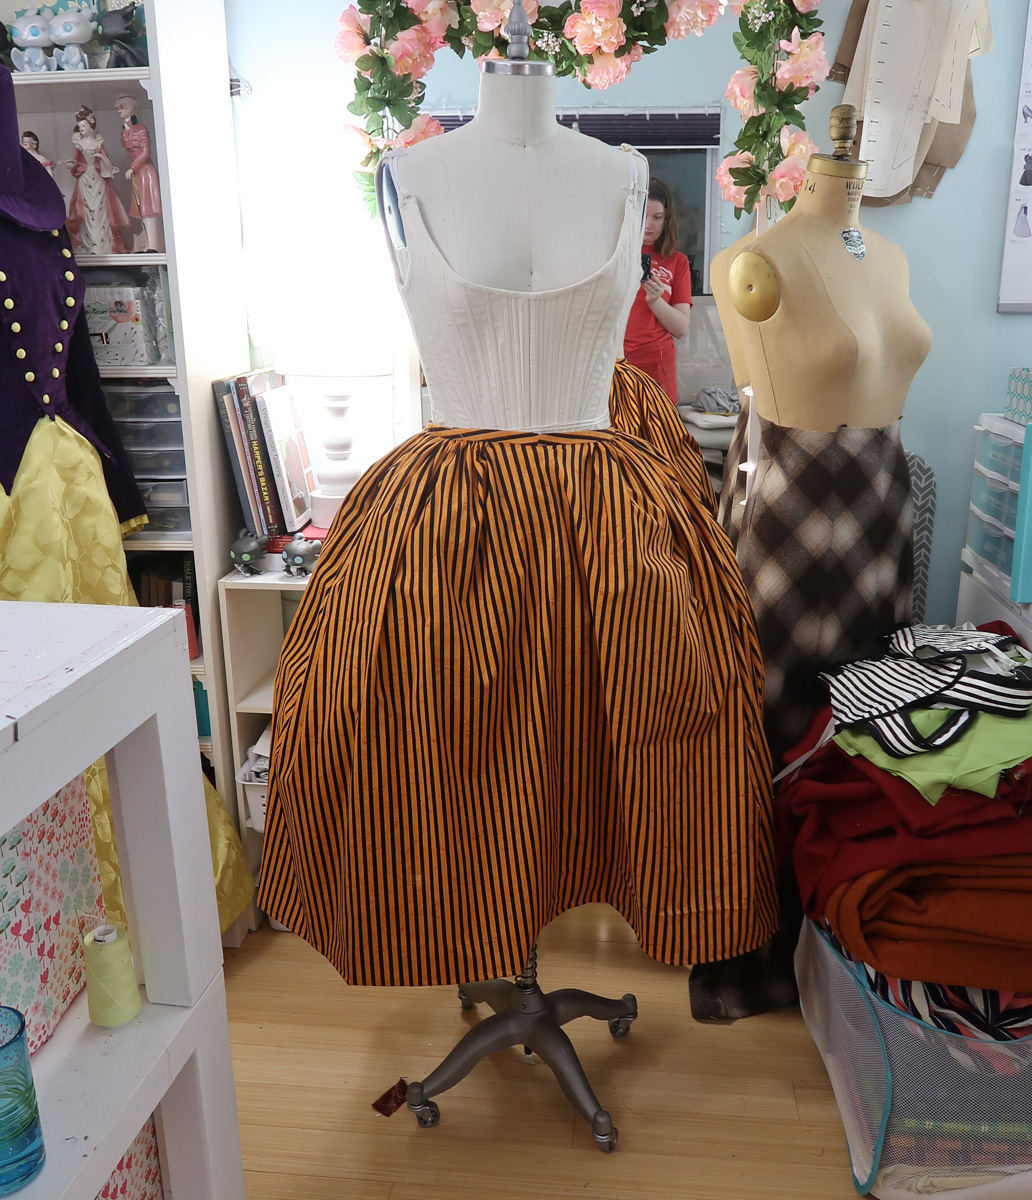
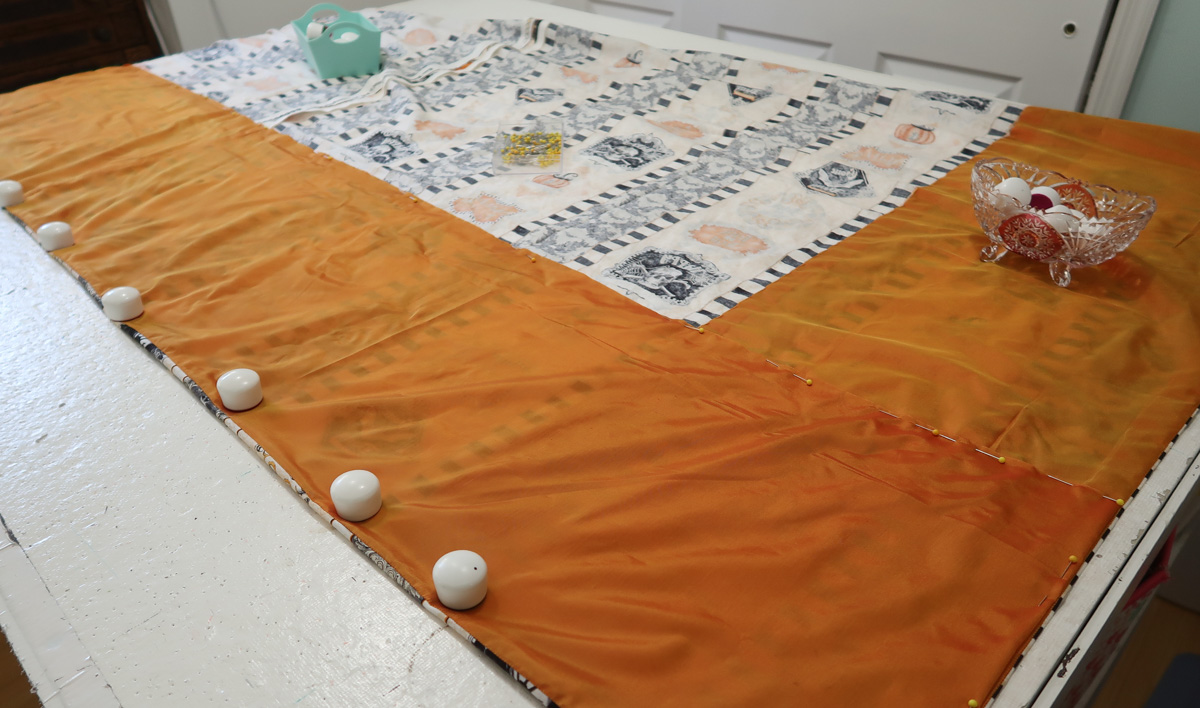
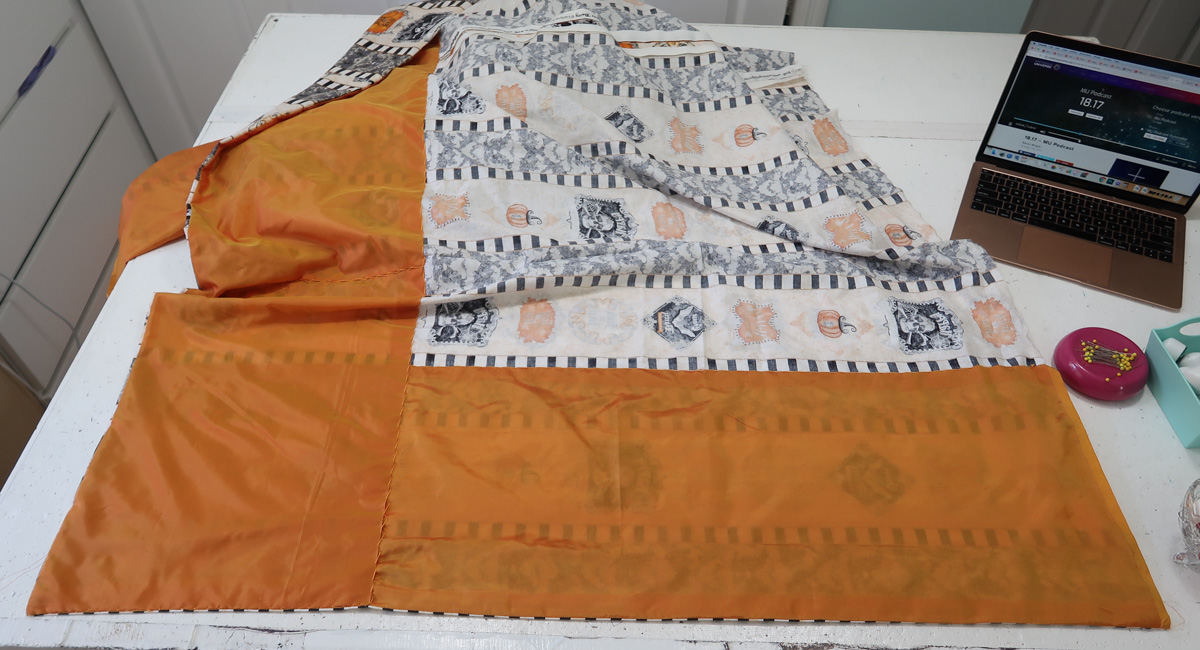
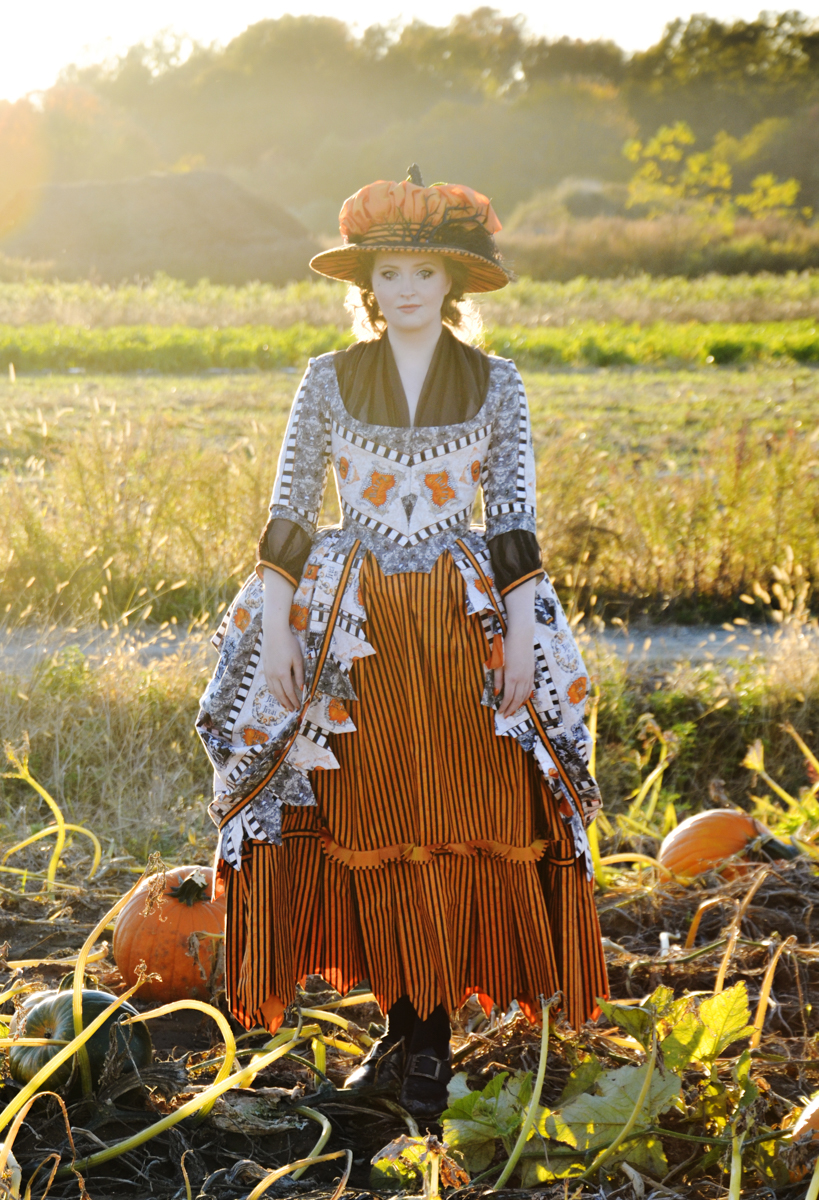
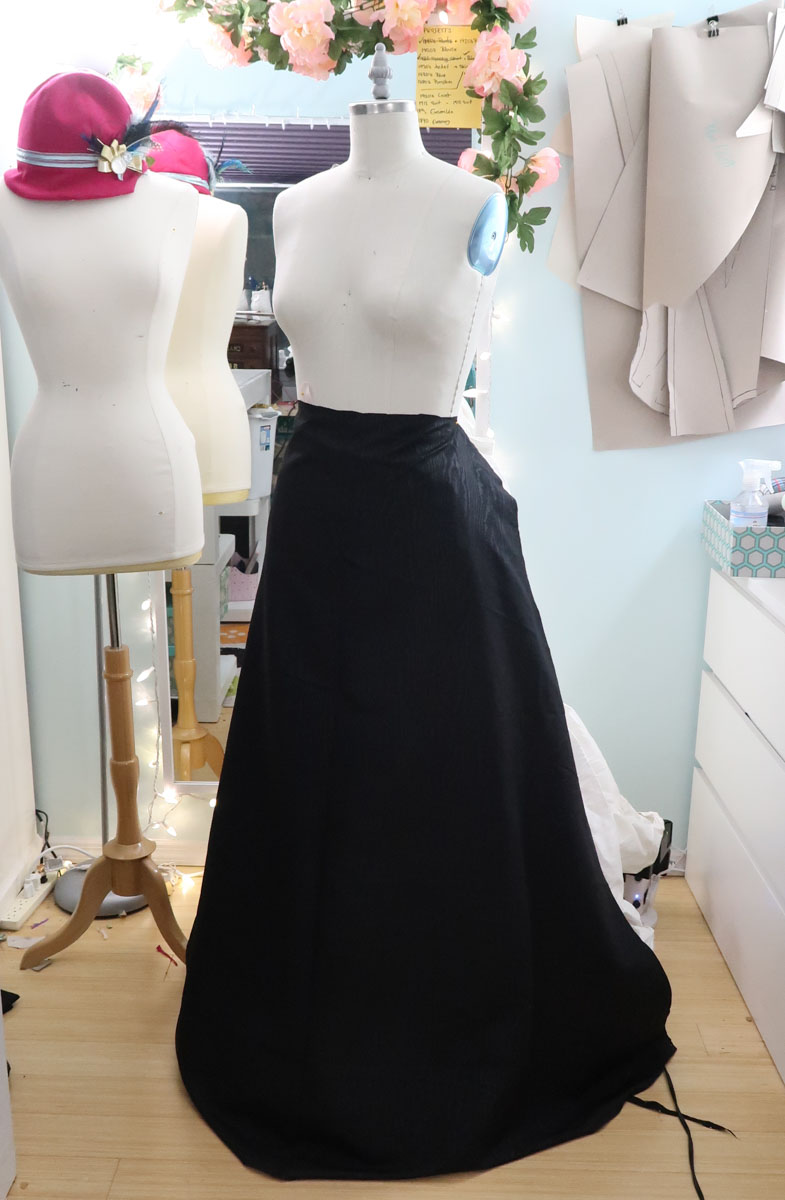
You can probably tell that the bodice is worn over a coordinating skirt in the photos above. So let’s switch focus for a moment and go through the process of making that.

I didn’t take many photos of making the upper half of this skirt. But it’s basically four rectangles with sloped sides that were stitched together. Two panels make up the front, and two make up the back. I left the center back seam completely open to make it easier to add the trim later on.

The top edge was gathered down to my waist measurement, then bound with bias binding. The binding extends past the back edge of the skirt to form ties.

halloween-18

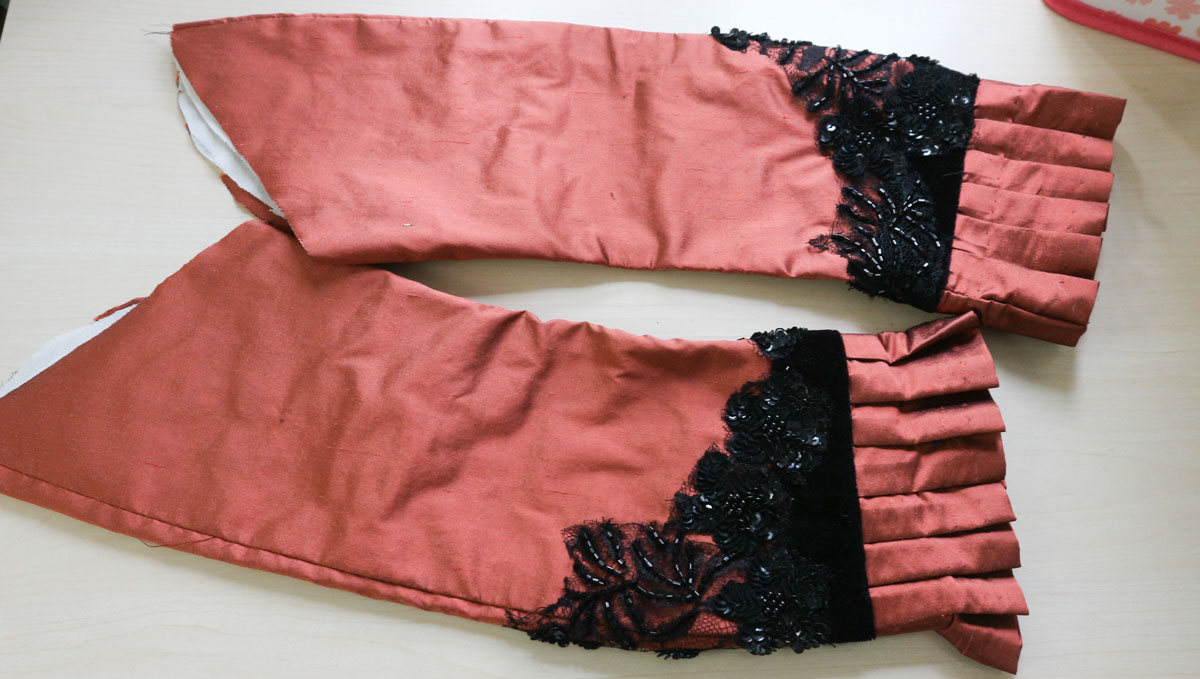
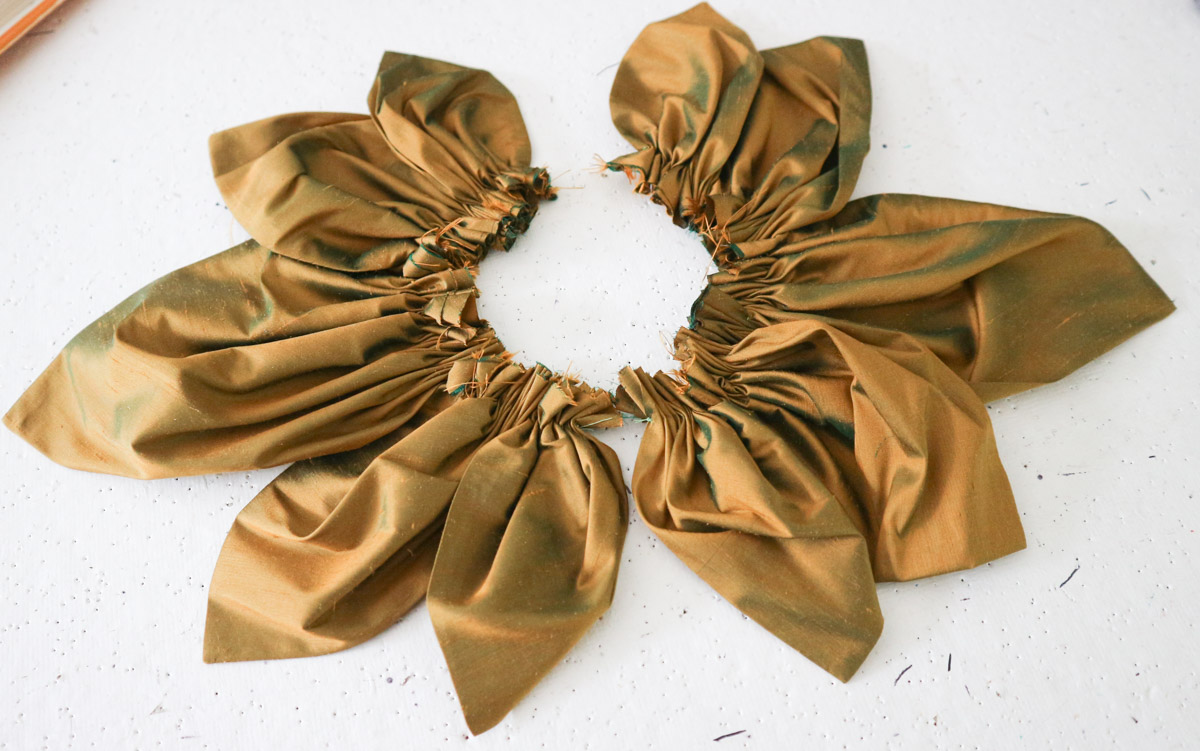
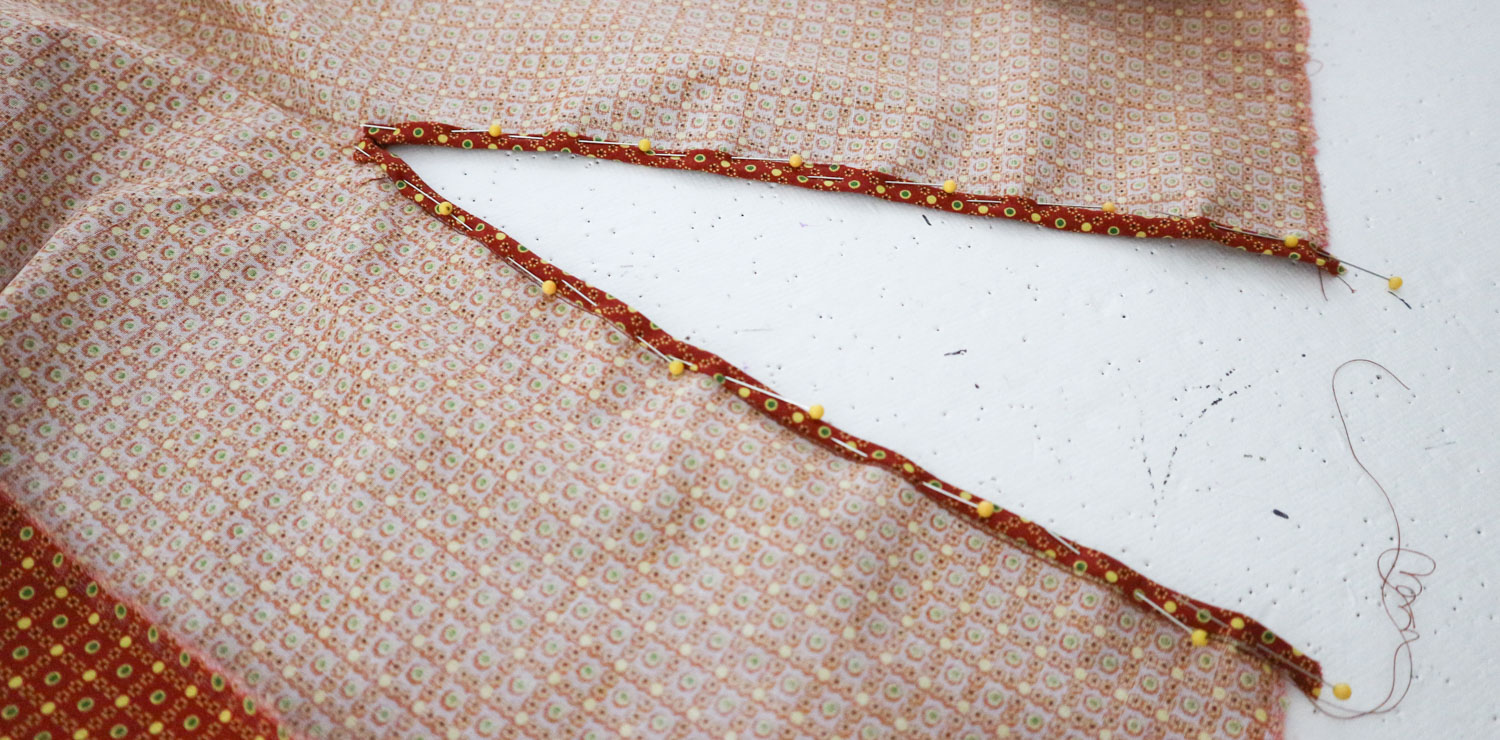
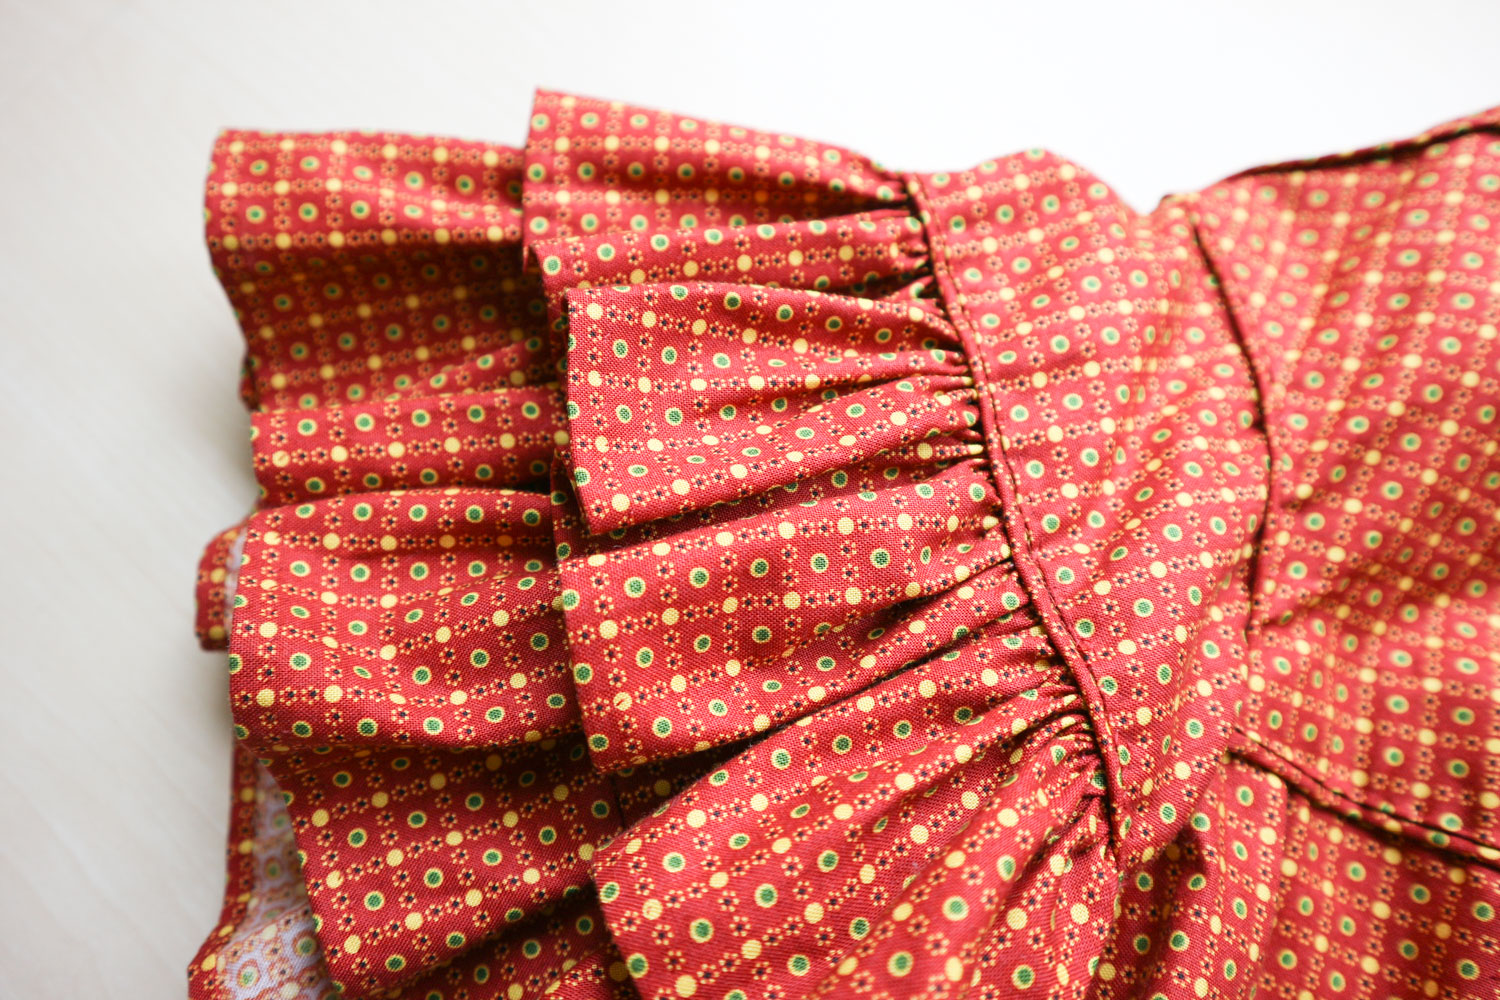
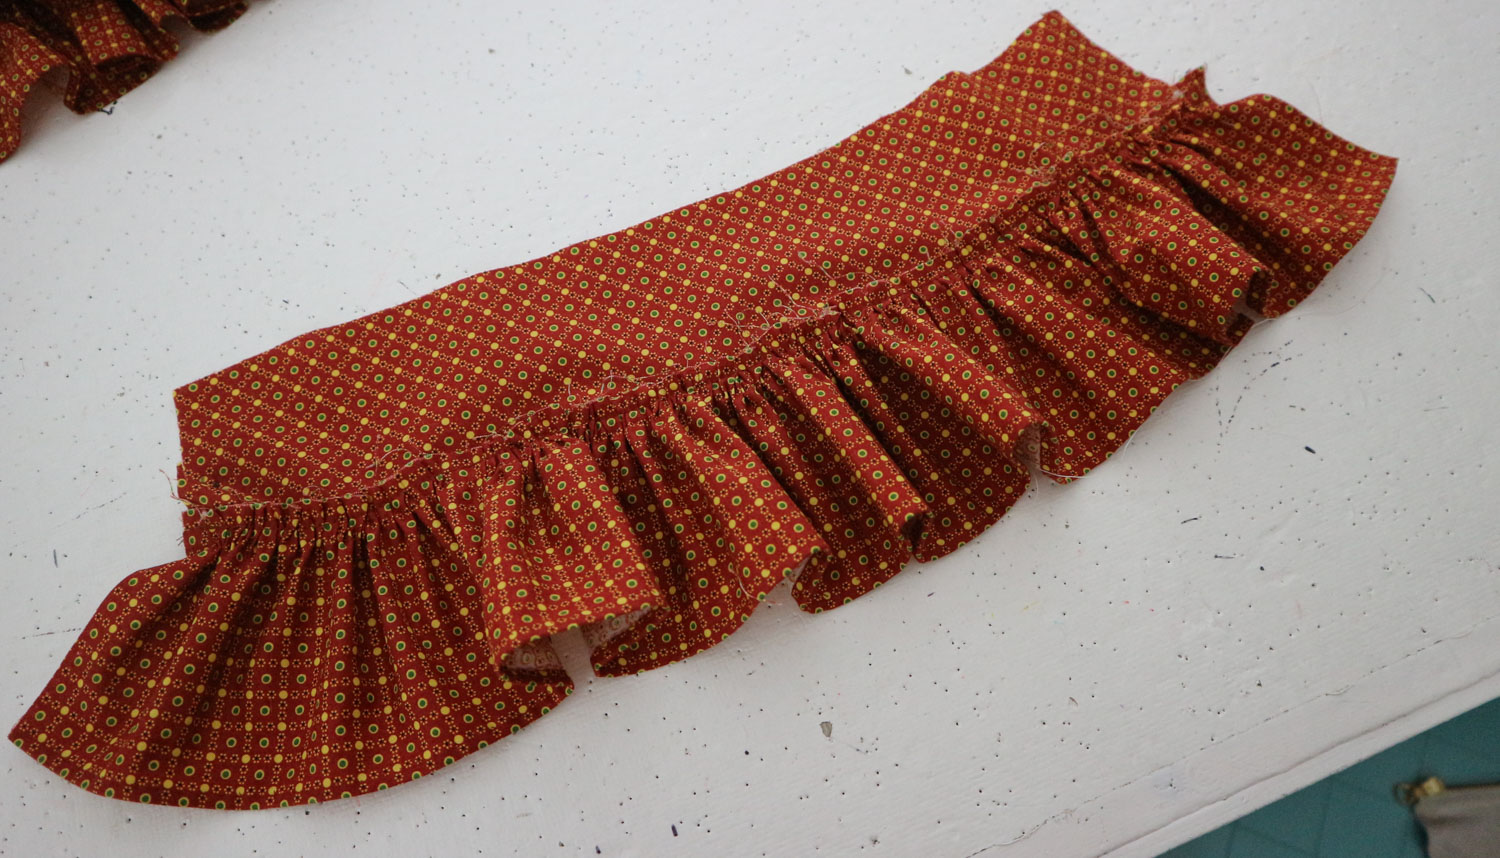
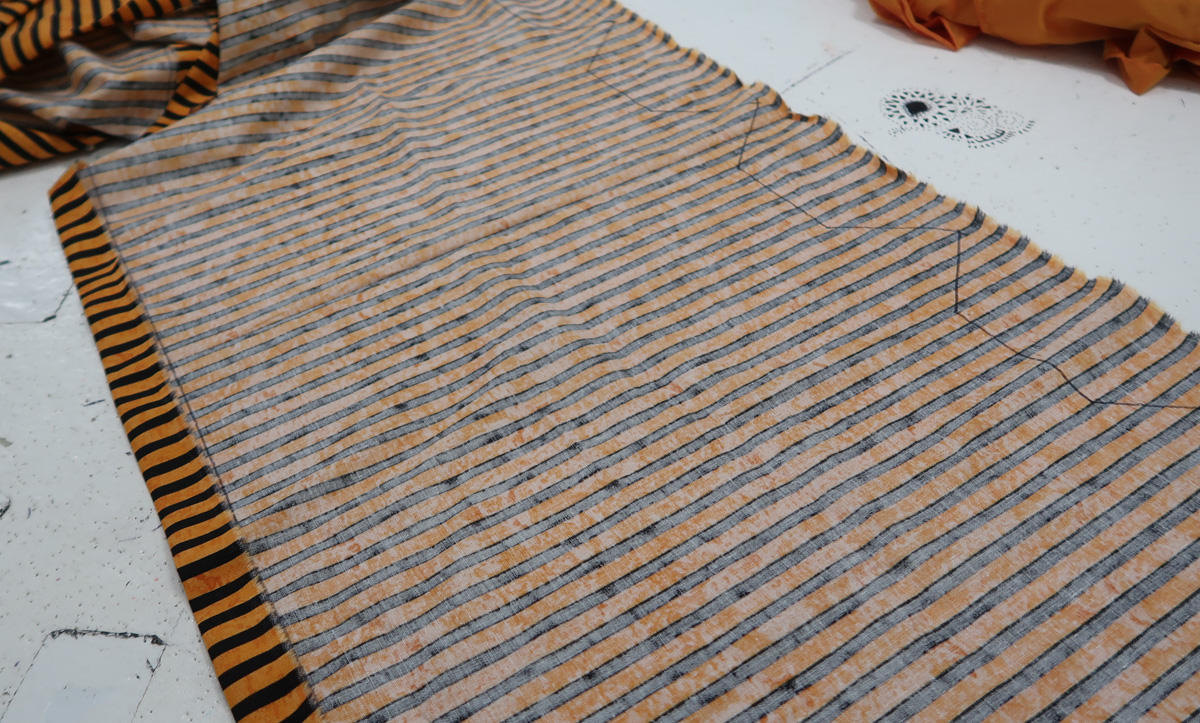
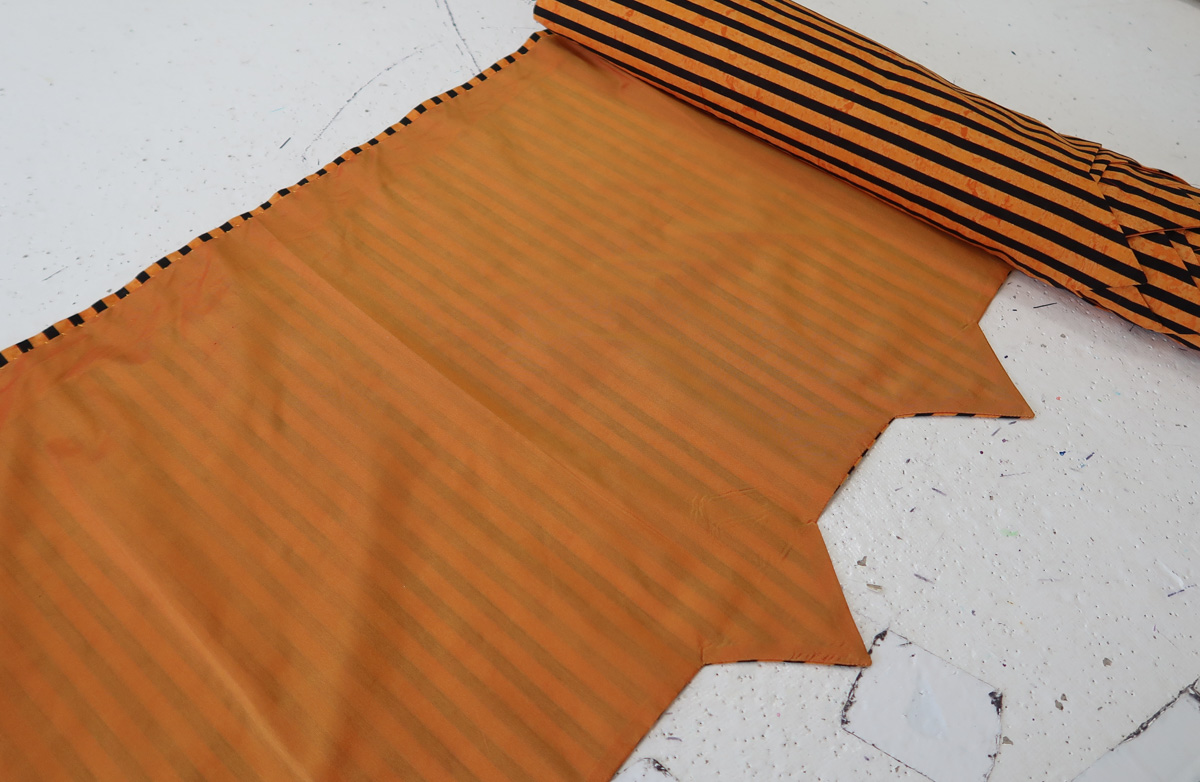
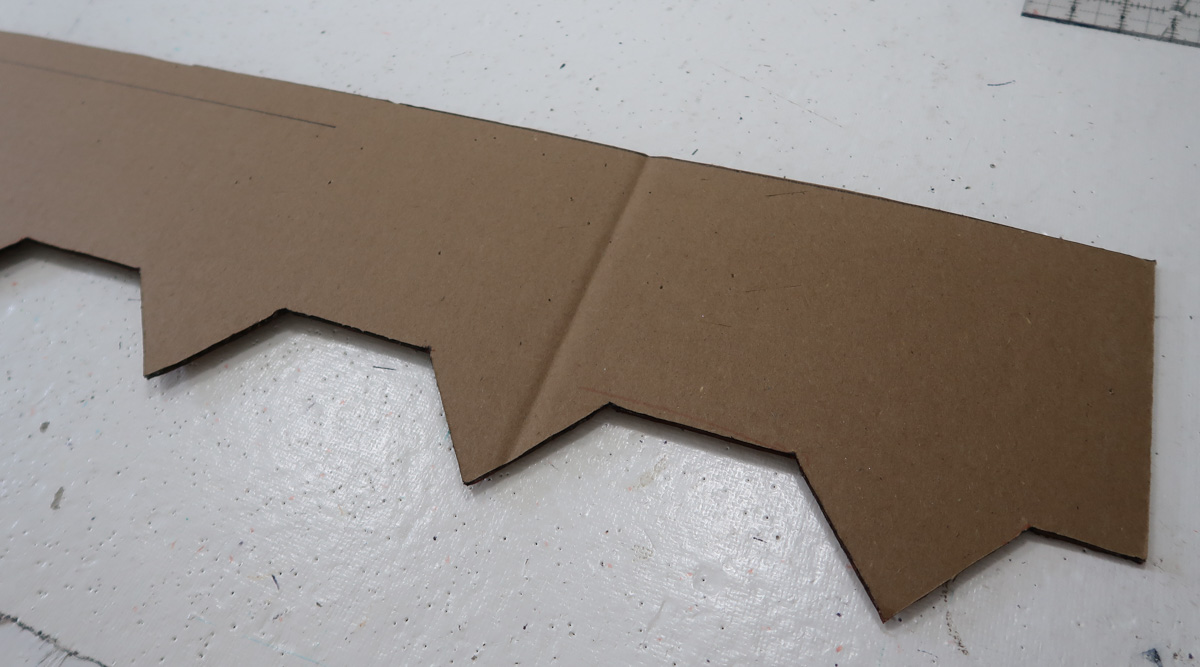
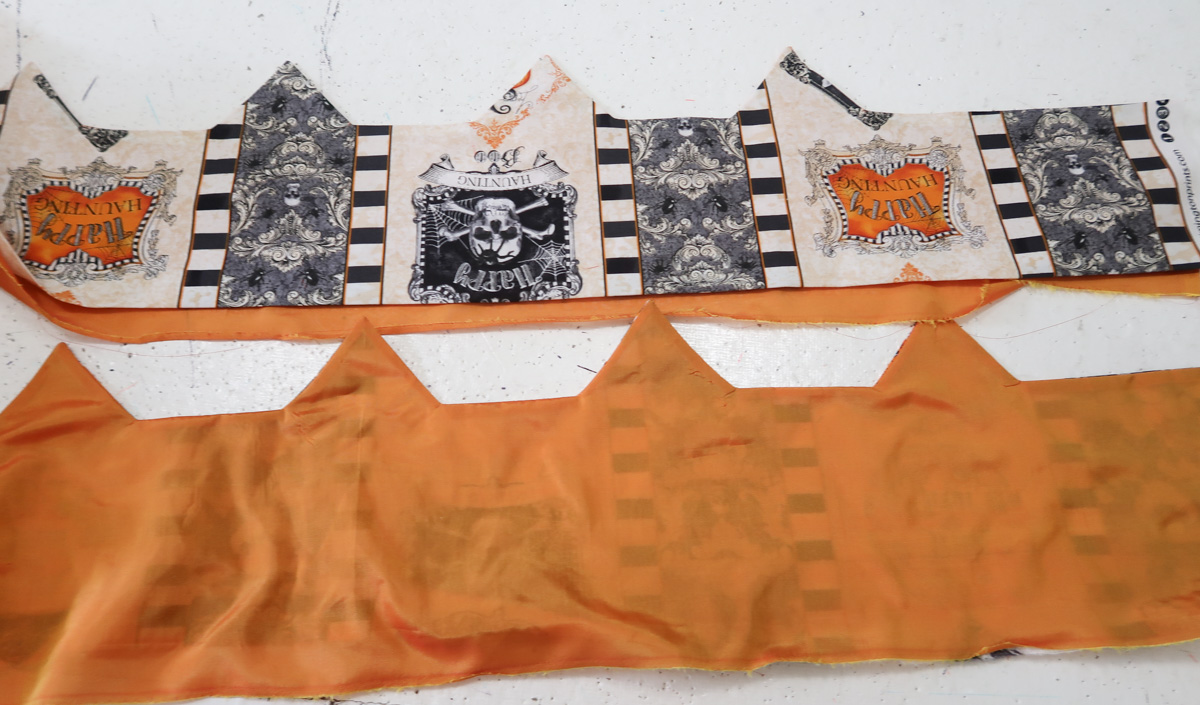
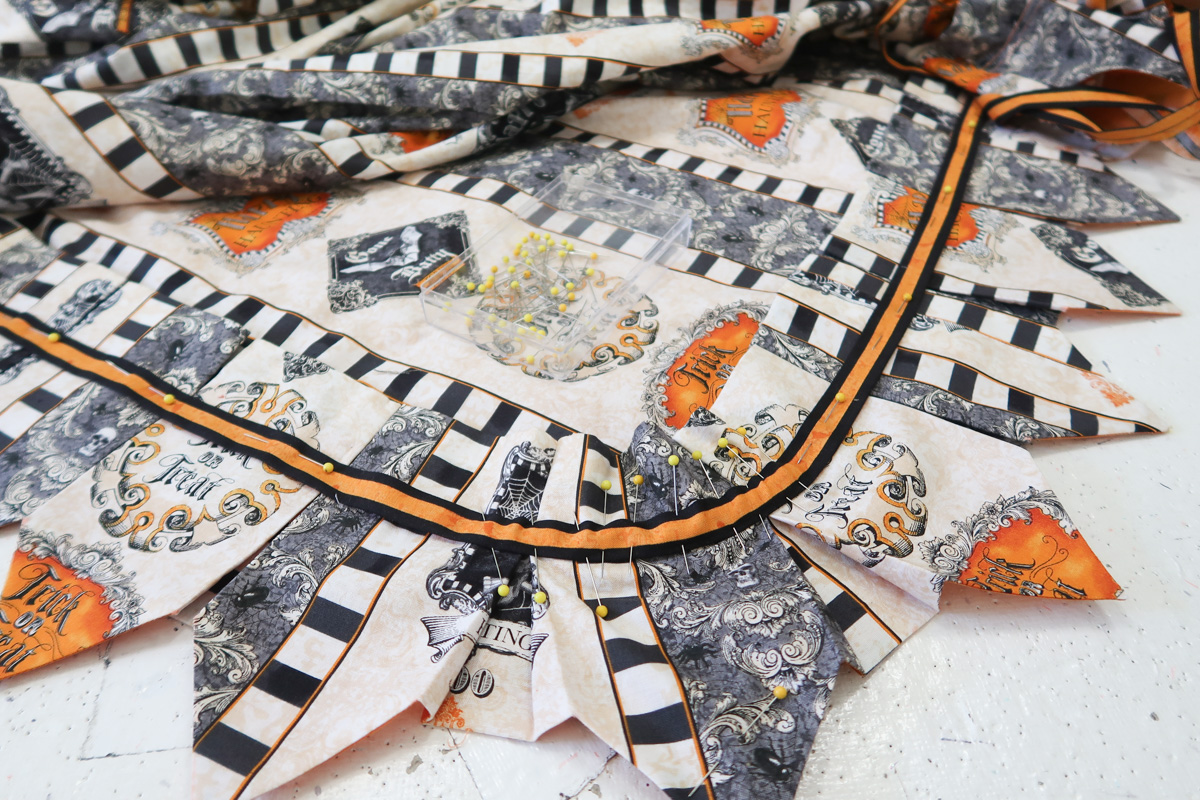
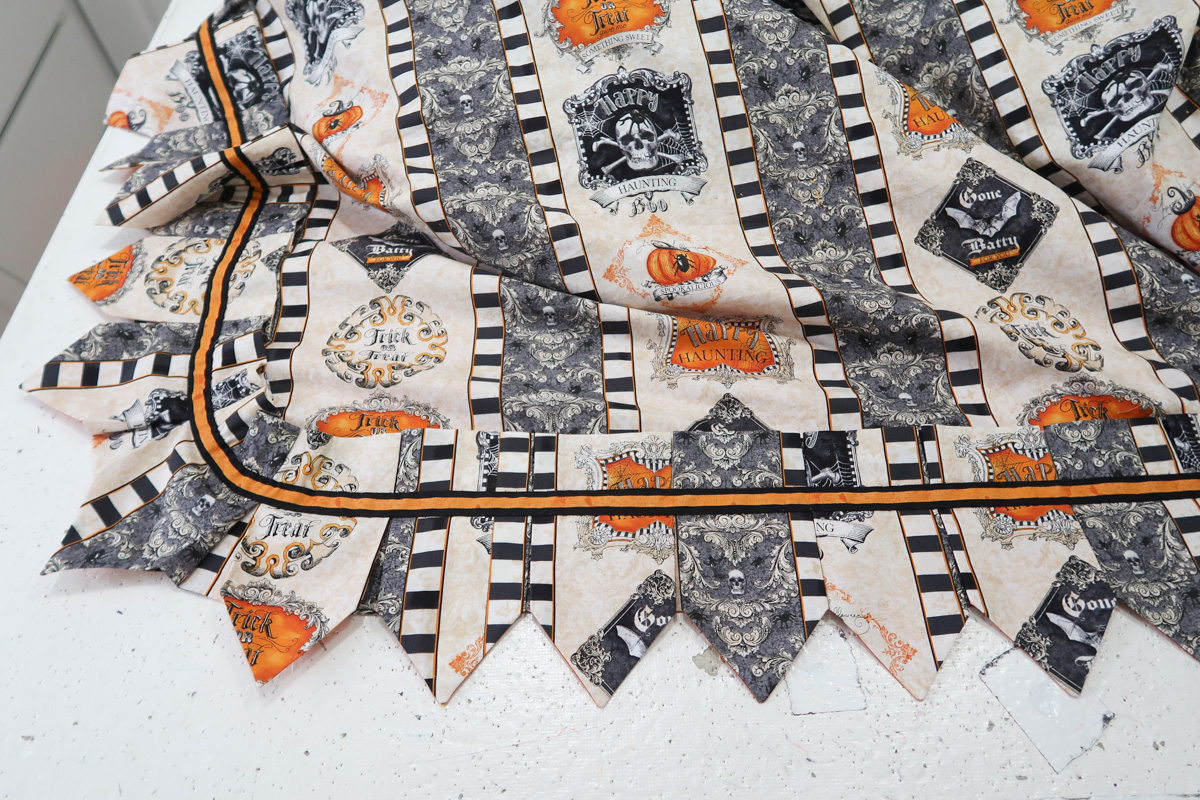
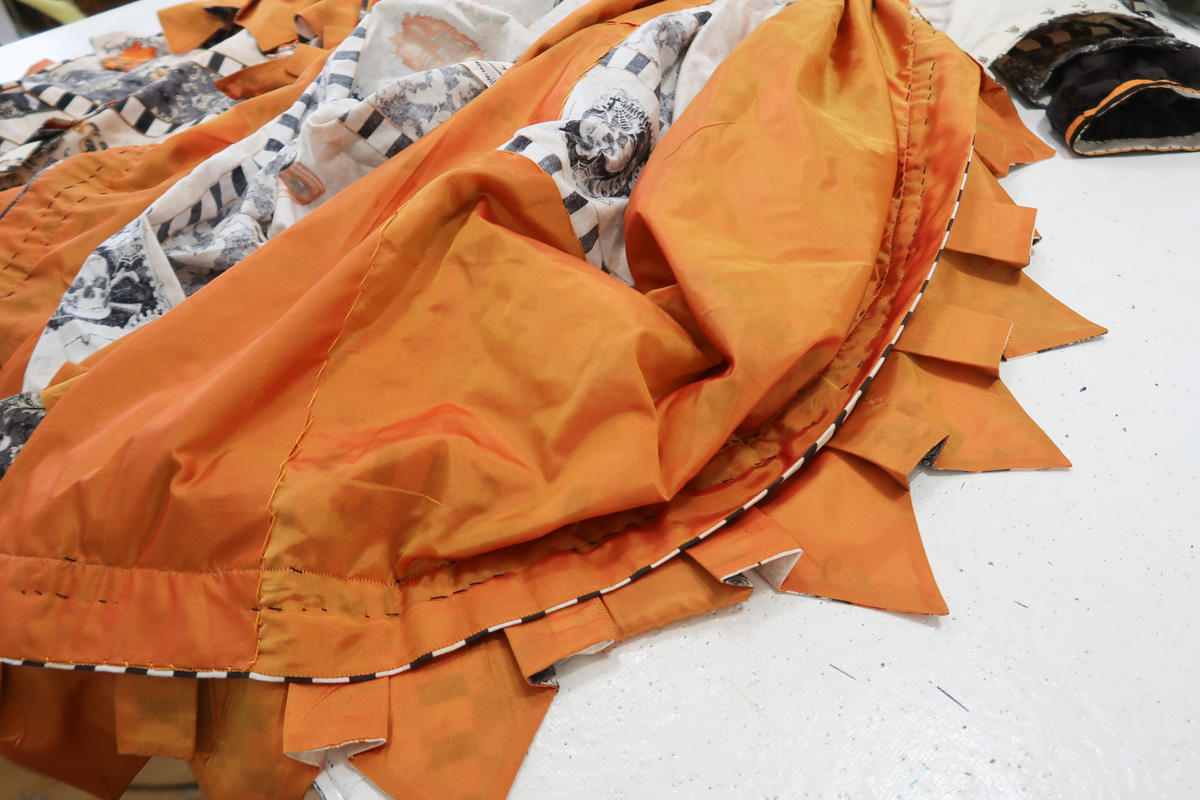
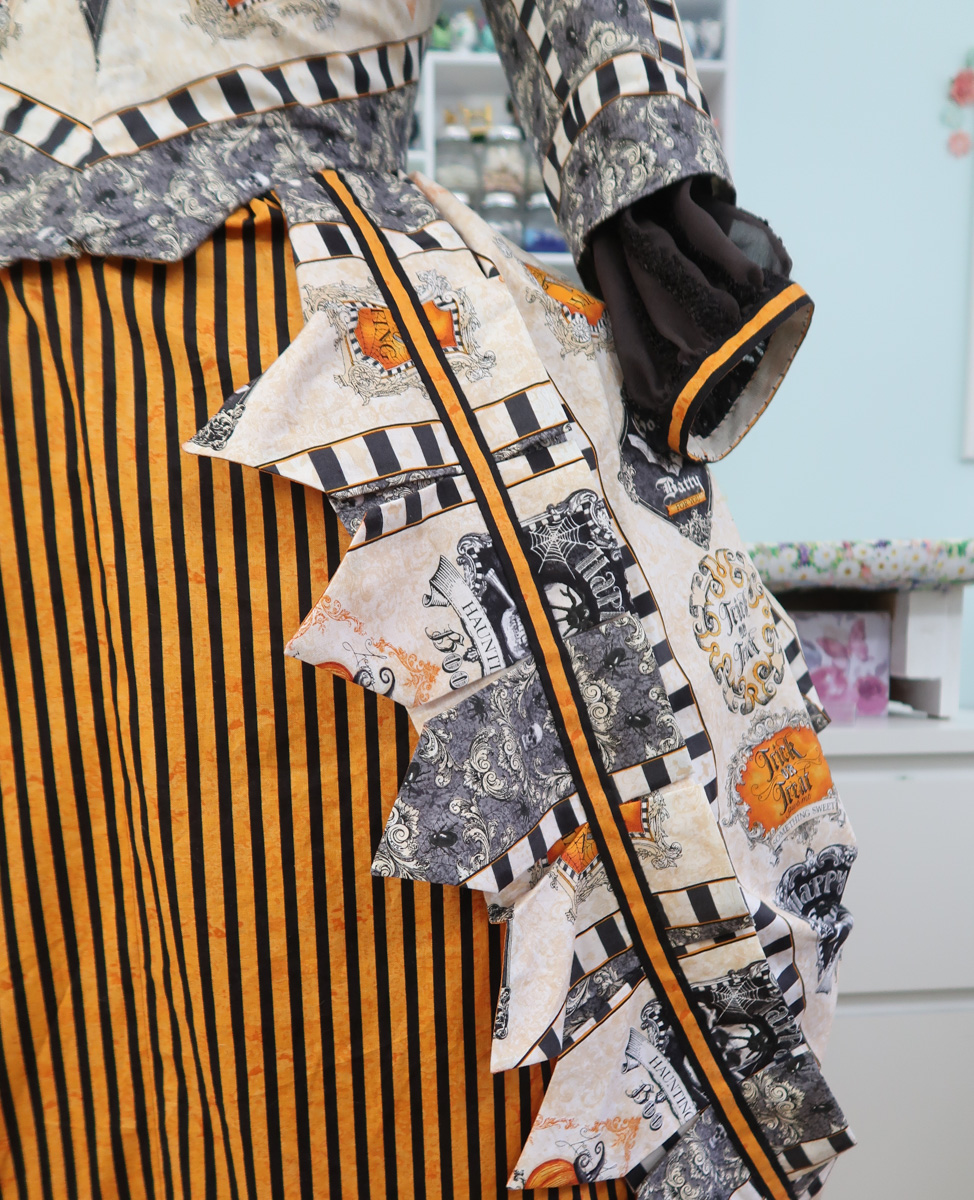
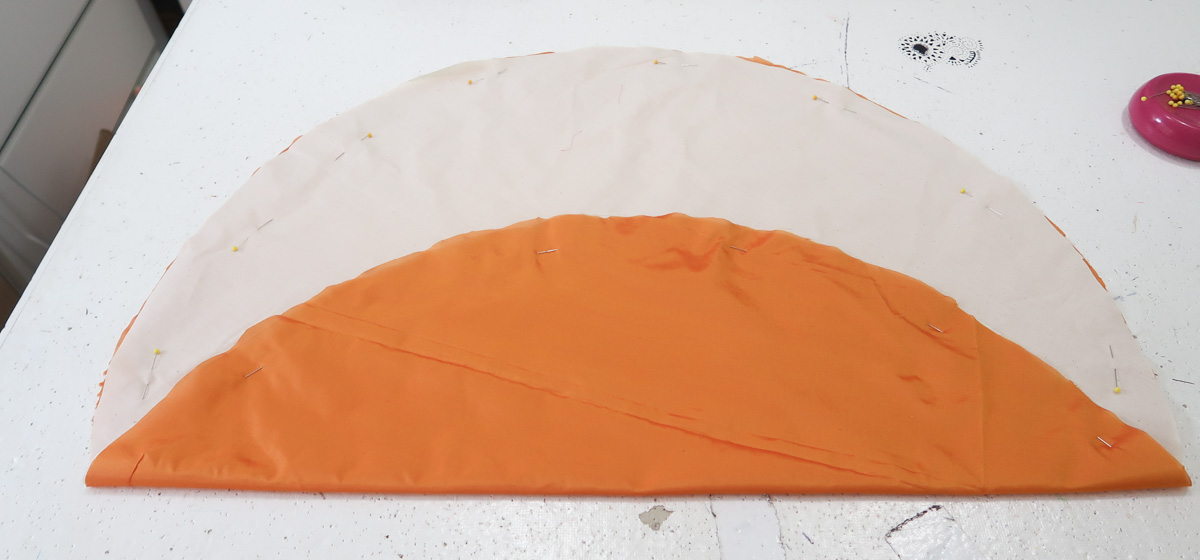
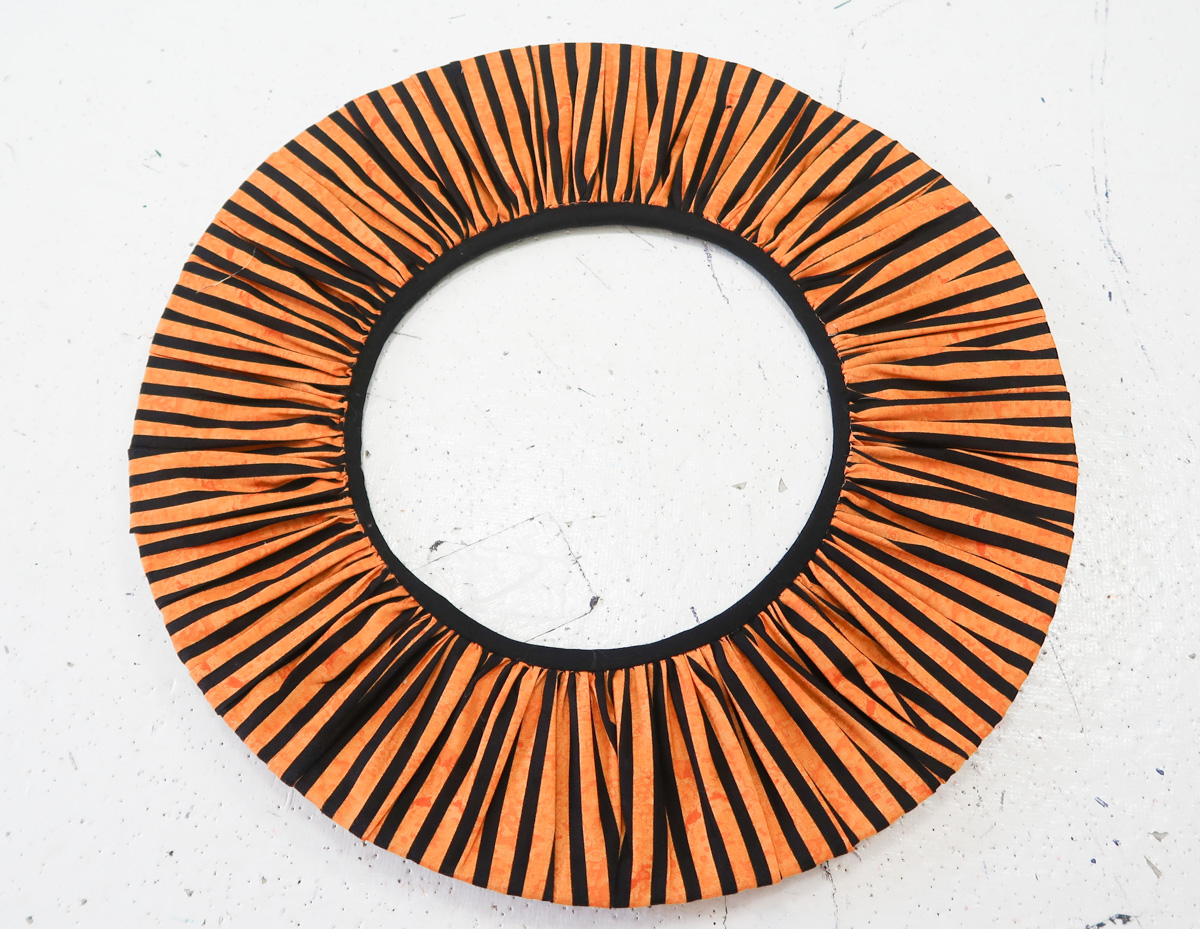
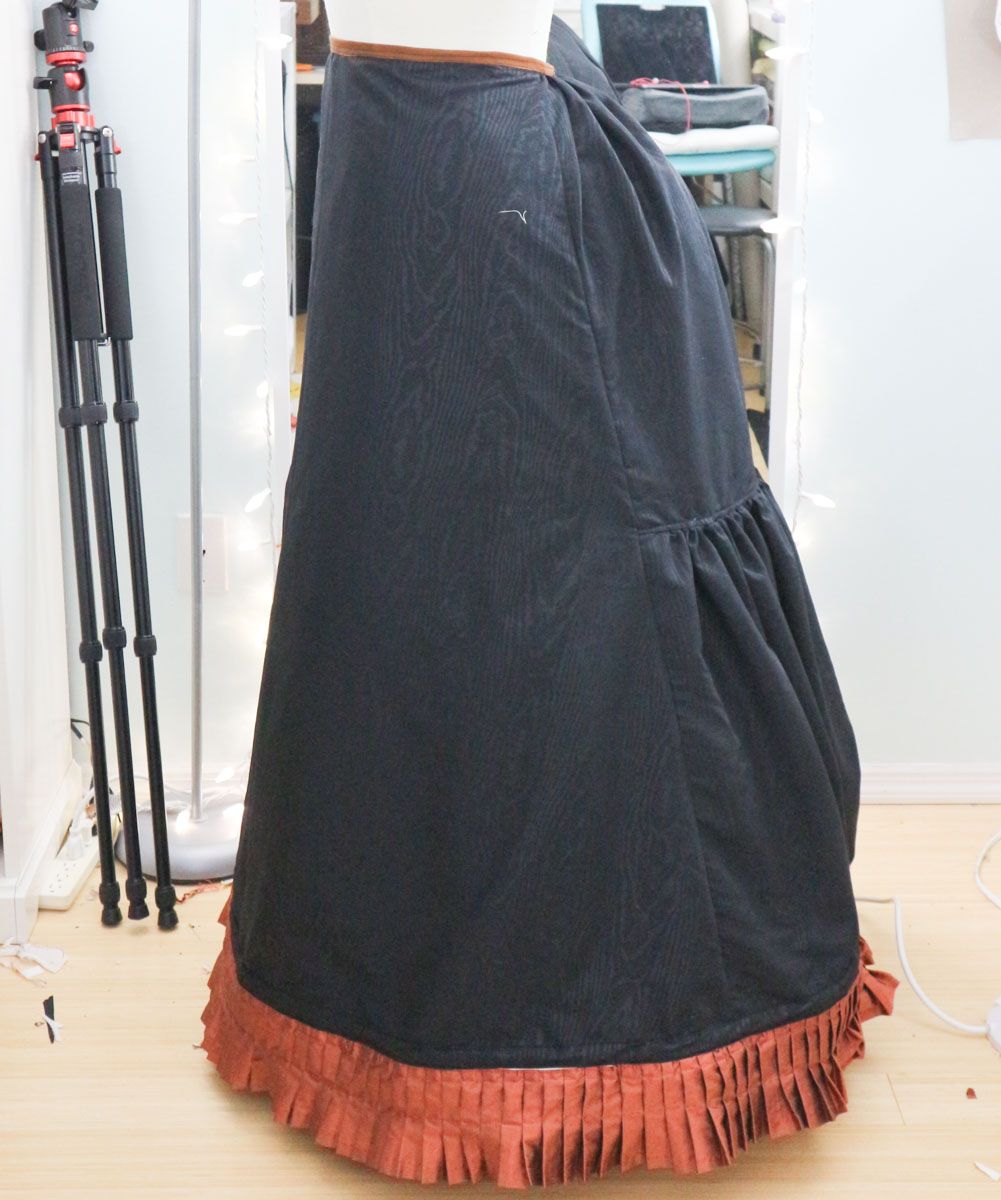
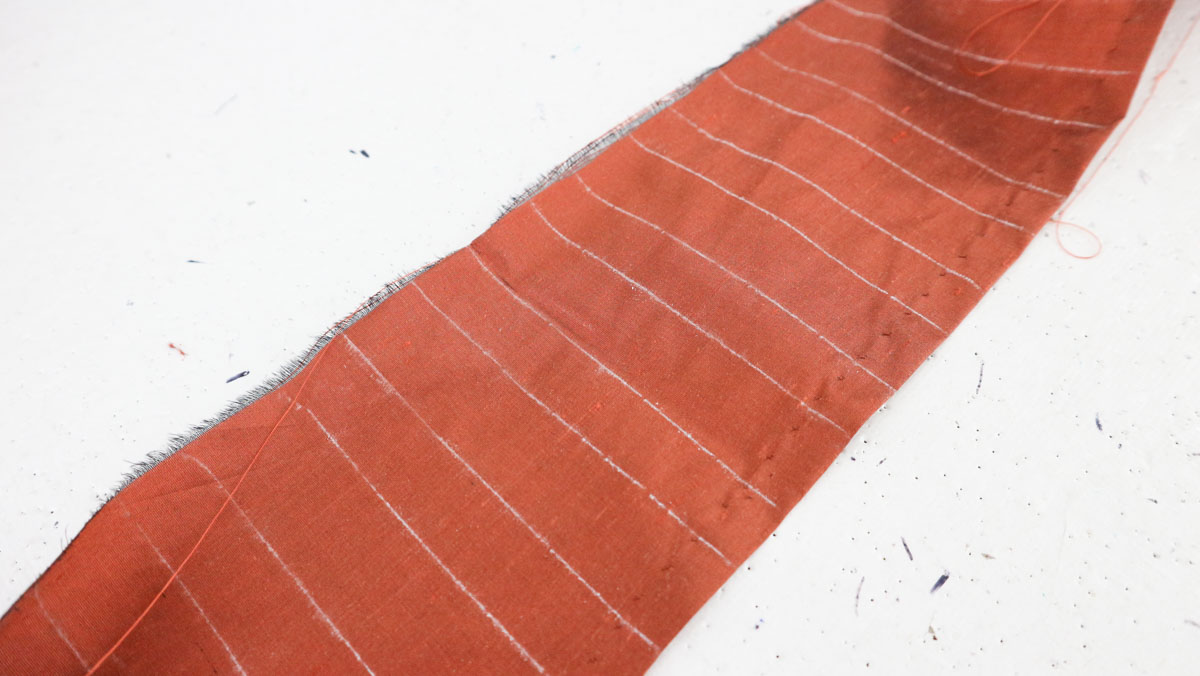
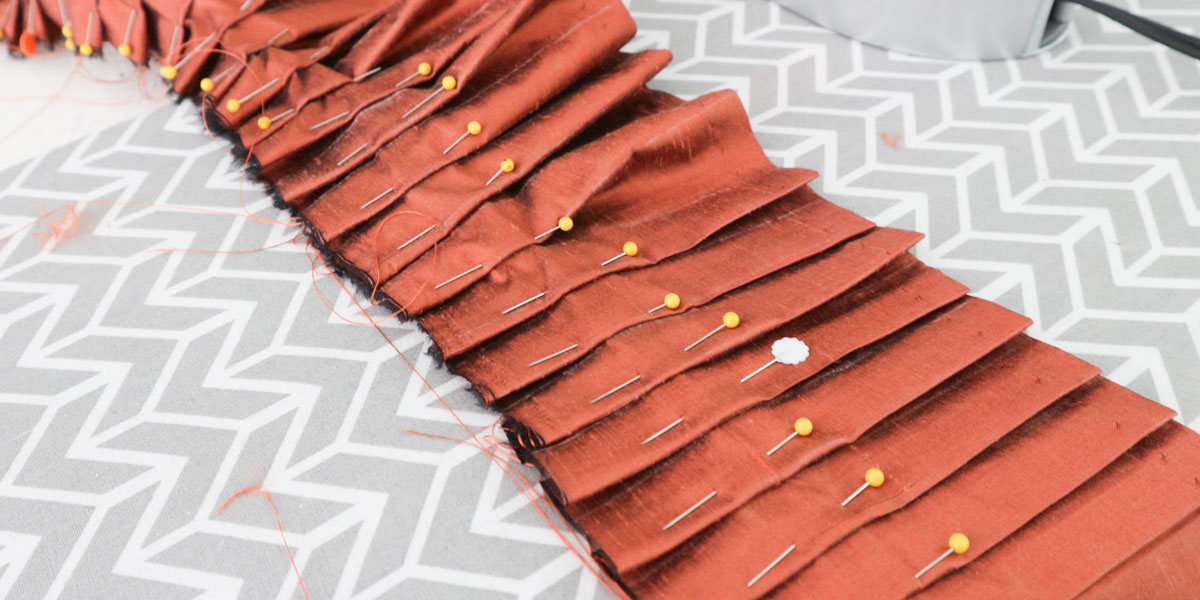
Hopefully I made up for my lack of documenting the upper half by taking a good dozen photos of making the trim for the hem. Because the trim was kind of complicated. I knew I wanted it to be pleated, and I wanted it to have a zig zag pattern (also known as a dagged edge) around the hem.

I started by cutting out eight 42″ wide strips that were a half inch longer than I wanted my trim to be. All these strips were sewn together to form one, very long strip. I repeated this process with a coordinating fabric that will be used for lining.

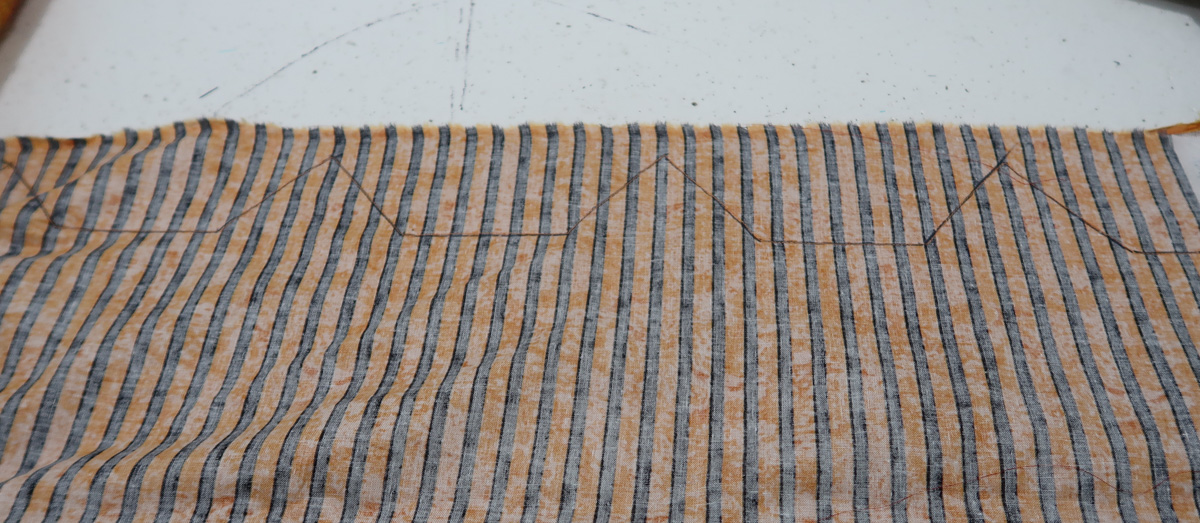
Then I made a template out of cardboard. I lined the straight top edge of the template up with the top edge of the strip of fabric. Then I traced around the bottom edge of the template to transfer the design to the wrong side of the fabric. This was repeated a bunch of times until the entire strip of fabric had the zig zag design drawn onto the hem.

halloween-6I also marked a line 2″ away from the top edge, then ironed the fabric inward so it touched that line. This created an even 1″ hem across the top edge.

halloween-7

I pinned the lining and outer layer of fabric together, across the bottom edge, with the right sides facing each other. Then I stitched across the markings from the template, making sure to pivot at each point and corner.

halloween-9

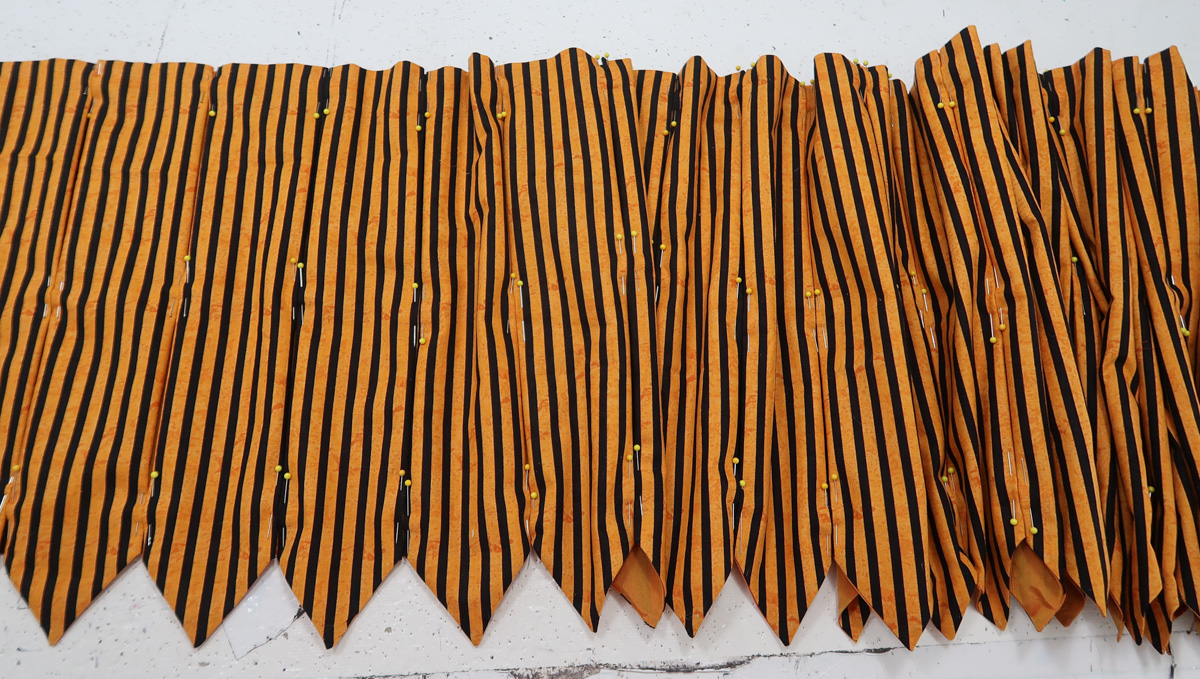
Then I cut away all the excess fabric. This included clipping into the corners, and trimming the fabric very close to each point.

halloween-10

Then the strip was turned right side out, and I used a turning tool to get each point looking sharp.

Here is how it looked from the outside after being ironed.

halloween-11

And from the inside!

halloween-12

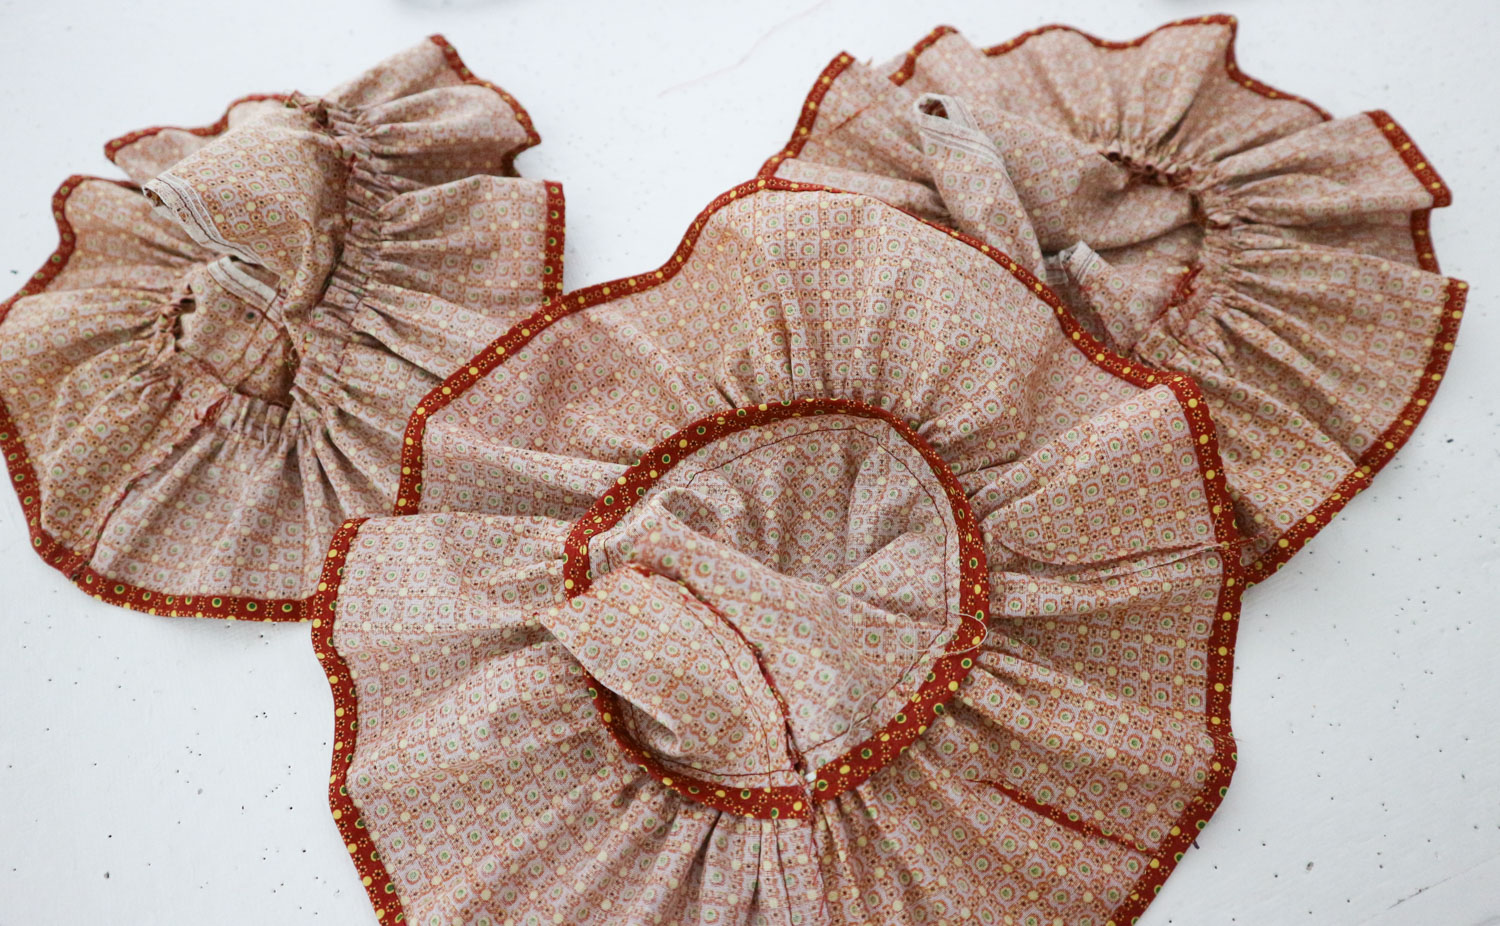
I laid the trim flat, with the right side facing down.  I smoothed the lining out, then I turned the top edge of the lining inward, until it sat 1/3″ below the edge of the outer layer of fabric.

halloween-13

I sewed the lining in place with whip stitches.

halloween-14

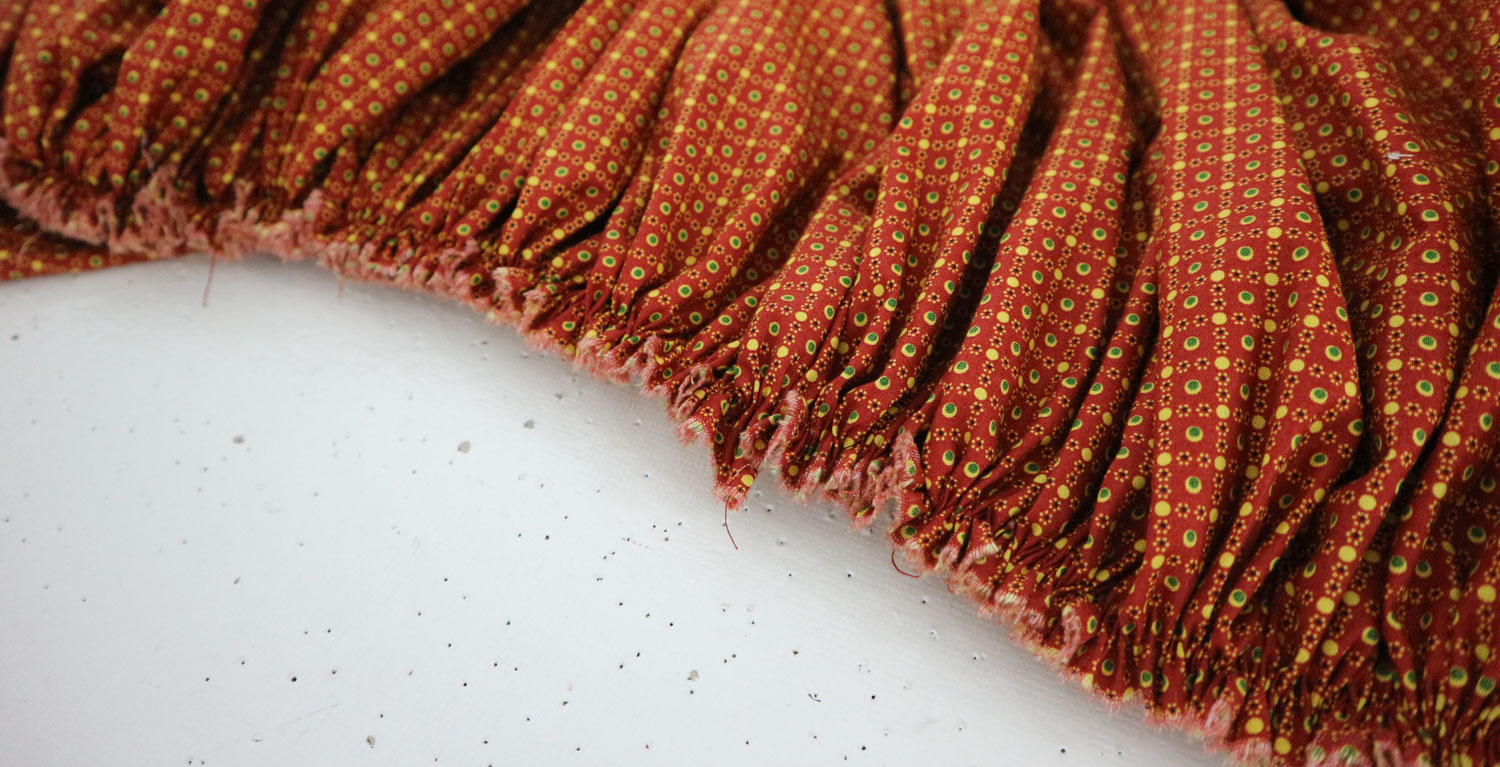
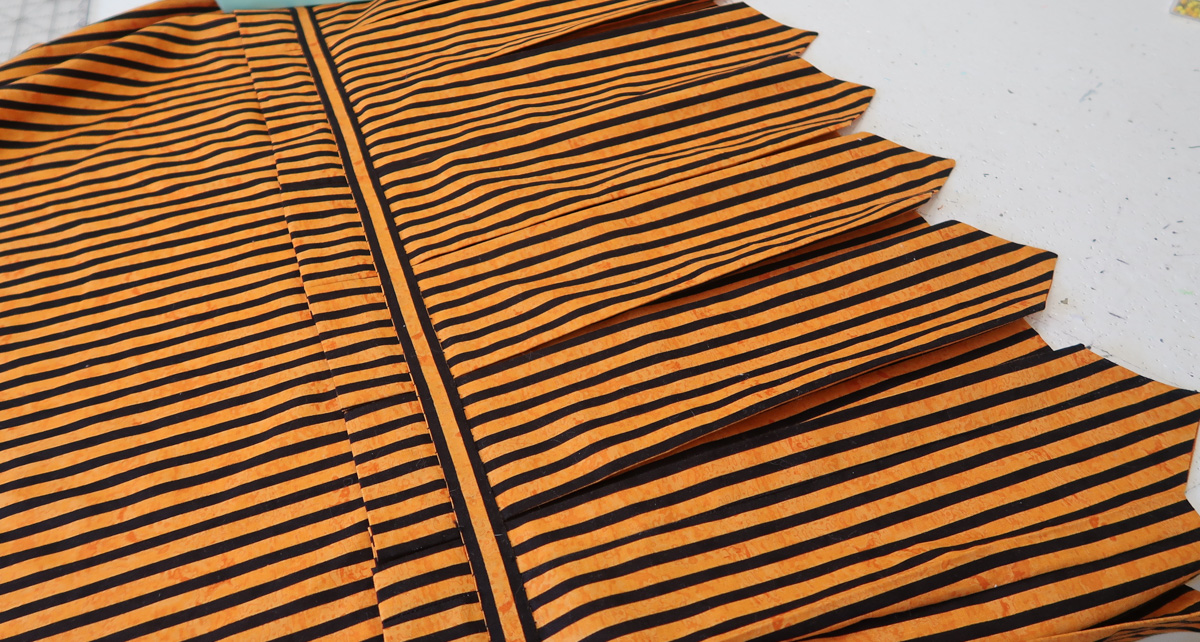
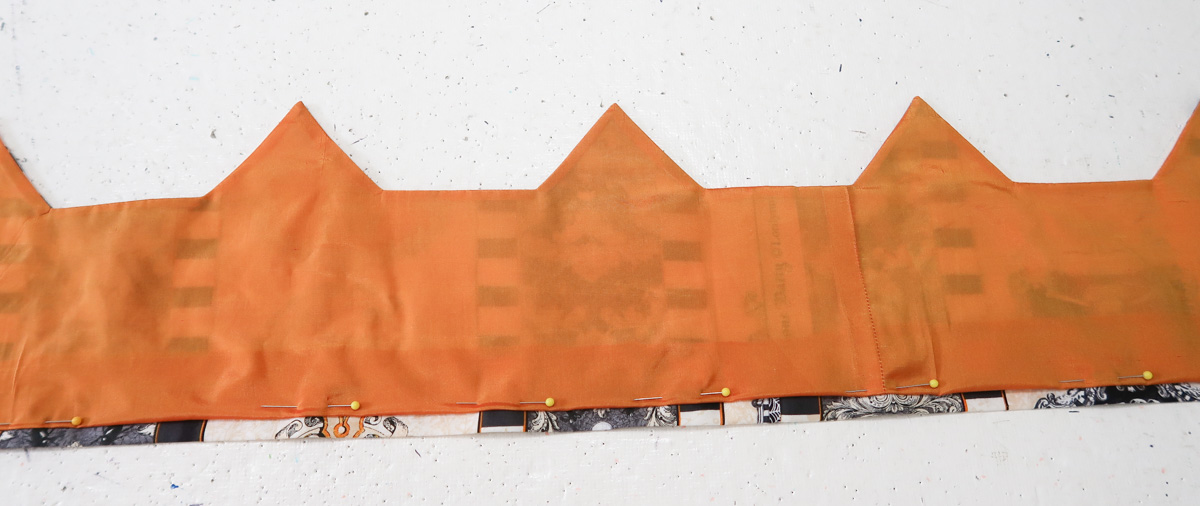
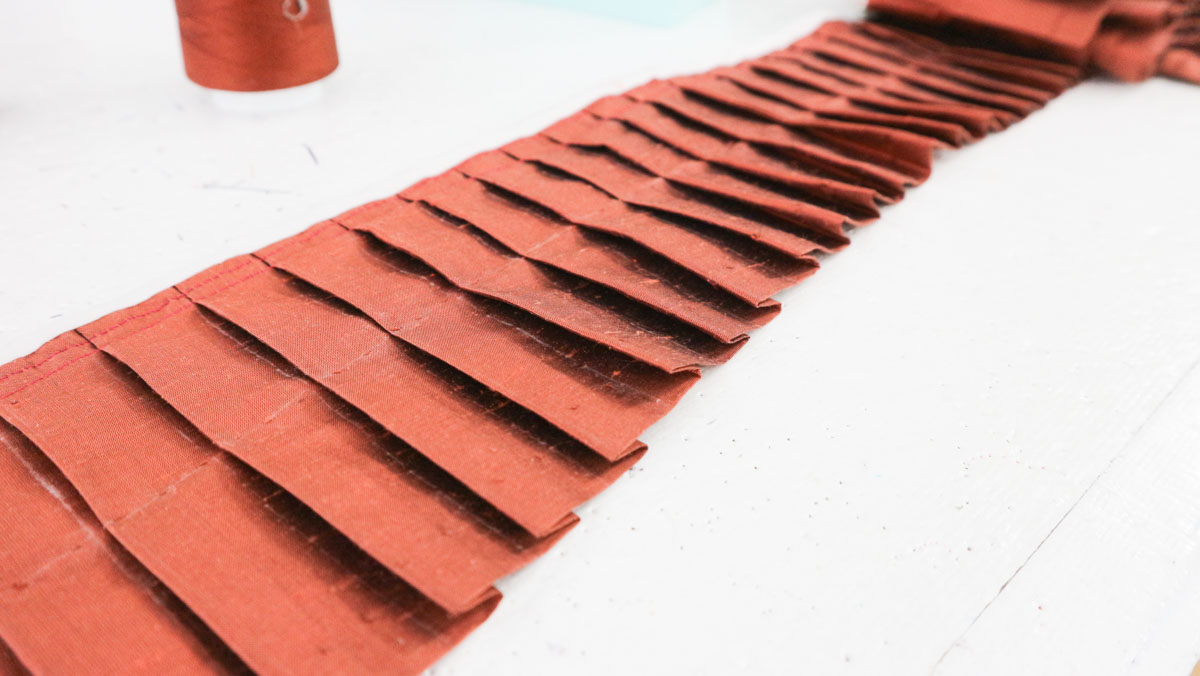
And now you might be thinking the trim is done and ready to be sewn onto the skirt. Oh how I wish that was the case. But no, it still needs to be pleated.

halloween-15

The pleats are 3″ wide box pleats (the width of the pointed portion) and 3/4″ deep. I used the stripes on the fabric as a guide for the pleats, so it was actually pretty speedy to do!

halloween-17

To secure the pleats in place, I stitched a line by machine 1.5″ away from the top edge. Then the pleats were thoroughly ironed before removing the pins.

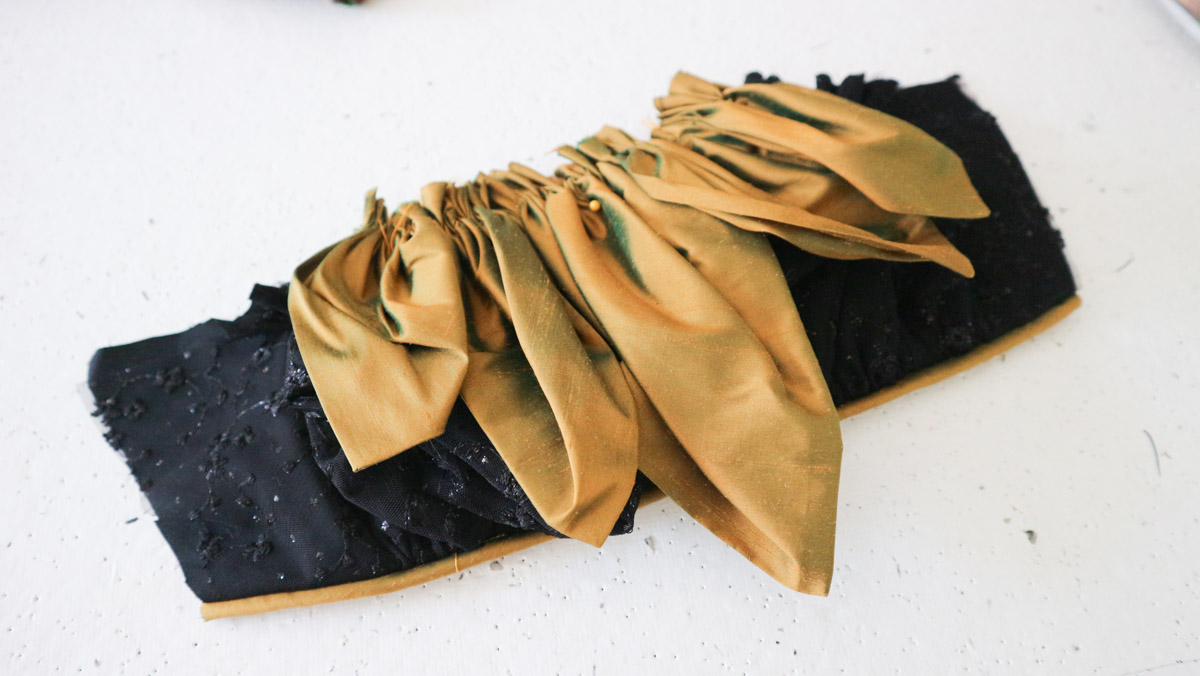
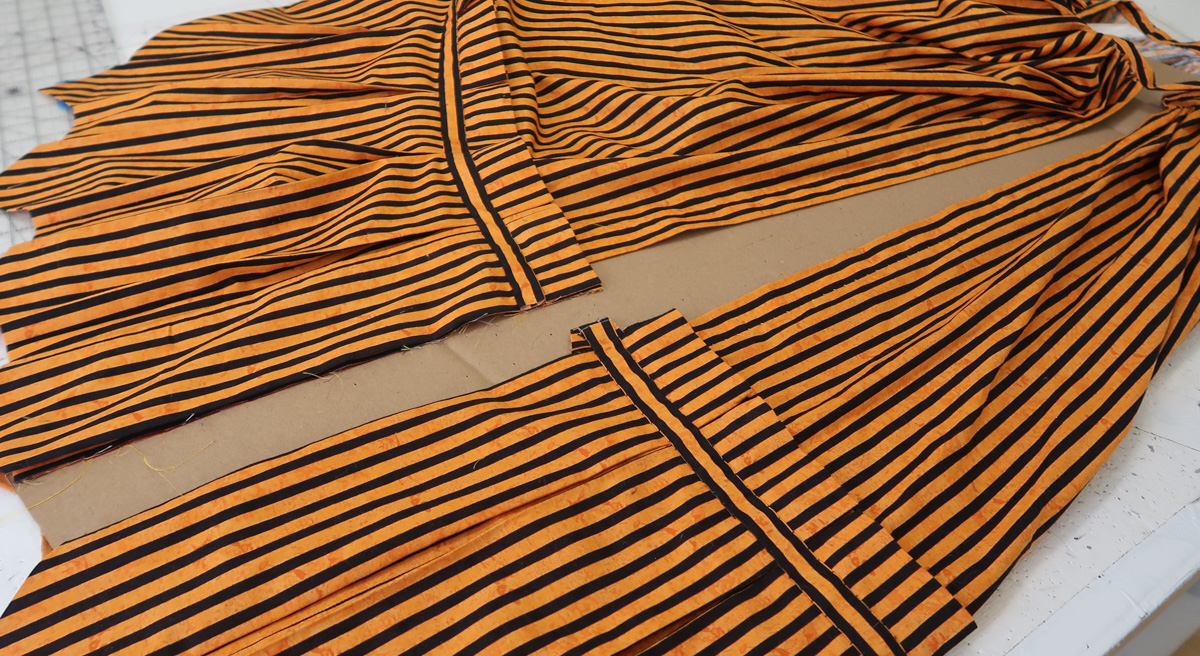
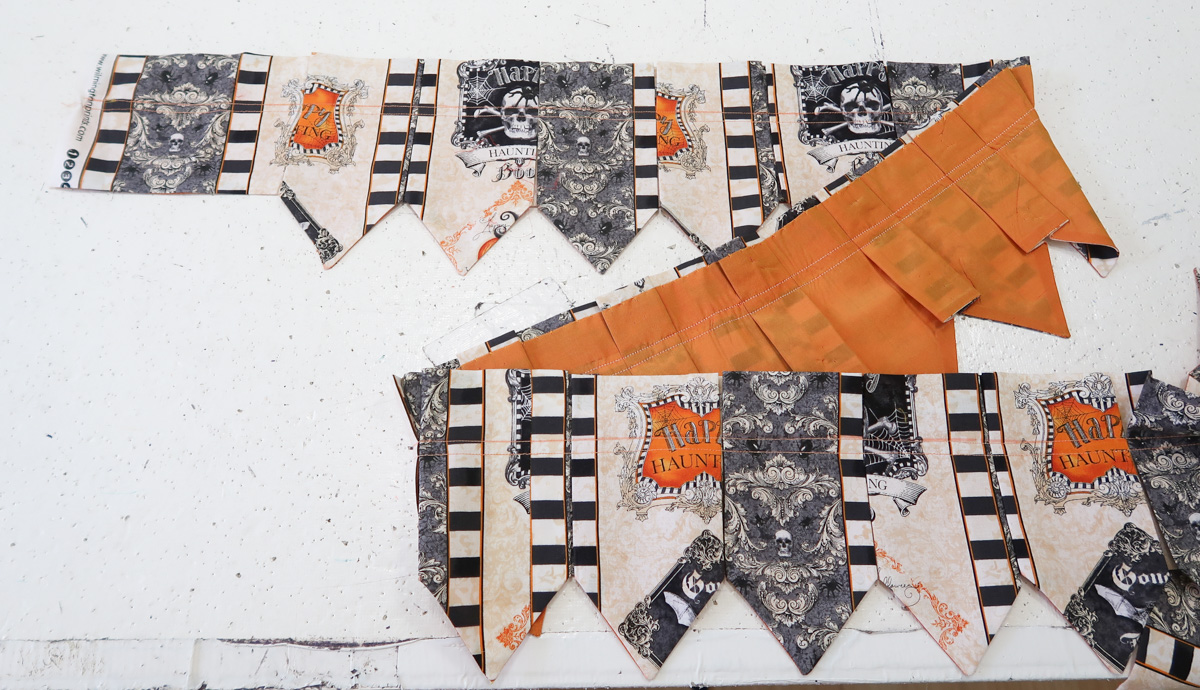
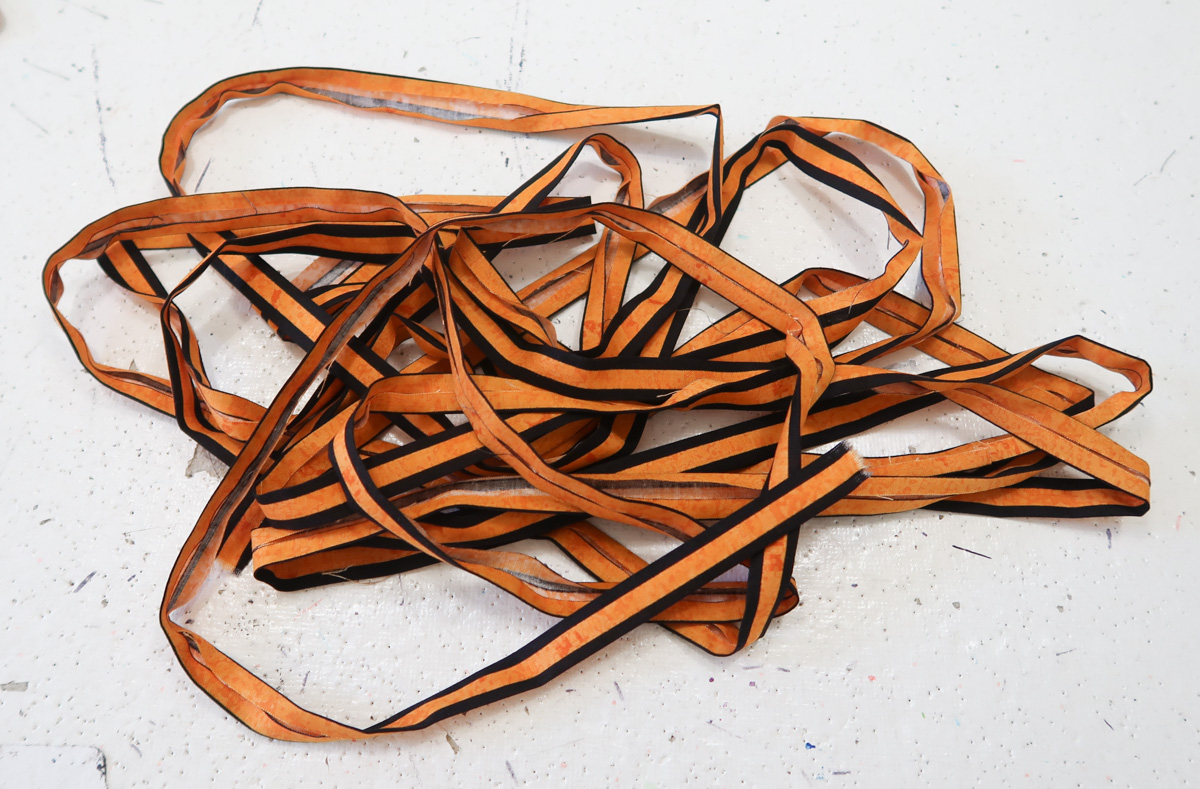
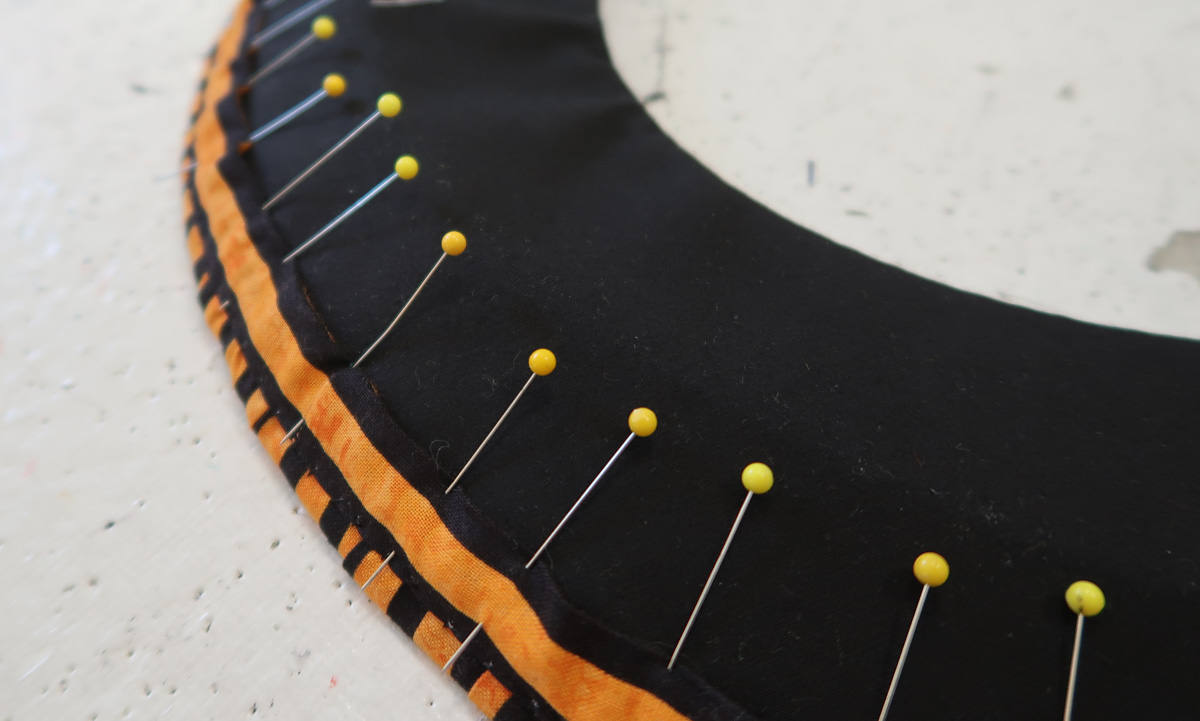
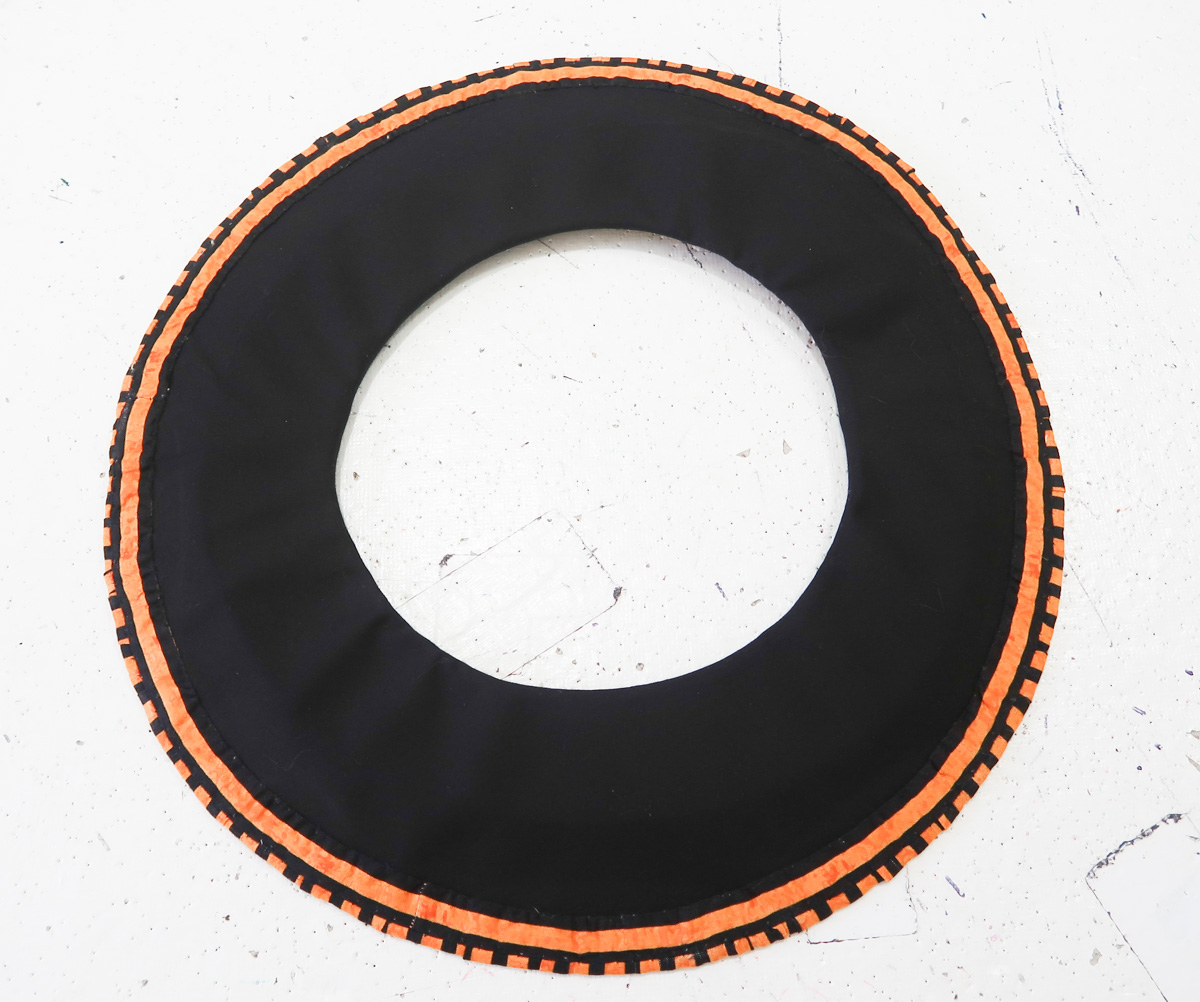
The pleated trim could now be sewn to the skirt – which I also opted to do by machine. But I covered that stitching with coordinating binding, cut from horizontal strips of the striped fabric. And that was all sewn on by hand.

halloween-19

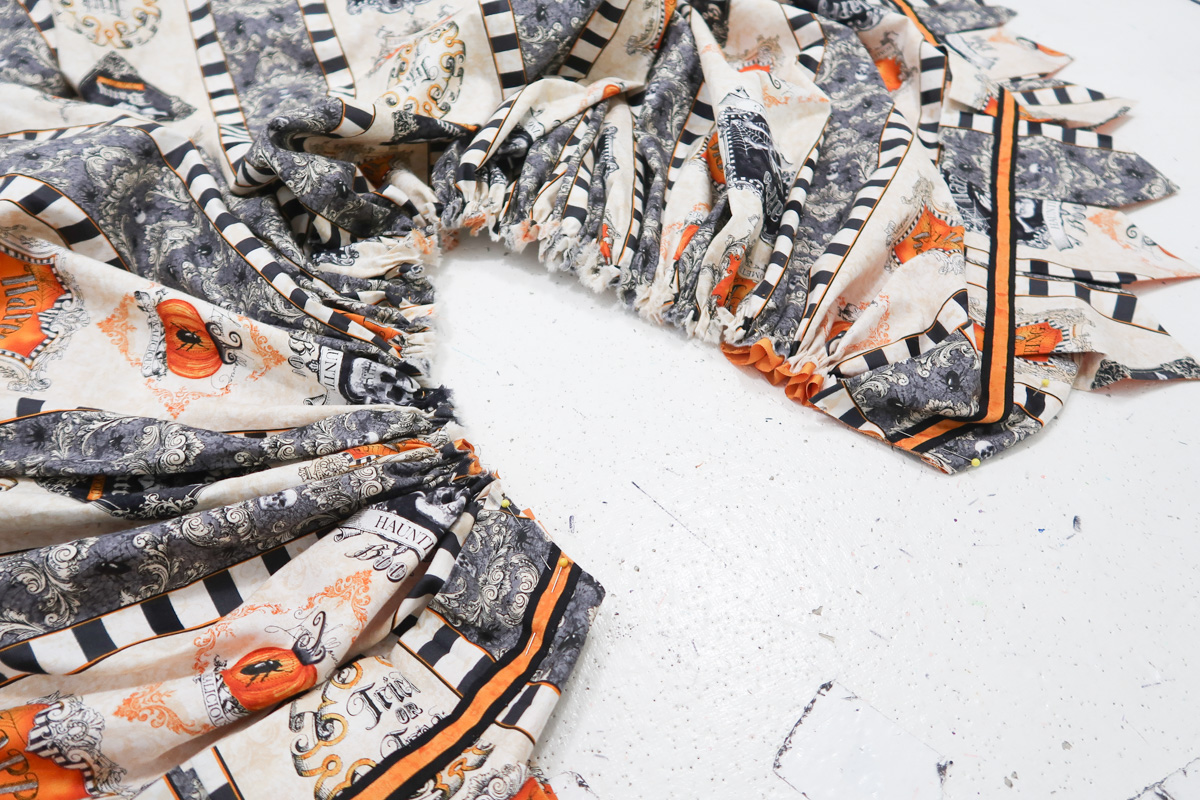
With the trim on, I began sorting out the back. I actually turned the back edge inward by an inch and whip stitched it down prior to gathering the top edge. So the back edge was “finished” – it was just left completely open.

halloween-21

I turned one of the sides inward by an inch, then lapped it over the other side. I did my best to get the points and trim to line up.

halloween-22

I sewed across this edge by hand using whip stitches. And I left the top 10 or so inches open, allowing me to easily get the skirt on and off.

I also did my best to make the inside look pretty by turning the raw edges inward…I’m not sure how successful this was, but I tried!

halloween-23

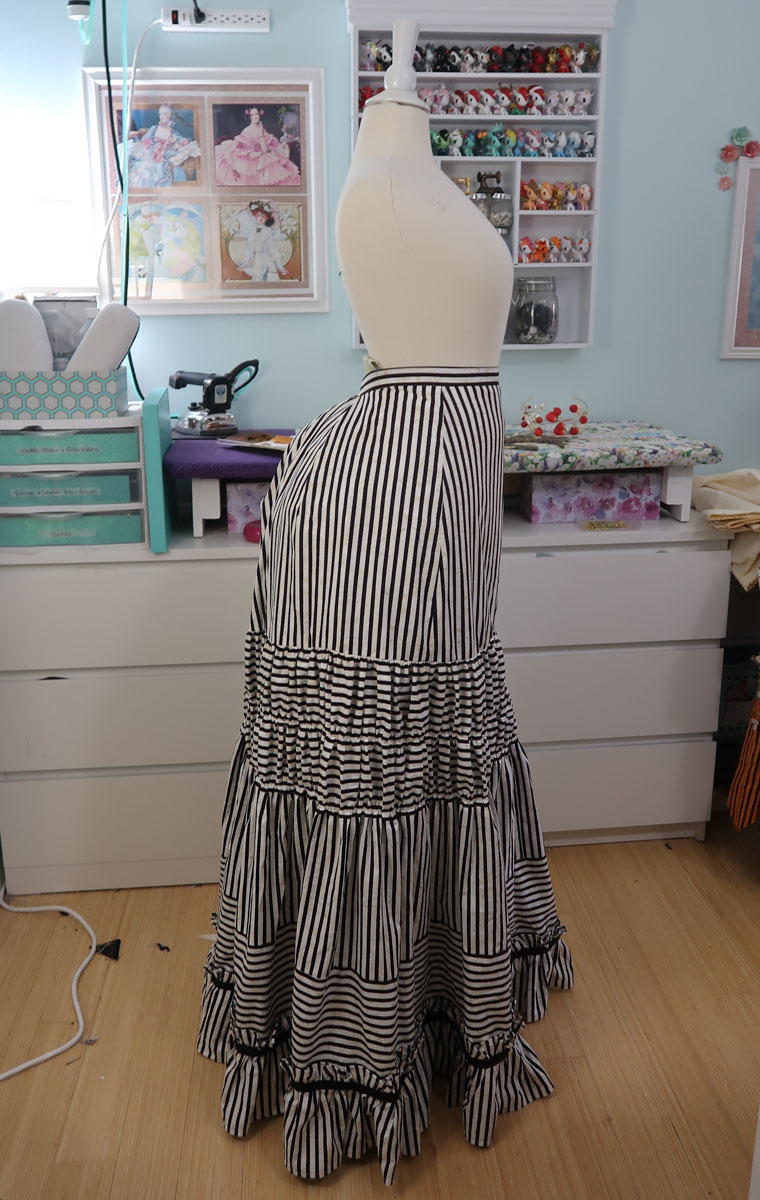
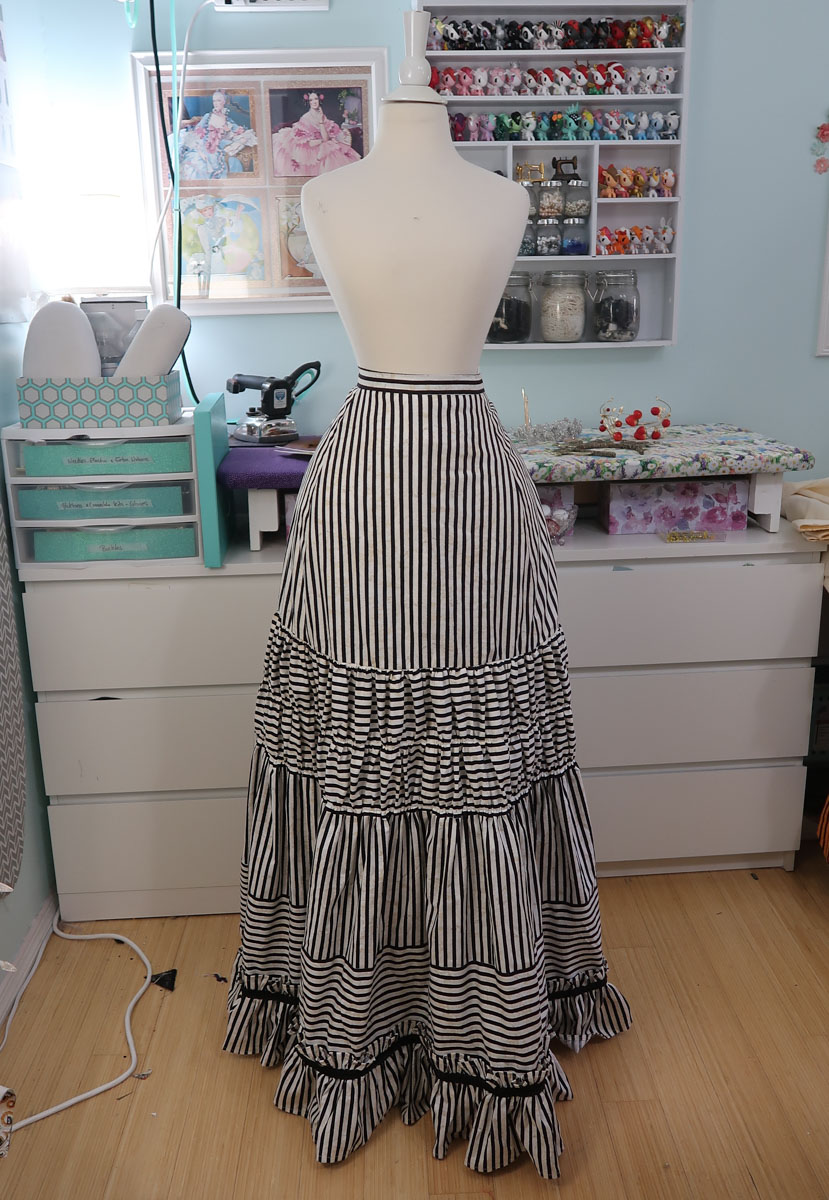
Now the underskirt was done! And it was time to get back to work on the polonaise. However instead of going back to the bodice, I began work on the skirt.

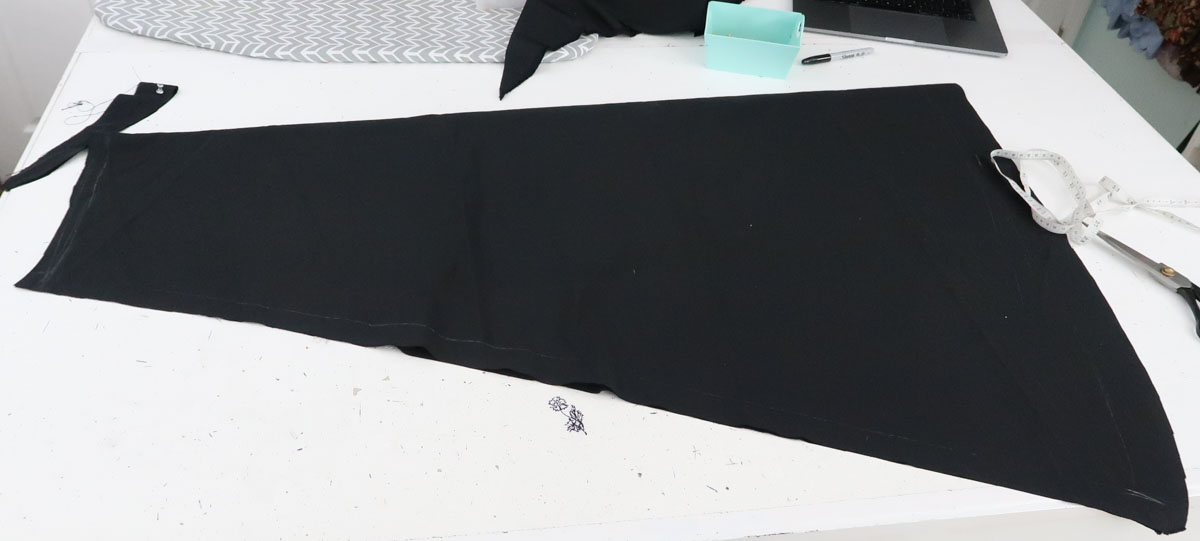
I measured my fabric before cutting the skirt out and realized I didn’t have quite enough for the skirt, trim, and sleeves. At least not if I wanted to make them according to my original plan. But I knew the trim would add some length to the skirt, allowing the skirt panels to be shorter, and leaving me with more material leftover for the sleeves.

So with that in mind, I decided to make the trim first, and figure out the skirt panel length later on. The trim was made using the exact same method show above – just with narrower strips, and a different fabric.

Here is my handy template.

halloween-26

And the marked strip pinned to the lining.

halloween-24

Here it is after being sewn.

halloween-25

Then it was trimmed…

halloween-27

Here it is after being turned right side out.

halloween-28

And after ironing.

halloween-29

To finish it off, I folded the top edges inward and pinned them together. Then stitched them together by hand.

halloween-30

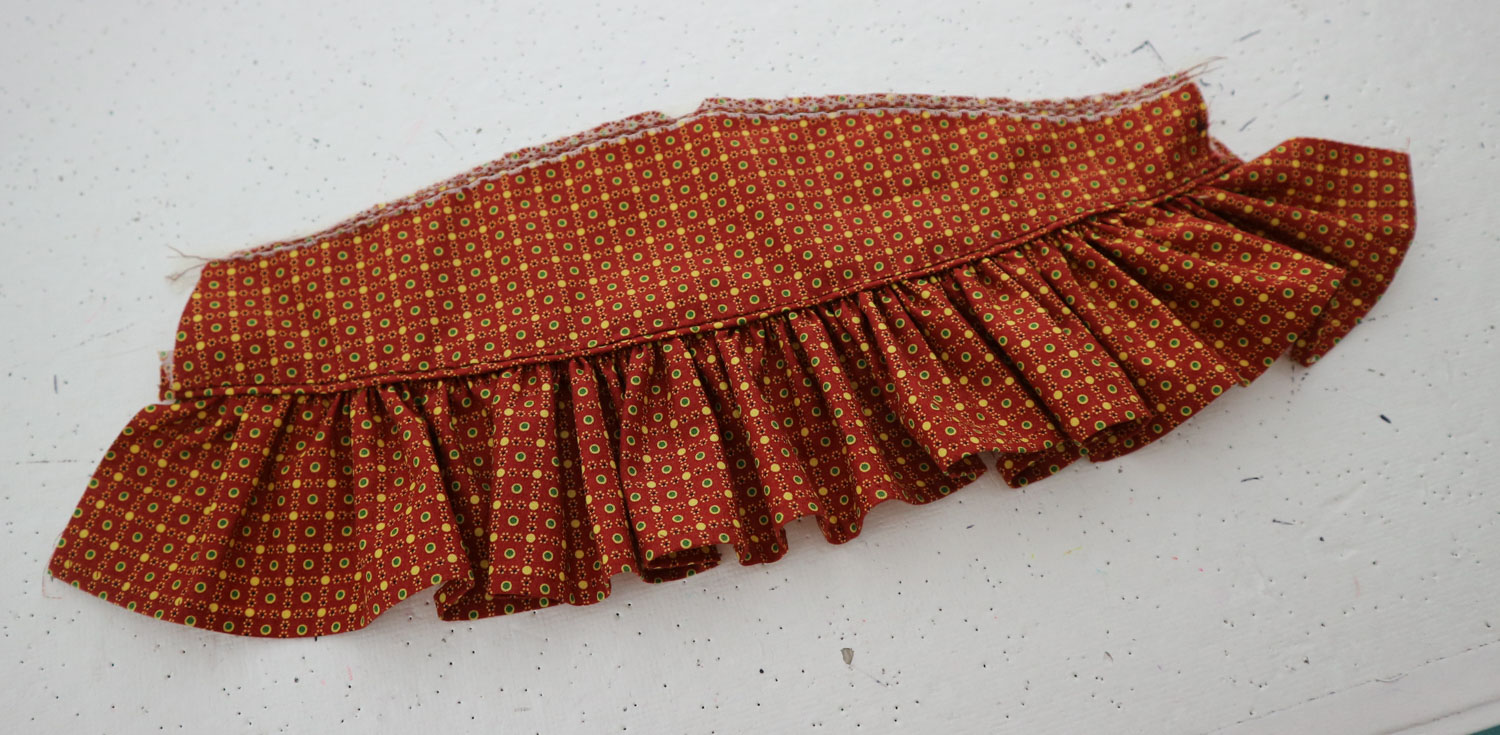
Like with the longer trim, the strip was pleated using the stripes as a guide. Then I sewed 1.5″ away from the edge by machine and gave it a thorough ironing.

halloween-33

But I couldn’t sew it on, because I didn’t have anything to sew it on to.

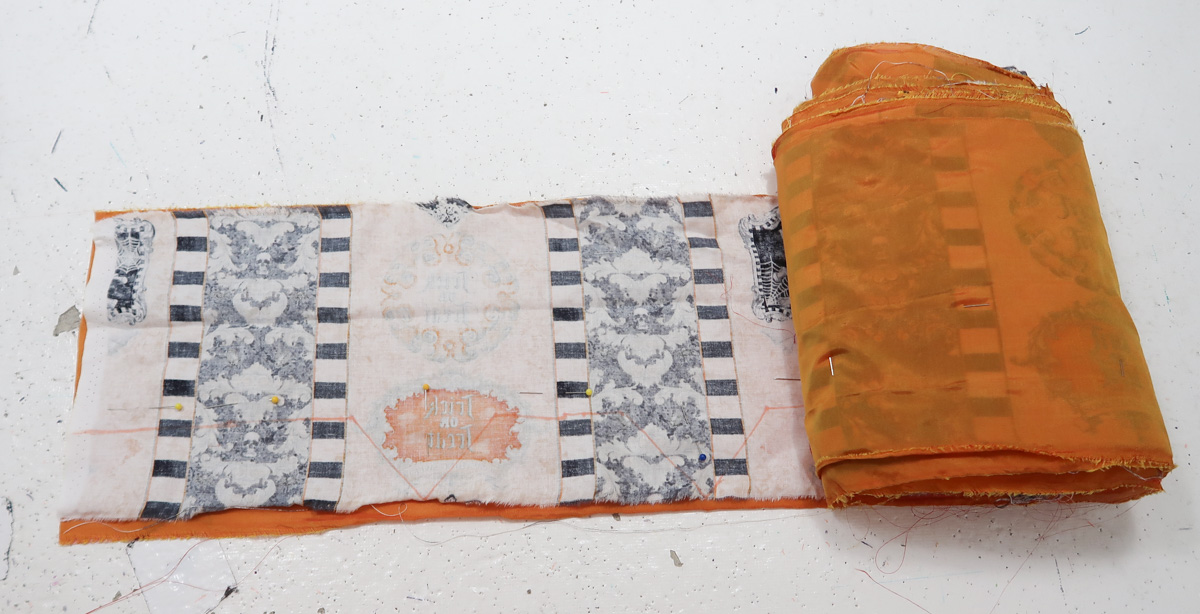
I ended up cutting 12″ off my remaining fabric and setting it aside for the sleeves. Then I divided the remaining length of fabric into three equal pieces, and hoped like hell that my skirt would be long enough.

The three equal lengths of material were stitched together, selvedge to selvedge.

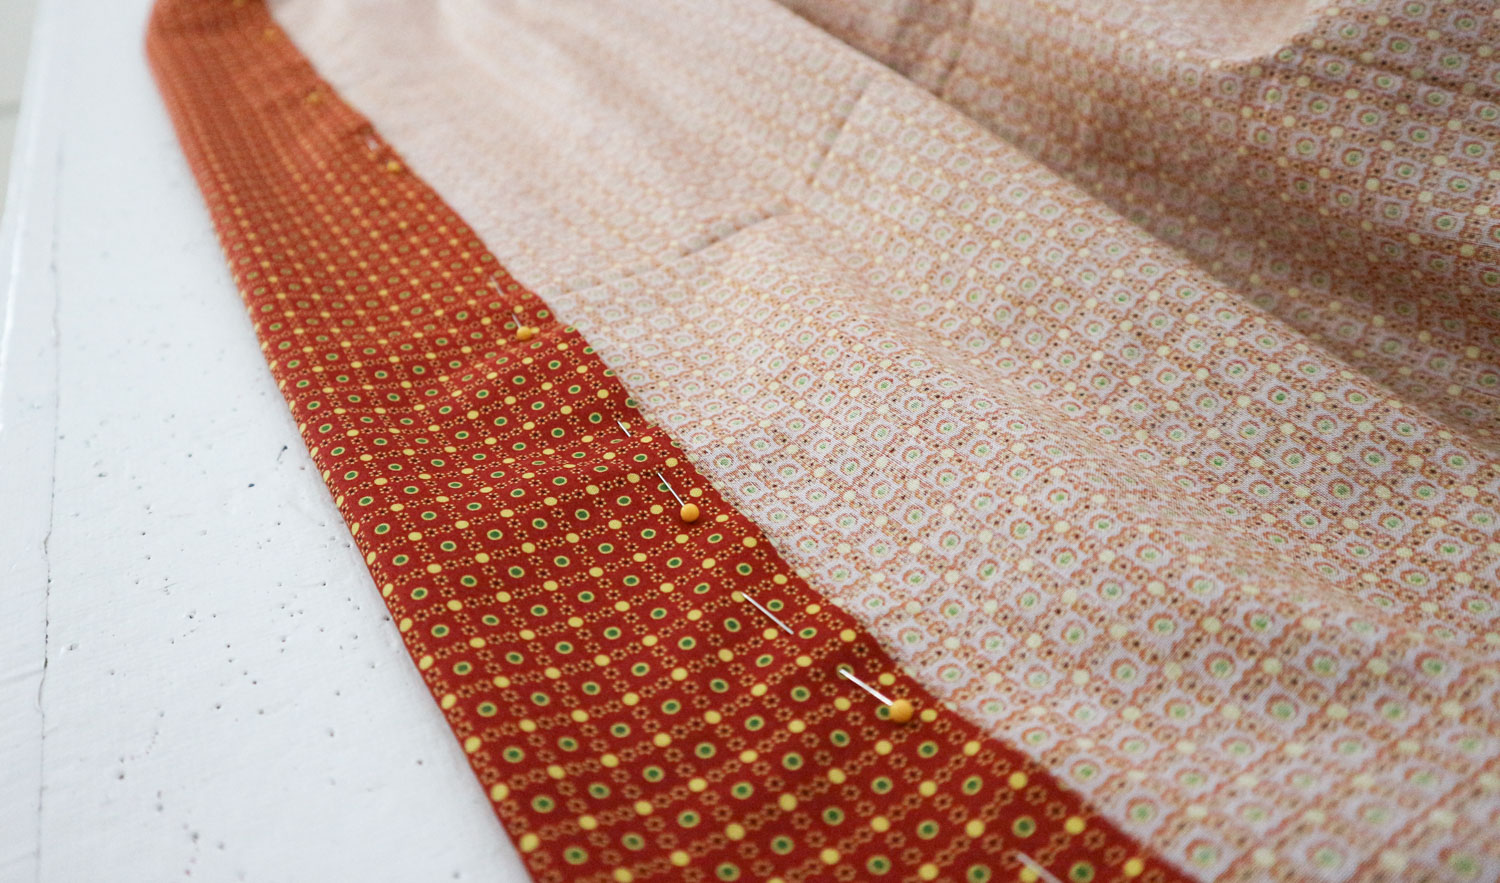
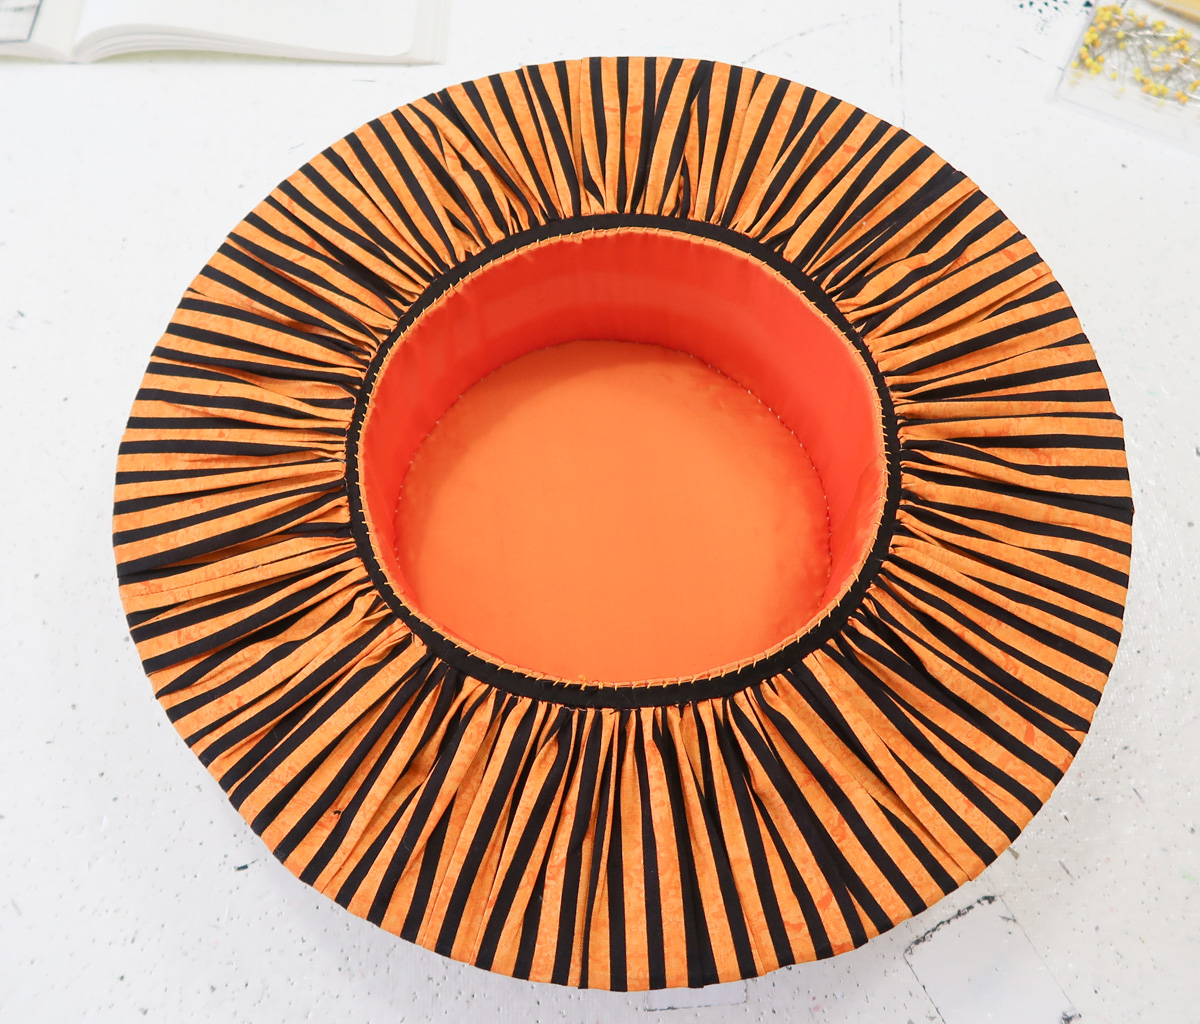
Now, because this is a robe a la polonaise, the skirt will be bustled in the back. Which sometimes reveals the under side of the fabric. This isn’t a big deal with woven prints, since the print is usually identical on both sides of the fabric. But with stamped prints (aka quilting cotton – which is what I’m using) that are printed onto the fabric, one side tends to have much lower saturation and can look pretty ugly.

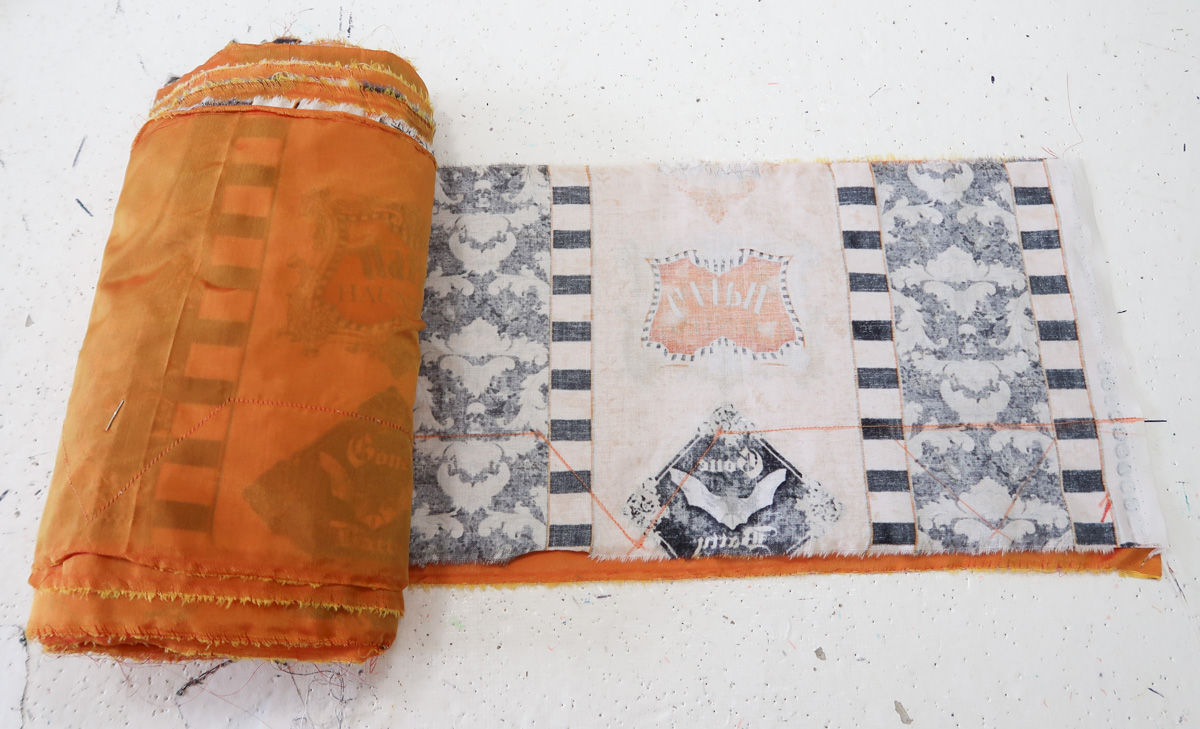
So I decided to line the hem with 15″ wide strips of polyester tissue taffeta. This is also what I was using to line the trim.

The taffeta was sewn on with a quarter inch seam allowance – leaving as much length to my skirt as possible. Then it was turned inward and pinned down.

halloween-31

I folded the top edge of the taffeta inward by about an inch. Then whip stitched the folded edge in place by hand.

Annoyingly, my tissue taffeta was one inch narrower than the quilting cotton. Which meant three strips sewn across the bottom edge came up two inches short. Requiring me to cut another strip. Luckily I had lots left!

halloween-32

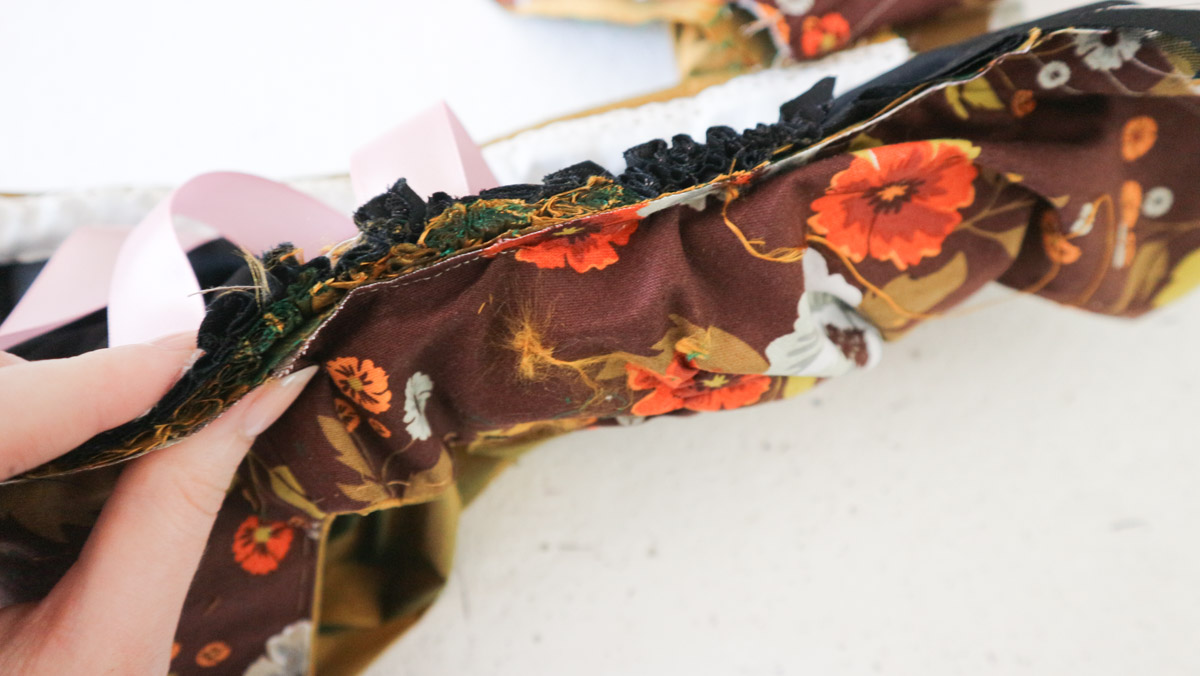
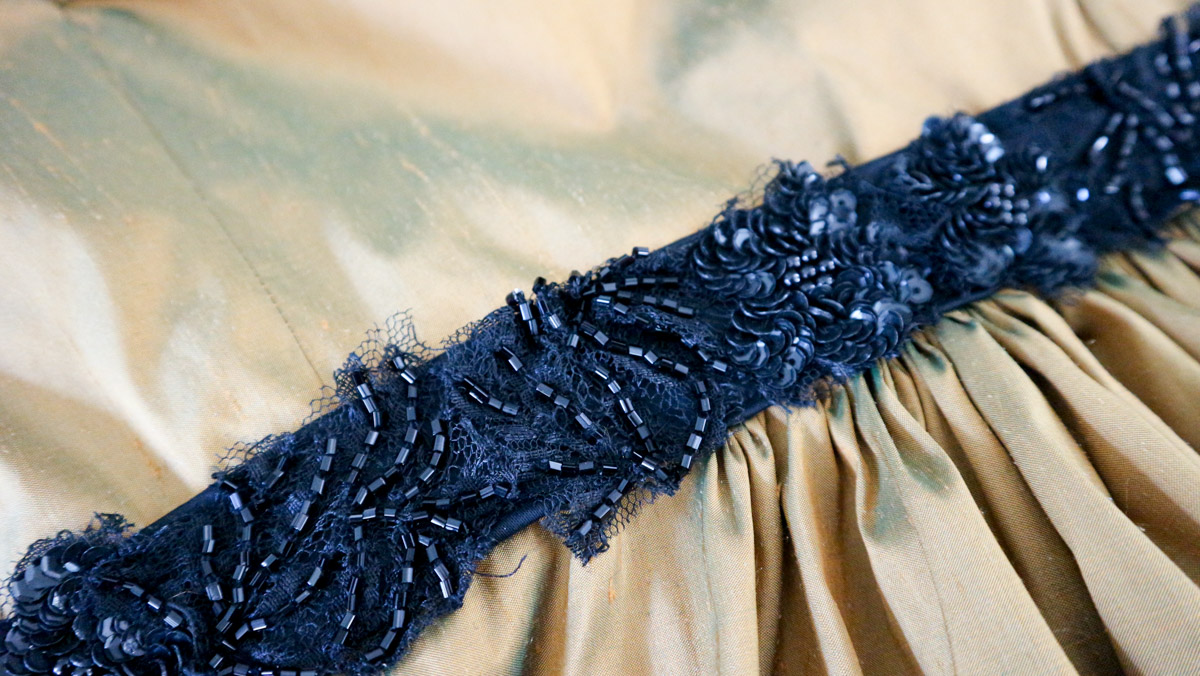
Now the trim was sewn on by machine. And once again, I planned on covering the machine stitching with binding. The binding is made from horizontal strips of the orange and black striped fabric.

The strips were sewn together, then the edges were ironed inward.

halloween-34

The strip is cut on the straight grain, so easing it around corners takes some care…and a lot of pins!

halloween-35

And here it is after being hand stitched in place!

halloween-36

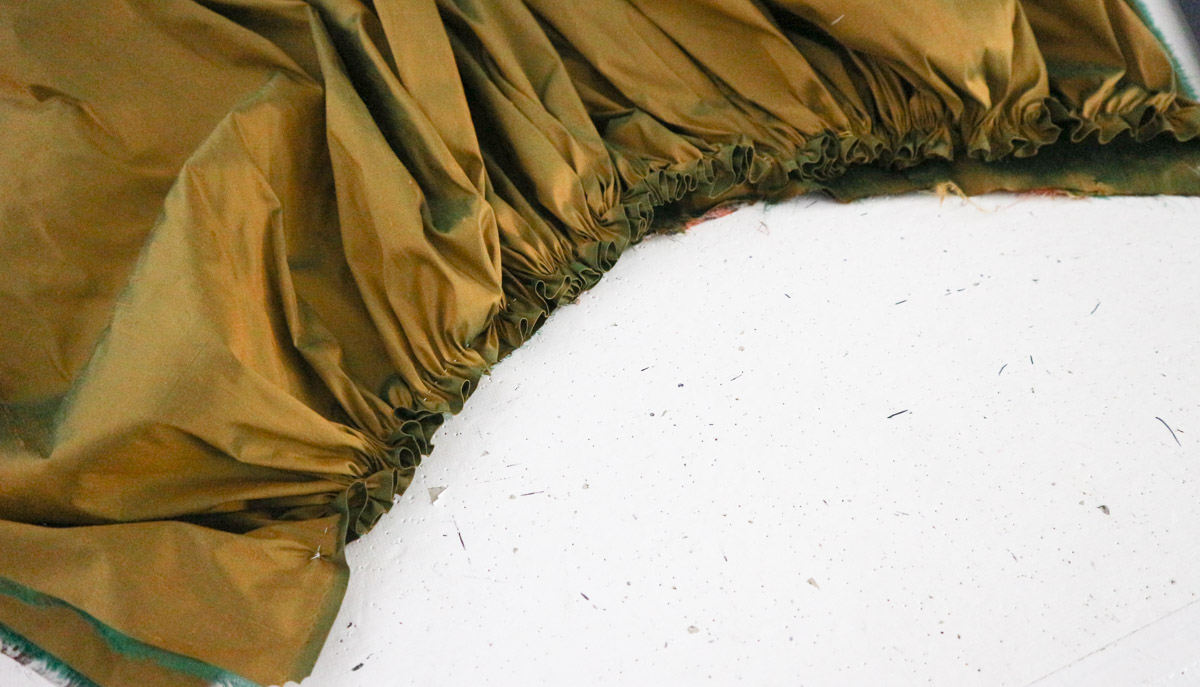
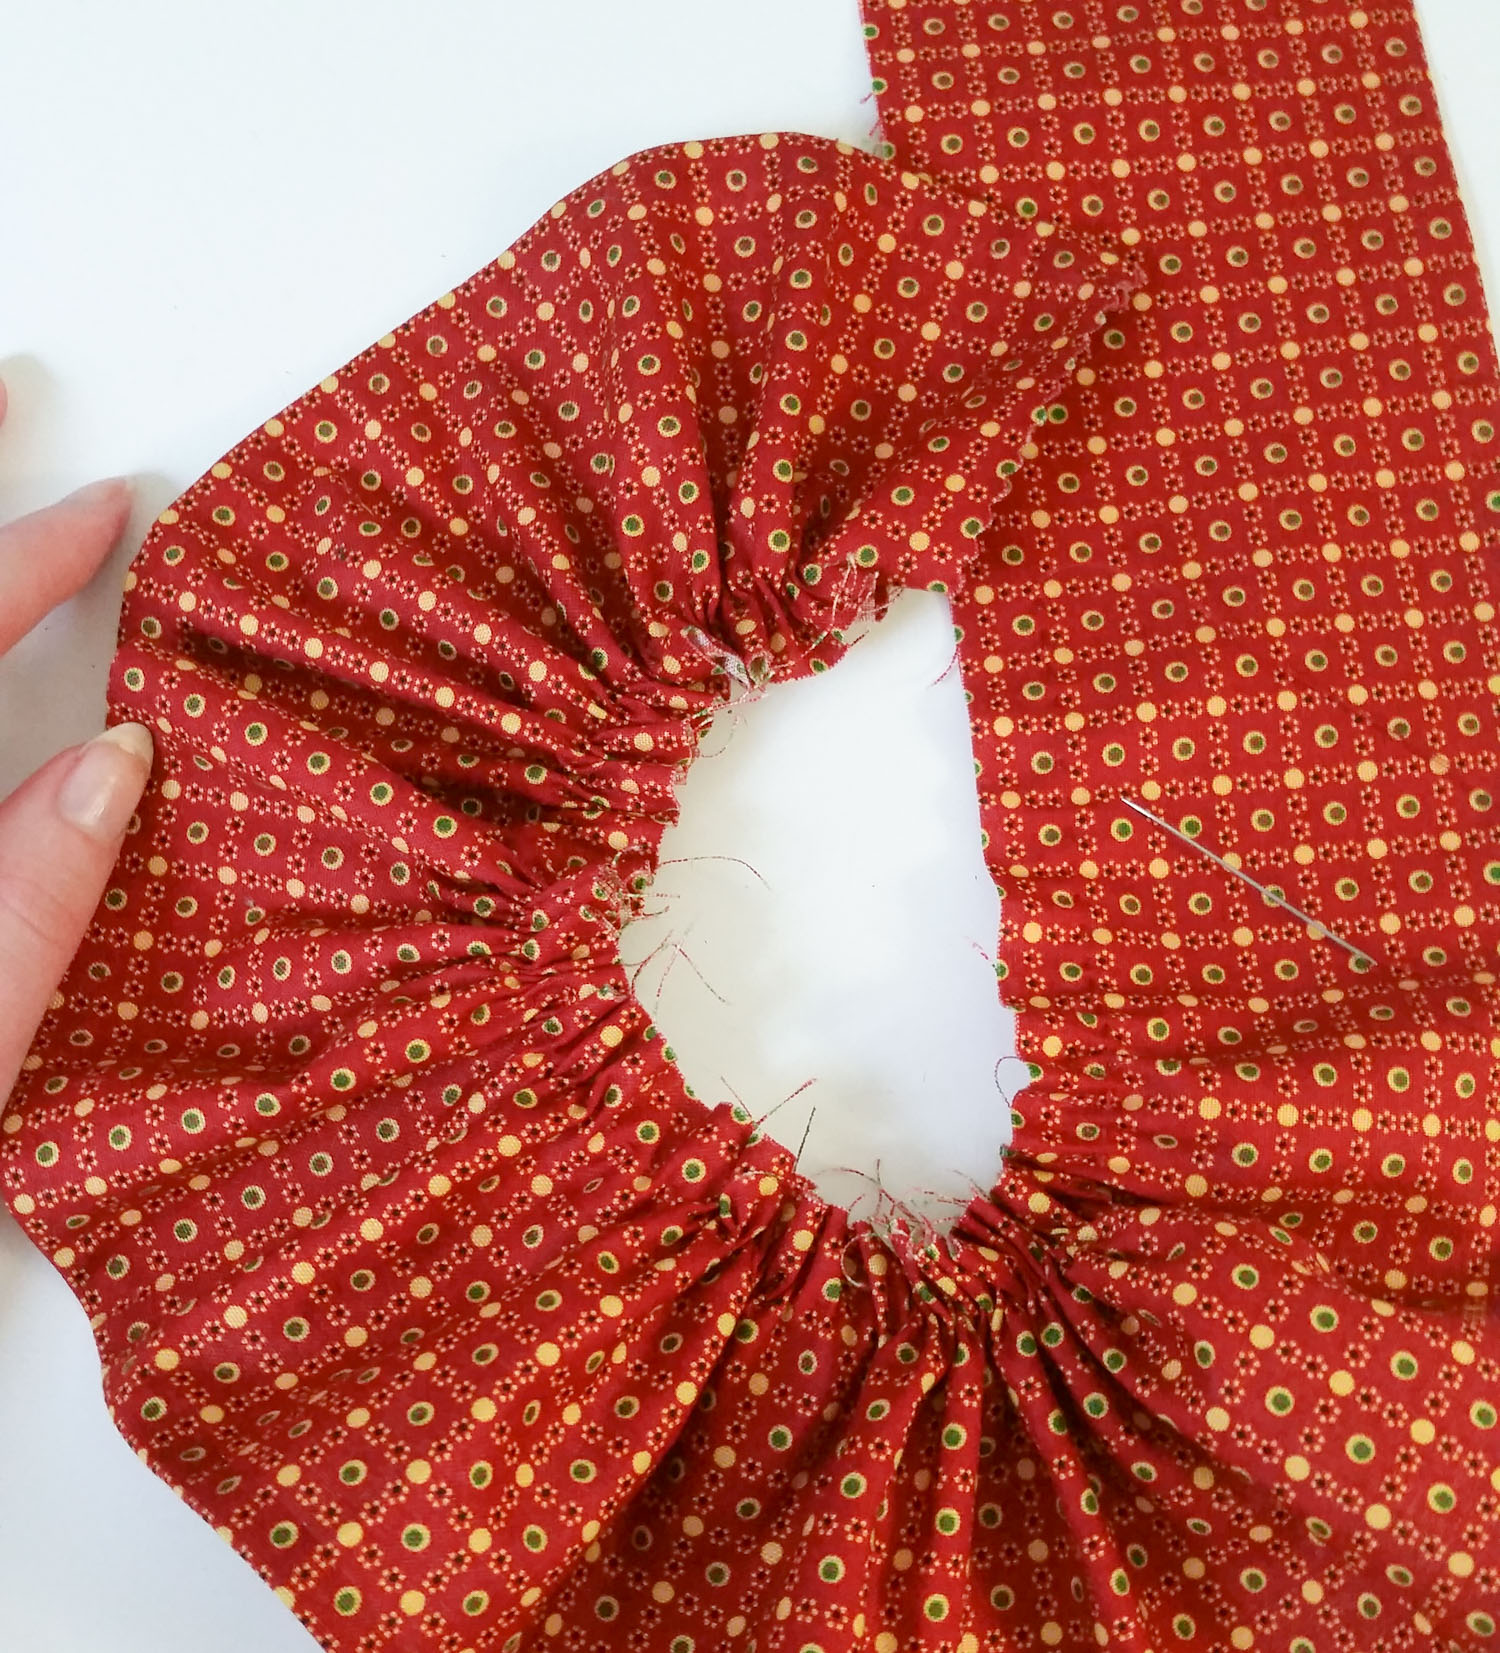
I measured across the bottom edge of my bodice, then gathered the top edge of the skirt to that length.

halloween-39

The skirt was whip stitched to the bodice.

halloween-43

halloween-44

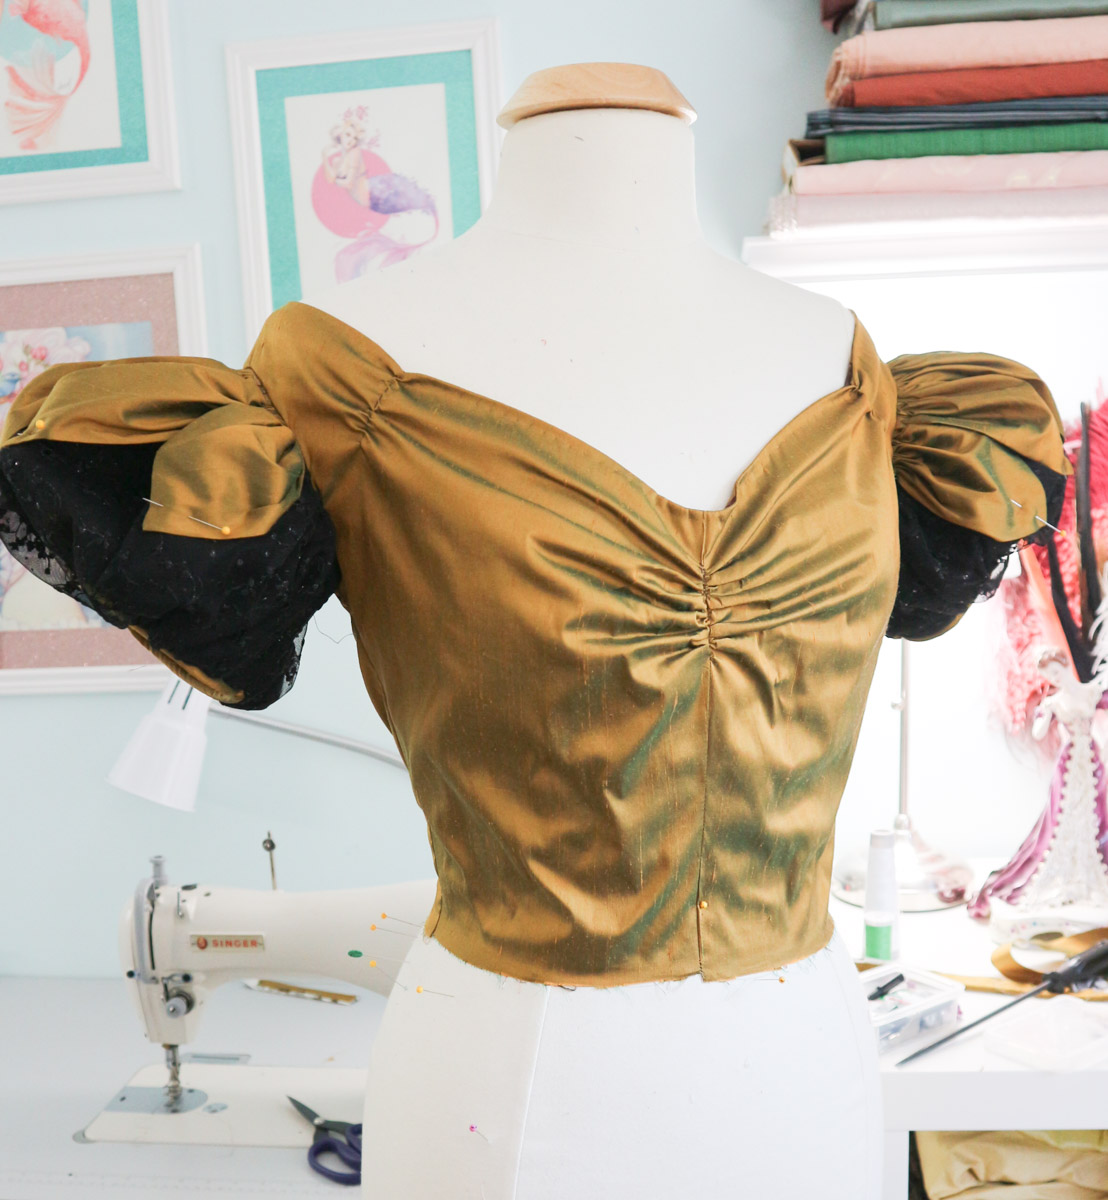
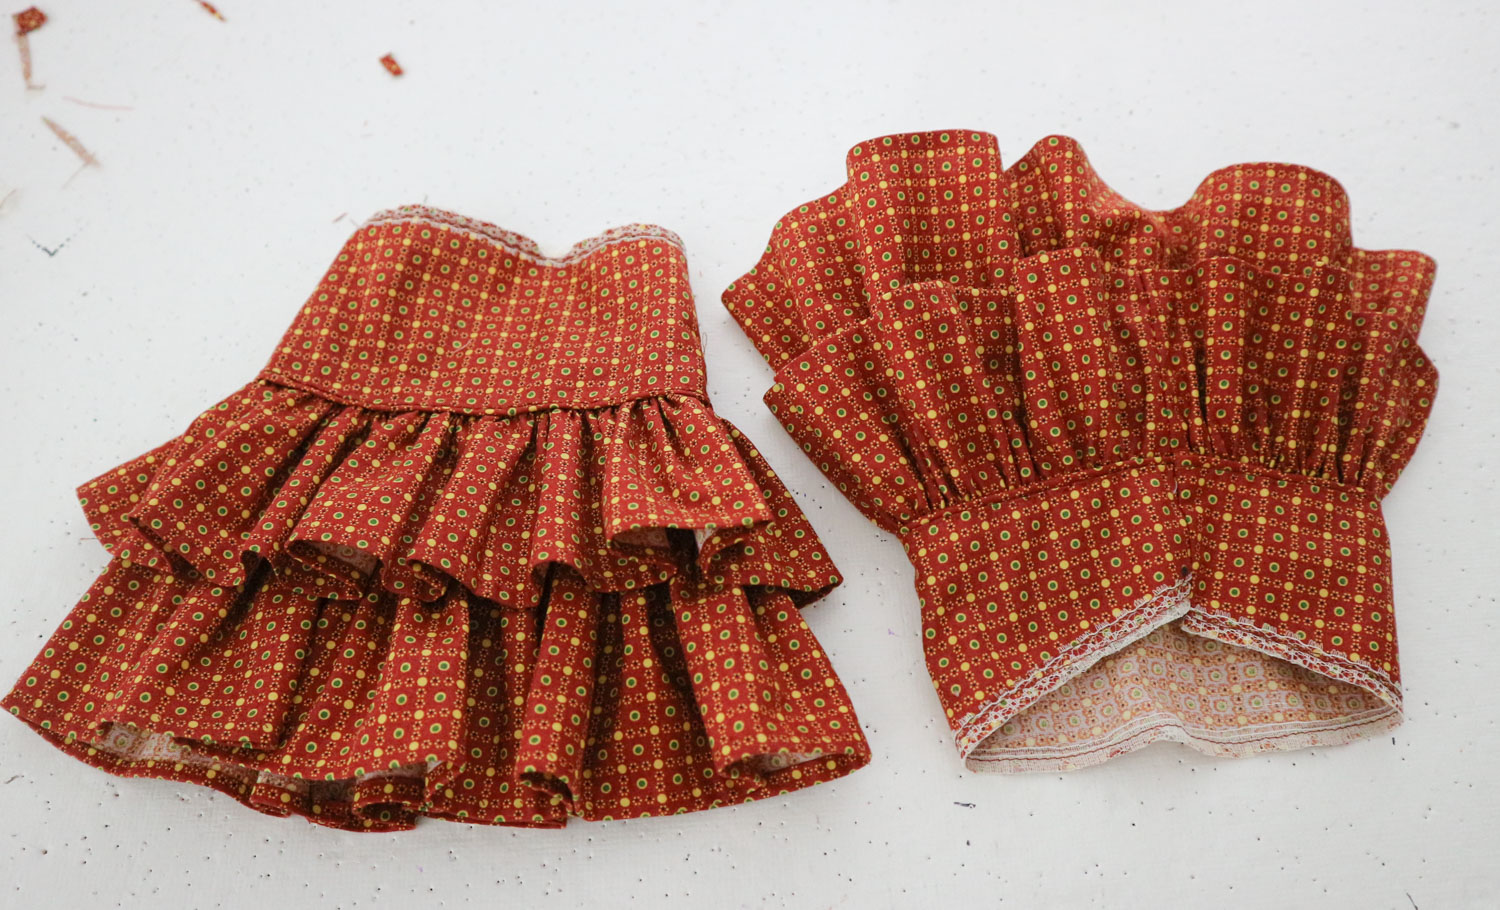
Now for the sleeves! I kind of cheated and used a sleeve pattern from a robe a la francaise that I made earlier in the year. Even though I’d used the pattern before, I still made a mockup and altered the fit and shape to be better suited to this design.

And then I used that pattern as the basis for a lantern sleeve pattern, which is about four inches longer than the original pattern. This will be used to make a set of under sleeves from a lightweight silk chiffon.

halloween-51

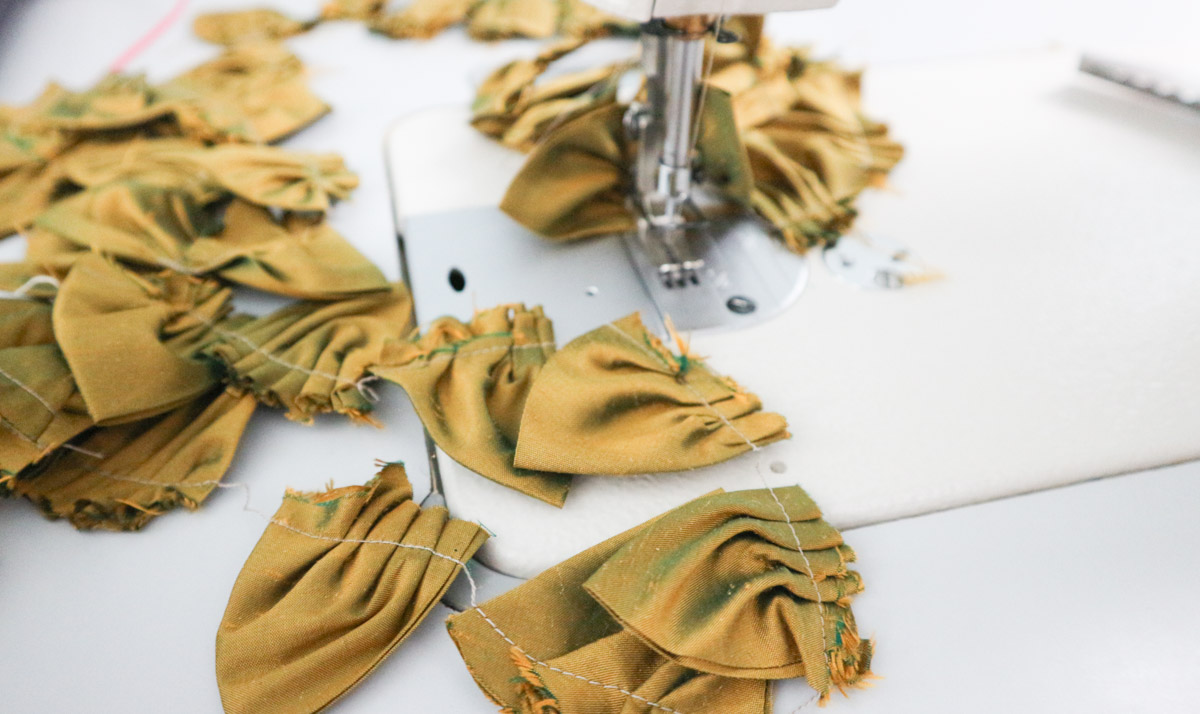
It turns out that 12″ piece of fabric I set aside earlier was way too short for the sleeves I ended up drafting. Luckily I had some scraps leftover from cutting the bodice that I could put to use. I ended up adding a horizontal band to the bottom of the sleeves, which gave me the length I needed and creates a really cool windowpane effect within the pattern.

halloween-45

The sleeves were sewn with 1/2″ seam allowances and fully lined.

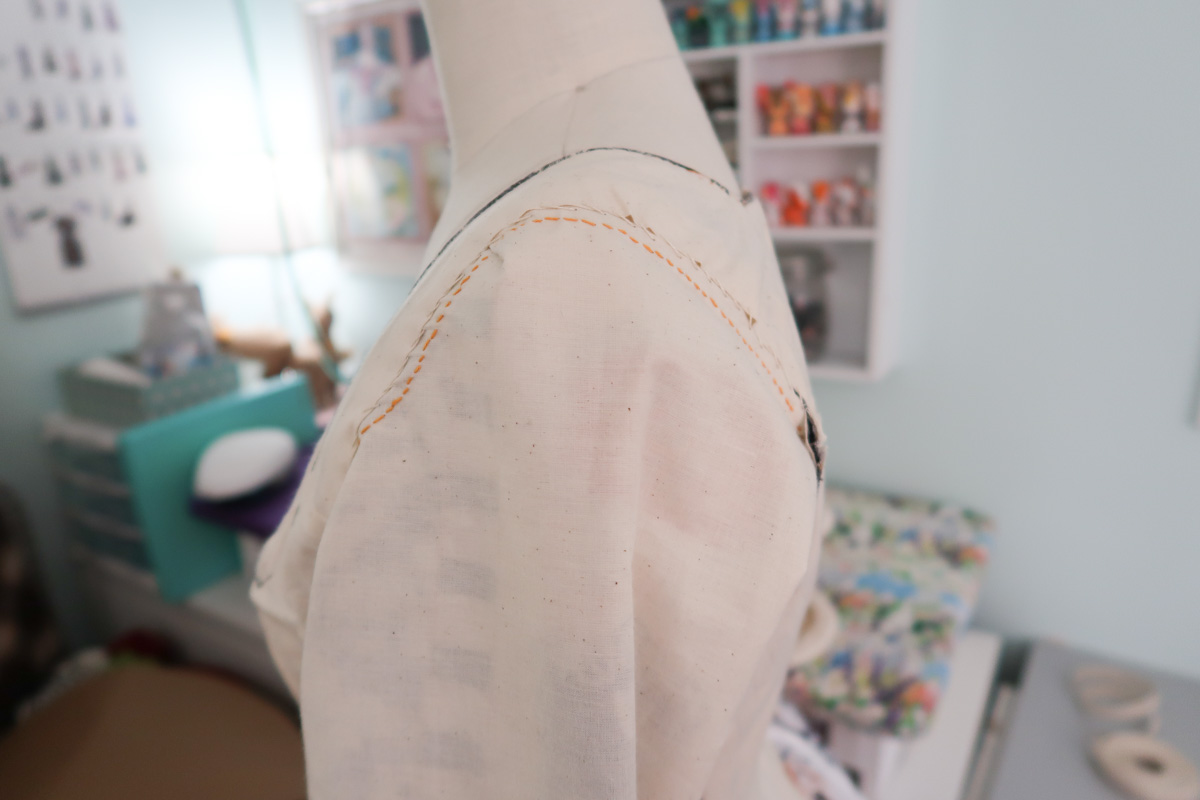
Then the bottom half was stitched to the underside of the bodice armscye. The top half of the sleeve was set the 18th century way, by being pinned between the strap lining and outer layer of fabric. This allows you to adjust the volume of the sleeve head and get a customized fit.

halloween-46

Here is what it looked like from the inside after the sleeves were sewn on.

halloween-48

halloween-47

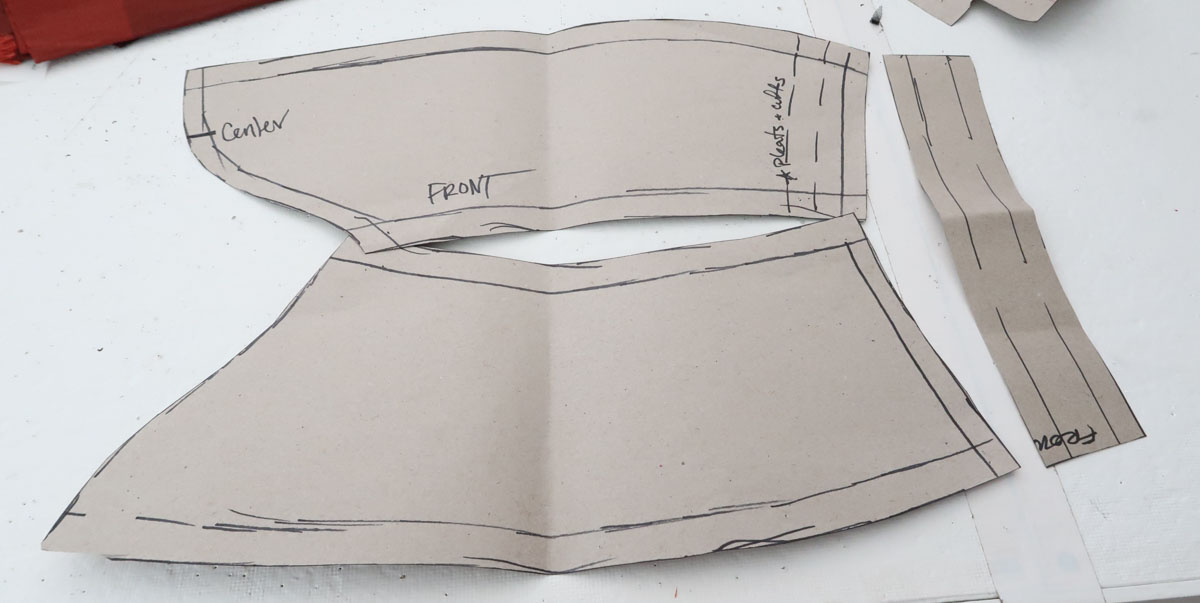
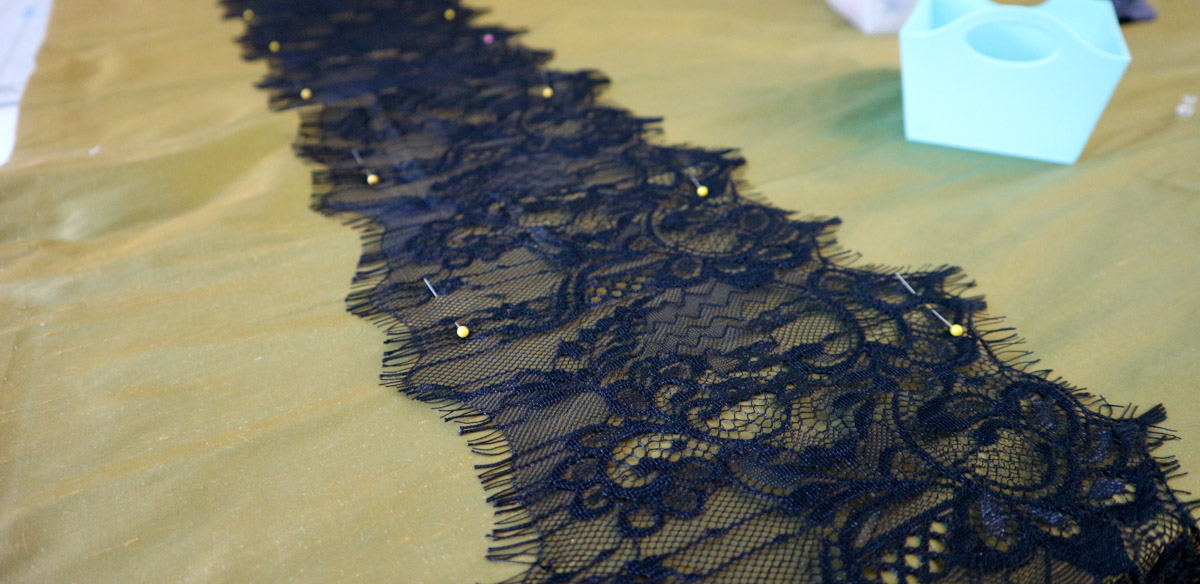
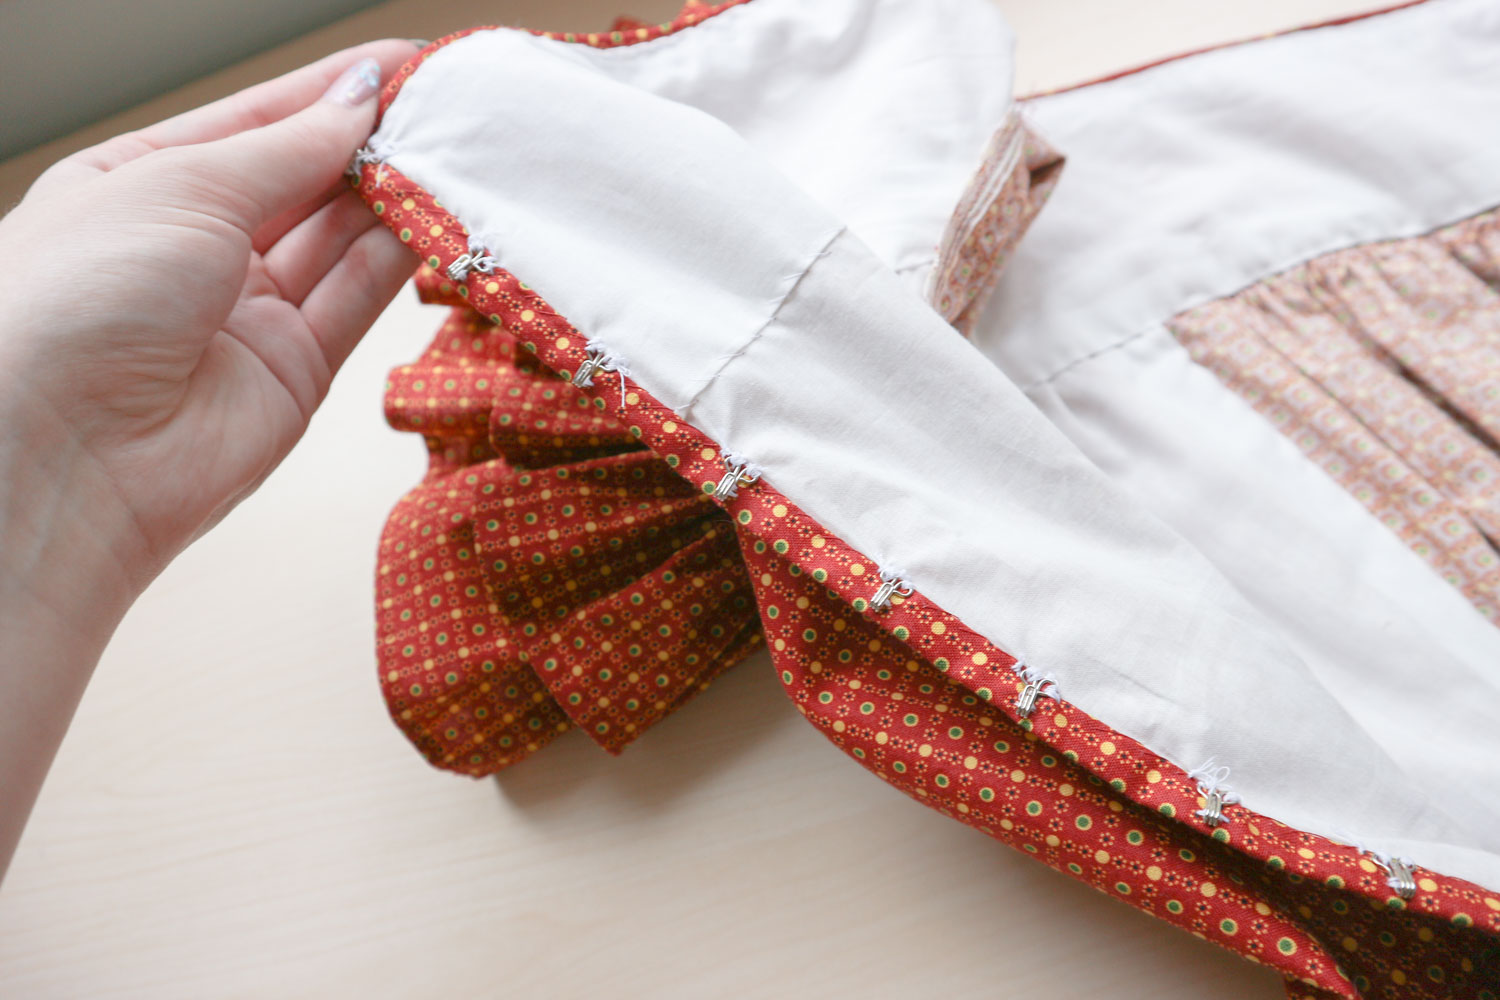
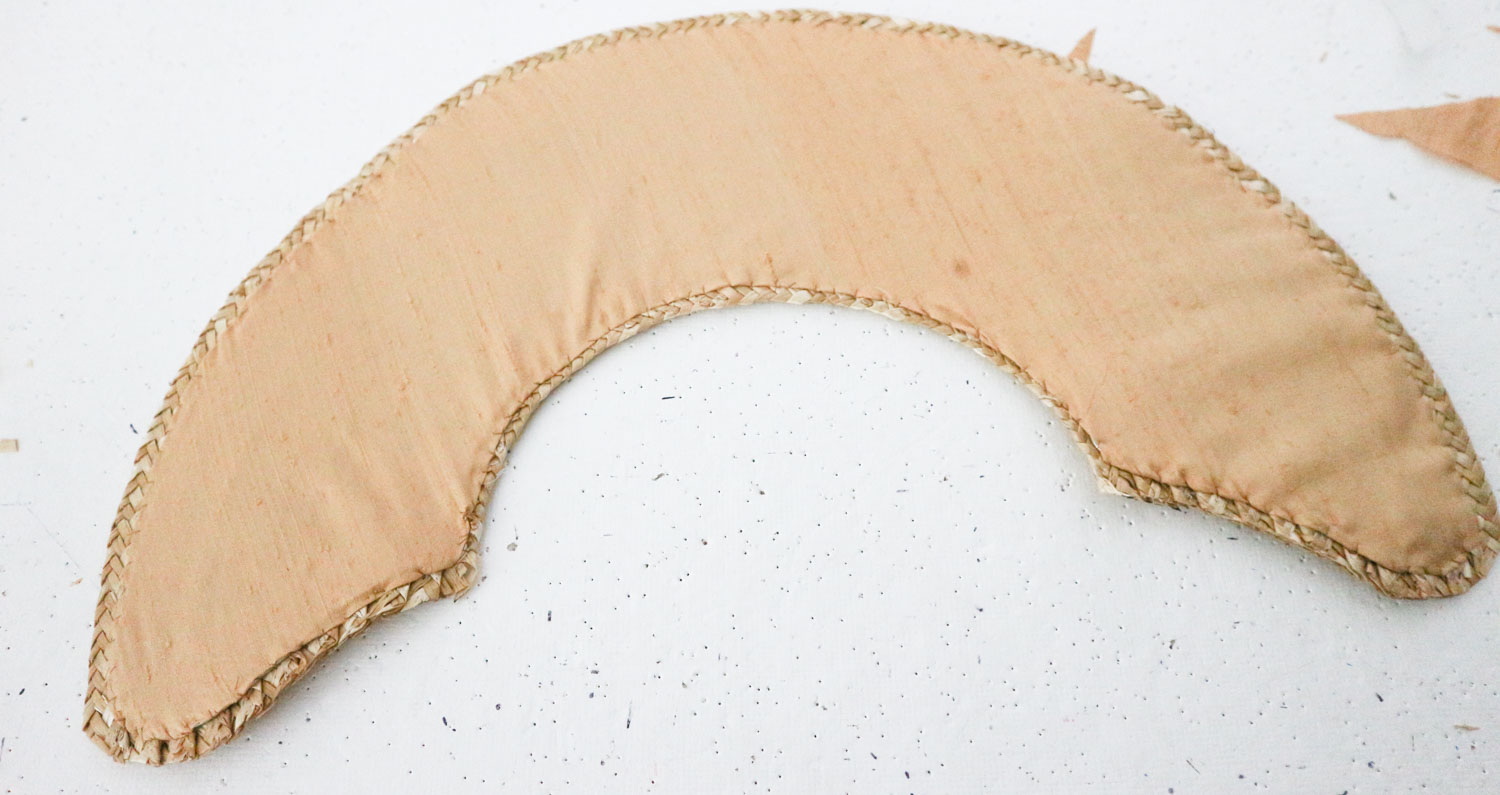
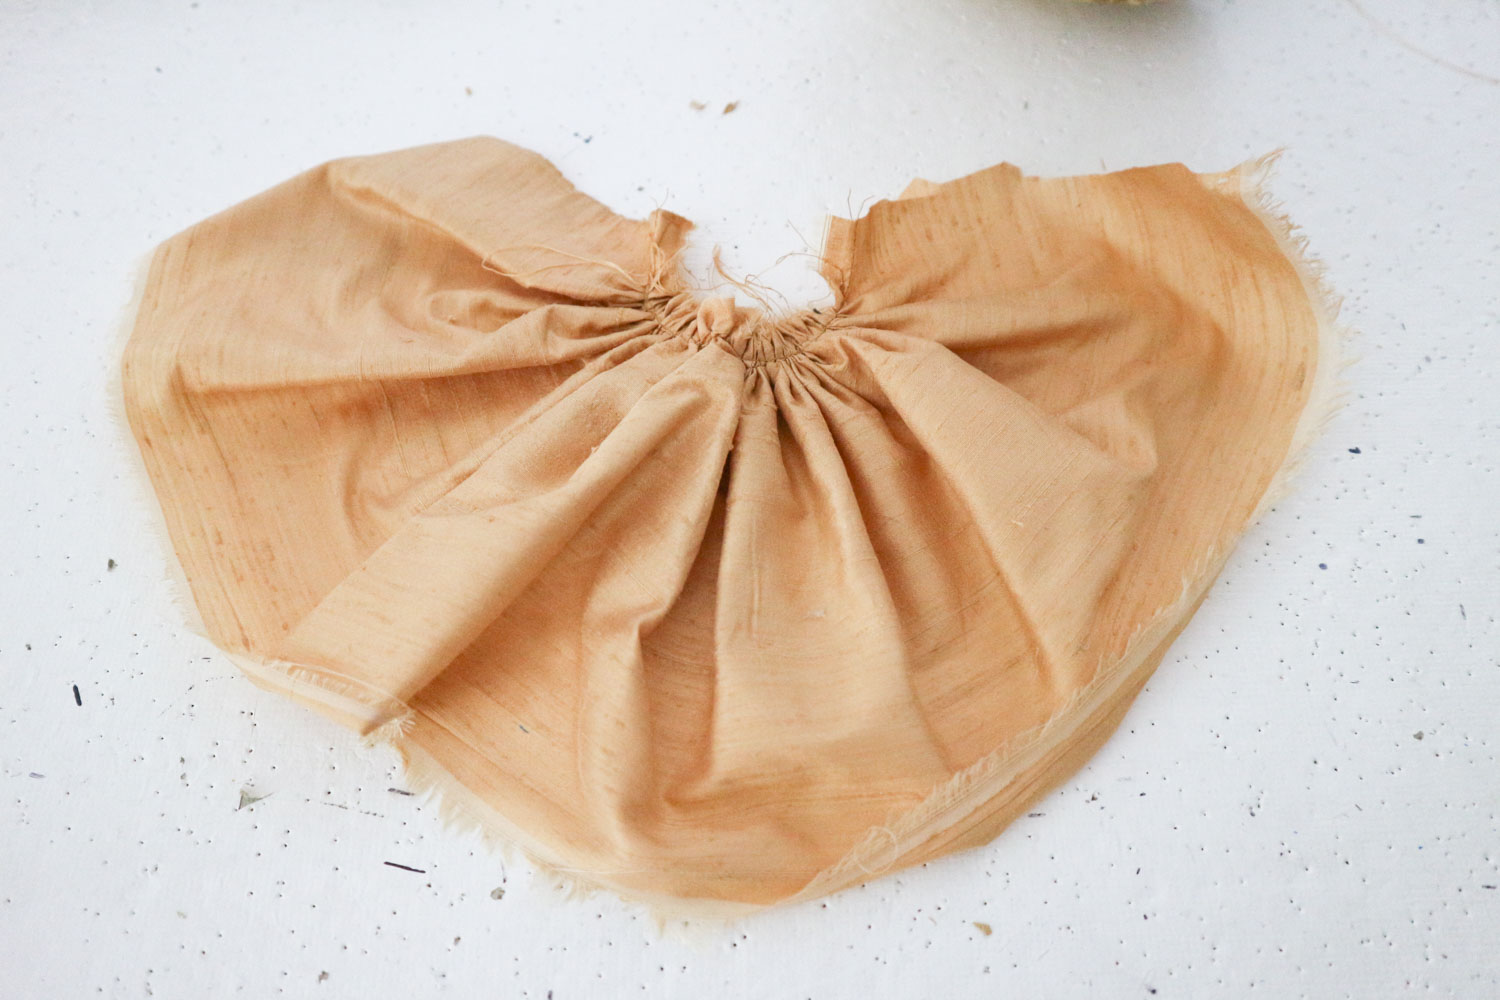
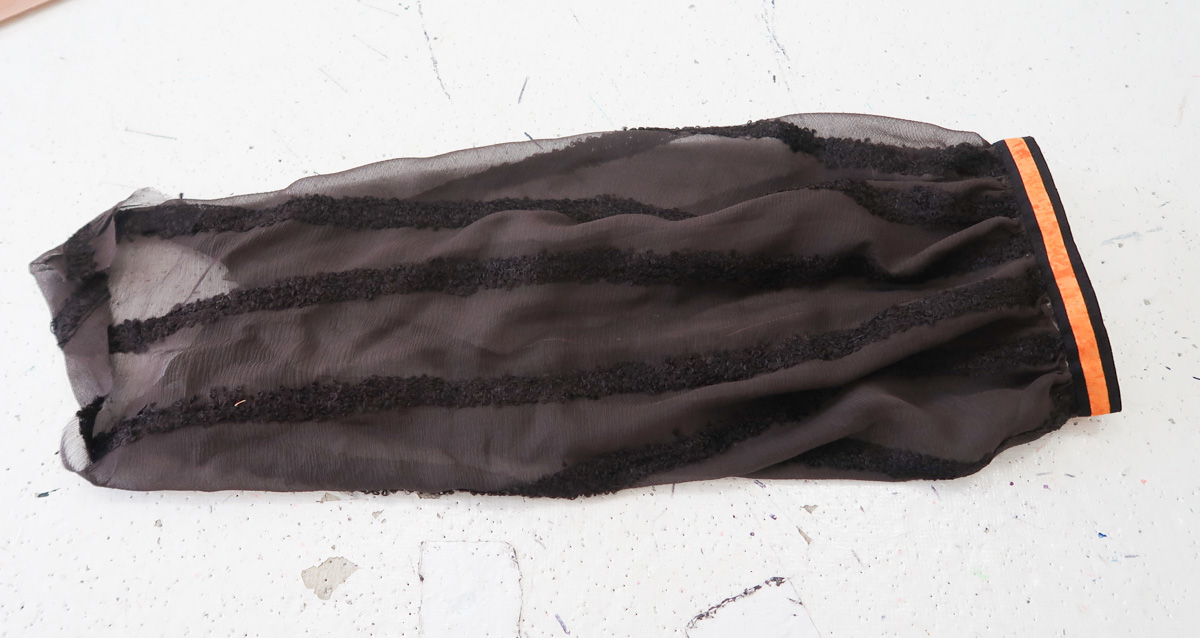
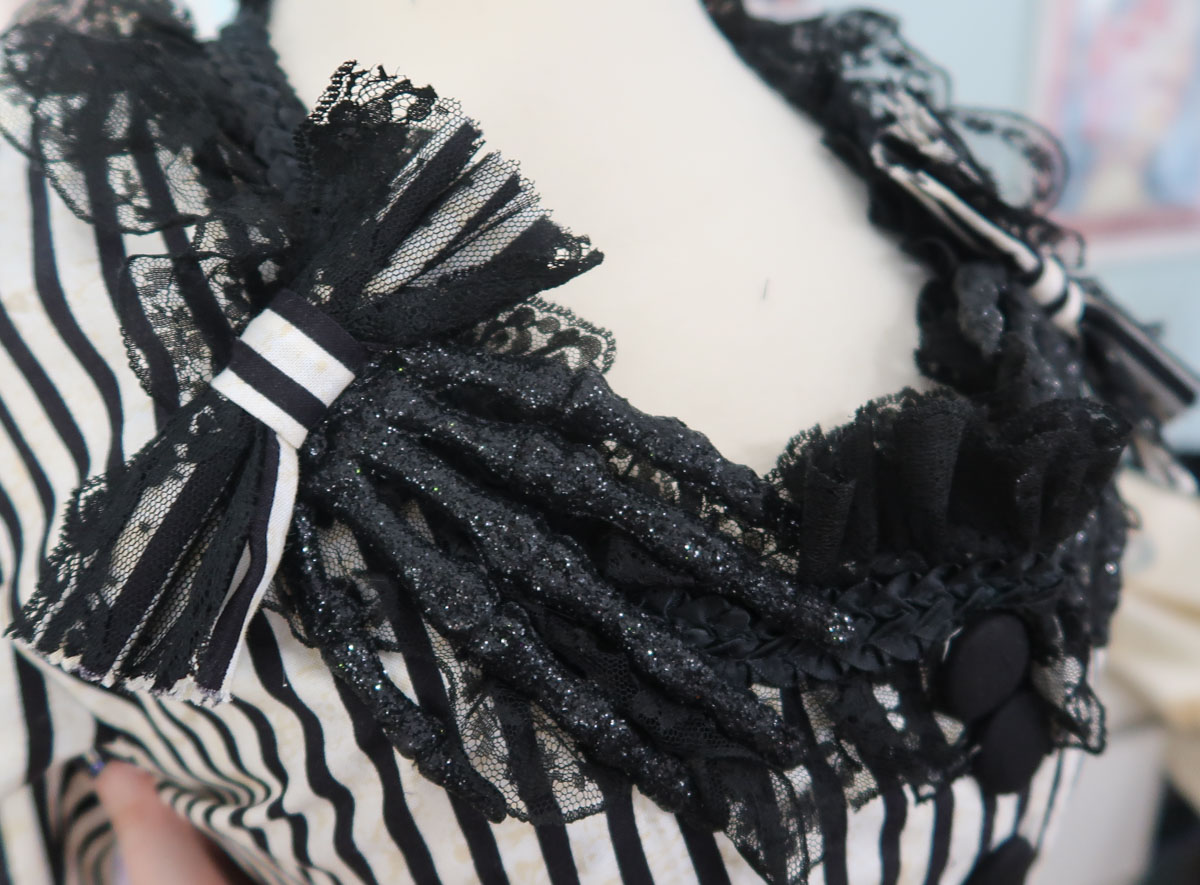
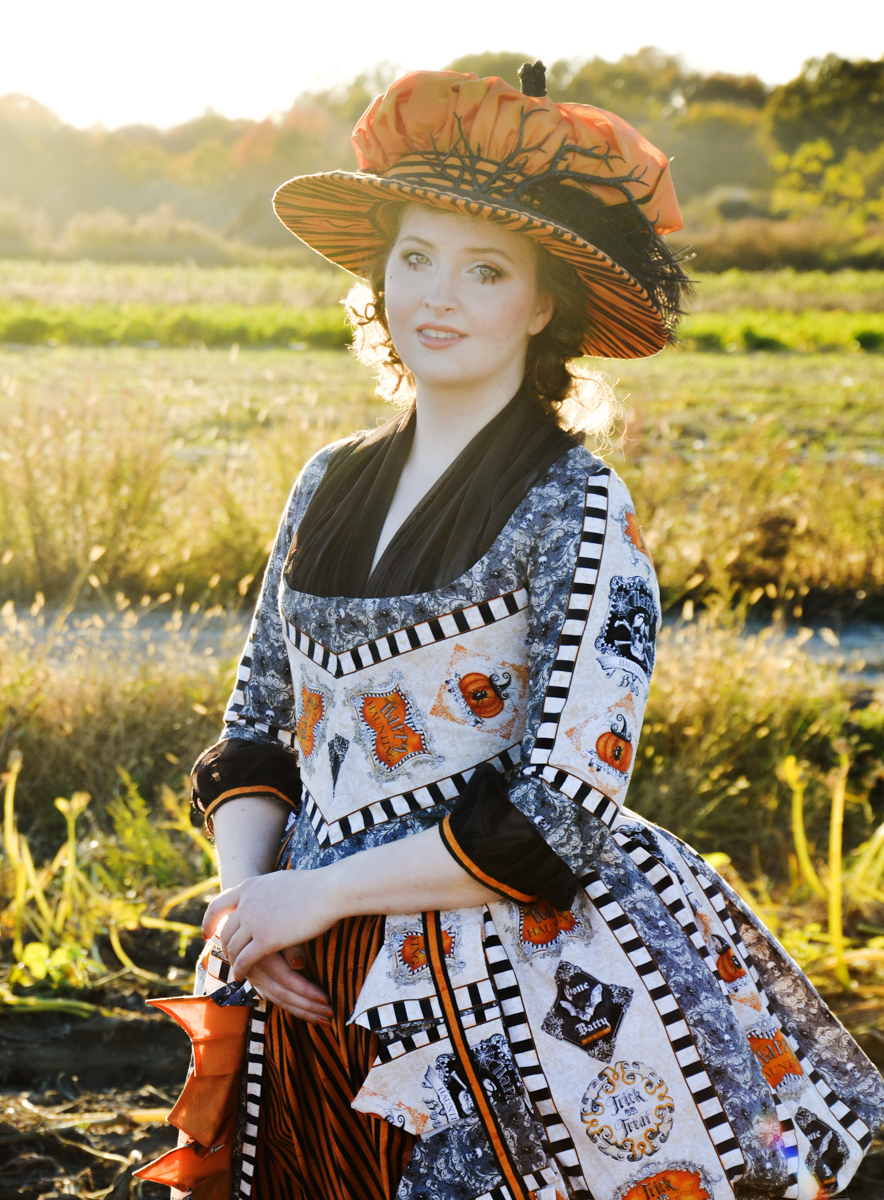
Now it was time to add the under sleeves. These were originally supposed to be part of a decorative chemise worn beneath the dress. But I didn’t have enough fabric to make a chemise, so I decided to make undersleeves that could be removed, and a matching fichu to trim the neckline.

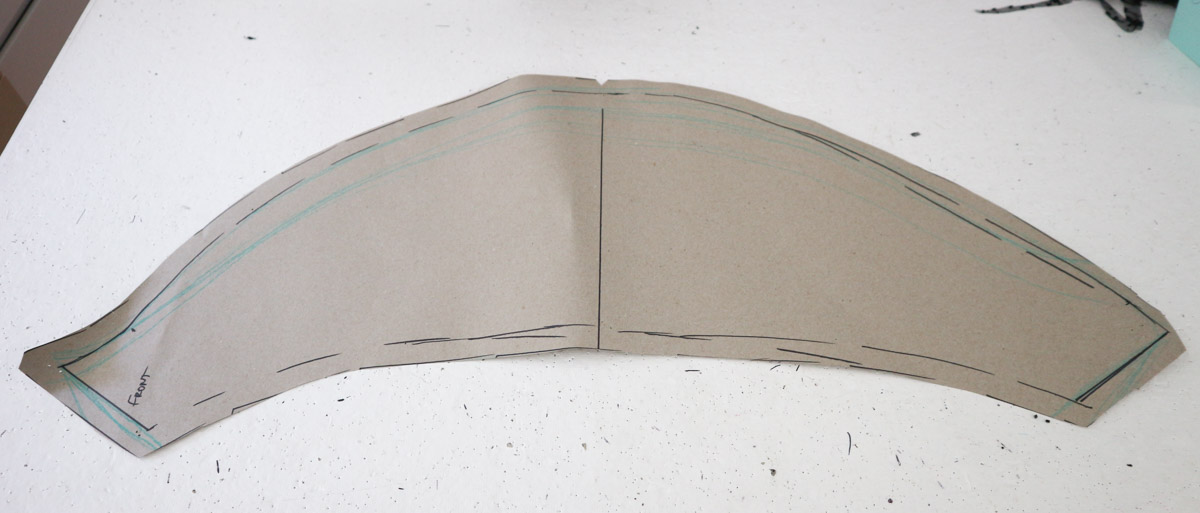
I showed the pattern for these above. The bottom edge was gathered to 12″, then linen ribbon was stitched to the underside. I sewed the side seam as a french seam, and sewed cotton binding overtop of the linen ribbon, sandwiching the raw edge of the chiffon in between and out of sight!

halloween-49

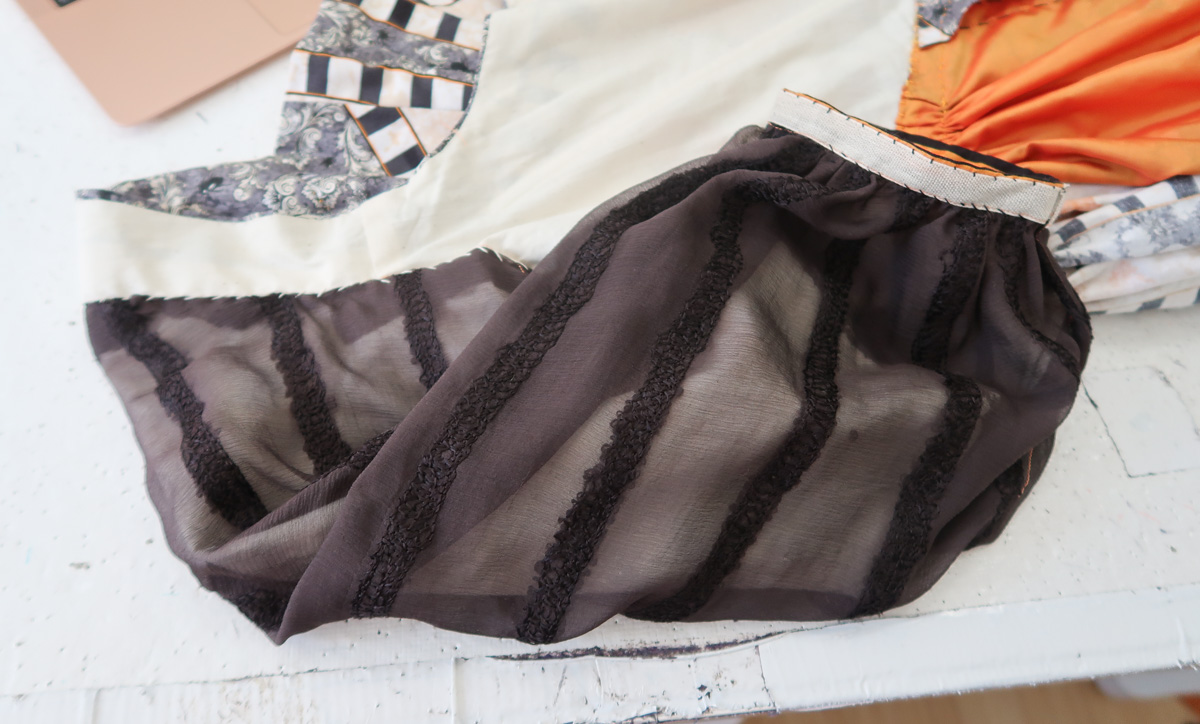
I folded the top edge inward, then whip stitched it to the lining around the armscye of the bodice. These aren’t removable in a modern sense – as in they don’t snap or velcro into place. But historically trims were often basted to dresses and removed as fashion evolved or pieces needed to be laundered. So in that sense these are very much able to be removed if I want to style the dress differently in the future.

halloween-50

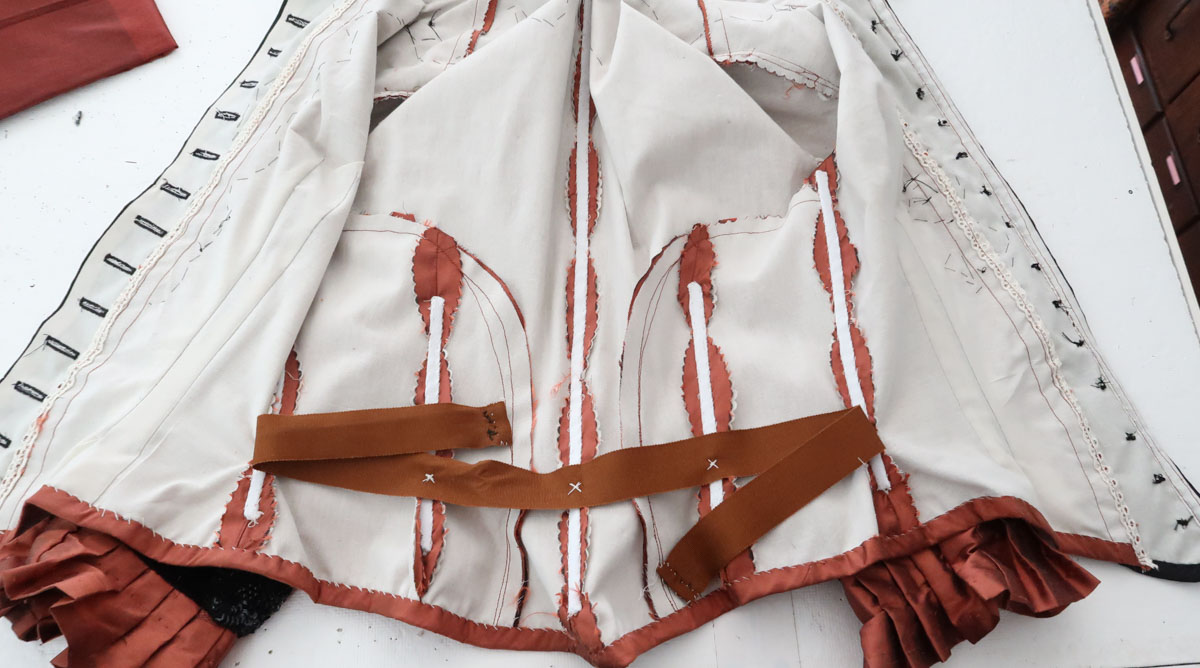
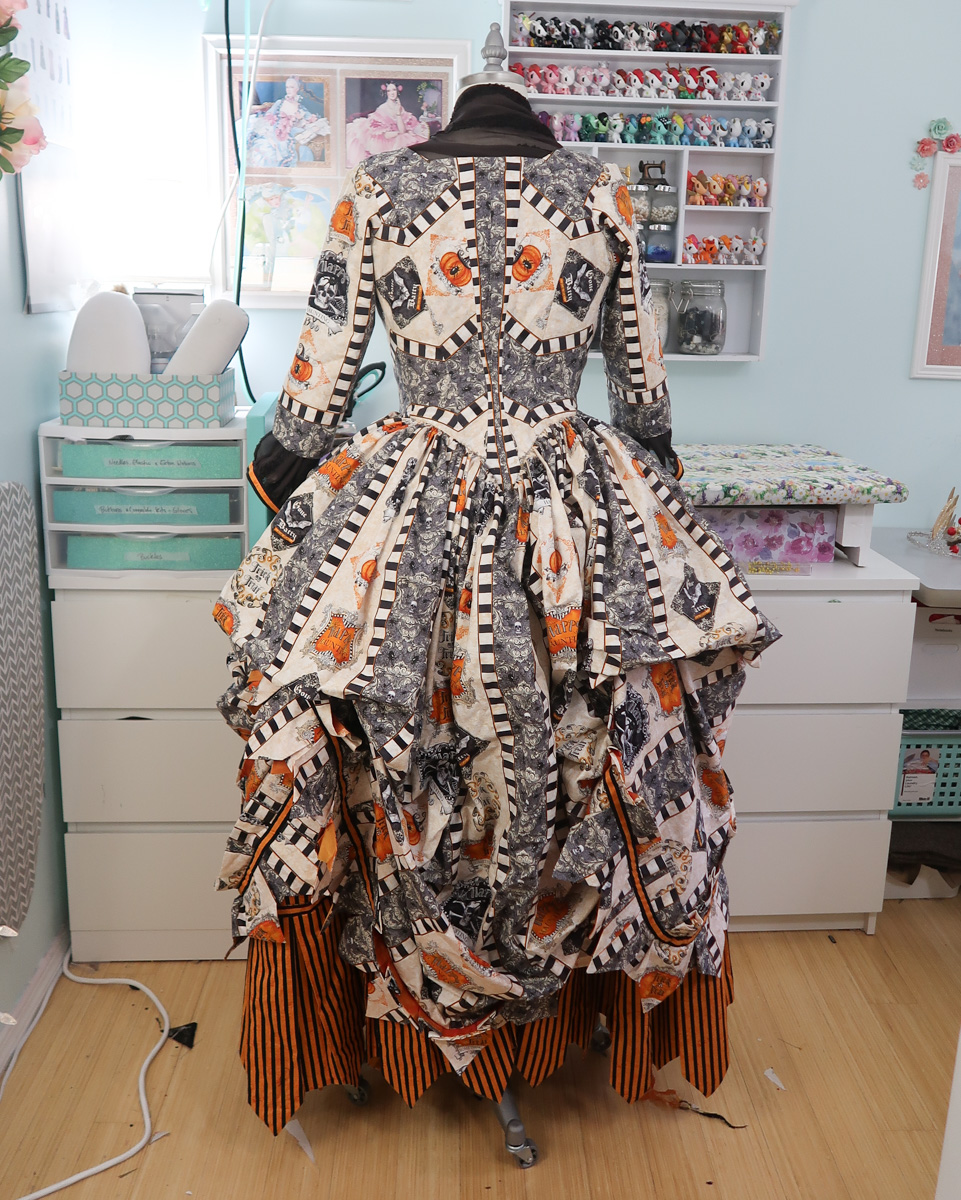
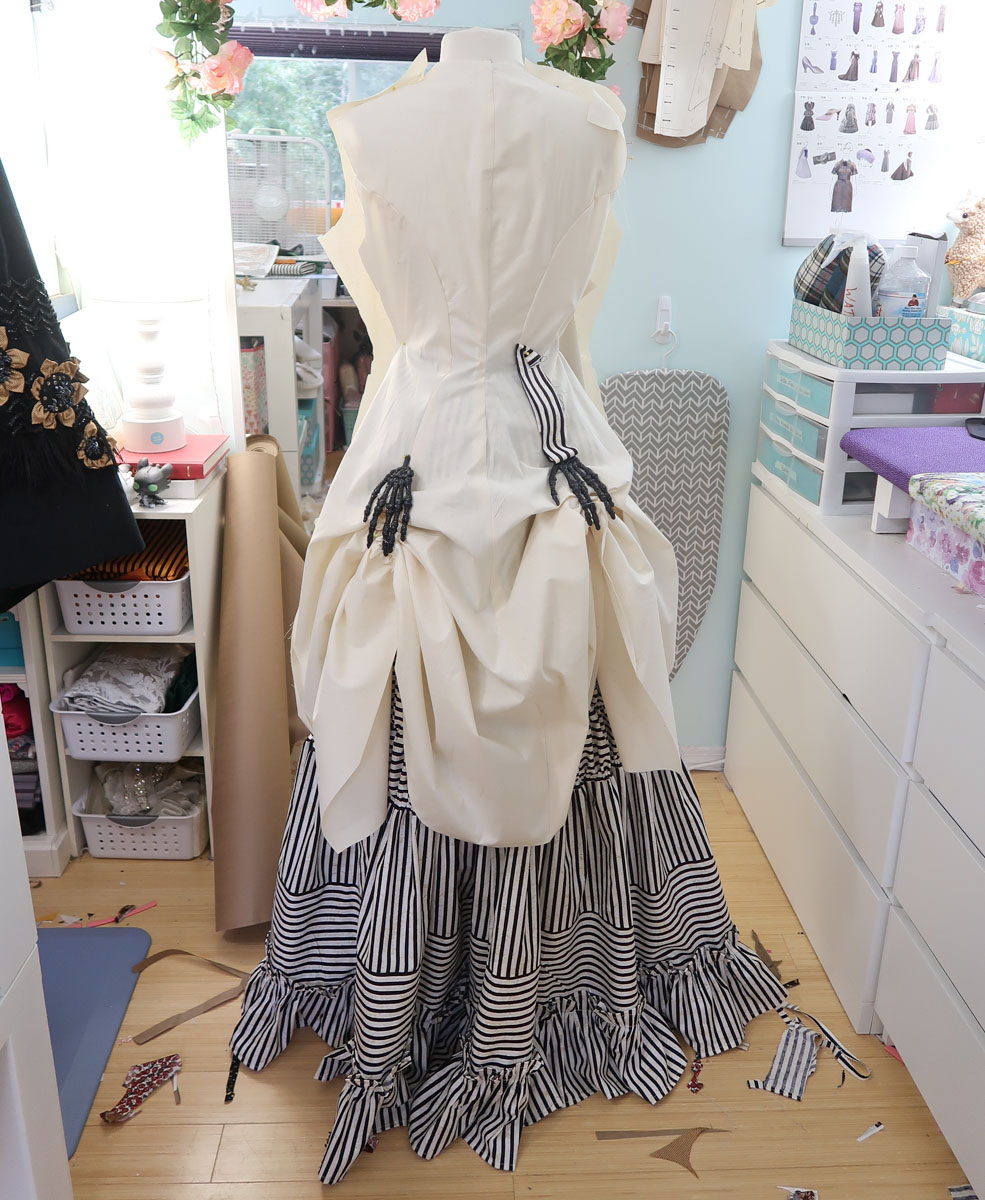
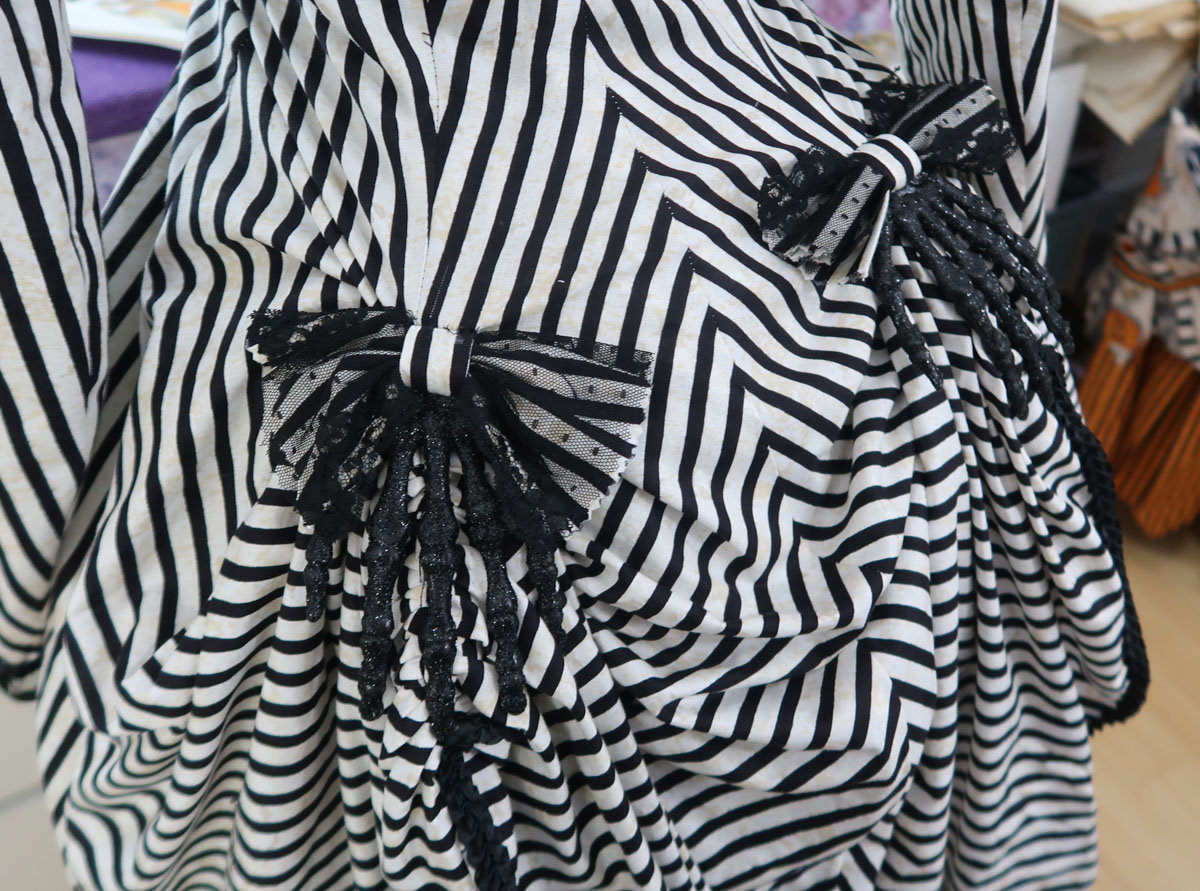
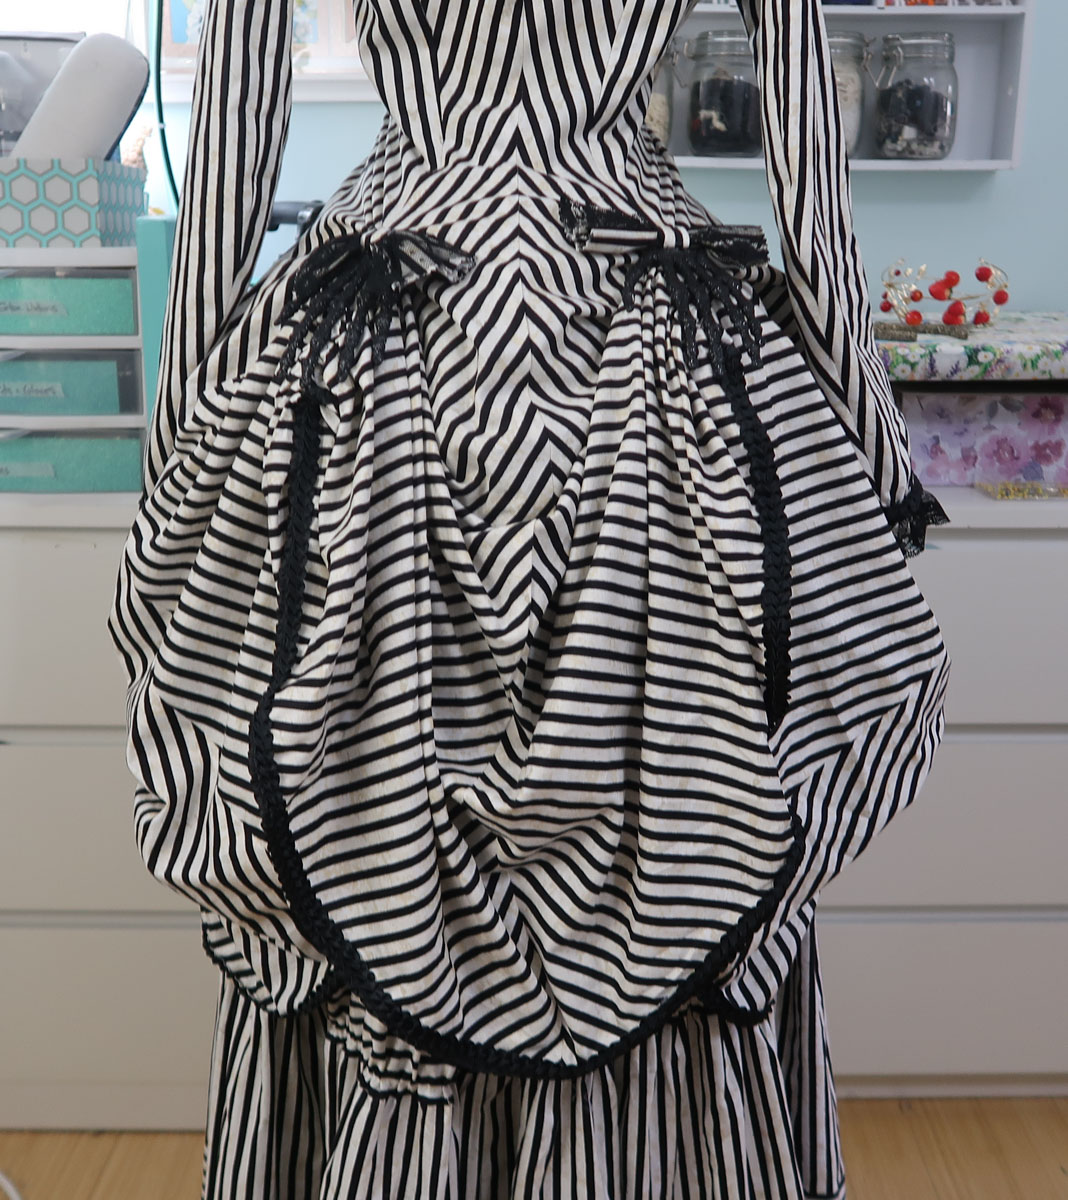
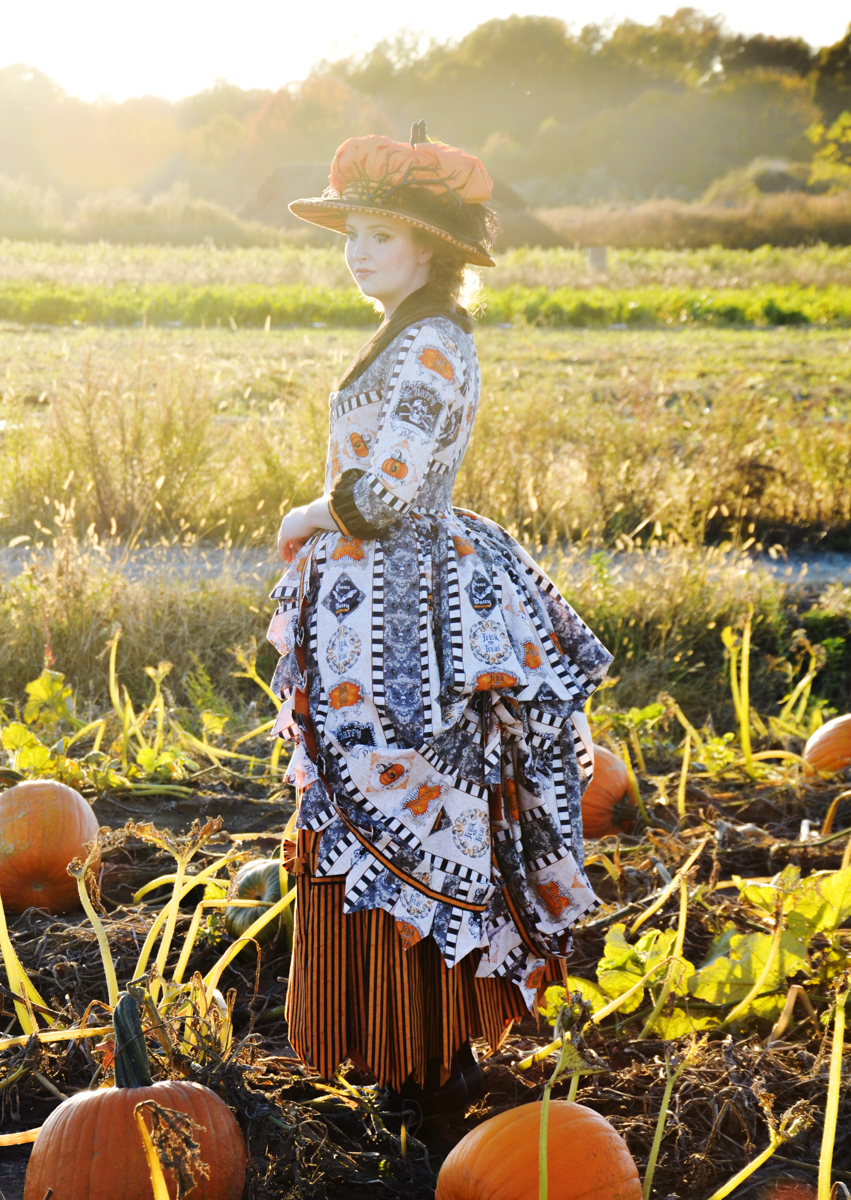
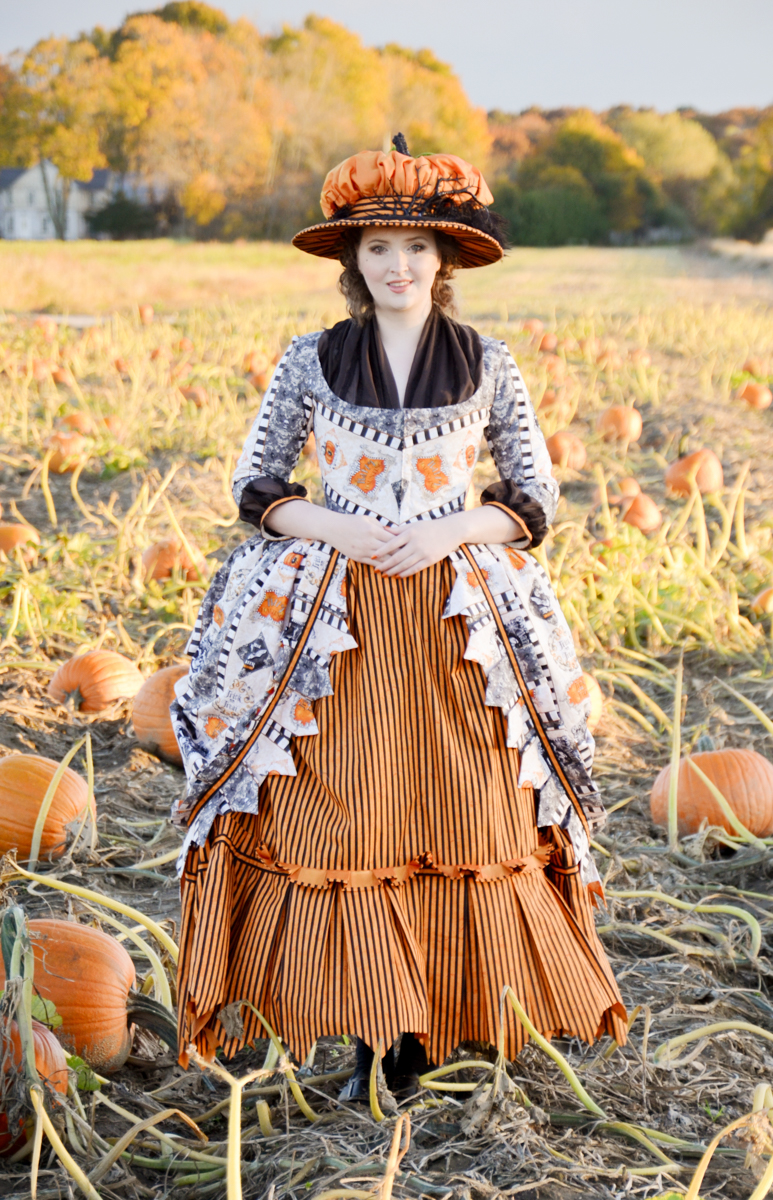
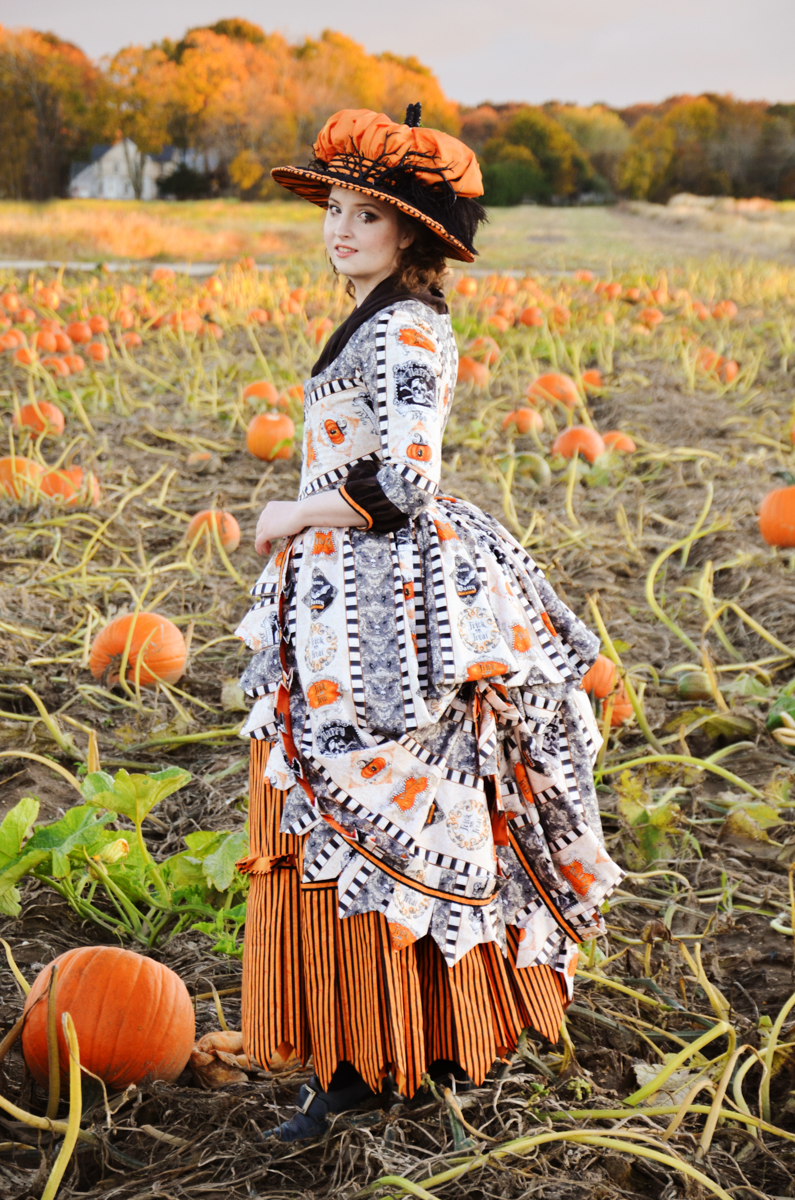
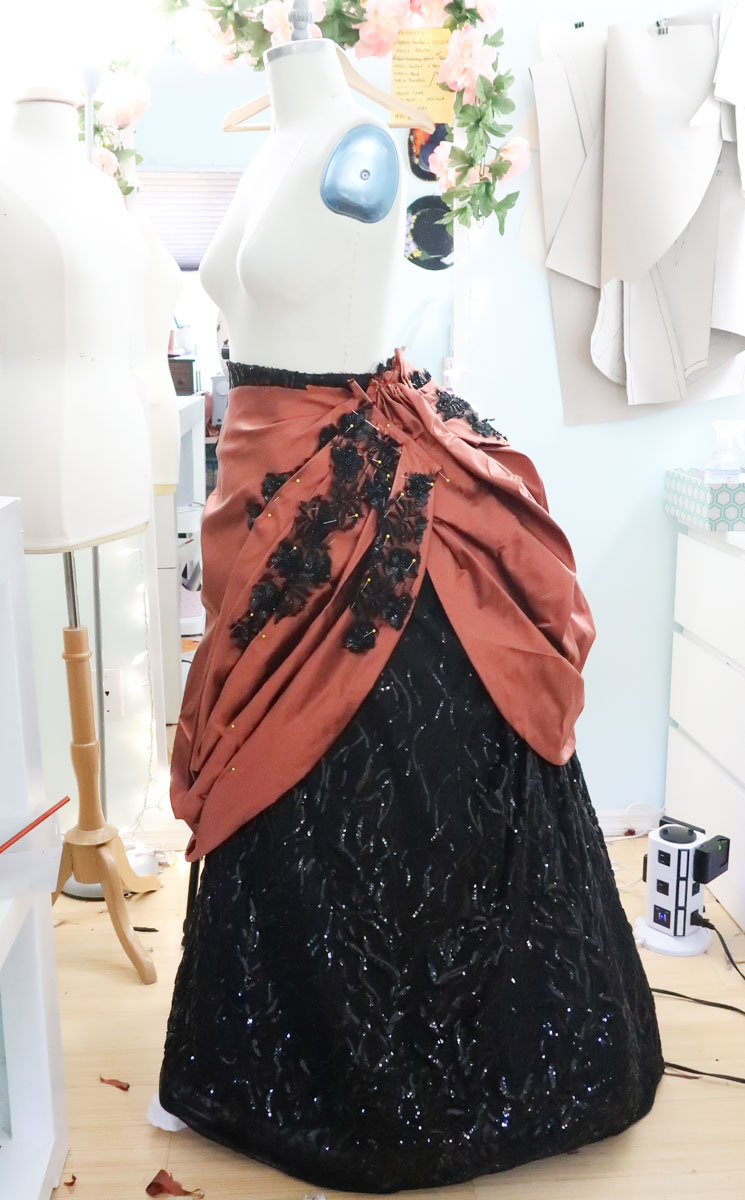
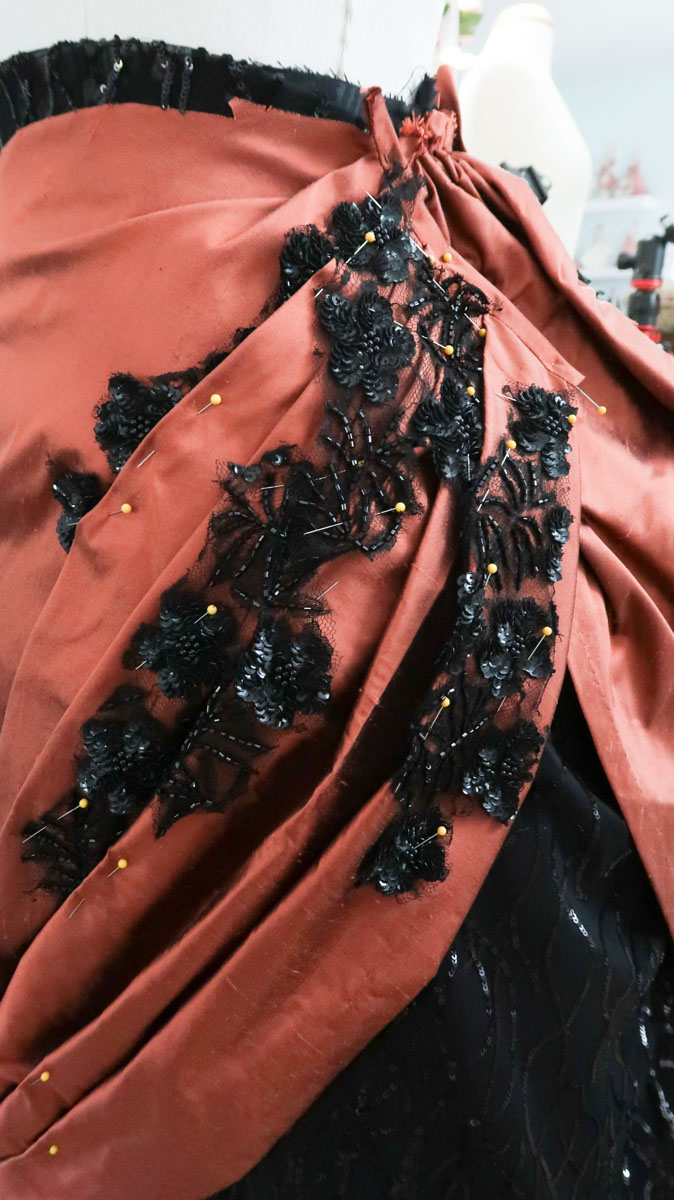
The last step was sewing the ties in place. These are what change the shape, and style of the dress and turn it into a robe a la polonaise.

There are ties placed about 30″ from the front of the skirt, and 15″ away from the hem. And those tie-to-ties sewn to the waist of the bodice, at the base of each side seam.

halloween-53

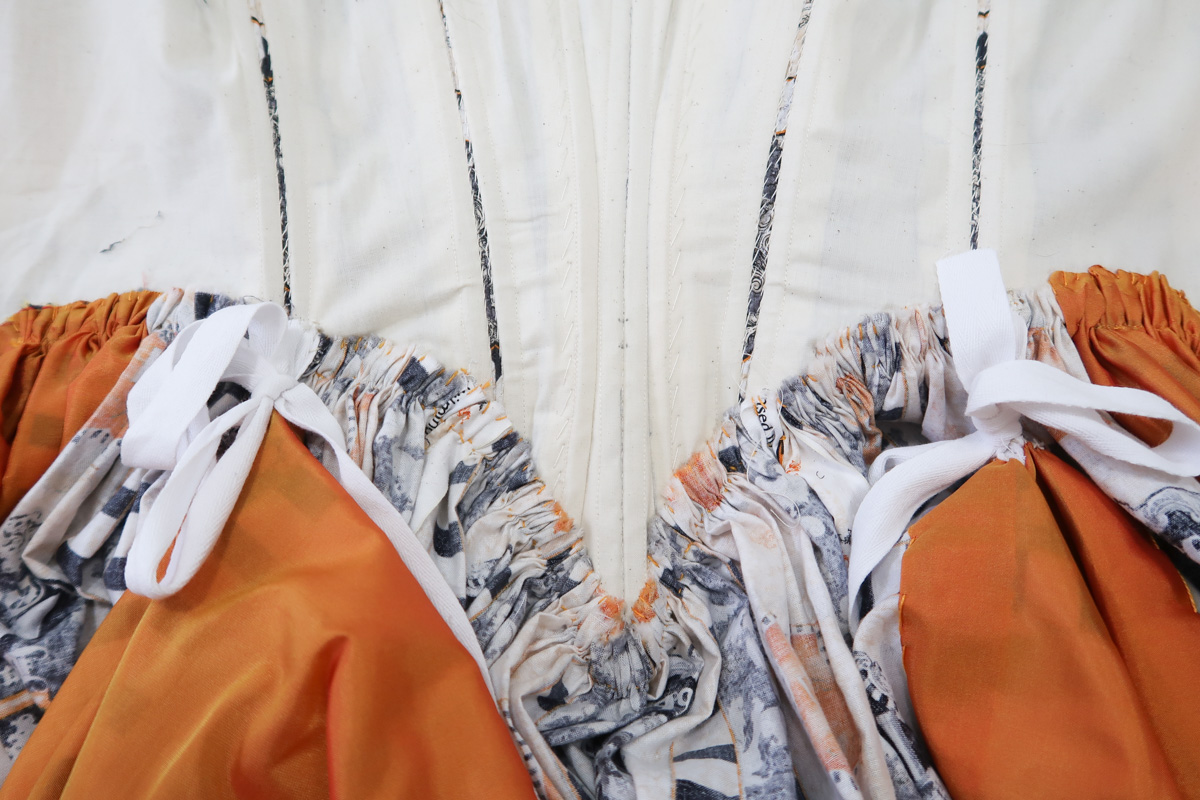
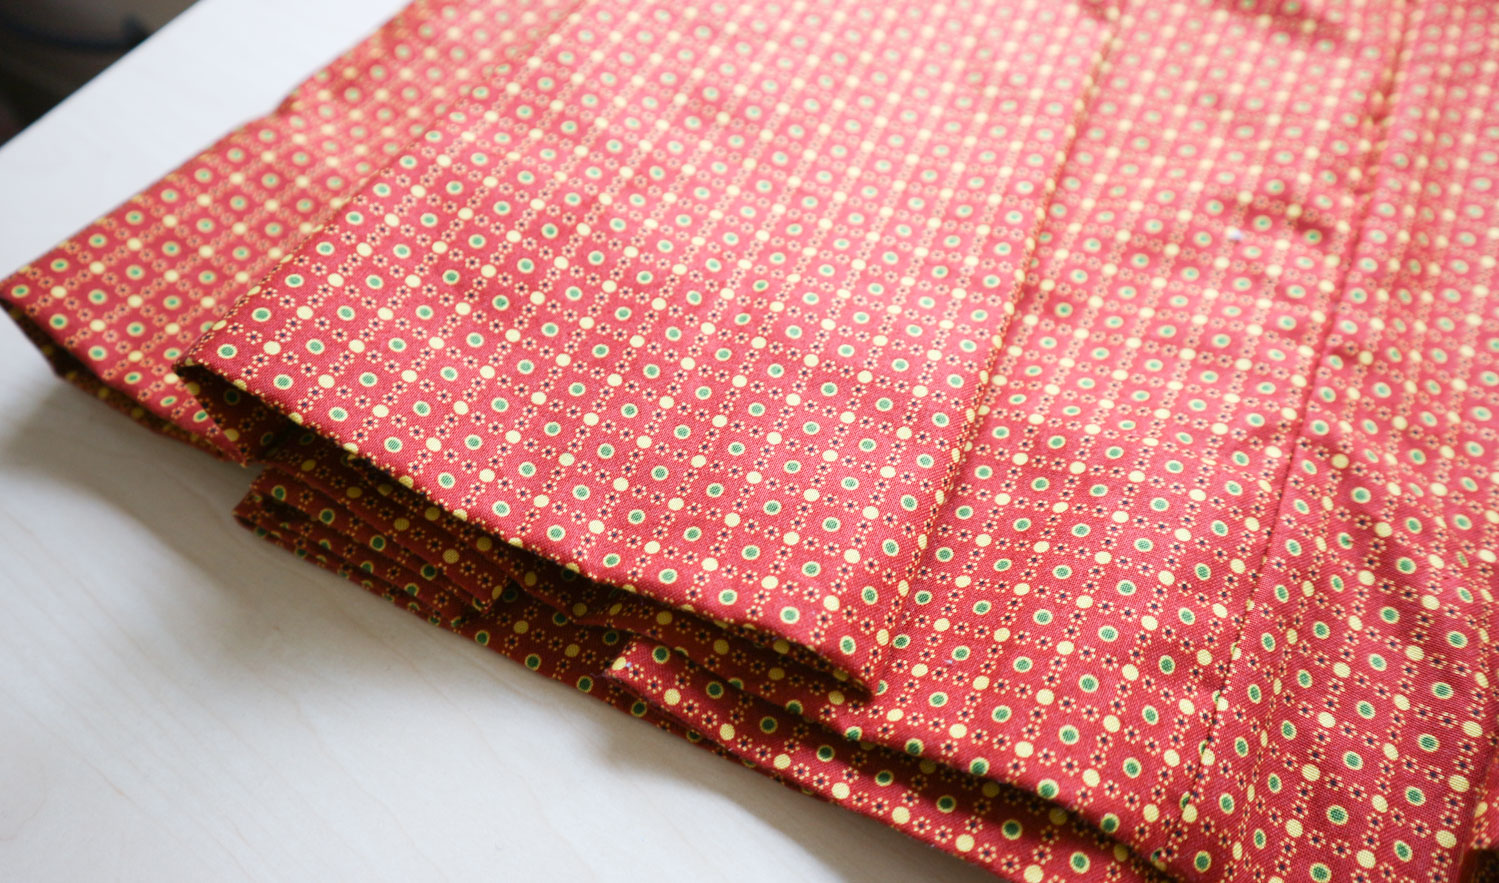
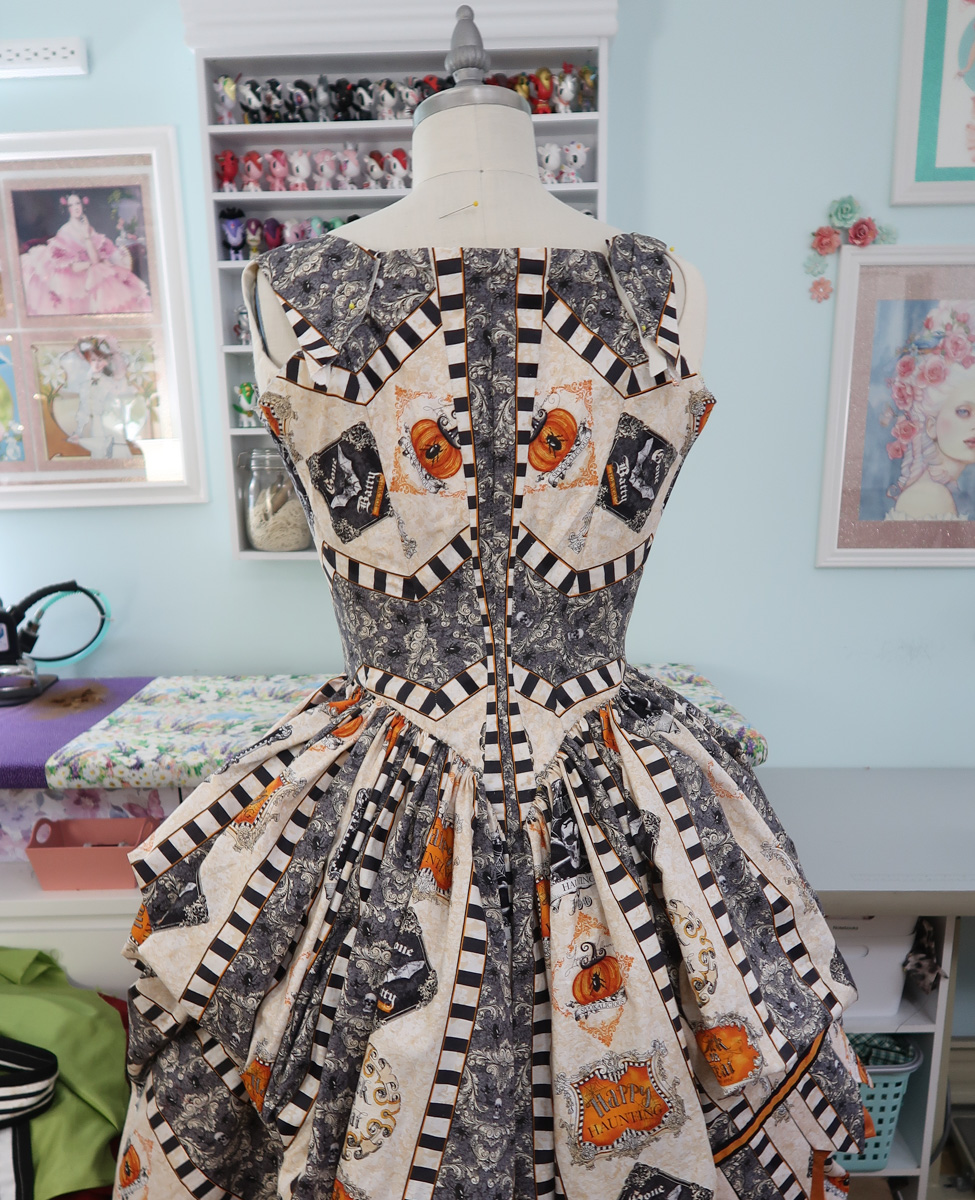
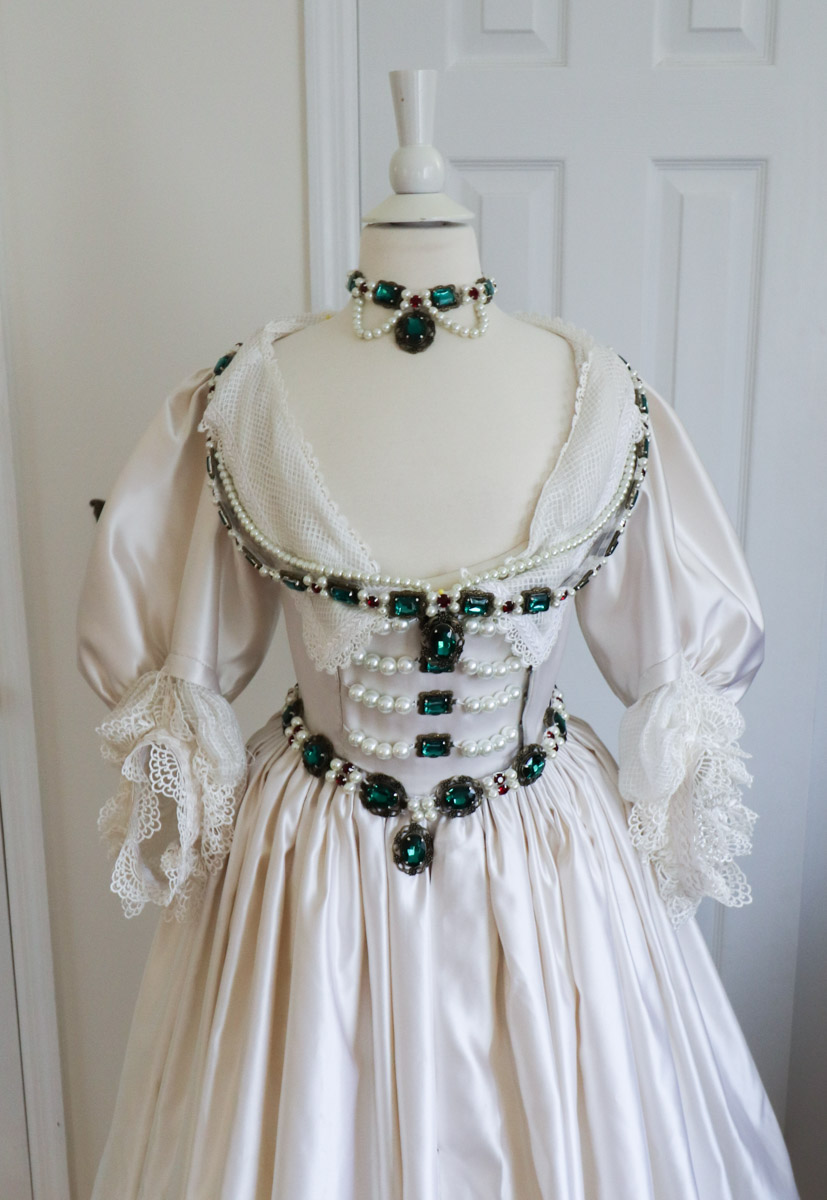
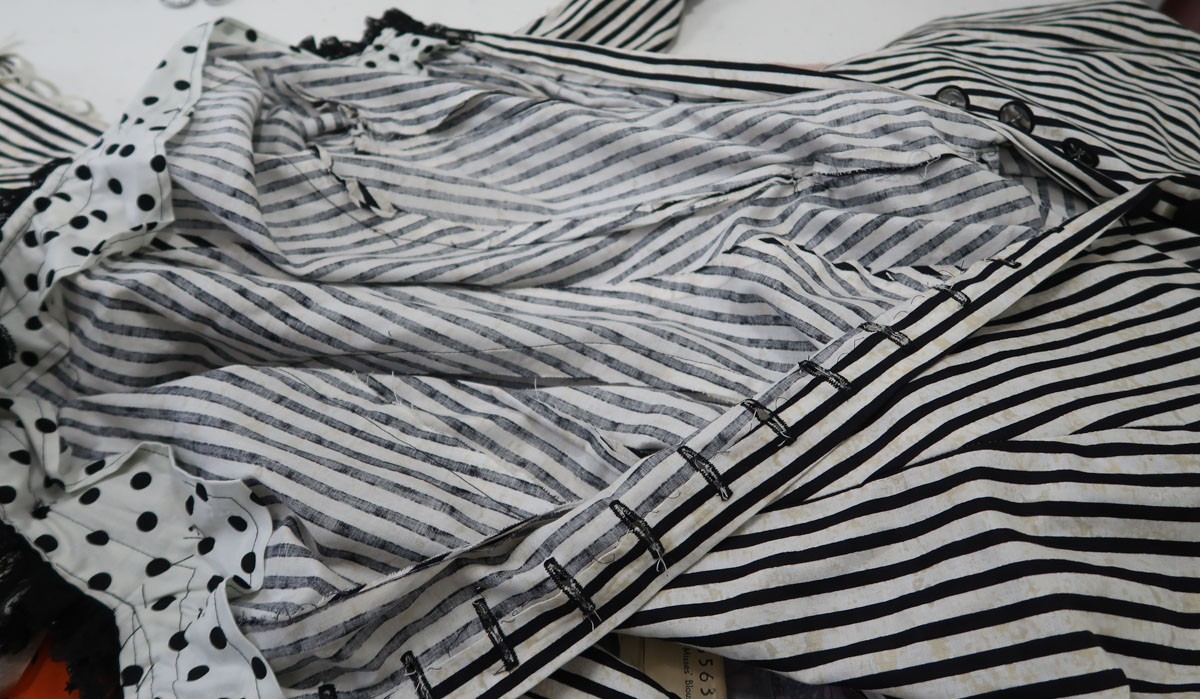
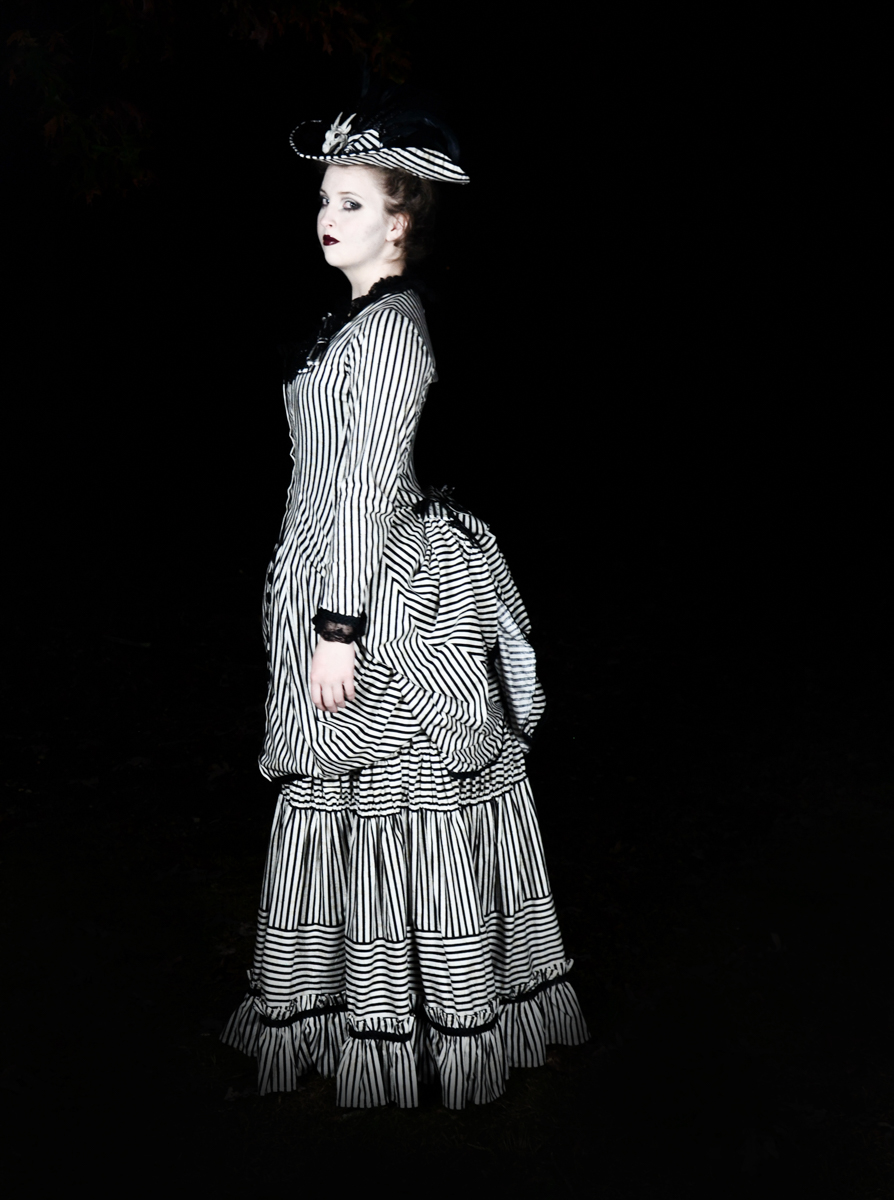
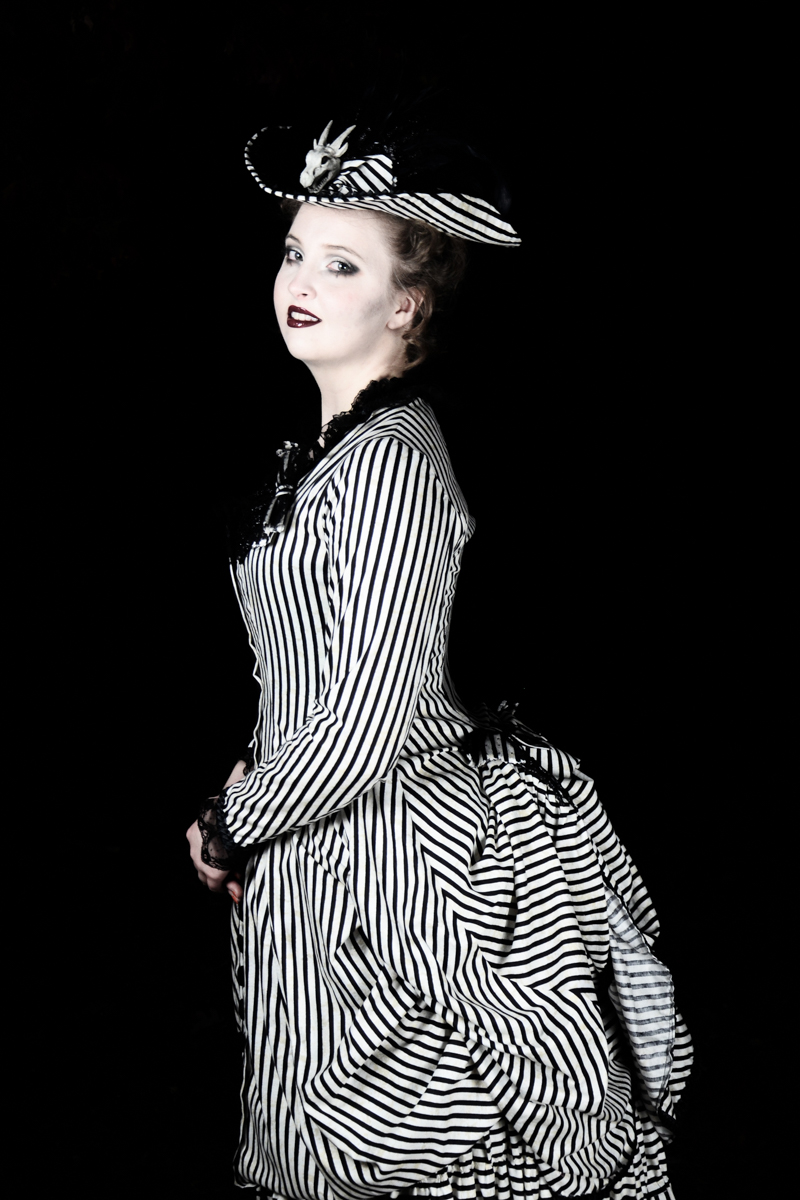
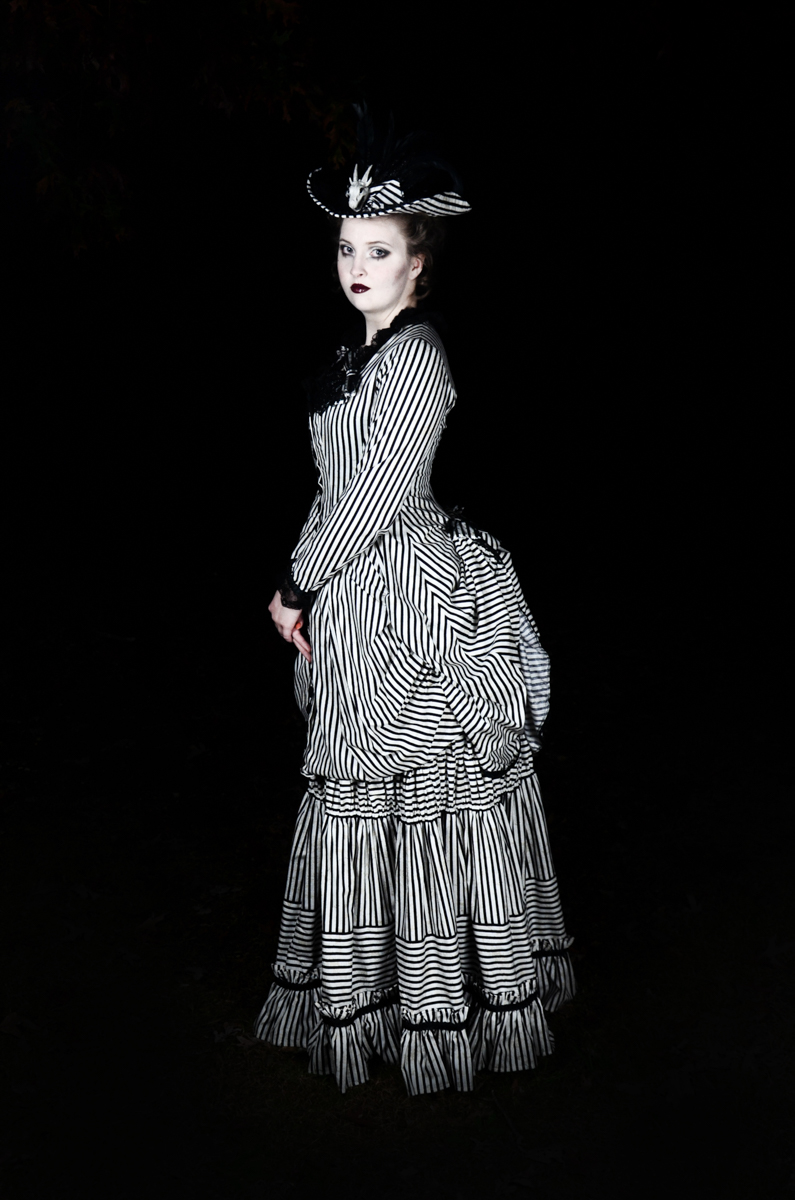
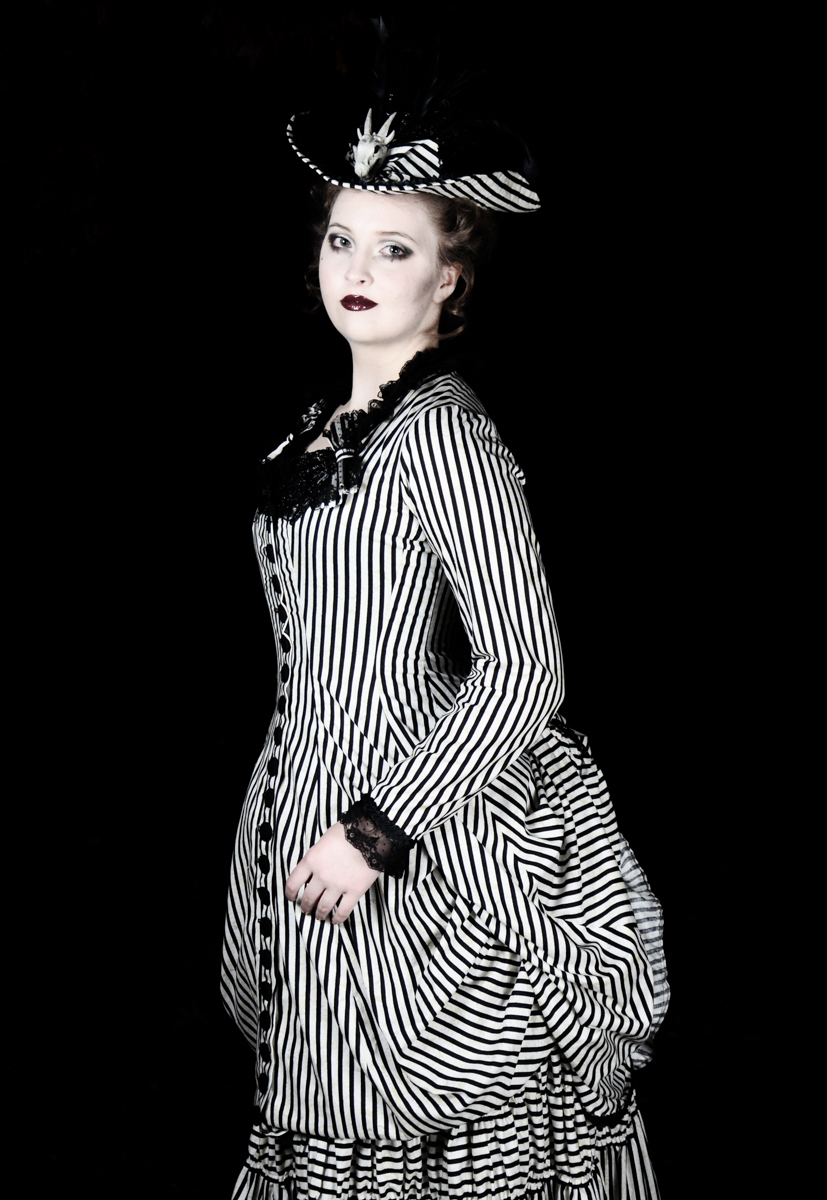
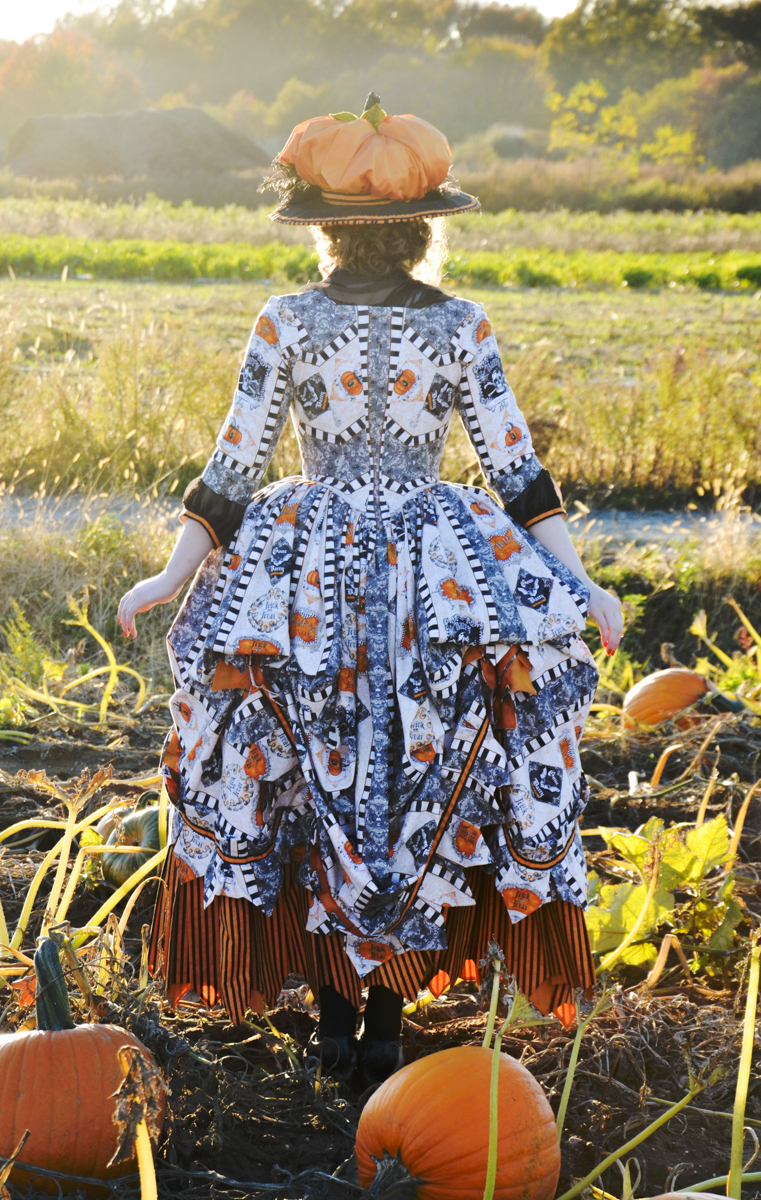
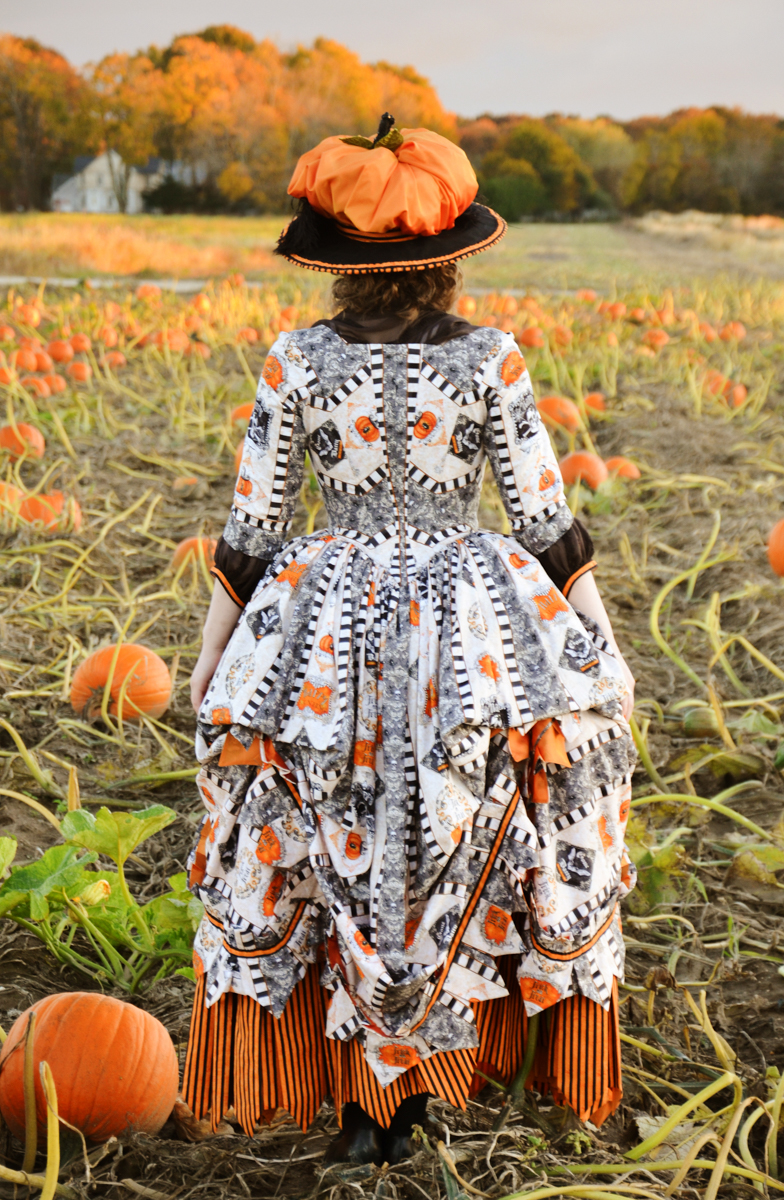
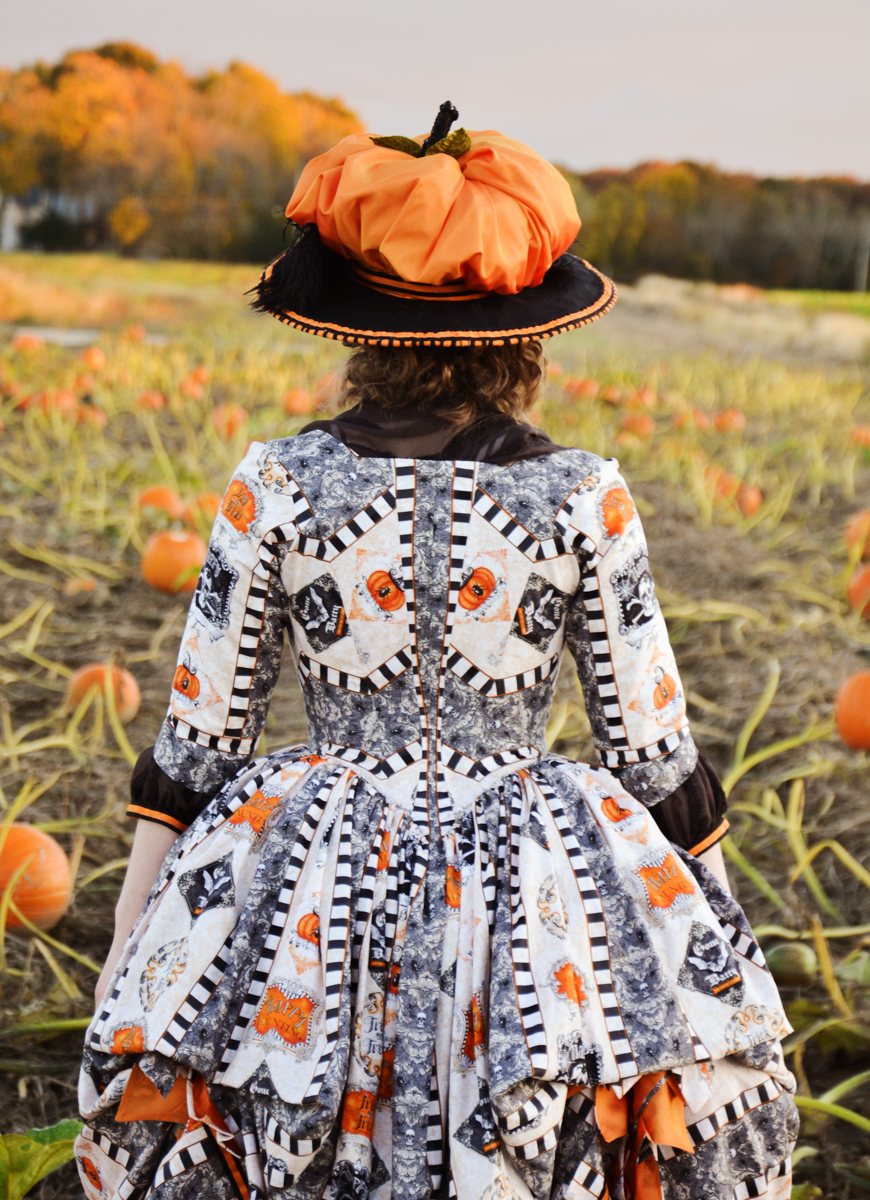
Here is what the finished interior of the bodice looks like – I’m soo proud of the construction on this one, and all the finishing work done by hand. Even though it’s a quirky fabric I think the quality of work (and the silhouette, obviously) help give it that historic flare.

halloween-54

I also love the lining. Lining fabrics are so cheap in the garment district, I really should stock up and line the skirts of more of my projects. That way if the hem flares up at any point, the interior still looks very tidy.

halloween-55

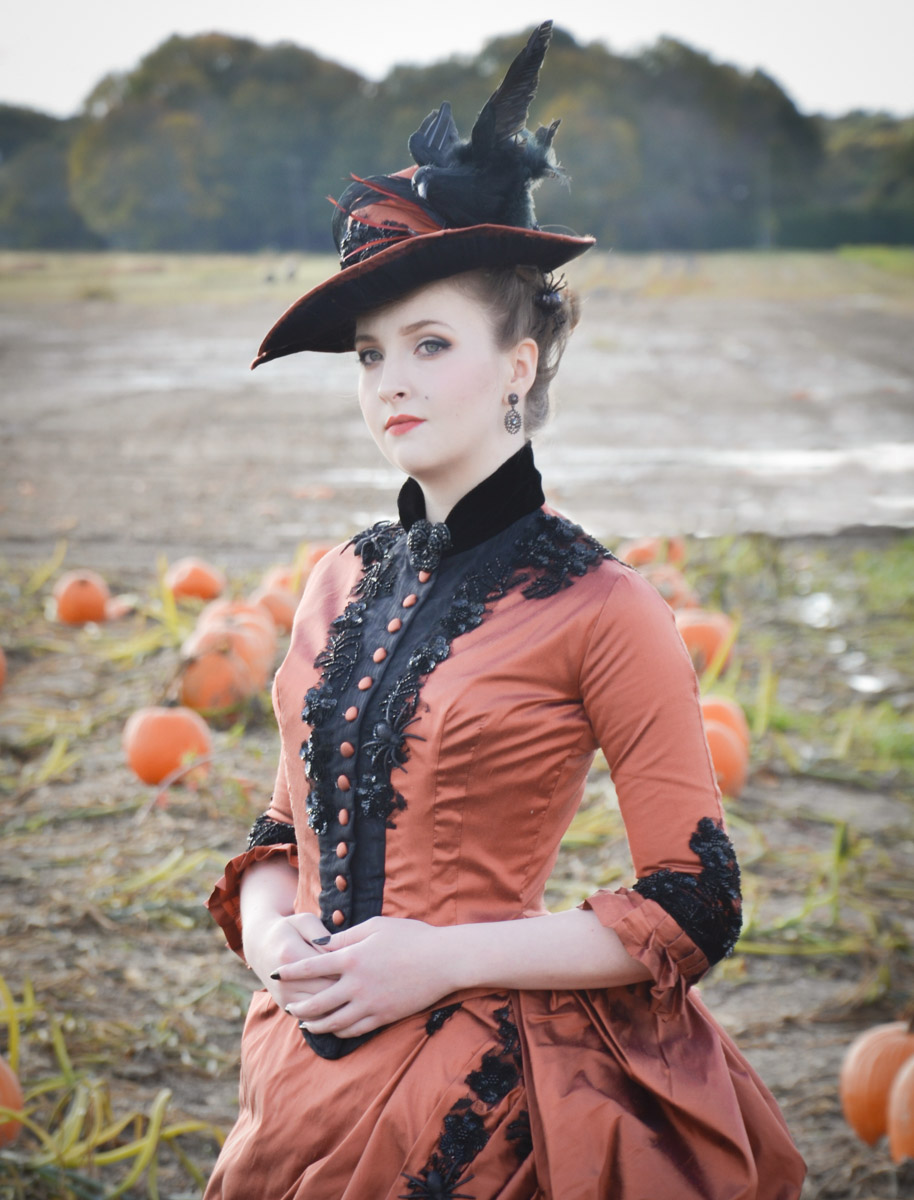
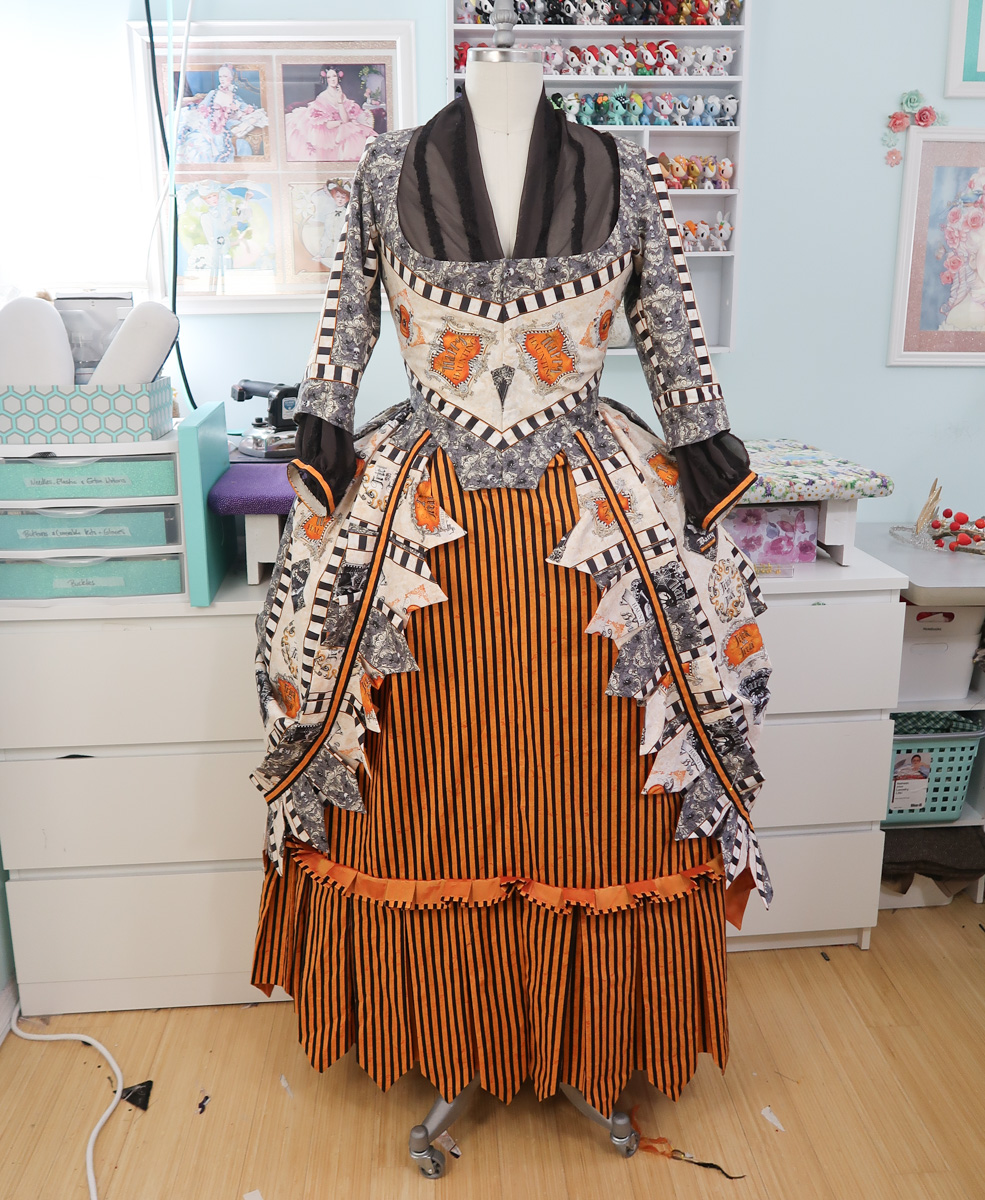
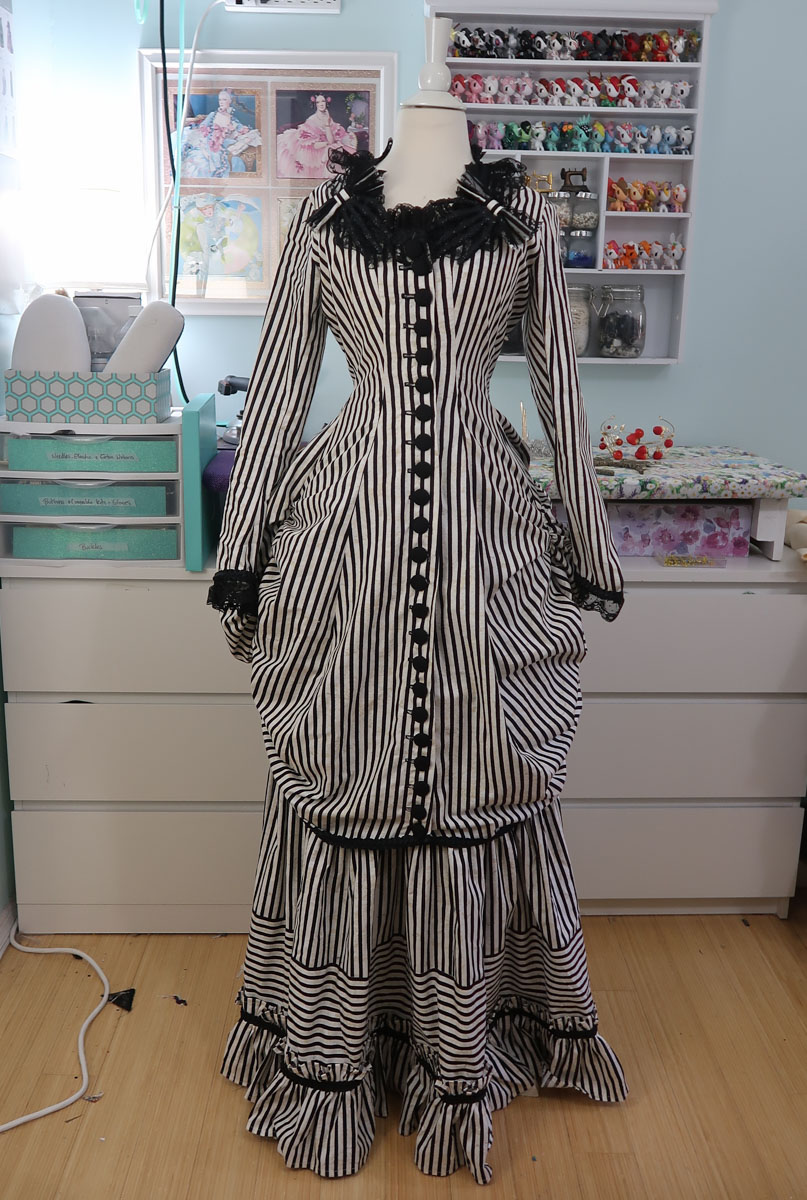
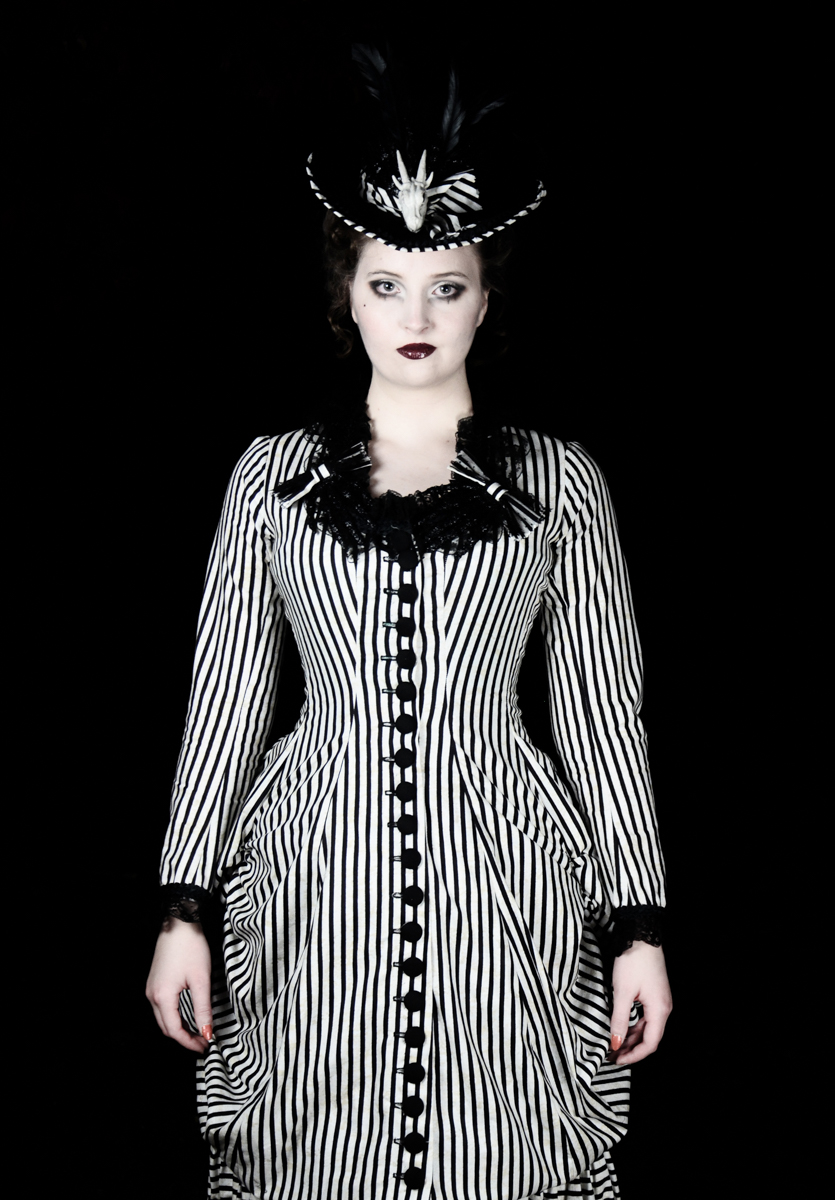
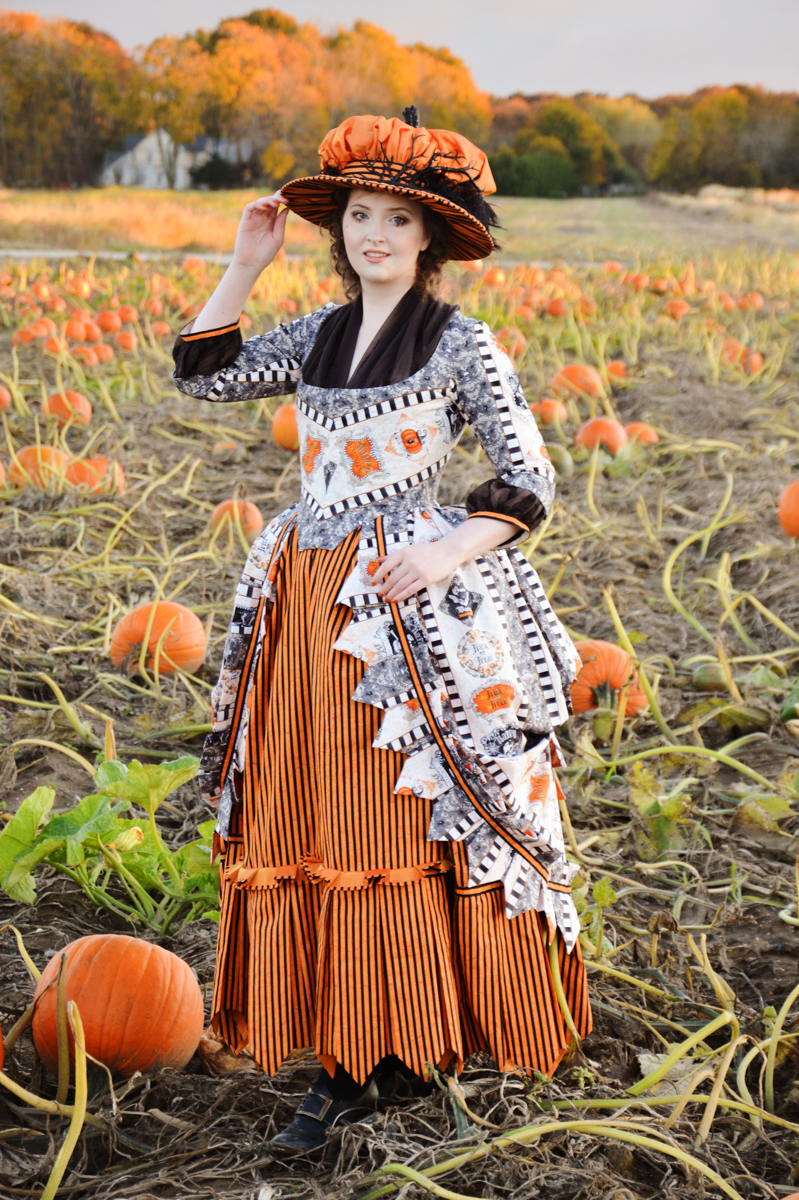
And that finishes off this dress! As I said, I’m really proud of the quality of work on this one. And I think it’s quite nice visually too. It also fits better than any previous pumpkin project (especially last years, oof).

Unfortunately as soon as I put on the entire ensemble, the trim on the underskirt started sagging. It didn’t do this AT ALL while it was on my dress form, prior to photographing it. So I’m not sure if it was the wind, or the movement from wearing it…but it looks like this now, which is a bit of a bummer.

halloween-56

Though it kind of looks intentional? So this is probably the only time I’ll point it out.

halloween-57

halloween-58

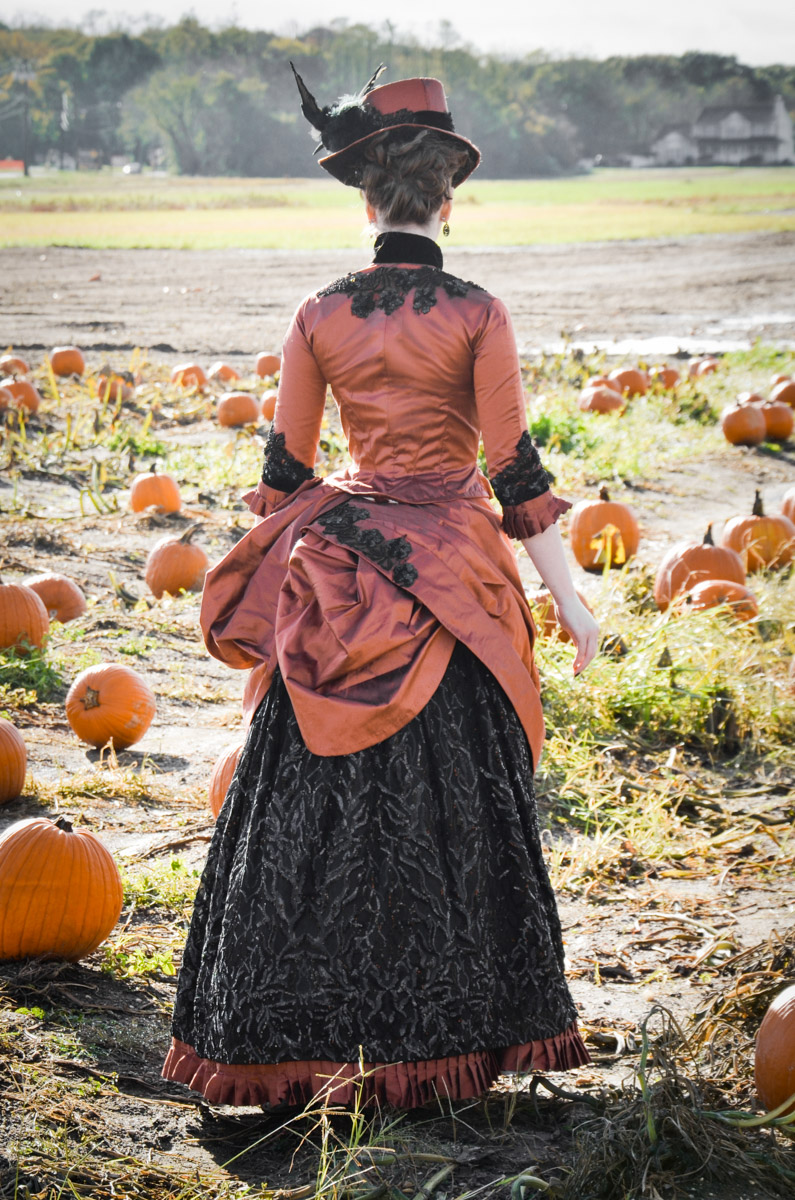
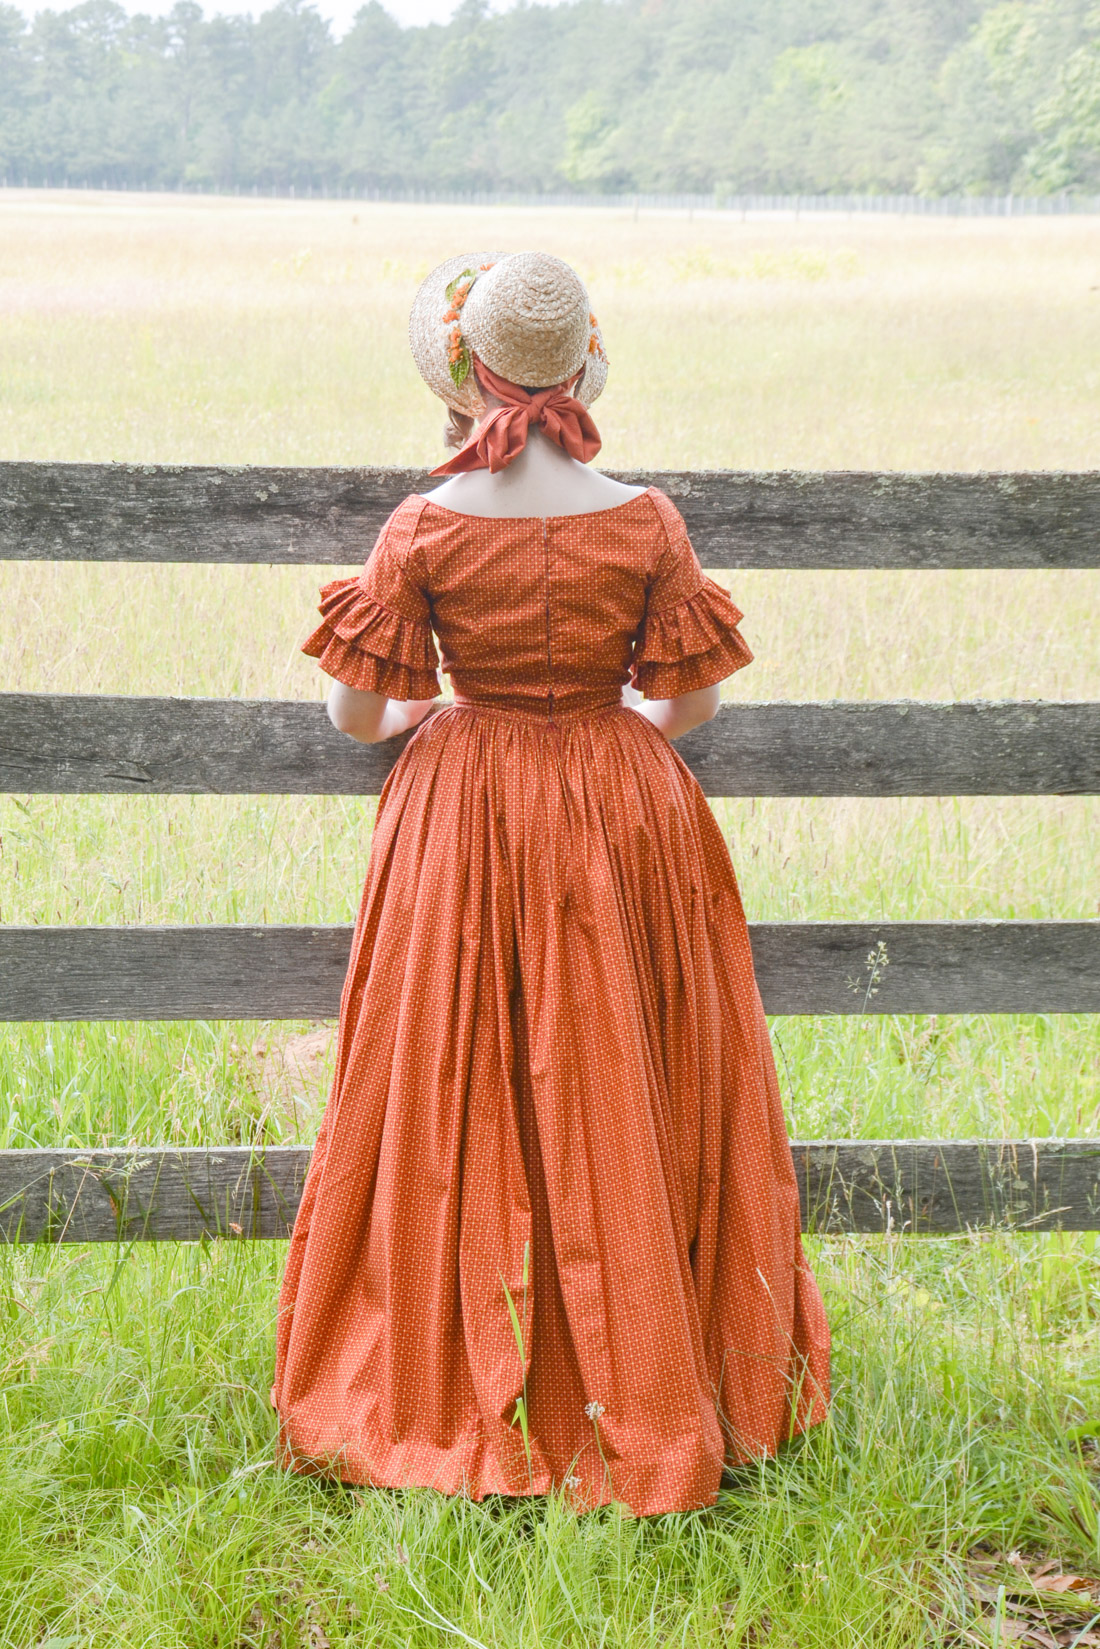
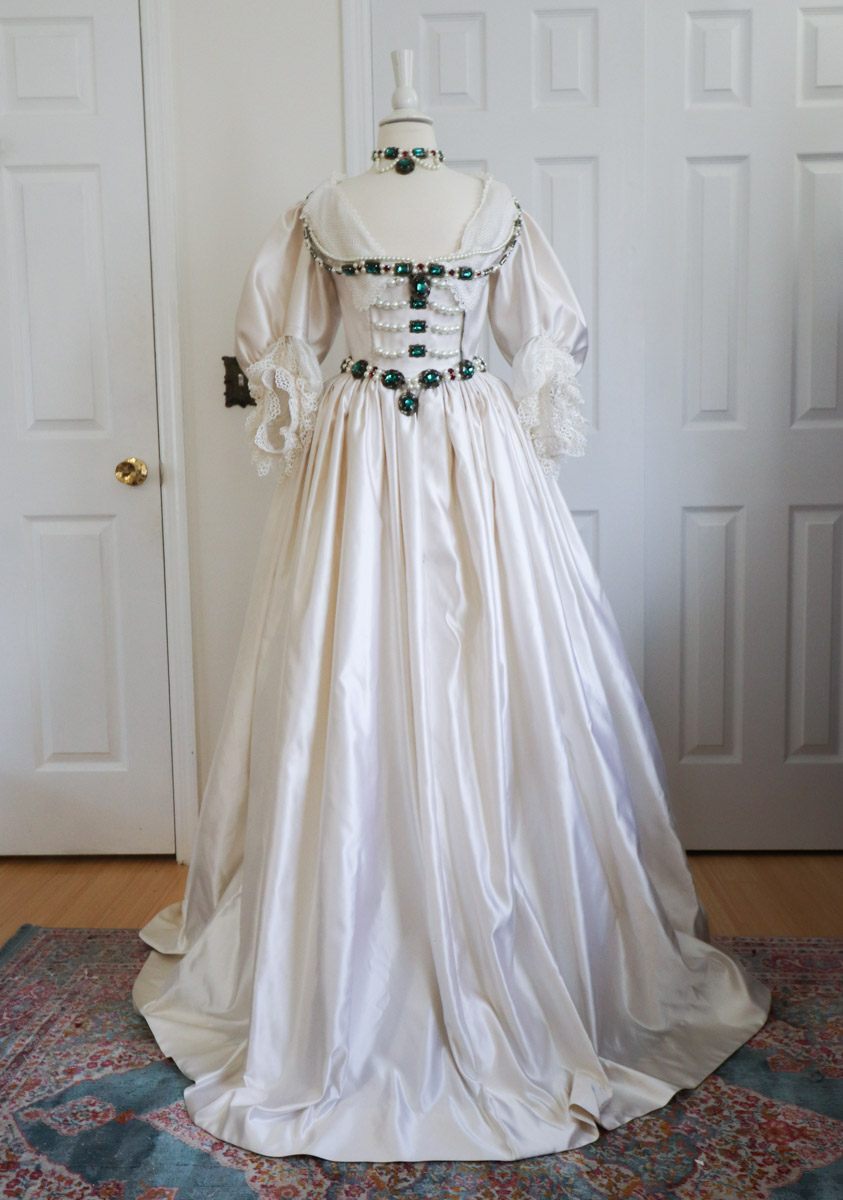
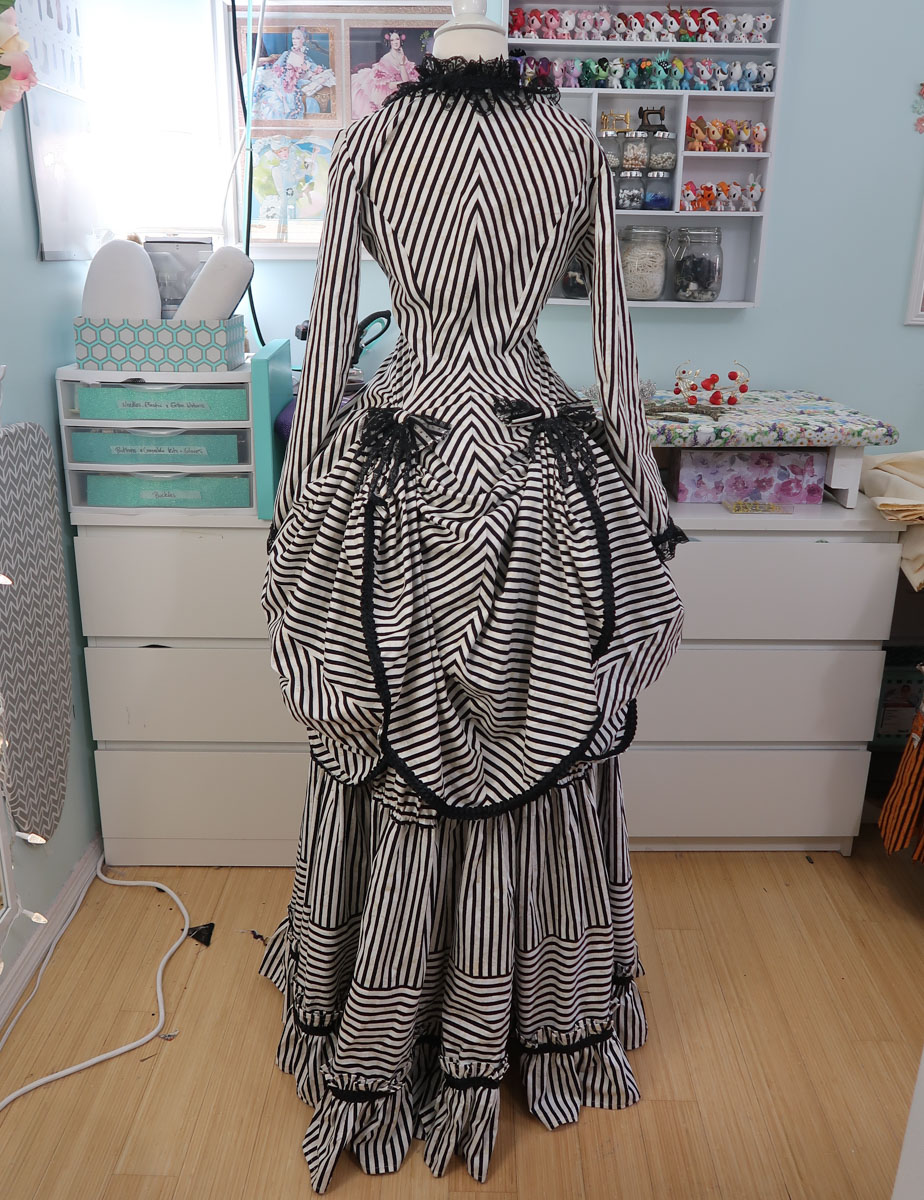
The back is by far my favorite part. It has so much volume and texture, I love it.

halloween-59

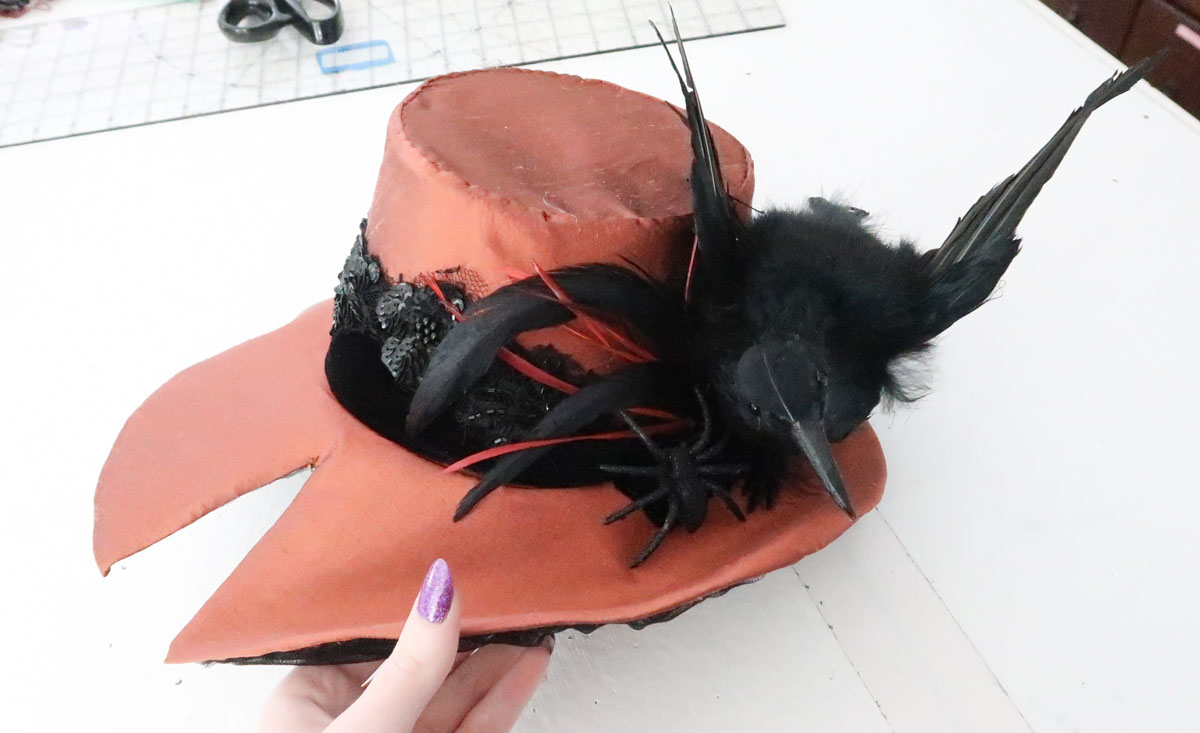
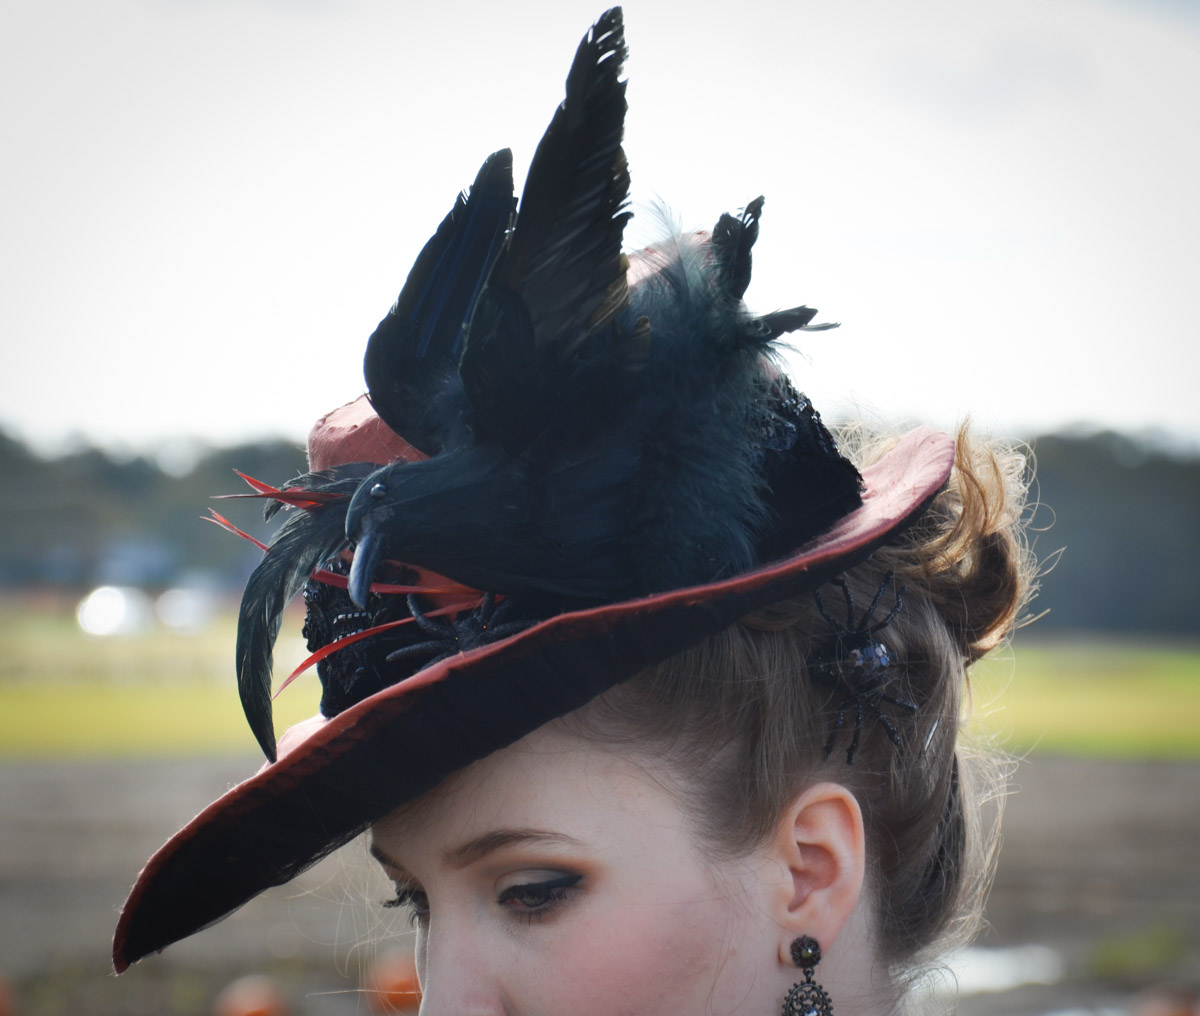
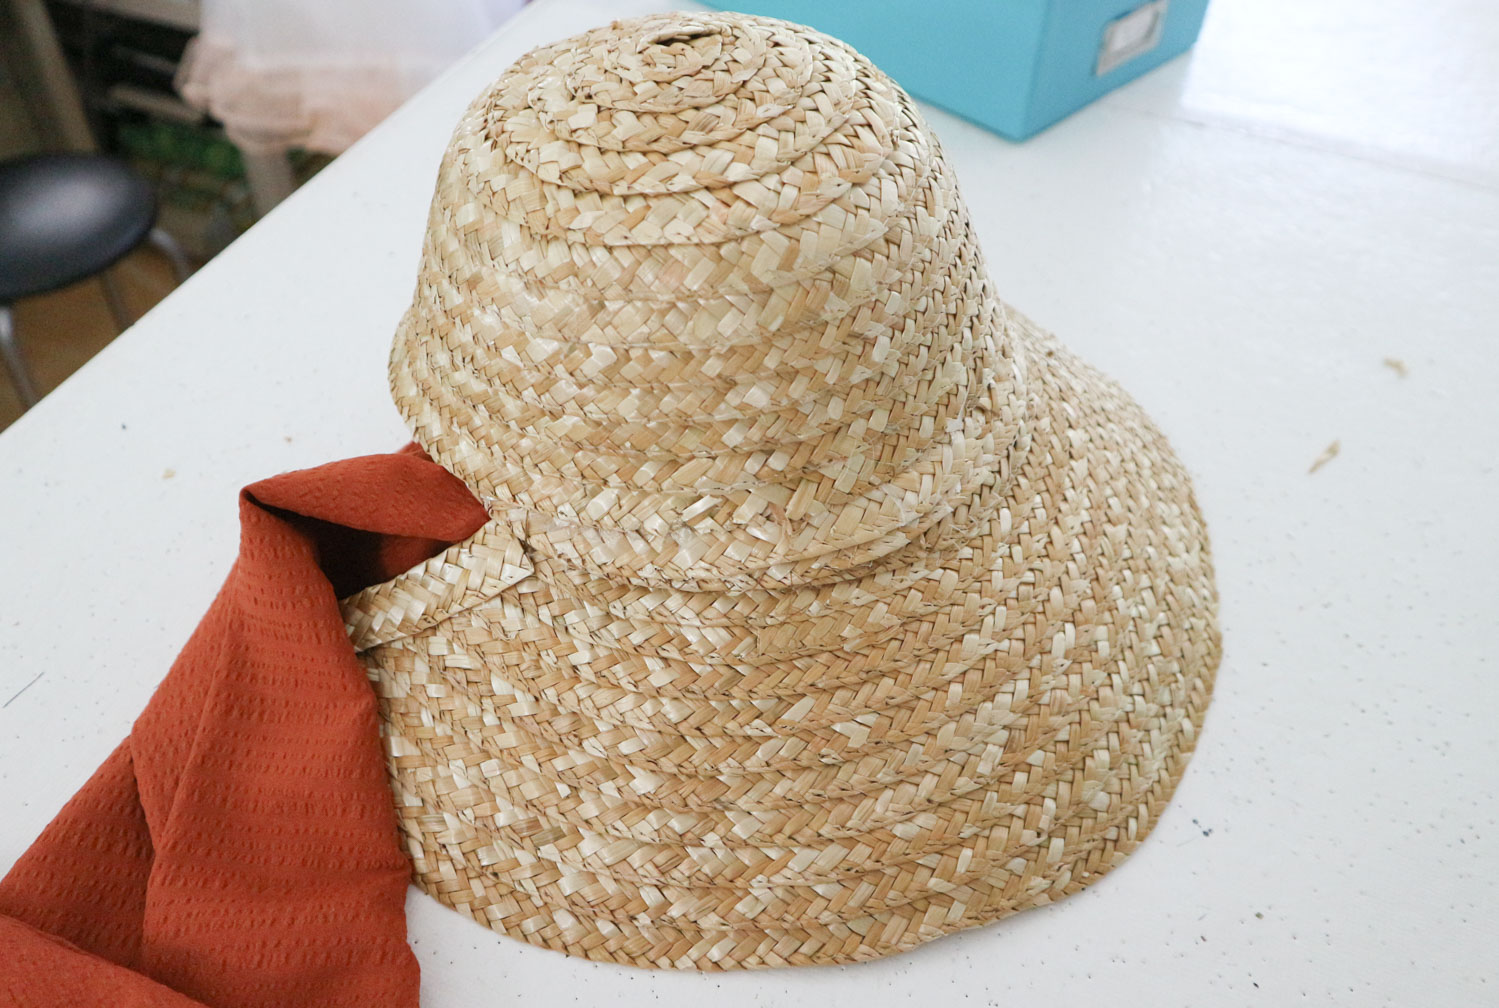
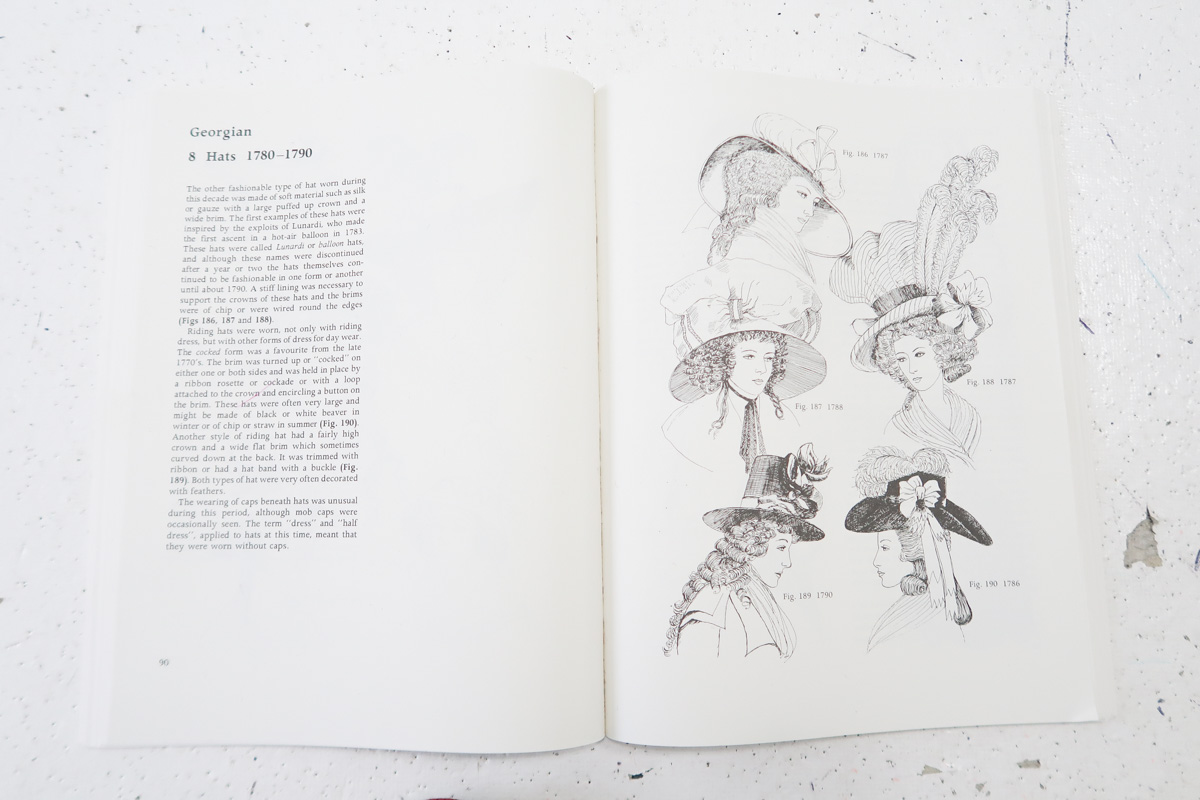
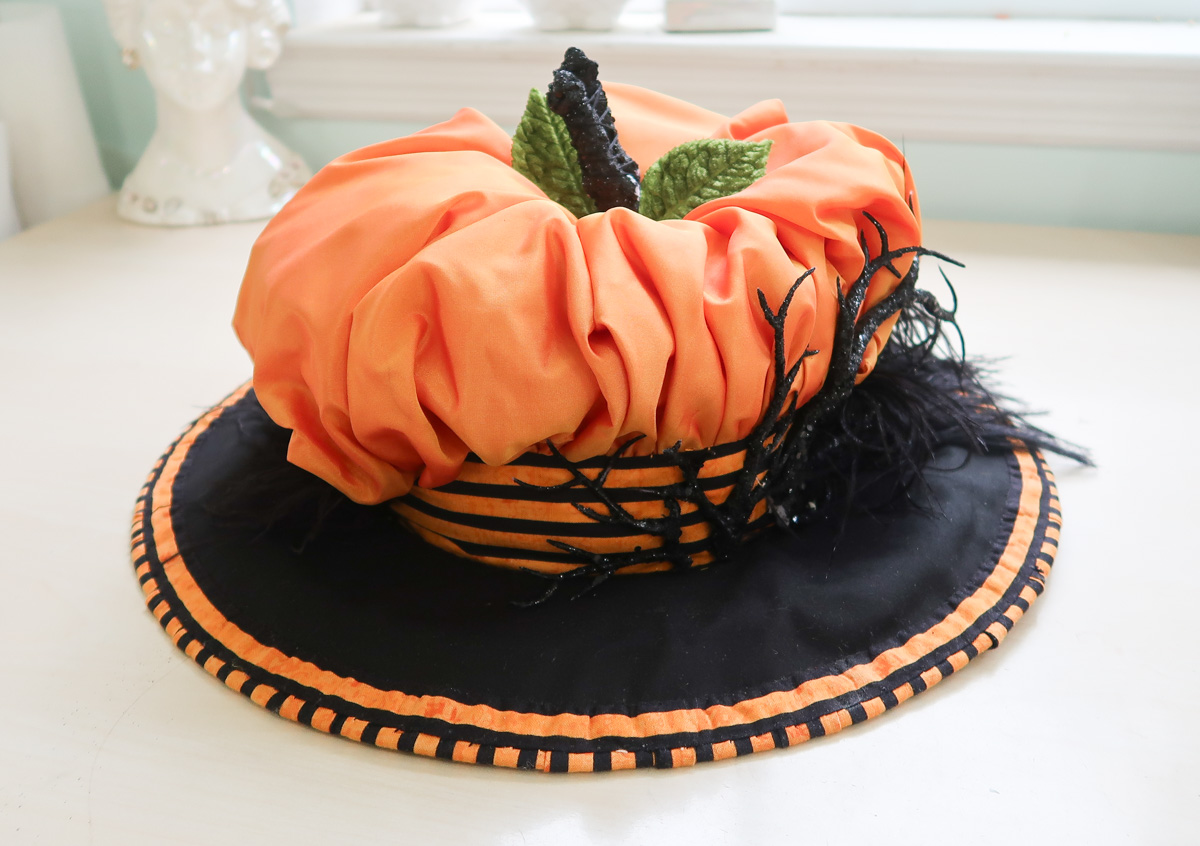
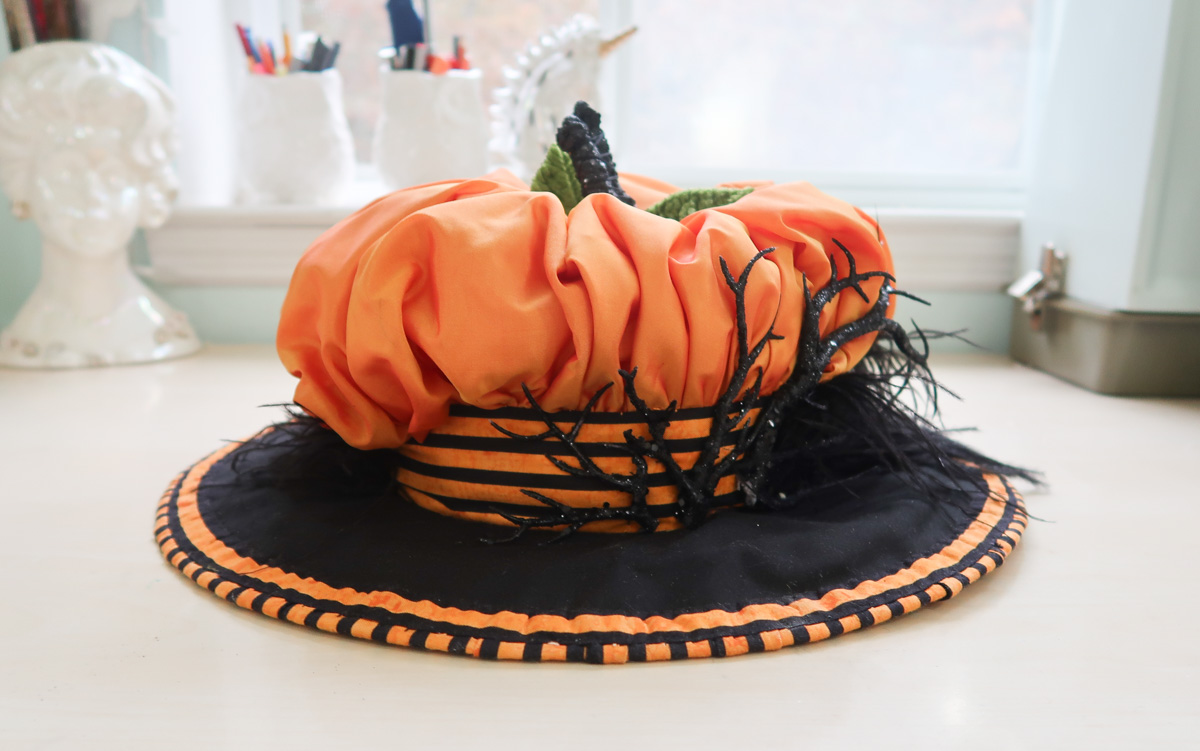
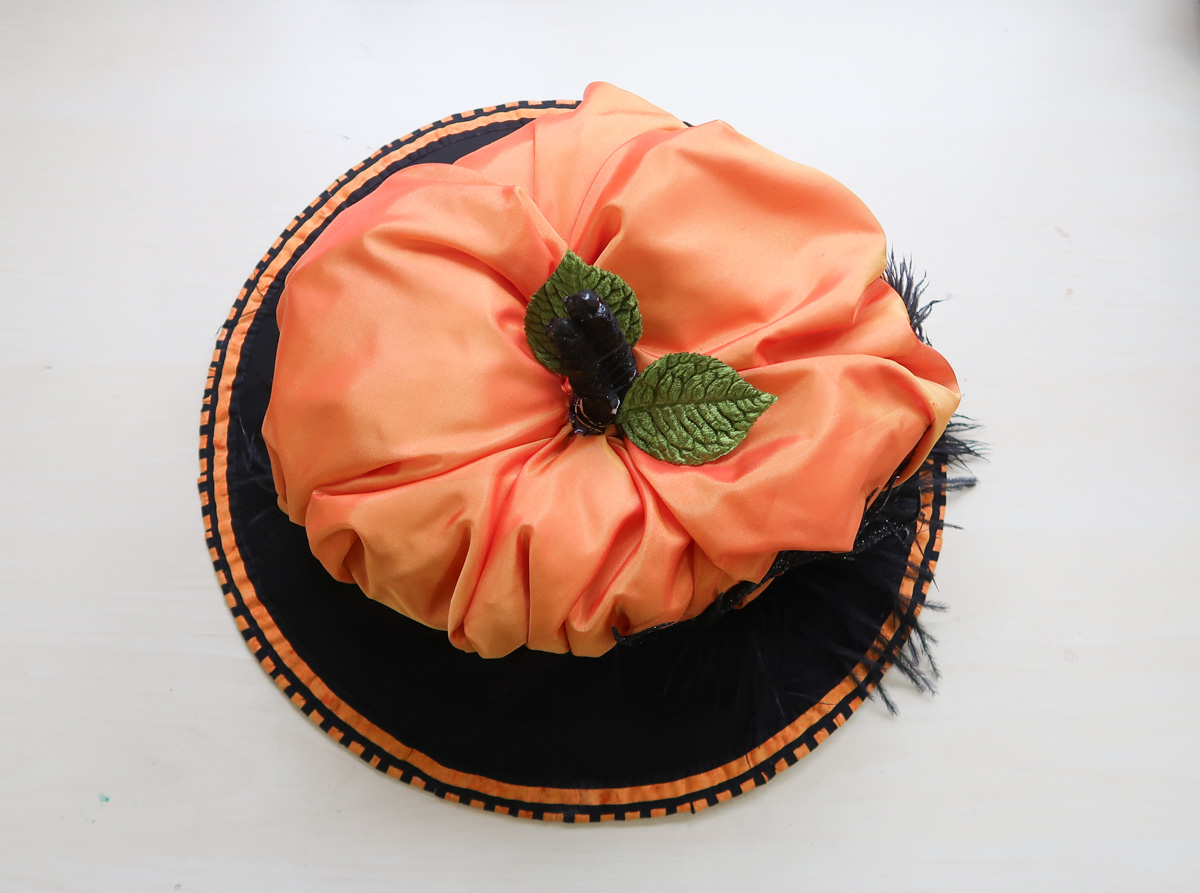
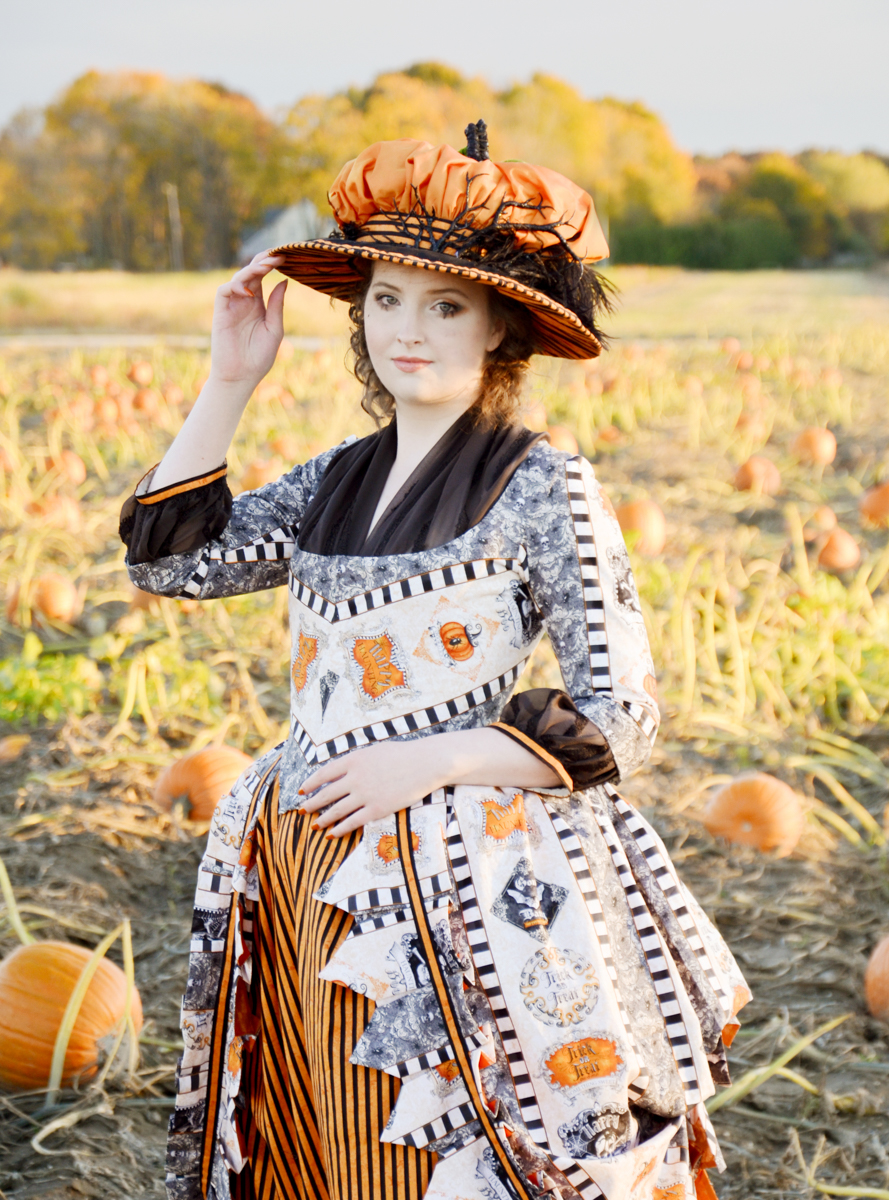
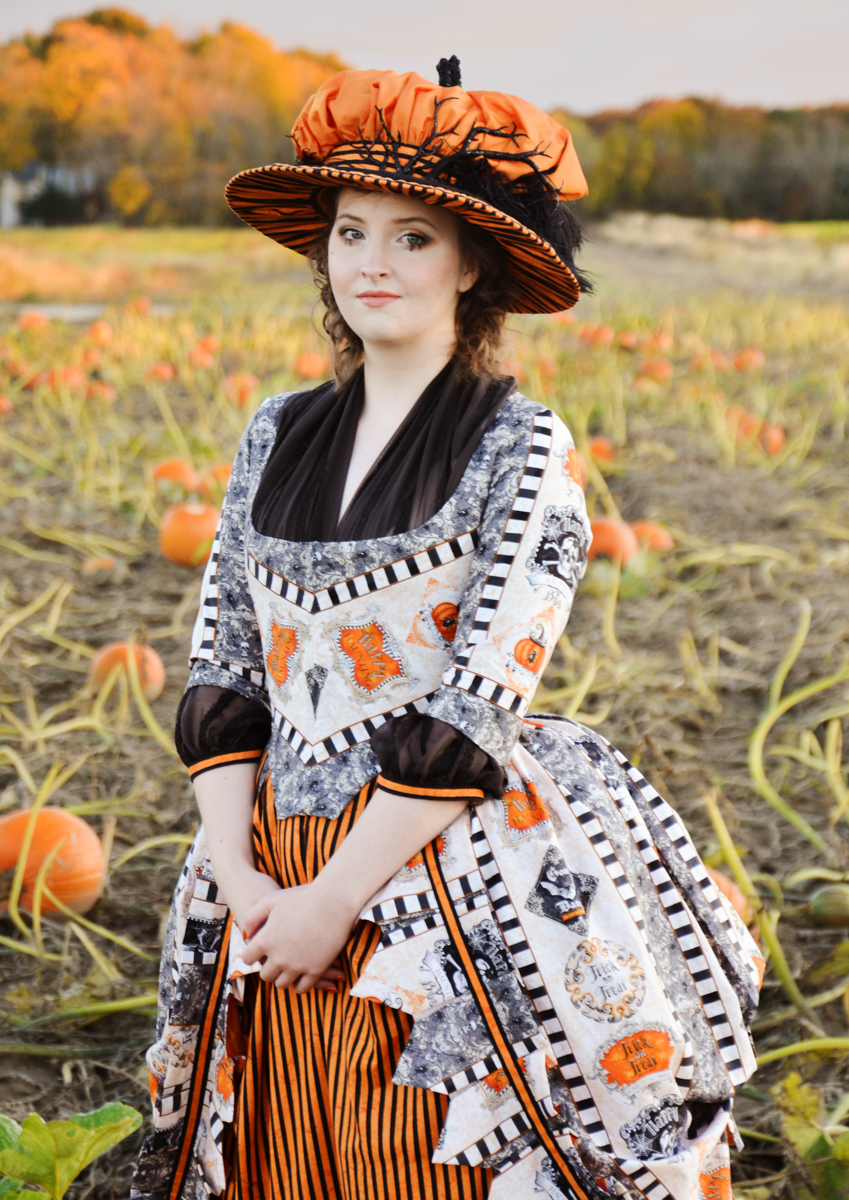
Though my favorite part of this project isn’t even the dress. It’s the hat. It’s such a great hat. It was also completed an hour before photographing this ensemble, so I think the adrenaline of trying to get it done on time has endeared me to it further.

As I said, this was inspired by a hat paired with an extant garment. Specifically a style of hat called Lunardi. Here are some examples of Lunardi (or simply, balloon hats).

halloween-20

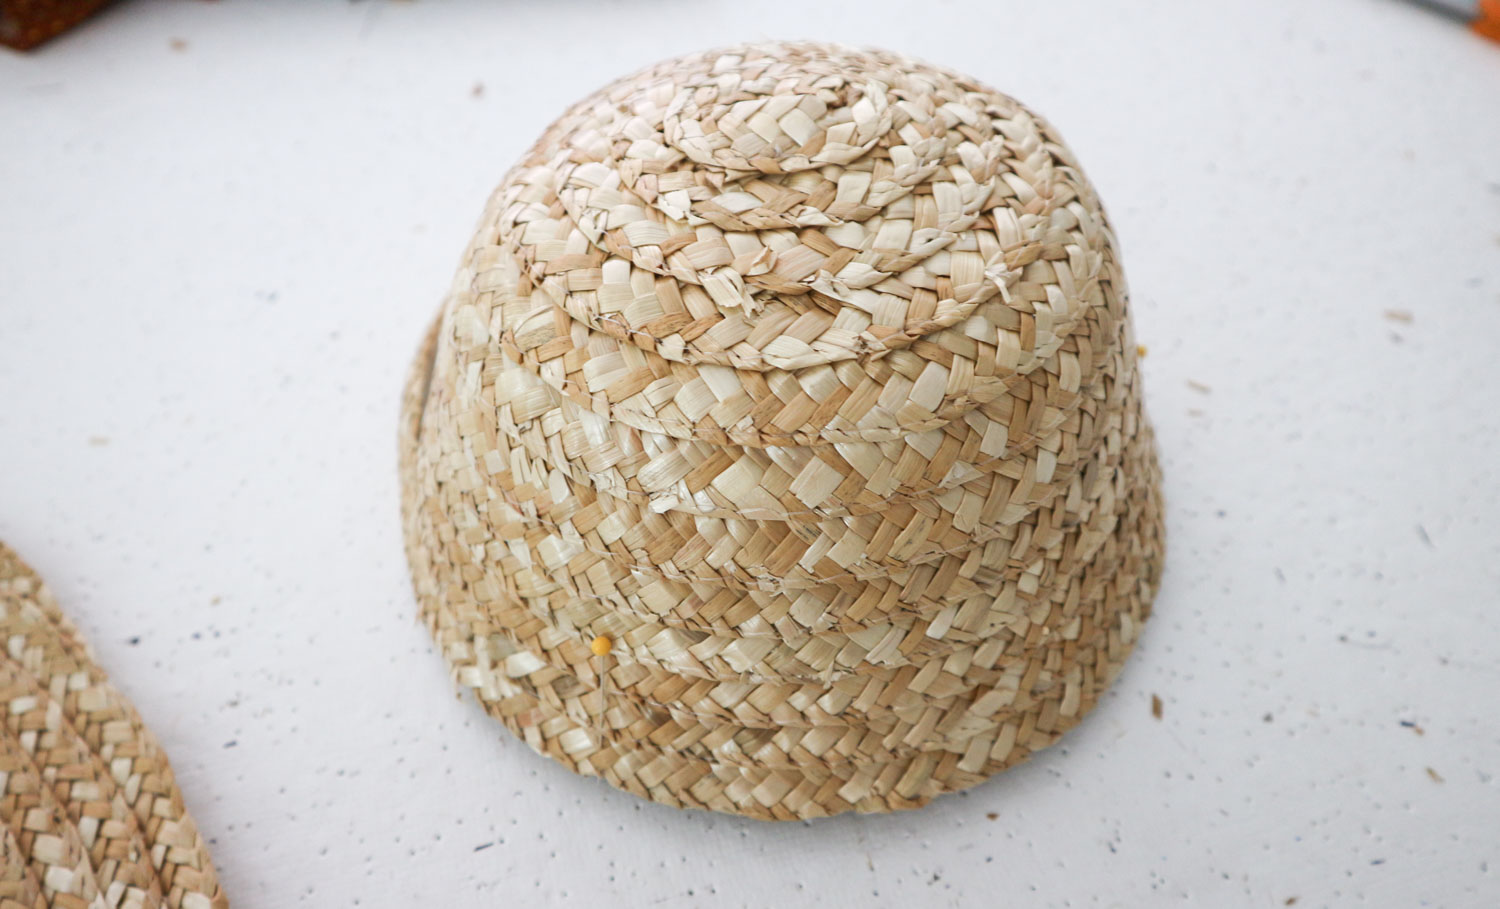
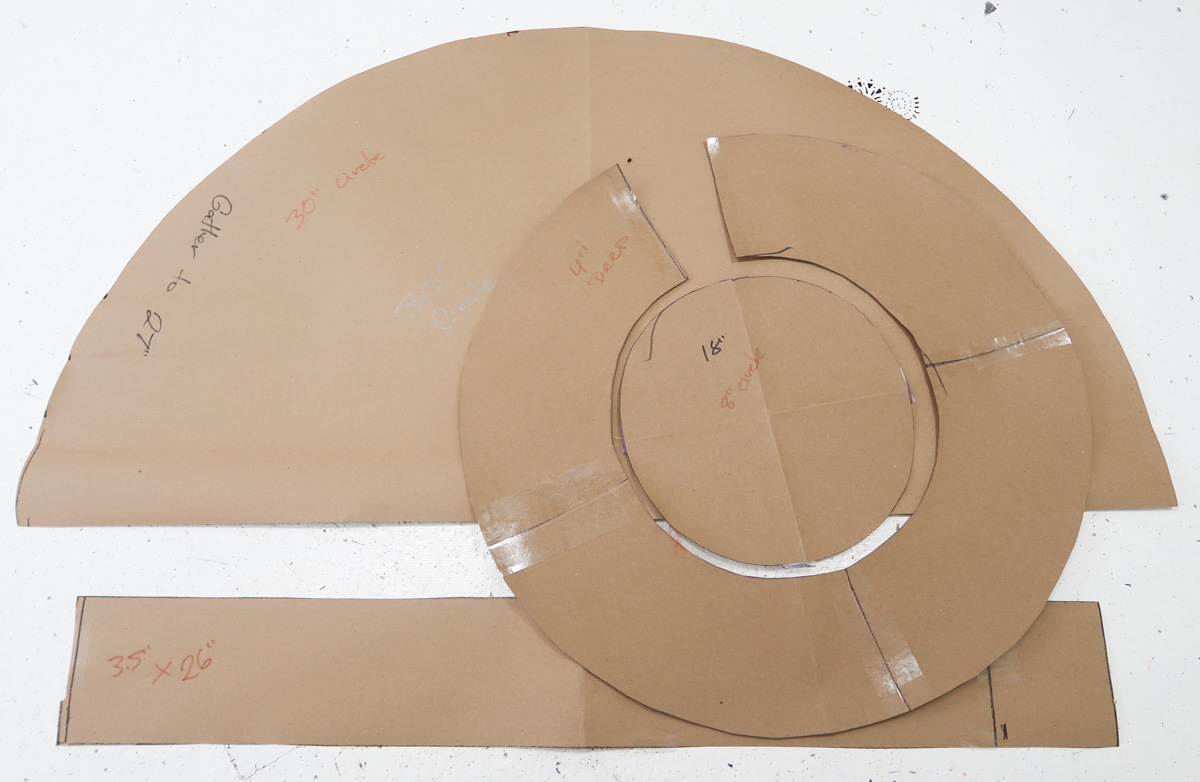
My hat started, as most hats do, as a pattern.

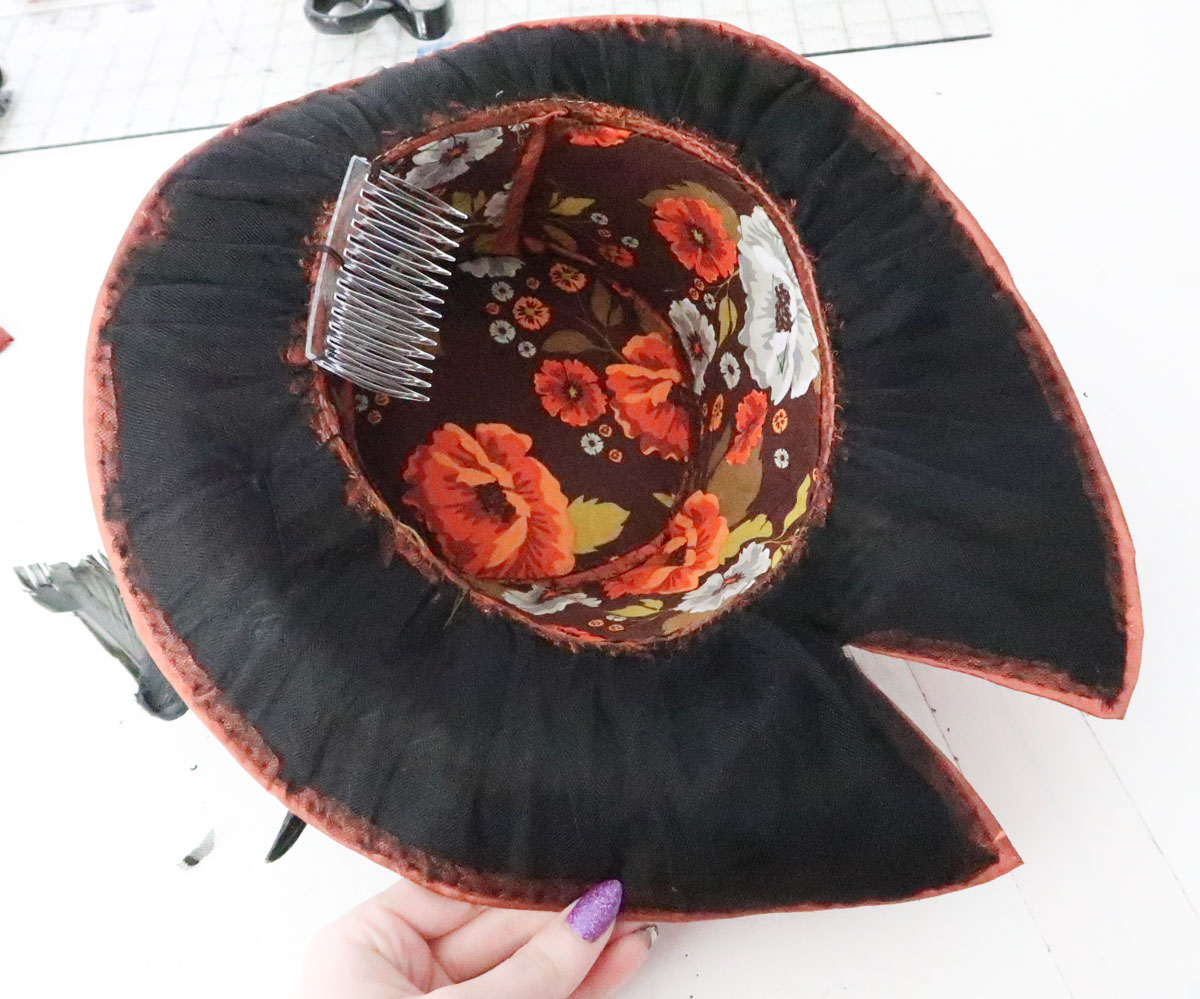
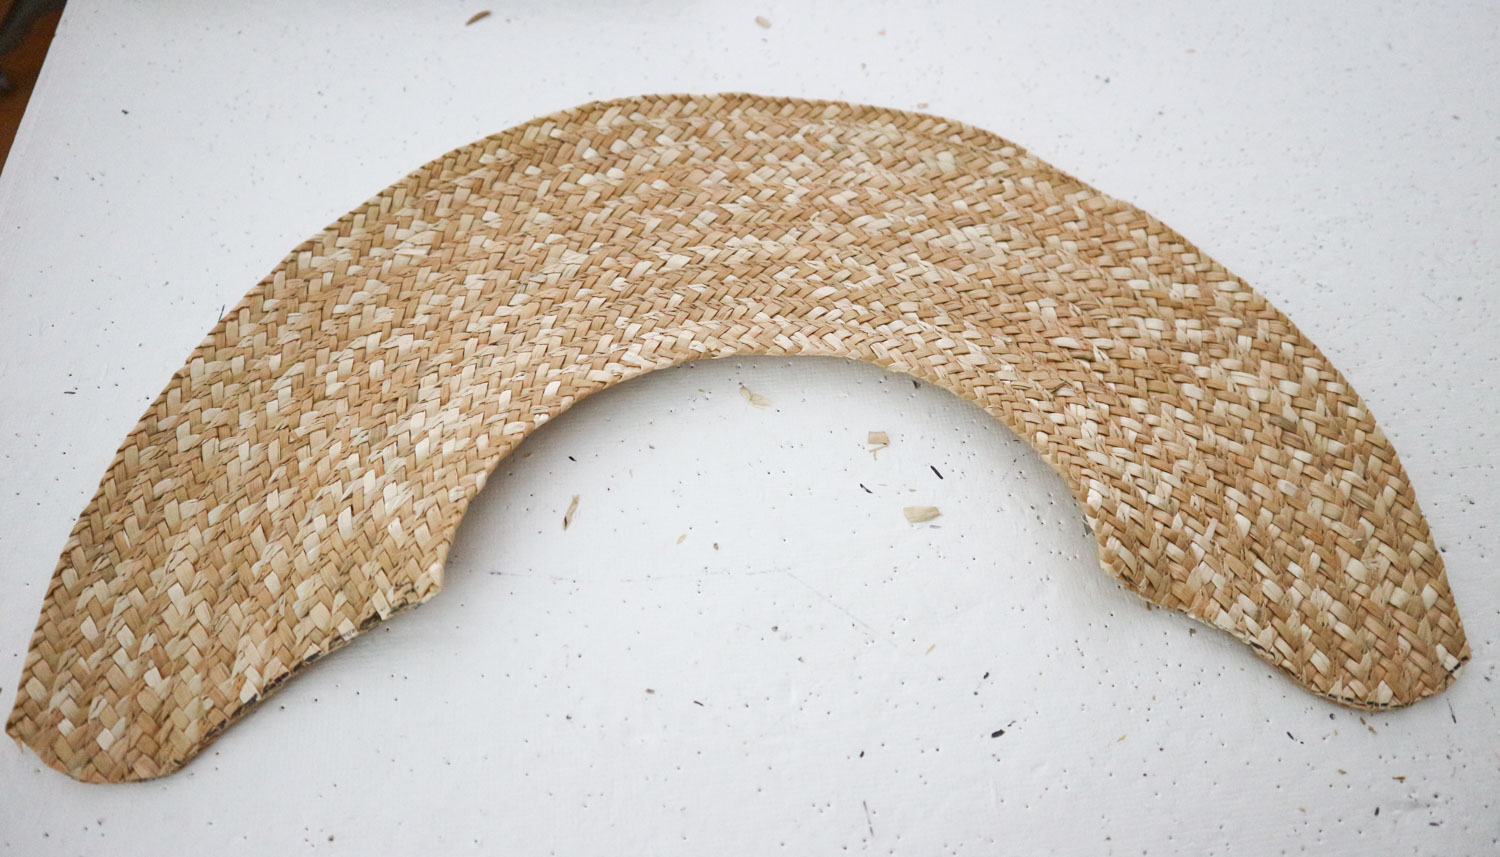
The brim is 4″ deep, and almost a full circle with a 26″ inner circumference. The top of the hat is an 8″ circle, and the wall is a 3.5″ x 26″ rectangle. The puffed portion is a 30″ circle gathered down to have a 26″ outer circumference.

You with me?

halloween-23

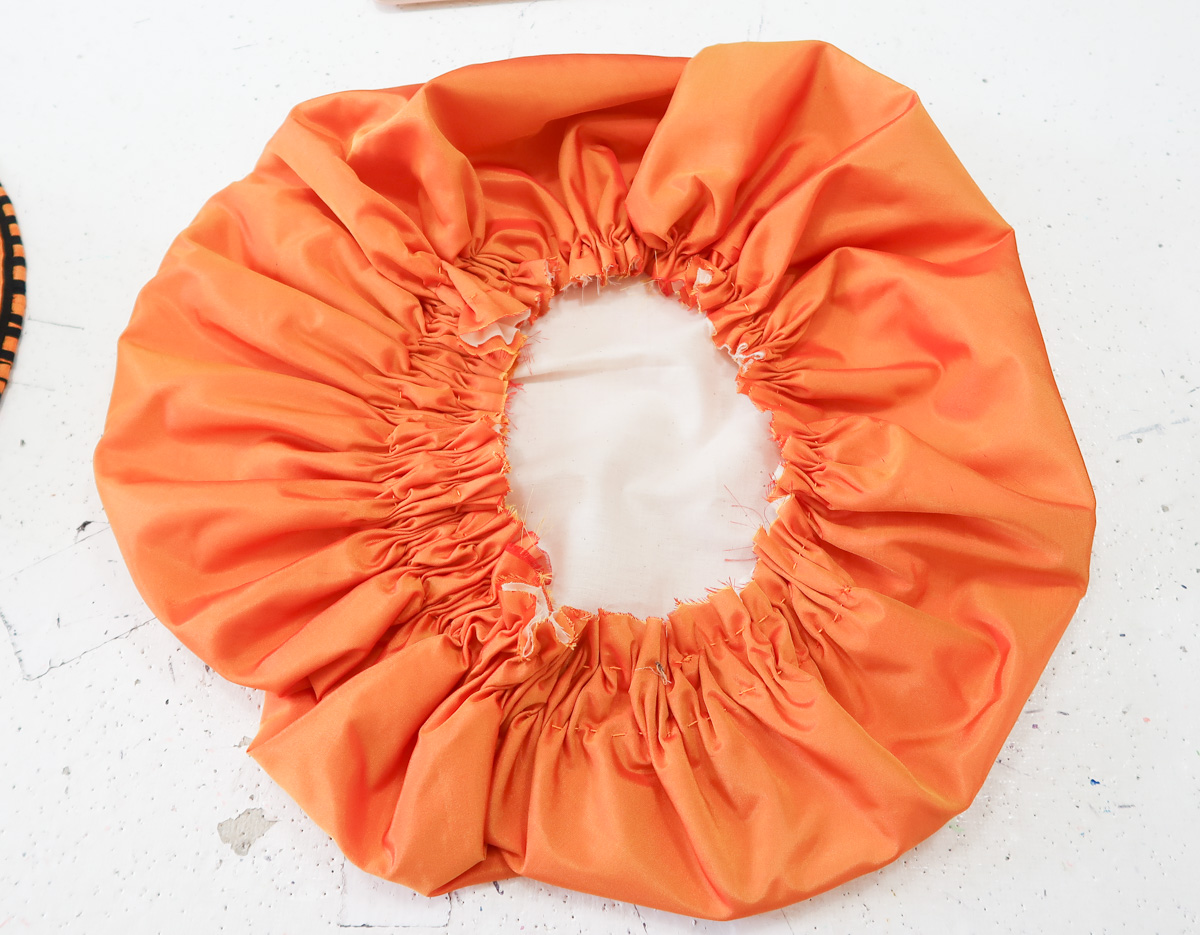
The 30″ circle was cut from orange tissue taffeta (which featured as lining for the dress and underskirt)  and flat lined with muslin to add body and opacity.

halloween-10

The other pieces were all cut out of felt weight interfacing – this is the stuff they sell for handbags, so it’s pretty sturdy.

The top of the hat is really just a support structure for puffed portion I’ll add later on. So I didn’t reinforce these pieces with wire, I just covered them with tissue taffeta.

halloween

The side covered with taffeta is actually going to be the inside of the hat. The outside will be covered later on.

With that in mind, the pieces were whip stitches together. This is the outside of the hat.
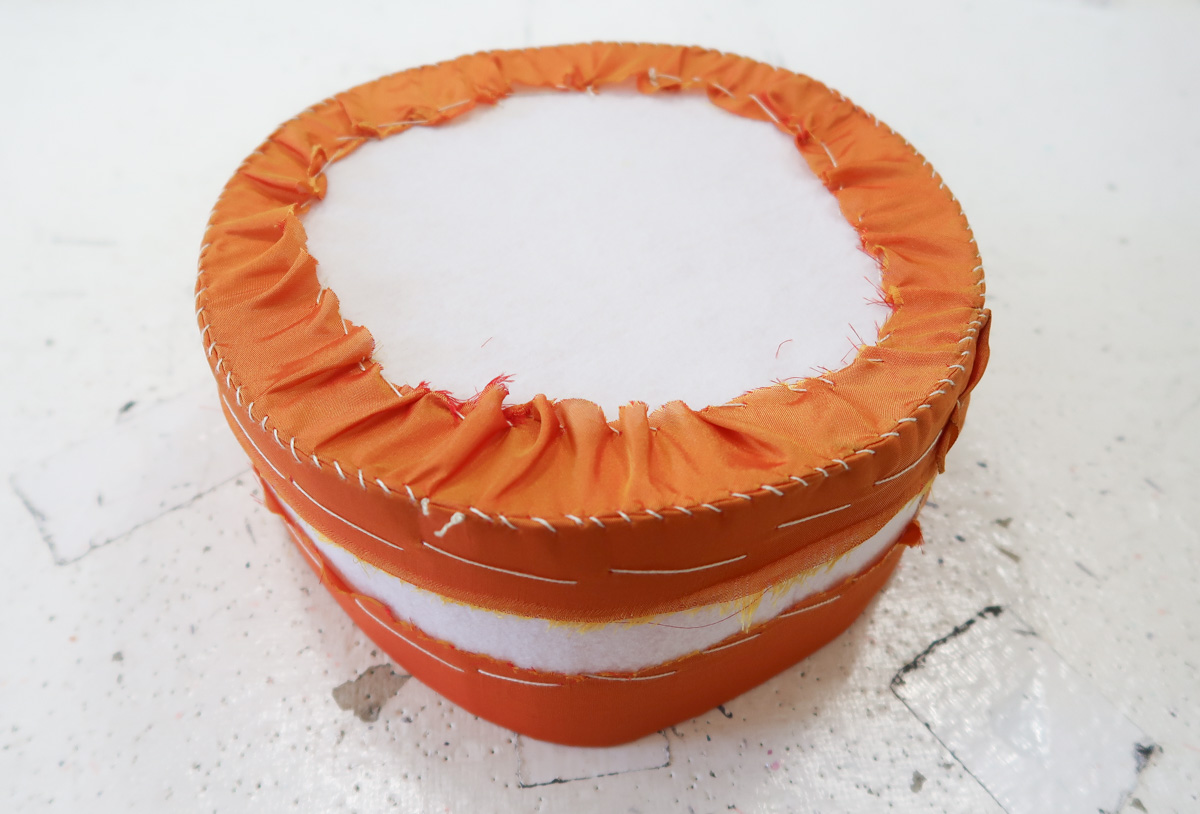
halloween-6

And the inside.

halloween-7

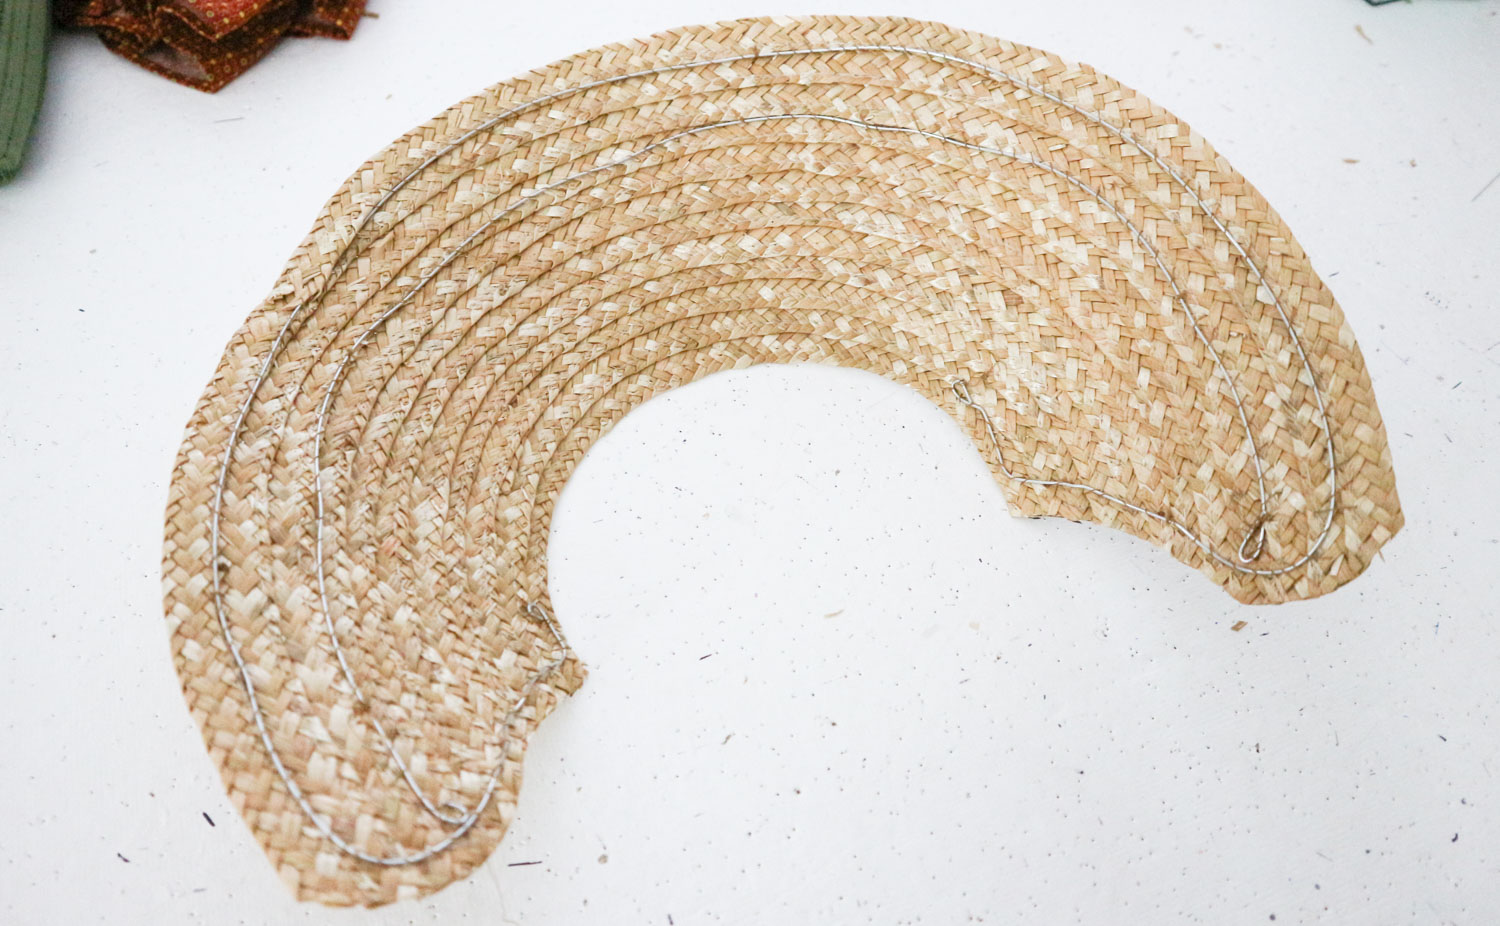
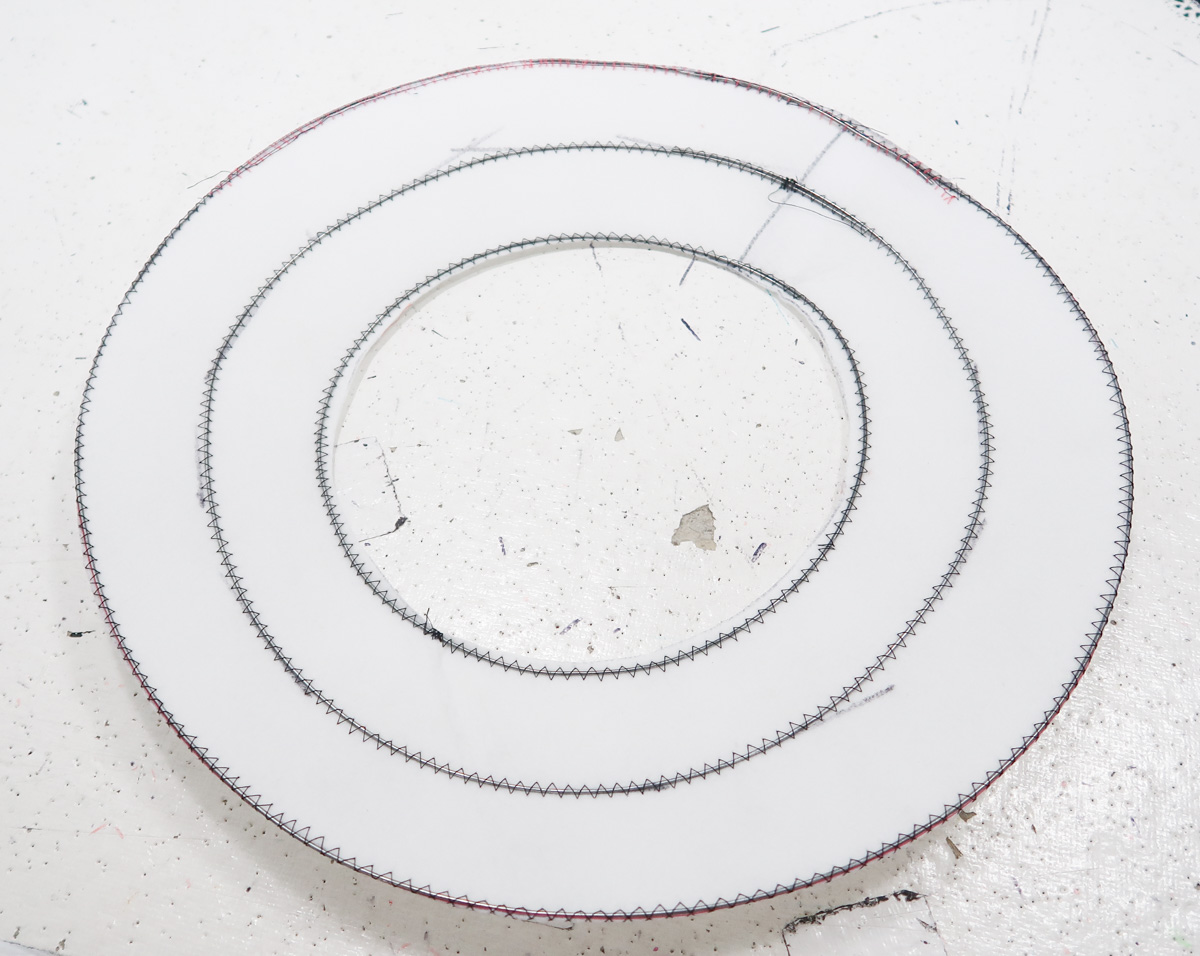
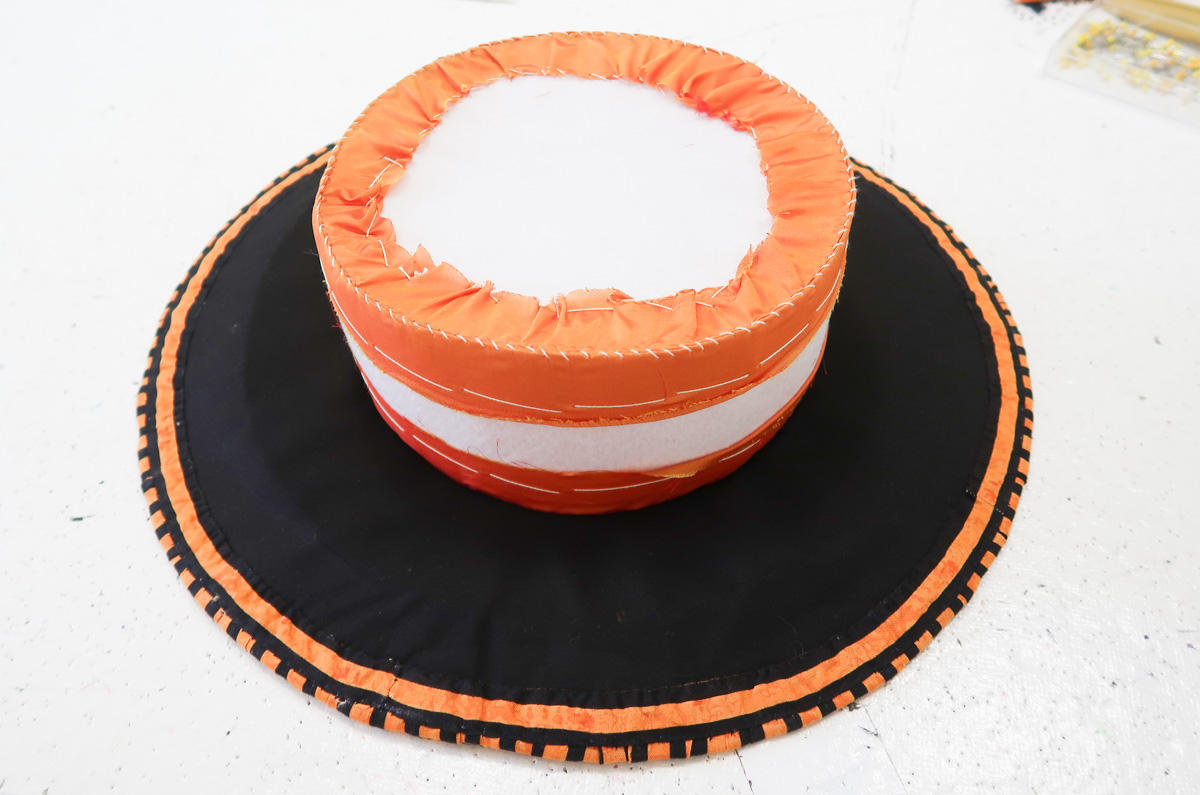
The brim however, supports the whole hat. And needs to be reinforced in order for it to keep its shape. So I used a zig zag stitch on my machine to secure three bands of wire into the hat. I made sure the ends of the wire overlapped by a few inches so there wouldn’t be weak points.

halloween-2

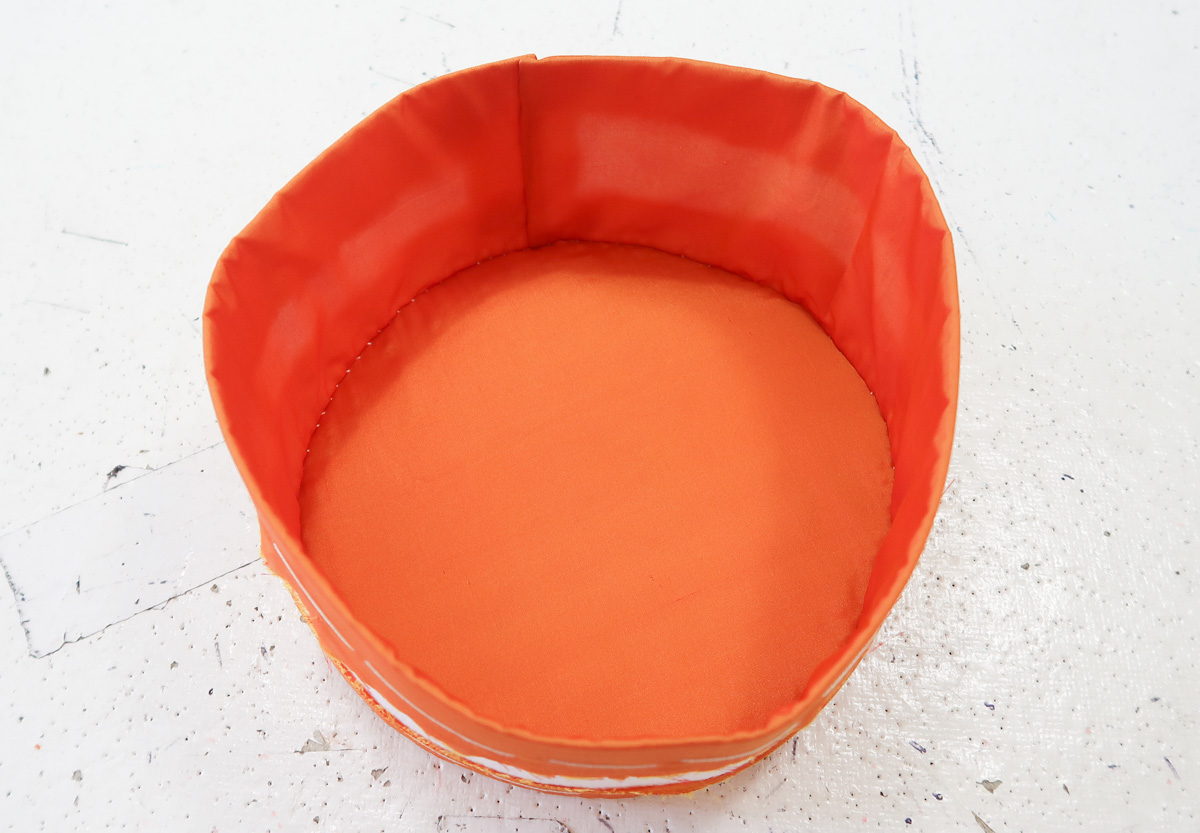
I basted black cotton sateen to the outside of the brim (the “outside” of the brim is the smooth side of the interfacing – the inside is the side with the wire stitched to it).

Then I sewed together three 4.5″  x 42″ strips of orange and black striped cotton. I gathered one edge down to 28ish inches – big enough to wrap around the inner circumference of the brim, with an inch or two to spare. This will be the lining.

The gathered edge was basted to the inner edge of the brim (this raw edge was covered by cotton sateen that was folded inward and whip stitched to the lining later on). The other edge of the lining was wrapped over the outer edge of the brim, extending by a 1/2″ onto the other side of the brim.

halloween-5

To cover the raw edge of the lining now visible from the exterior of the hat, I used more of the striped binding. As I said earlier, this is cut on the fabrics straight grain – it isn’t flexible like bias binding. So it had to be carefully pinned around each curve.

halloween-3

And here it is all sewn in place!

halloween-4

Now I whip stitched the brim to the cap of the hat. I always start stitching them together at the center back – that way if they don’t line up quite right, I can fudge it a bit and it won’t be visible from the front!

halloween-8

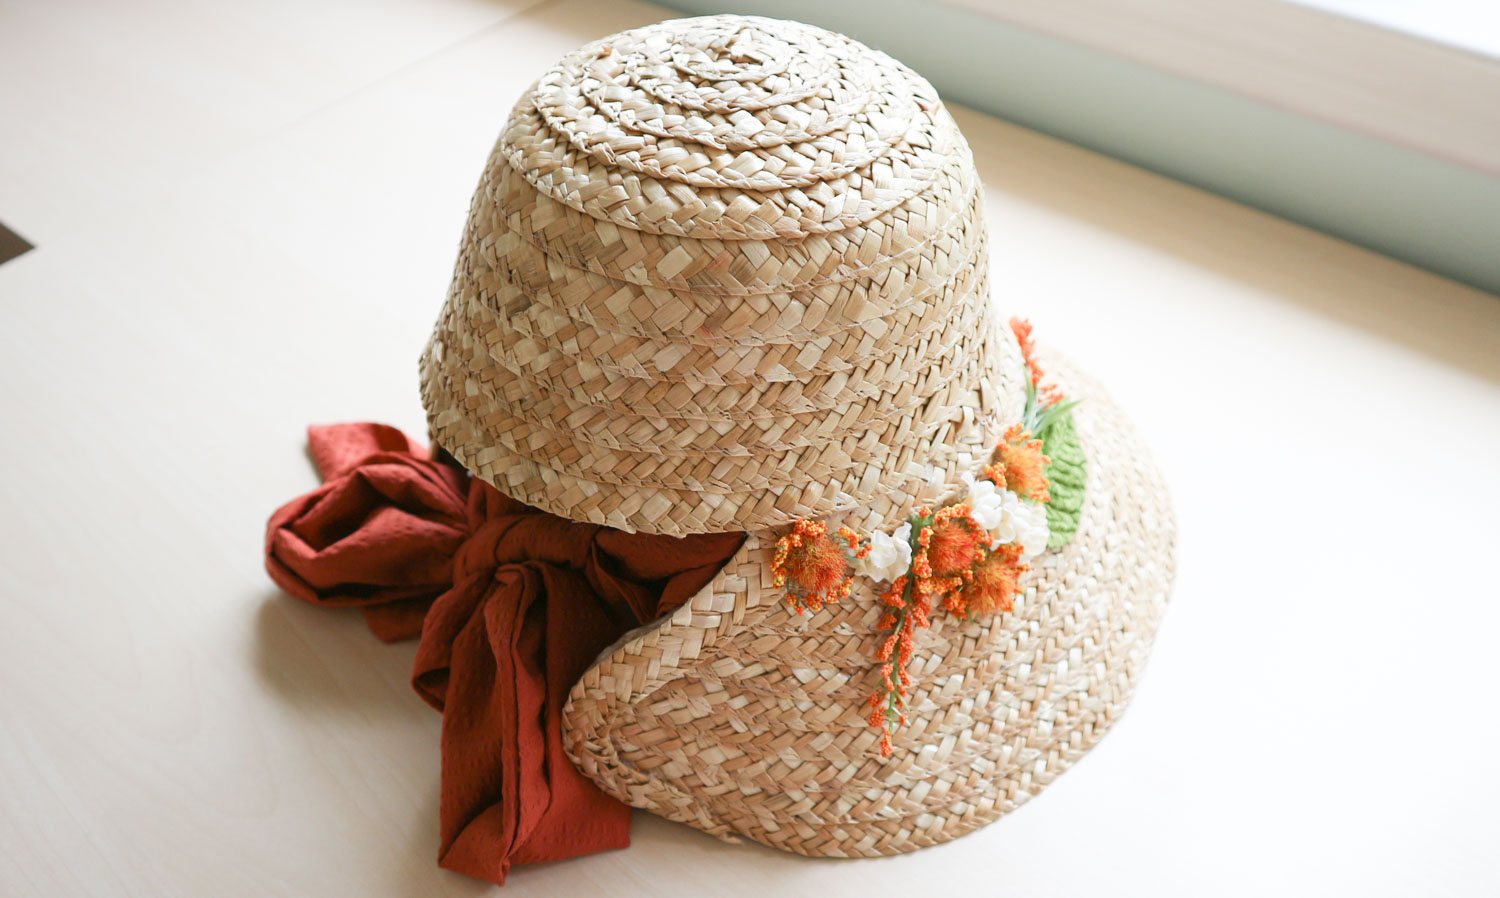
Here is what the top looks like. At this point, you may doubt the possibility of it looking like a pumpkin. I was right there with you. *But the main rule of hat making is that if you add enough crap, it will definitely look okay in the end. So I moved ahead.

*This may not be an official rule of hat making

halloween-9

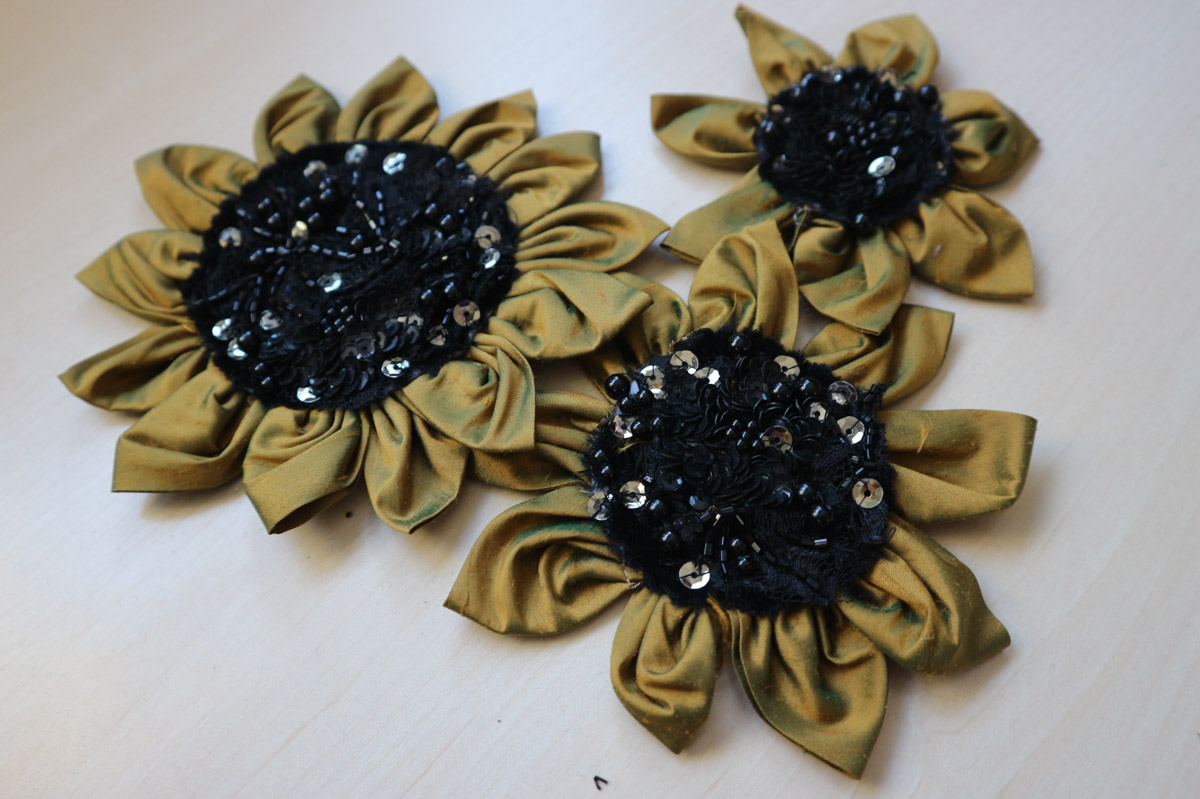
I gathered down the outer edge of the circle I cut out earlier. Then I tried placing it on top of my hat…and it was a little too big and floppy. So I ended up adding another row of gathers half inch away from the first row. But I only did this on one half of the circle, since I wanted it to sit asymmetrically on the hat.

halloween-11

It was still looking pretty floppy and not pumpkin-y at this point. So I decided to pad it out a little using scrunched up pieces of tulle that I tacked to the outside of the hat.

halloween-12

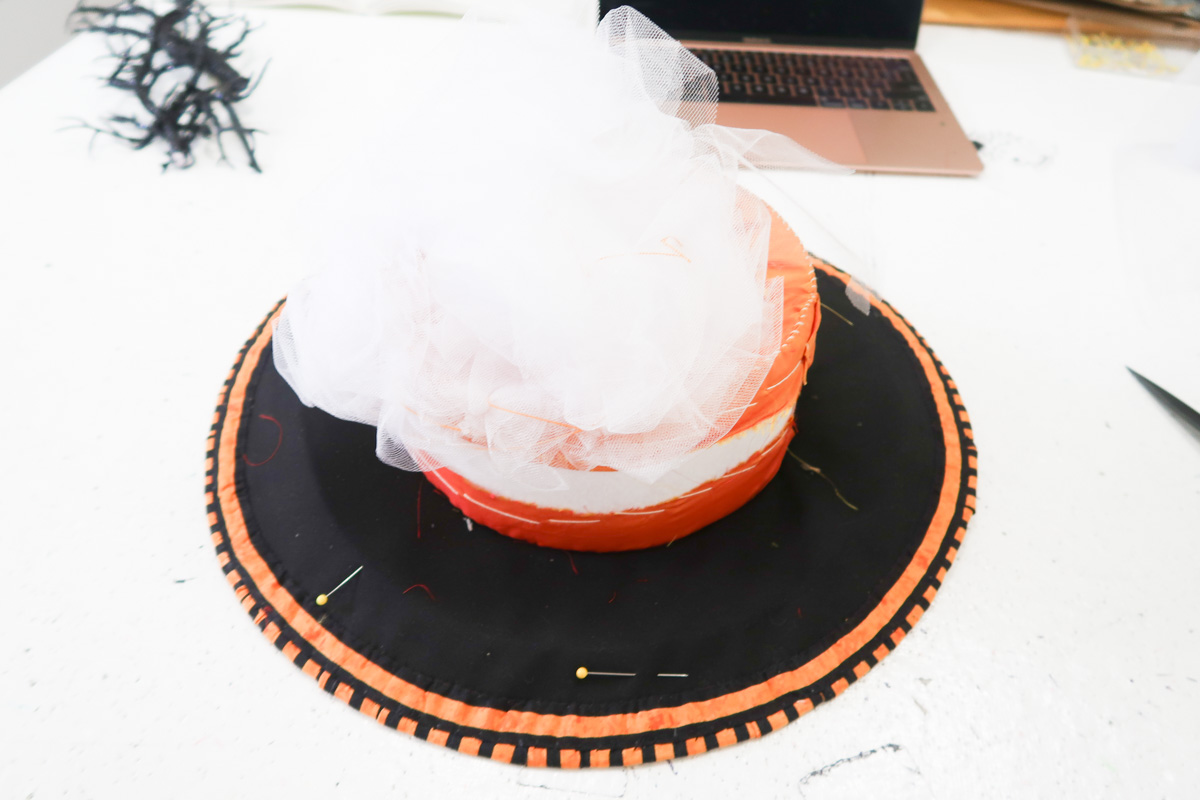
And now I was getting somewhere! I basted the bottom edge of the circle to the hat.

halloween-13

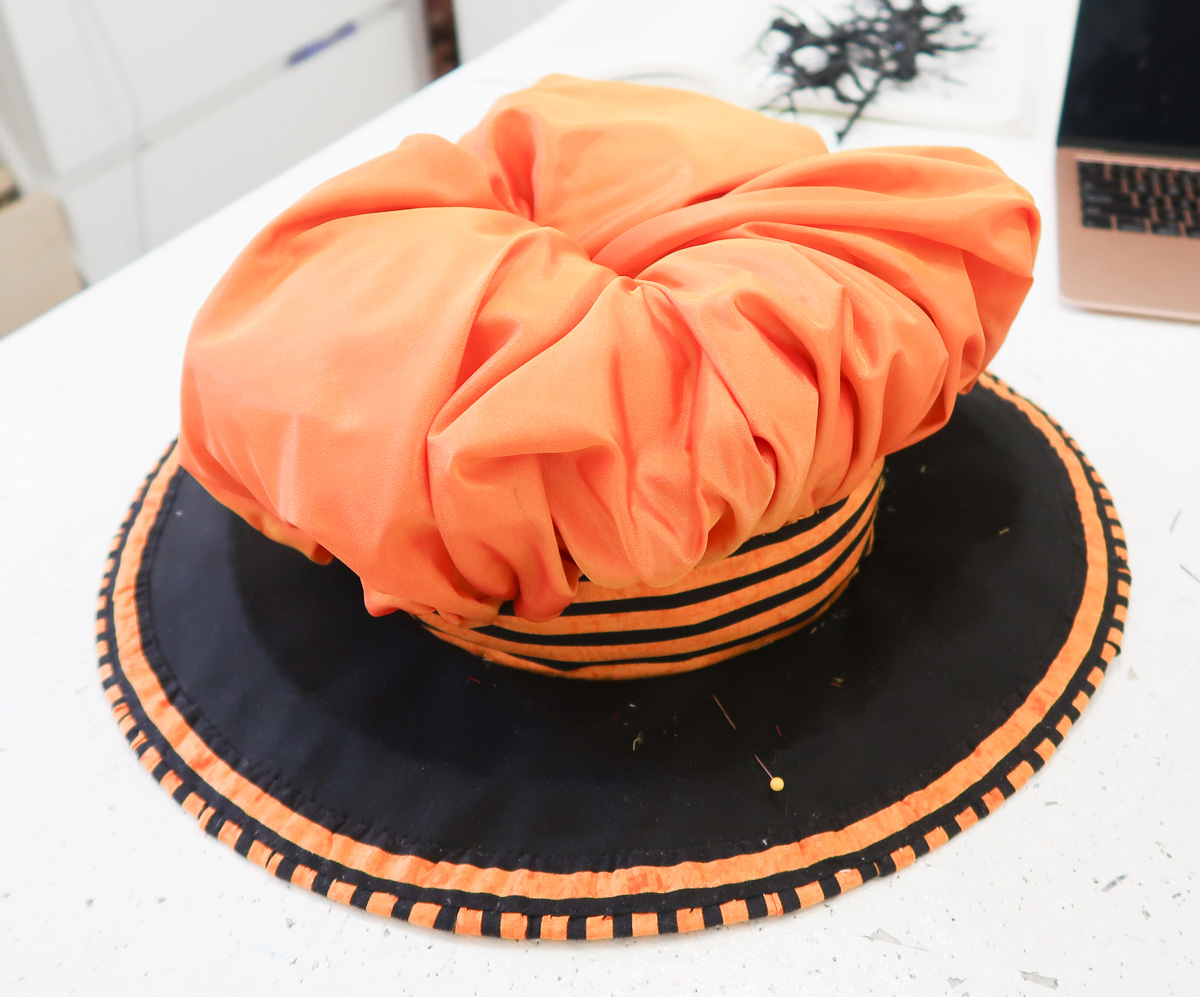
Then I covered the gathered edges with a band of striped cotton. The band is at its full width of 2.5″ at the front, but tapers to be 1″ wide on one side. This is to enhance the asymmetrical shape of the top.

The band was tied at one side, and basted to the hat to secure it in place.

The center of the top of the hat was tacked down to create a tufted effect that makes it resemble a pumpkin!

halloween-14

As far as trims go, I used some cut up ostrich feathers which were placed horizontally against the base of the brim to add texture. I also used some black glittery branches I bought for a $1 at Michaels. Both the feather and the branches were sewn on by hand.

halloween-15

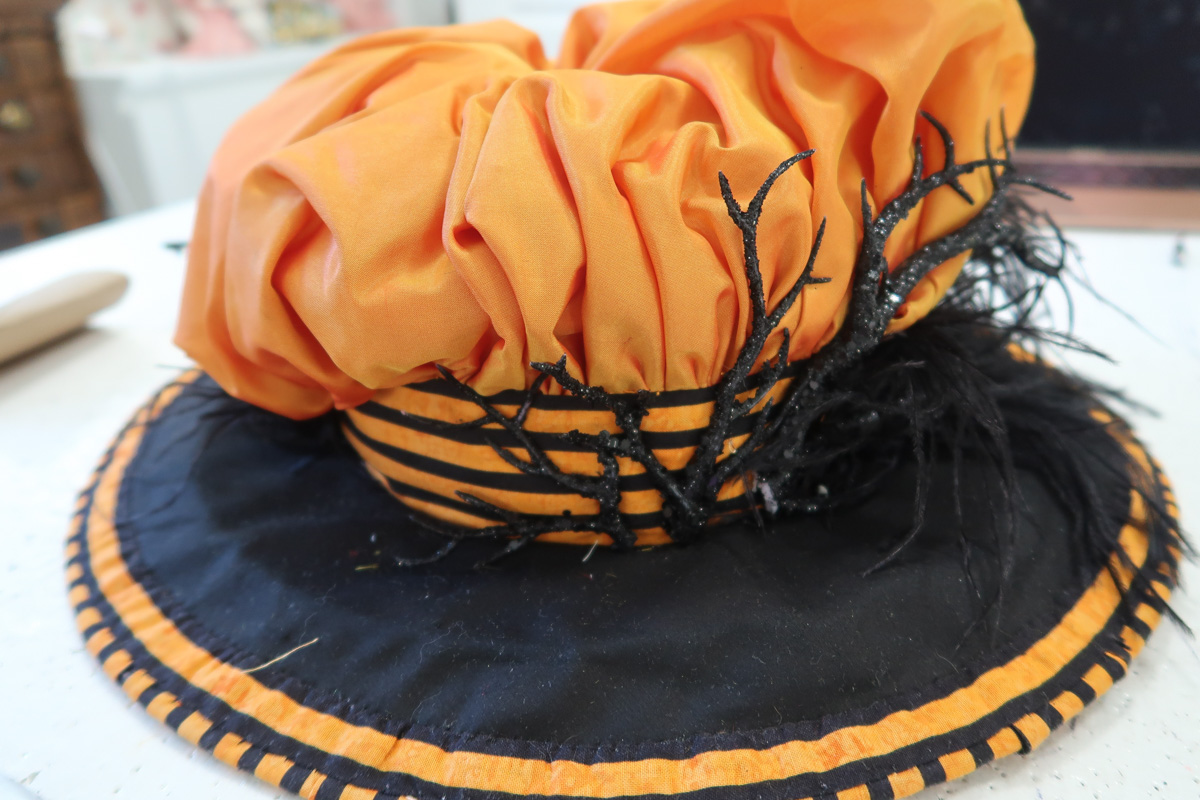
The stem of the pumpkin is made from the base of the branches. I had to glue two together to get the convincing amount of girth for a pumpkin stem, then I glued it over the tufted portion of the hat. There is some thread wound around the stem and securing it on as well, since I didn’t fully trust the glue.

The final touch were some velvet millinery leaves to cover the glue around the stem.

I also tacked one side of the puffed layer to the brim. This covers the knot securing the band around the hat, and makes the pumpkin look slightly tilted.

halloween-18

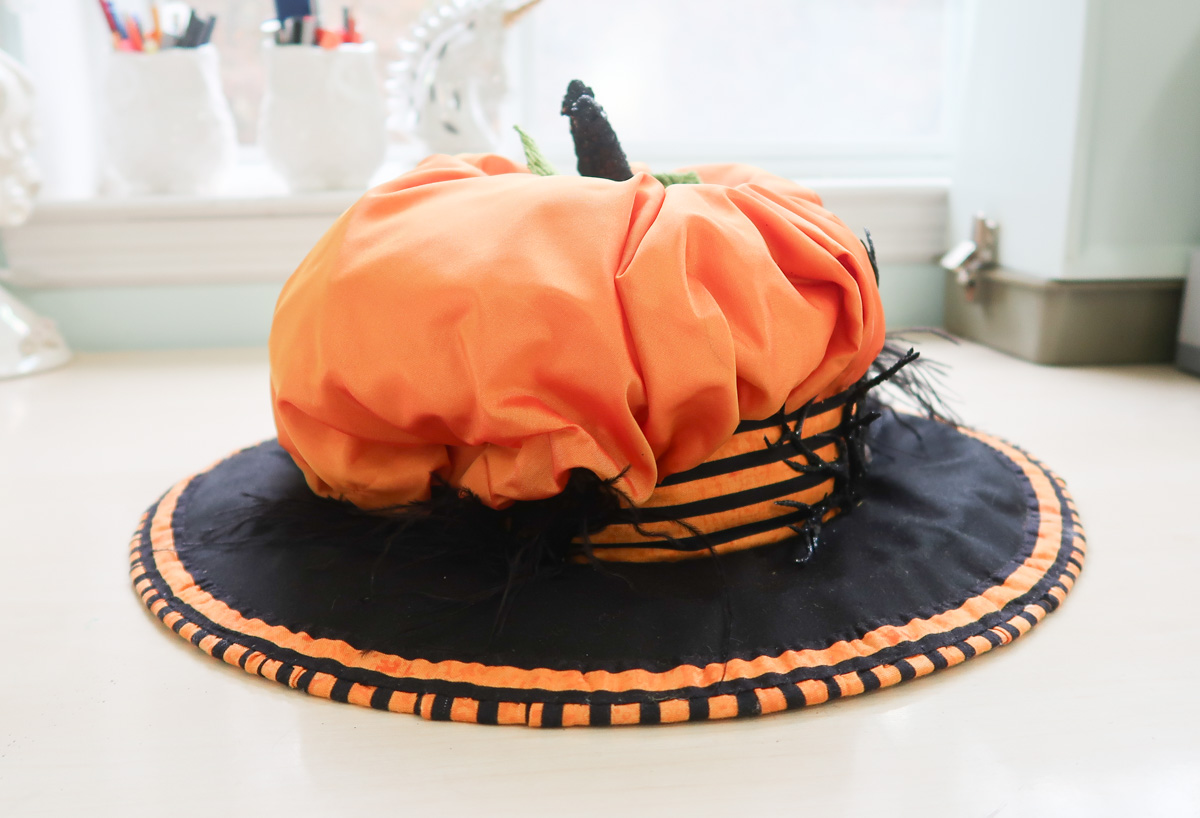
And that is it! The pumpkin hat was done! And it’s pretty glorious if I do say so myself.

halloween-16

halloween-17

Maybe my favorite hat I’ve ever made. Which is saying a lot, because I’ve made some great hats.

halloween-19

And with the hat finished, and the dress finished, and the underskirt finished, it’s time to finish this post!

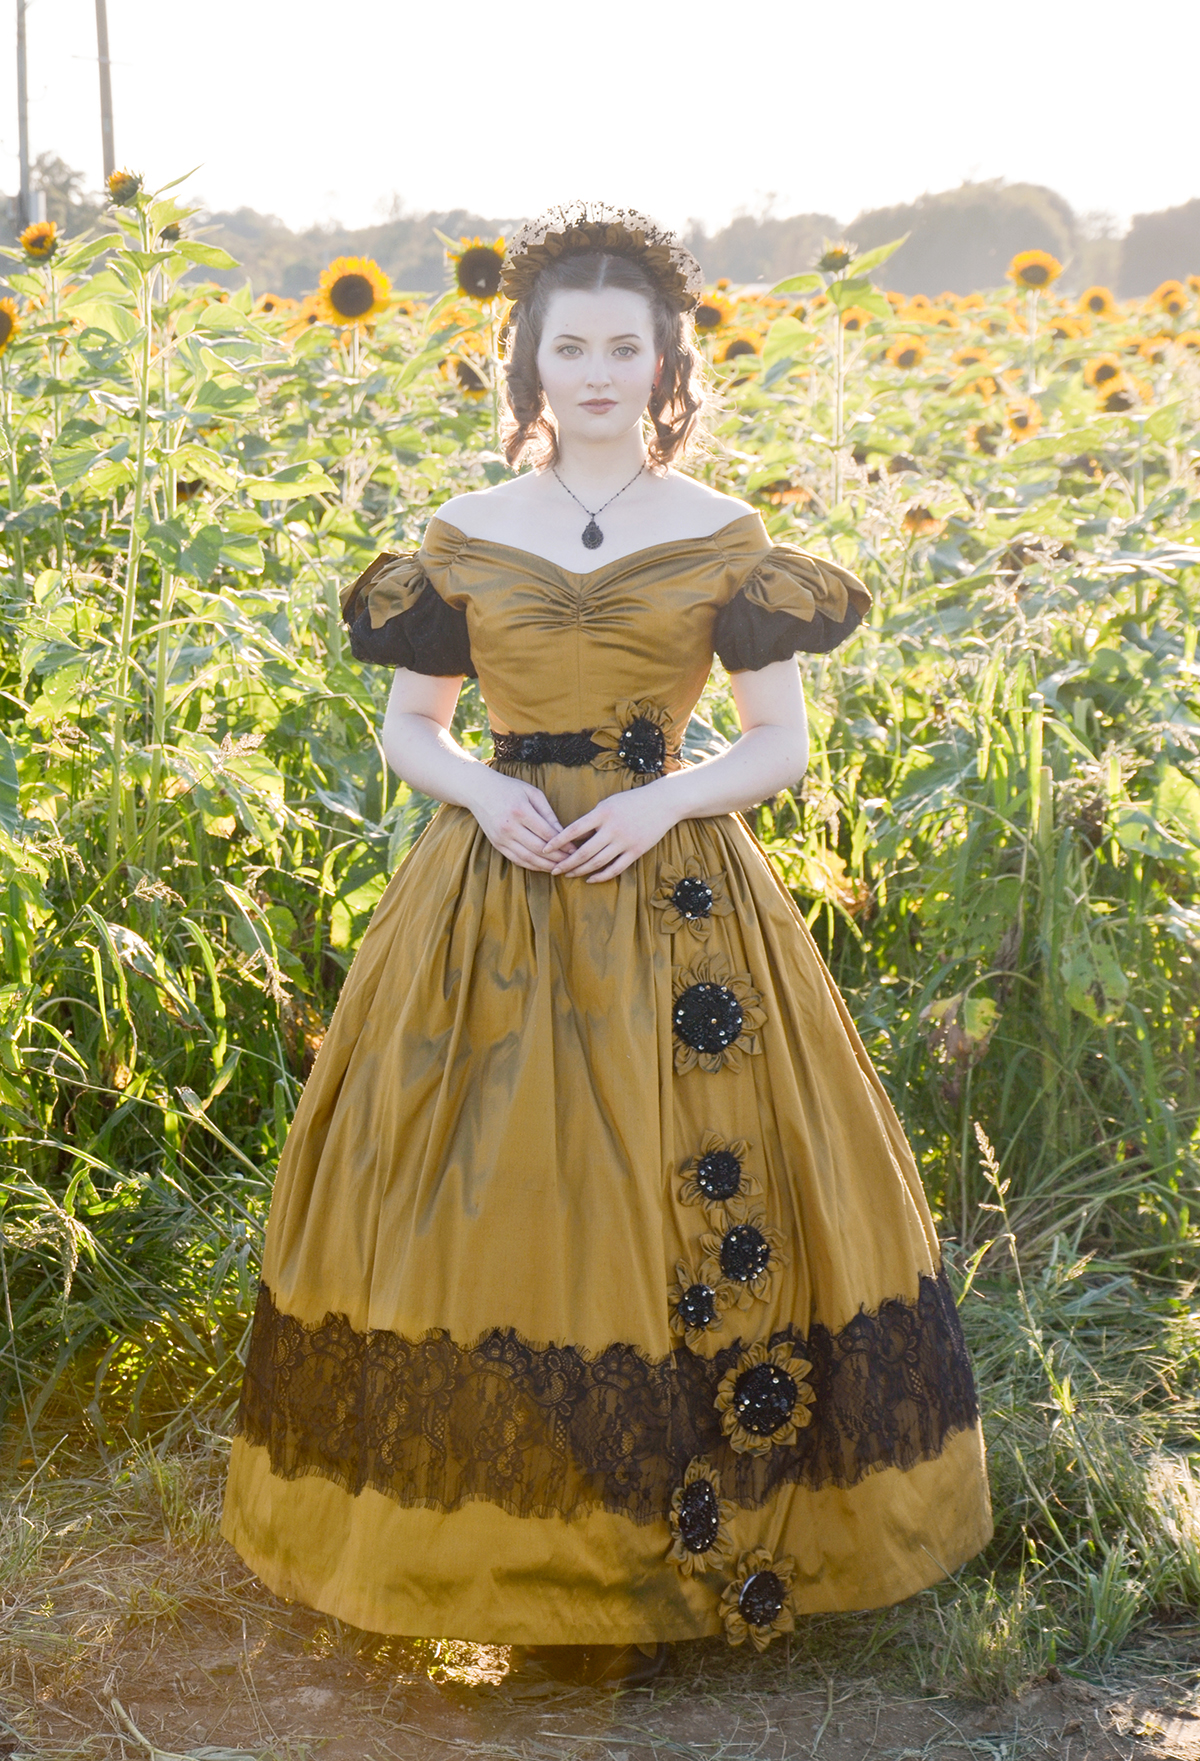
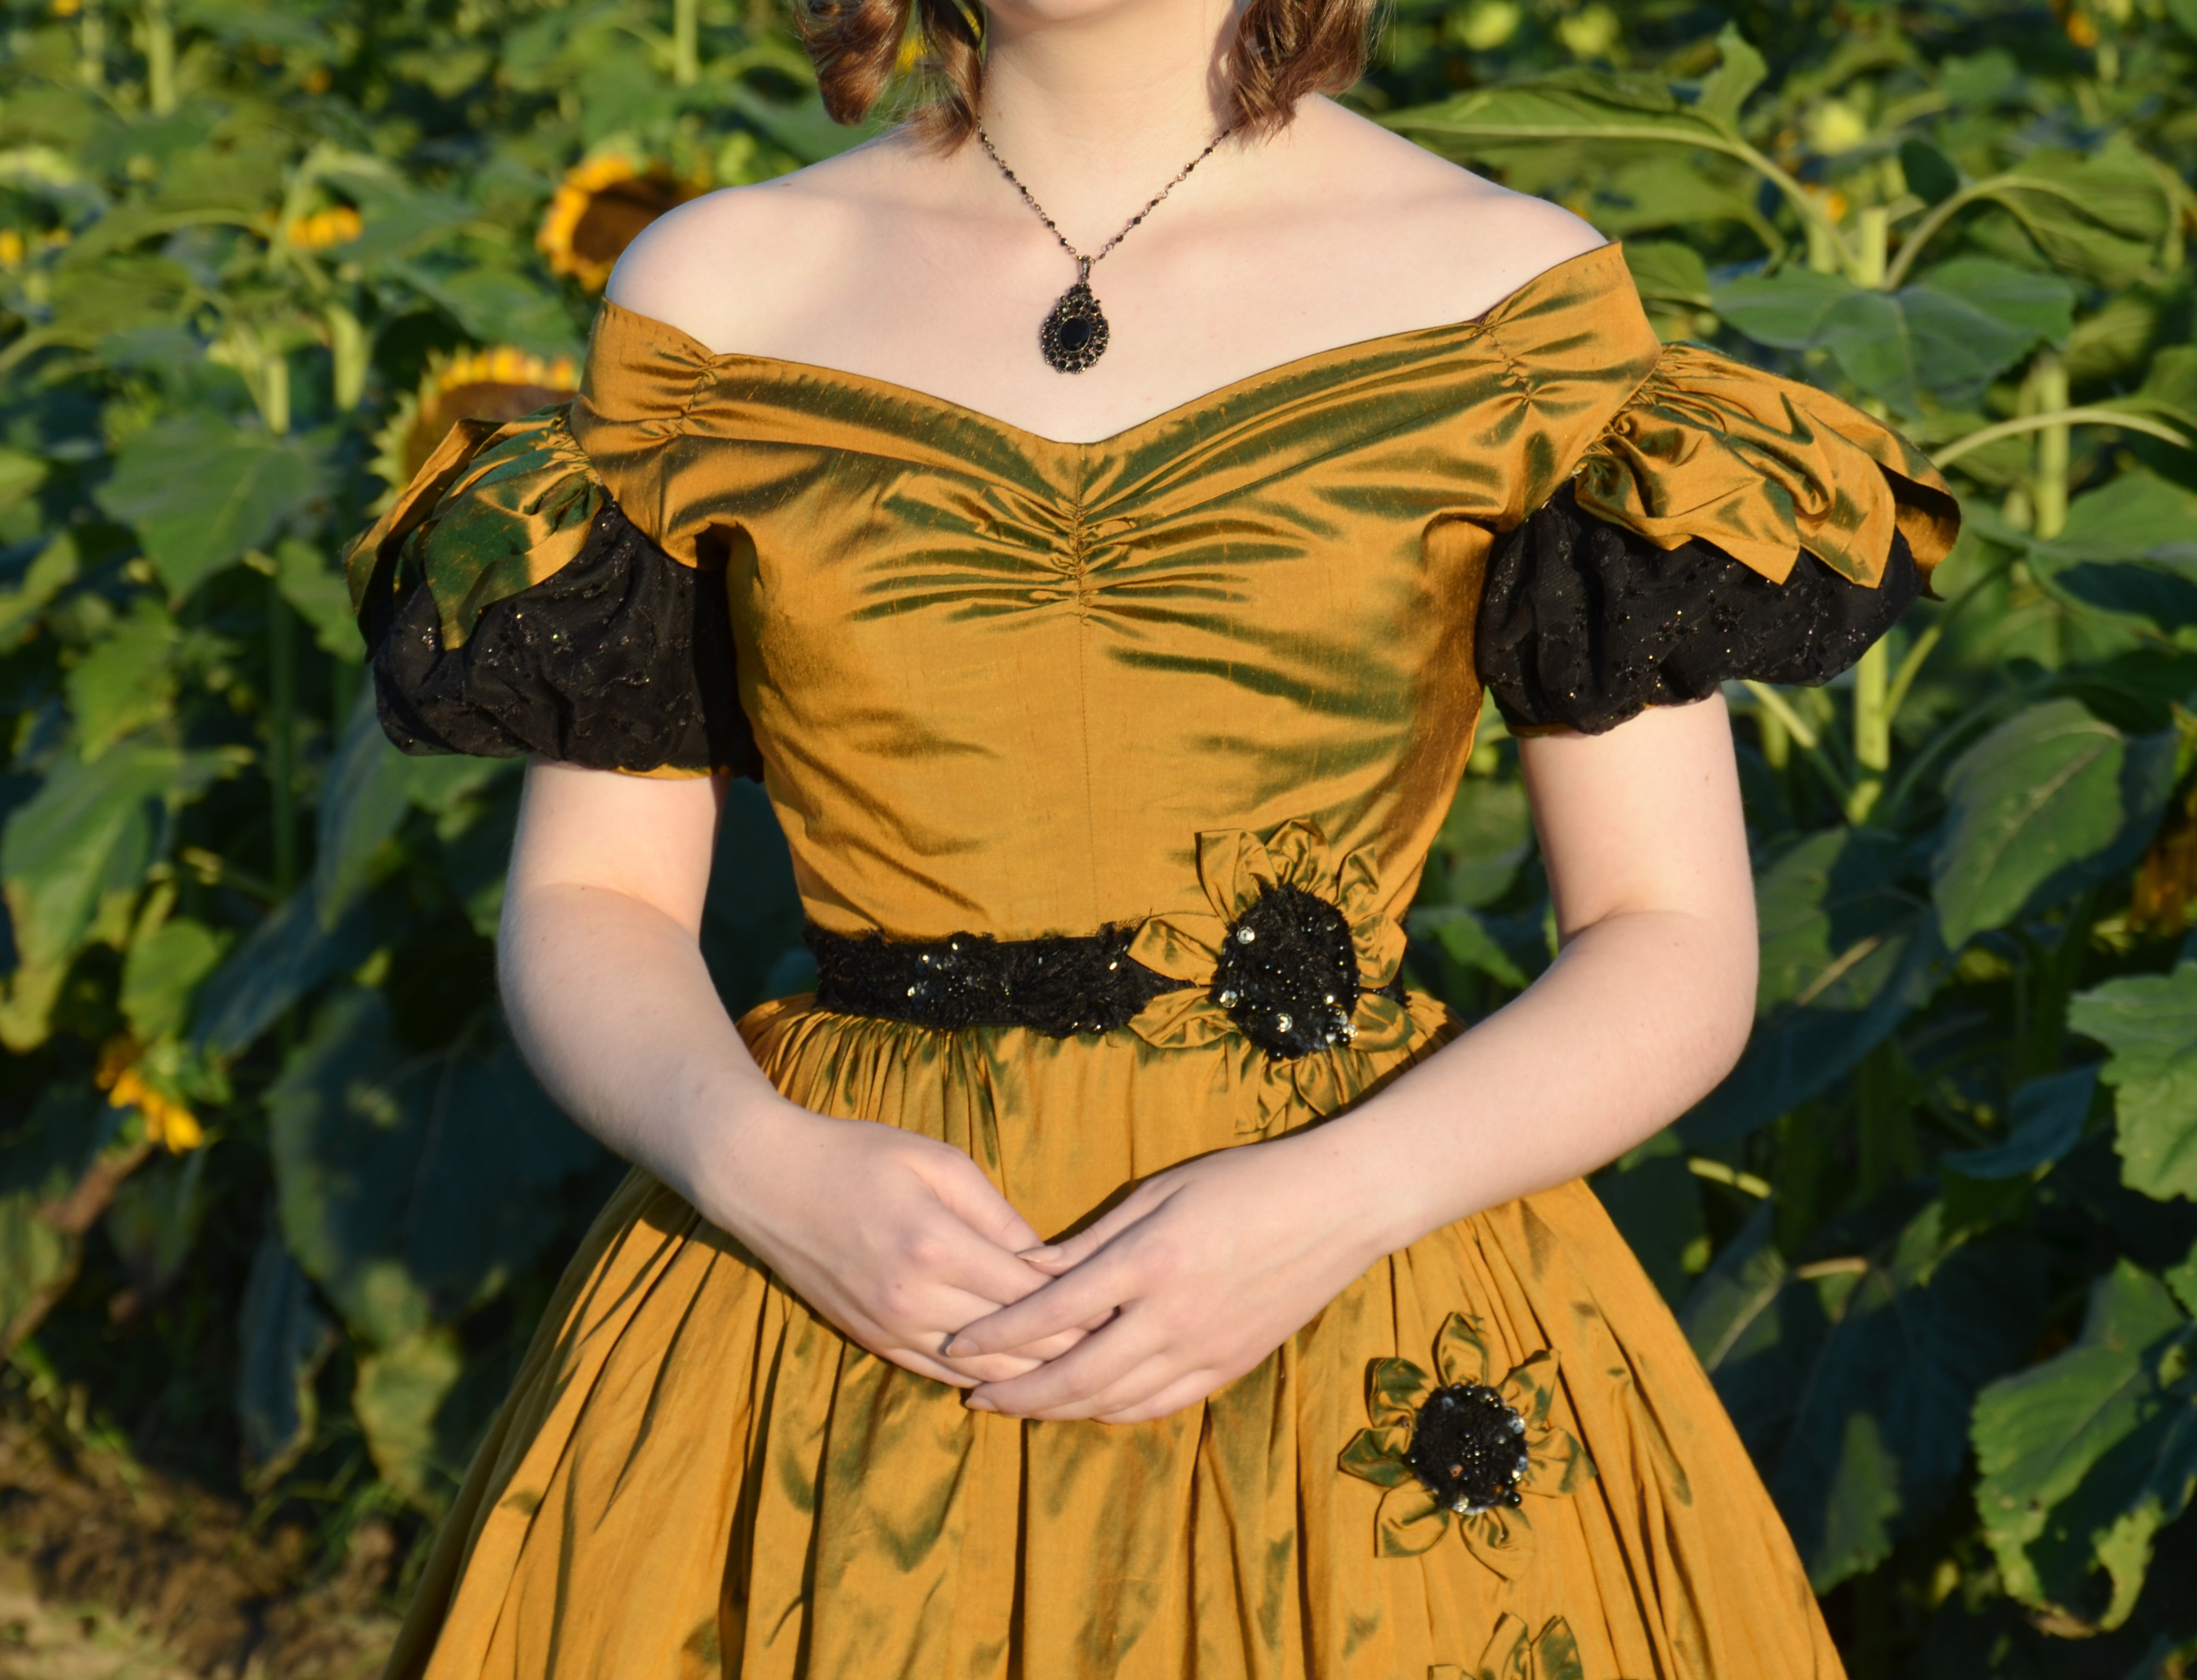
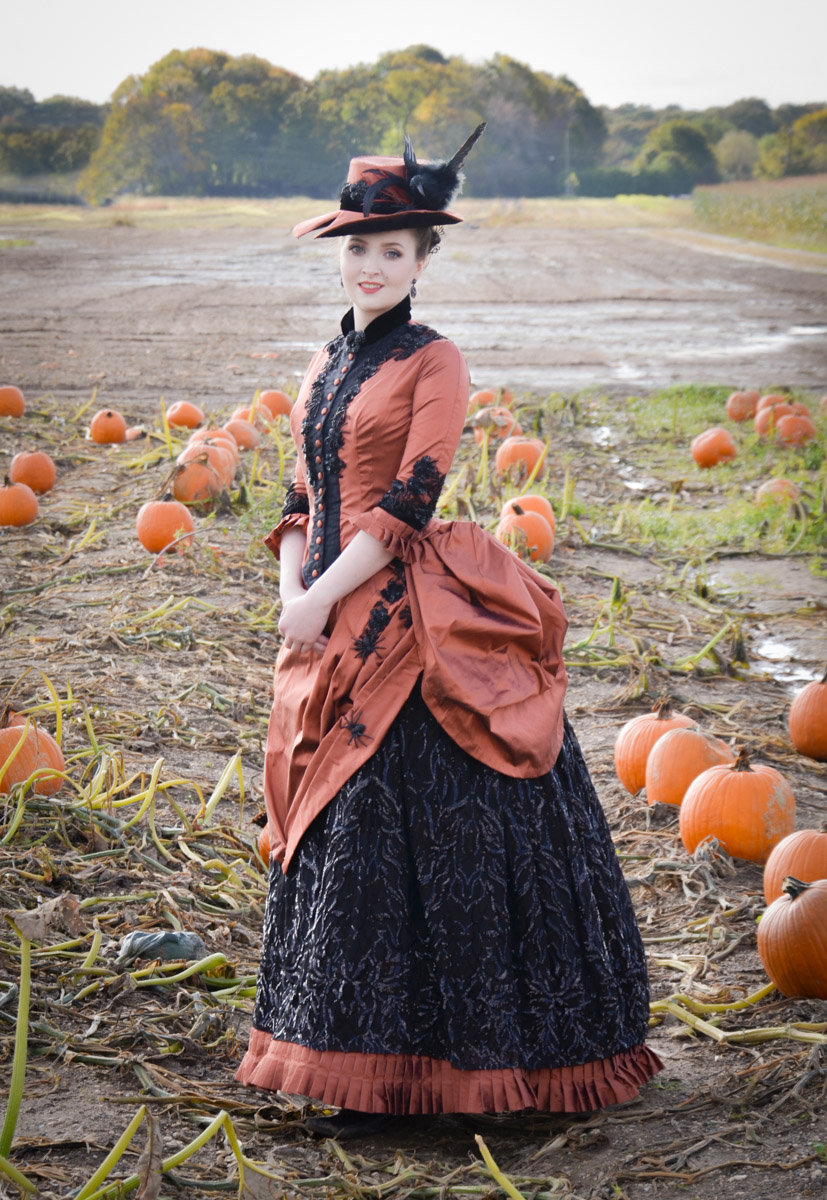
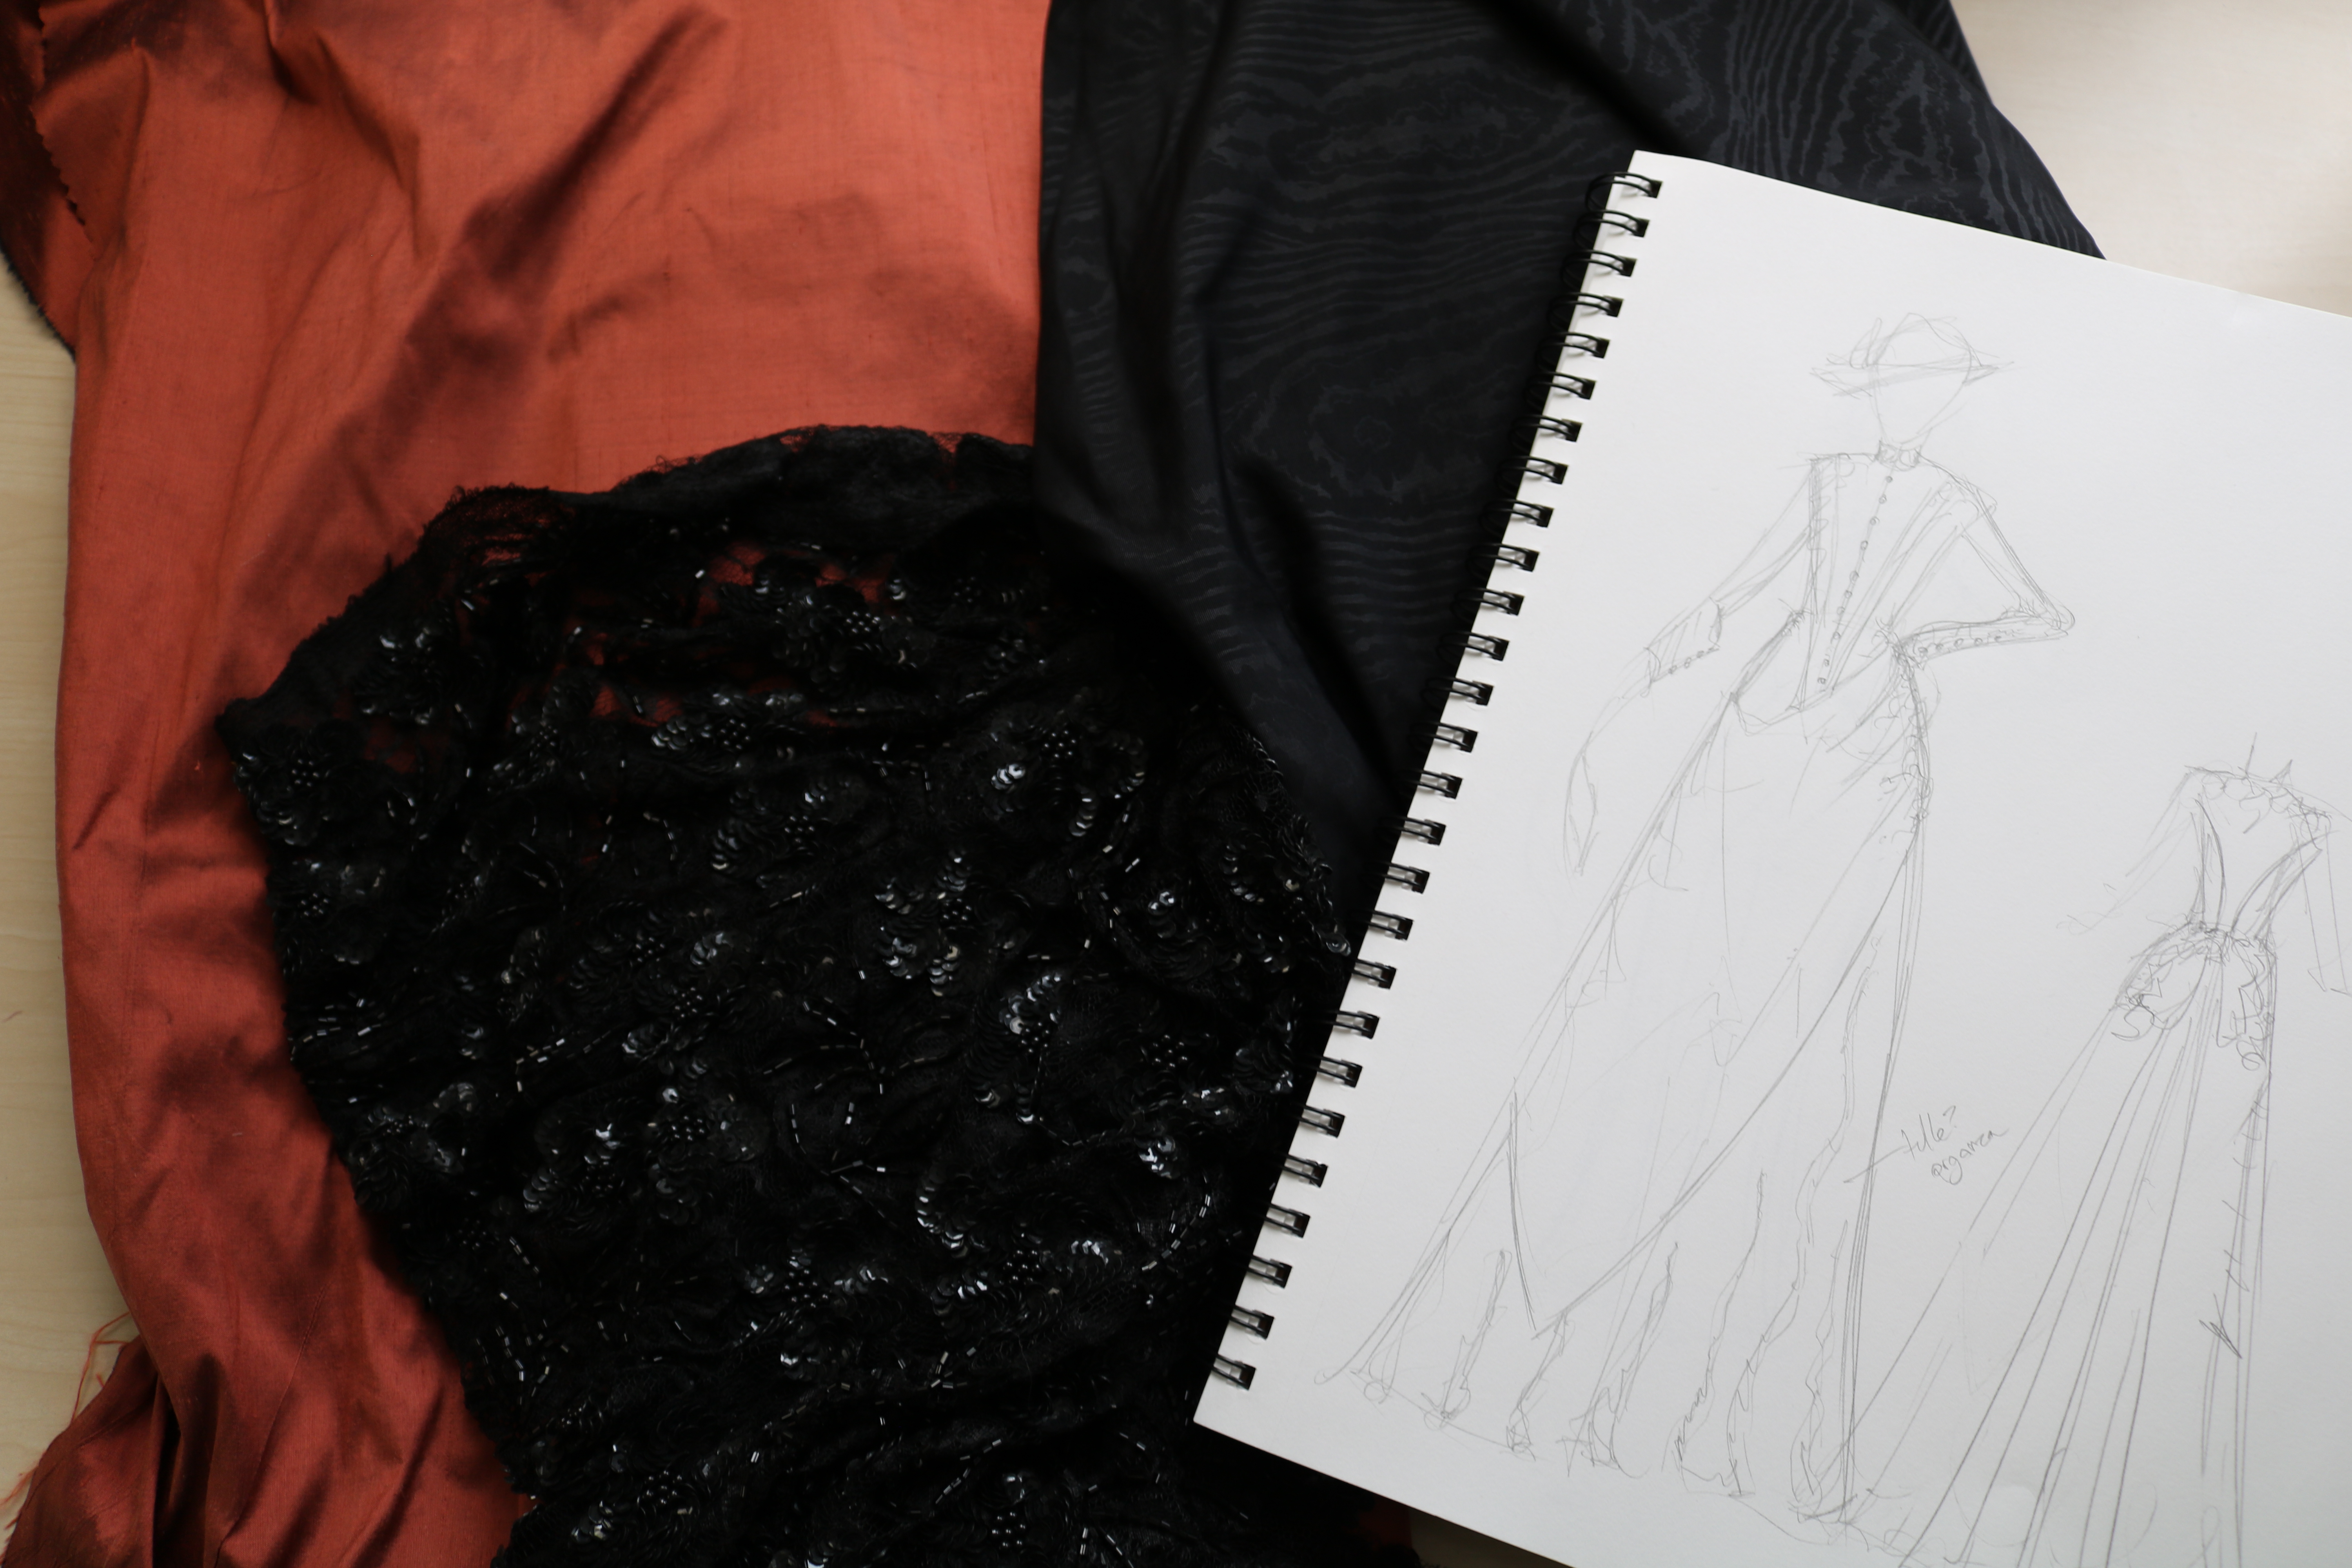
Thanks SO much for reading! I will be back with photos of the finished ensemble tomorrow – along with another special post, about another ~spooky~ project.

Also THANK YOU to anyone who has stayed subscribed to my blog despite it’s lack of activity over the past couple years. I really appreciate it, and I’m looking forward to reviving it in the coming months!


An 1880’s Inspired Dress : Pumpkin Project 2018

It’s become a bit of a tradition for me to make a Autumn themed ensemble in October, and photograph it in a local pumpkin patch. Last year I made an 18th century Redingote and the year before that, an 1890’s dress.

This time around I wanted to venture into a period I’m a bit less familiar with – and slightly terrified of (fitting, since it is halloween, huh?) : The 1880’s.

The bustle decades of fashion in general intimidate me. I think I understand how the dresses are supposed to go together, and the rough shapes the pieces should have. I mean I’ve read books about them, looked at original patterns, and scoured photos of dozens of extant garments! But I always get overwhelmed when it comes to making them, and had never finished one…until now!

spooky1880 (3 of 12)

It has its problems, but I learned a lot and its made me way more confident about attempting costumes from this period, so I think it is a success – at least in my eyes!

I went into this project knowing what period I wanted it to be from (the 1880’s) and what fabrics I wanted to use (orange silk shantung, black faille, and black sequined lace)…and not a lot else.

I tried to design it without referencing fashion plates, since I wanted it to be somewhat original. I also wasn’t too concerned about historically accuracy – I was OK with it having some fantasy elements to it (like fake spiders. and sequins. and fake spiders with sequins on them). I figured that would take a lot of pressure off me when constructing it, which was good since I only had a week to make this!

This was my first sketch, but I did make some changes as I got further along with this project.

IMG_4879

I decided to make the skirt first, so I could drape the bodice over the skirt and hopefully have a better fit.

I also decided the skirt would be two layers. Layer one has a black base, with contrasting trim on the hem, and a sequined overlay.

Layer two is orange shantung that has been pleated and trimmed to form a bustle.

Both of these layers go on top of this petticoat, which I hemmed and pinned to be more appropriate for the 1880’s, and a lobster tail bustle straight out of Norah Waugh’s Corsets and Crinolines*.

I put the foundations on my dress form, took measurements off them, and used that to create a underskirt pattern. Well, pattern might be a stretch! I figured out the dimensions of the pieces, then these were transferred directly onto the faille with chalk.

This is the front panel of the underskirt.

lightroom (1 of 32)

lightroom (2 of 32)

…And the finished underskirt. I wasn’t great about documenting this. The back panel is just a rectangle gathered to fit the waist, with a ruffle sewn on to the lower half to add volume.

The waist was finished with ribbon, and closes with a hook at one side. Everything was stitched with french seams, except the top 10″ of the right side, which was left open to make the skirt easy to get on and off.

lightroom (27 of 32)

I originally wanted to add dagged trim to the hem – to look like Jack o lantern teeth, but I didn’t have enough fabric. So instead I sewed together several rectangles of orange fabric,  hemmed them by hand, then pleated them down to add texture.

lightroom (7 of 32)

lightroom (8 of 32)

The pleats were kind of unruly, so I tack stitched them down 2″ away from the top edge. I also finished the top edge with binding, to prevent fraying.lightroom (9 of 32)

I topstitched the pleats on to the underskirt…and then top stitched black binding on top, because I realized the white binding I originally used would be visible through the lace overlay (oops).

lightroom (25 of 32)

I don’t actually have any photos of adding the lace overlay, but it was effectively a three yard cut of lace that I trimmed hemmed, and gathered, until it fell just above the pleated trim. It was stitched onto the underskirt, just below the waistband.

I was originally going to fussy cut the lace into the shape of trees and hand-stitch it on, but I ran out of time and the lace wasn’t really dense enough to do that.

( In these photos the overlay is just roughly pinned on – it hasn’t been hemmed and gathered yet!)

lightroom (3 of 32)

This is also the kind of beginning stages of my bustle.

The bustle had three pieces – two “poofs” made out of rectangles with three sides gathered (the other edge makes up the hem, and was stitched by hand). And the front portion which draped down, and was made by draping the fabric and pleating it until I liked the shape.

lightroom (4 of 32)

The pleats were tacked down by hand, and the back edges were bound. Then I pinned lace across the pleats to add interest.

lightroom (6 of 32)lightroom (5 of 32)

That was all stitched on by hand, too. And that was about it for the skirt! I added a waistband to the bustle layer, and a few hooks to keep is closed. There were also some plastic spiders added later, just for good measure.

The bodice pattern was draped over all the skirts, and though I draped/patterned it myself, I used a lot of original pattern images as a reference when placing the darts and seams (you can see some of them here, if you scroll around).

Then I transferred that to paper, and turned it into a mockup…which was way too big. Like so big I couldn’t even tell how well it would fit when taken in. I pinned the necessary alterations, then marked them all on my pattern.

This was mock up number two, which still needed a few changes but fit surprisingly well! I loved the shape of the hem, and I thought the fit through the bust and shoulders was pretty great!

Here is the “final” pattern.

lightroom (22 of 32)

Most of the garments I’d seen from this period were flat lined. So I cut each piece out twice, once from shantung, and once from a lightweight canvas-y fabric.

Each piece of shantung was backed with the canvas, then treated as a single piece.

lightroom (16 of 32)

Unfortunately I didn’t realize until after sewing all my bodice pieces together that I still had a large needle in my machine, like the type you use with thick wools. It had caused the seams to pucker quite badly. I didn’t have enough fabric to recut the entire bodice, but I did re-cut the front panels.

Here you can see the difference in the darts sewn with a silk needle (left) and one with the heavy duty needle (right). Changing your needle matters!

lightroom (20 of 32)

Now I had to assemble the center panels before doing a fitting. These were made from the black faille, and lined with the canvas material.

lightroom (17 of 32)

I bound the edges to prevent fraying, and used my machine to stitch 15 buttonholes into the left front panel. Then I sewed 15 buttons onto the other!lightroom (18 of 32)

Here is the first fitting (this is before I replaced the font panels, so ignore the puckers!) – somehow the black panel was too short, leaving a gap at the shoulder. So I had to add an extension there. But everything else looked really good!lightroom (19 of 32)

So I decided to add boning into the bodice. Most garments I looked at from the 1880’s had pinked seams, with boning sewn into the center. Though I wasn’t aiming for perfect historical accuracy (in case the sequined lace didn’t throw you off!)  I did want to practice some historical techniques for future projects.

I used spiral steel boning for this, since I thought it would bend well with the curved seams. I loosely whip stitched 3/4″ twill tape around the bones, then used more secure whip stitches to sew the bones into the bodice. lightroom (21 of 32)

Here is the interior – you can see the bones, and the grosgrain ribbon waist tape that I added.

You can also see the bias binding, which I used to finish the bottom edge of the bodice.

lightroom (28 of 32)

Now onto sleeves! I flat drafted these using a few measurements, but they were way too big.

lightroom (23 of 32)

This is take two, which was better, but still not great.

lightroom (24 of 32)

I think it took me three more attempts before I ended up with something I was happy with. I don’t have a worn photo, but this is the final pattern.

lightroom (32 of 32)

The sleeves were…one of the more frustrating parts of this project. It seemed like no matter how I lined them, what I lined them with or how much ease I added, they wanted to wrinkle.

Finally I attempted flat lining them with the canvas I used on the bodice, which seemed to work OK but still isn’t perfect. I realize now it must have been a drafting error…but I didn’t have any of those problems on the mockup!

The sleeves have a velvet cuff, which covers the top edge of more pleated trim. I also stitched on more lace, and I tried to make it look like the lace was crawling up the sleeves.

lightroom (26 of 32)

I sewed the sleeves onto the bodice, then trimmed the seam allowance down to 1/4″ and whip stitched it to the lining.

The bodice also got a collar (basically a 2″ wide rectangle with curves at the front) made of velvet and lined with faille. I like the contrast of the super black velvet against the less black faille.

Then I added a bunch of lace to the shoulder of the bodice…and a couple of spiders. My whole concept for this is that the lace is a spiderweb.

lightroom (29 of 32)

The final touch for this costume is the hat! It has a brim made out of buckram, a cap made from interfacing, and is generously decorated with lace and various halloween decorations. Including a whole fake bird I bought from michaels.

lightroom (30 of 32)

The interior is lined with gathered tulle, and cotton. A comb was sewn in so it can sit at an angle without falling.

lightroom (31 of 32)

Now up until this point, I was pretty happy with this project. And then I tried it on. And somewhere between adding the waist tape and sleeves, the fit became awful.

Or not even the fit, the fabric just…rebelled against me. It puckered really badly and rippled down the back (not something visible in ANY of my previous fittings) and the darts at the front strained too. But I don’t think it was too small. Because the bodice almost gaped away from my back.

spooky1880 (1 of 12)

Despite the fittings when making sleeve mockups going fine, it was suddenly really tight around the underarm and shoulder. But when the sleeve head was larger, it was baggy!

I think these problems would have been less obvious with a cotton fabric, or something without a sheen to it. Unfortunately one of the reasons I gravitate towards shantung, is because of its sheen.

I think I can probably fix it (or greatly improve it) by removing the boning in the back seam and taking it in slightly. I think removing the sleeves, letting them out, and cutting 1/4″ of material out of the armscye might help with the issue there…and I’m sure there are other fixes too.

But even with its faults, I’m happy with this project. I like the design of it, the fantasy elements, and the fact I finally finished a bustle dress! That fact alone has given me the confidence to attempt more…and hopefully those will fit a bit better.

Here are the worn photos:

spooky1880 (2 of 12)spooky1880 (8 of 12)spooky1880 (7 of 12)spooky1880 (4 of 12)spooky1880 (5 of 12)spooky1880 (6 of 12)spooky1880 (9 of 12)spooky1880 (10 of 12)spooky1880 (11 of 12)spooky1880 (12 of 12)

I hope you’re having a lovely Halloween, and thank you so much for reading!

The Sunflower Gown : Making a 1830’s Dress

Last Thursday I drove by the prettiest sunflower field, and was overwhelmed with the desire to make something inspired by it.

I also wanted to make something that could be photographed in the field.

Unfortunately, sunflower season is really short and I didn’t expect them to be around for another week.

Which meant I had to make a dress that week.

So I did!

I did the pattern drafting on Friday, and actual construction started on Saturday. I had the dress and a headpiece done and ready to be photographed by Sunday evening.

I think it turned out pretty well for two days of work!

resize

The idea for this was very much shaped by the fabric I had in my stash. In fact, at first I didn’t think I had any fabric that would be suitable for a sunflowery historical gown. I was planning on making a few 1950’s pieces in autumn tones that would suit the backdrop, and that is what I spent a good chunk of Thursday/Friday working on. But the further along I got, the more I wanted to make something historical instead.

So I went through my stash and came across a recently purchased silk shantung. I would lovingly call this fabric baby poop colored…But I still bought it, because it has a very strong gold/green shift, which is striking when light hits it.

It isn’t exactly sunflower colored – but it has yellow, green and black tones in it which is reminiscent.

sunflowers (10 of 27)

This was my original sketch, along with some skirt variations.

I designed this without researching references, but I did look to Costume in Detail* for construction notes regarding 1830’s dresses, which ended up being very helpful!

sunflowers (3 of 36)

The parts I was most excited about (like the big sleeves and gold petal overlays) ended up in the finished dress. But other plans had to be dropped due to fabric and time limitations.

Remember, I only had two days, and six yards of fabric, which isn’t a lot for a historical gown!

sunflowers (36 of 36)

The first idea I dropped, was the plan of having a pleated bertha collar. I decided it took too much fabric and time to create. Instead I draped and off the shoulder bodice which was shaped with gathering at the front and shoulder.

sunflowers (1 of 36)

sunflowers (2 of 36)

I made a mockup for this, then got everything transferred to paper. I also drafted the sleeves right away, which is rare for me. I tend to leave sleeves for last (as in, after the whole bodice is done) because I hate them so much. But there was no time to procrastinate!

sunflowers (32 of 36)

sunflowers (31 of 36)

The bodice pattern was cut out twice – once from a floral cotton which will serve as lining, and again from the silk. Boning channels were stitched into the seam allowance at the sides of the lining, and at the center seam.

sunflowers (4 of 36)

I stitched the layers together, with the right sides facing each other, all the way across the neckline.sunflowers (5 of 36)

I ironed the lining inward and stitched around the neckline by hand. At this point the side seams were still left open. And I wanted to leave them open until after sewing the sleeves on. Which meant I had to make sleeves.

sunflowers (13 of 36)

I cut the sleeves out from a layer of black cotton sateen, and a layer of floral embroidered glitter mesh.

I’m SO glad I remembered that I had this fabric in my stash. I don’t own a lot of black material and was quite frantic trying to find something for the sleeves that had a lot of texture, but wasn’t too thick or heavy (my previous candidate was velvet, which is both thick and heavy).

This ended up being perfect, and I had just enough left to work as an overlay.

sunflowers (7 of 36)

The sleeves were gathered down by hand. Originally I wanted these to be pleated, but I thought having pleated sleeves with a gathered bodice would look strange. So I gathered them instead.sunflowers (9 of 36)

I was going to pad these to get the amount of volume I wanted, but I decided to try stitching ribbon in first to see if that would help. I’m not sure what this is called (sleeve stays, maybe?) but it is often shown in sewing books.

The ribbon forces the sleeves to stay a certain length, which prevents them from sliding down the arm and losing their poof. These sleeves were about 13″ long in the center. And the longest piece of ribbon is 7″.

I didn’t have high hopes that this would work based on my test fitting…but it totally did! No need for sleeve pads here!


sunflowers (10 of 36)

But the sleeves weren’t done! I wanted the gold fabric to lay overtop of the puffed portion, almost like flower petals.

These petals were created with half circles of fabric, in various sizes.

sunflowers (11 of 36)

Each half circle was folded in half, and stitched together to form a quarter circle shape. The quarters were turned right side out and ironed. Then the rounded edge was gathered down by hand until it was an inch or two long.

Five of these will be used on each sleeve, which the longest petal at the center of the shoulder.

sunflowers (12 of 36)

This was stitched onto the top edge of the sleeve. I also finished the lower edge of the sleeves with matching gold piping.

sunflowers (14 of 36)

The lower edge looks a bit messy from the interior, and the top edge is kind of…uh…girthy? It’s almost a cm thick at points! So I decided not to finish this edge, since any stitching or binding would just add to that.

sunflowers (15 of 36)

Even though it was quite thick, my sewing machine stitched through it like a champ.

Once the sleeves were on, I sewed up the side seams. I also added boning to the front seam (it stops just below the gathering) and the side seams. Leaving me with this!

It looked so much better than I had expected it would – which really got me feeling excited about the project!

sunflowers (16 of 36)

Though the sleeves were the hard part of this project, they were made easier by the fact I had a clear vision. Where my thoughts towards the skirt were murky at best.

I knew I wanted some visual interest on the skirt – I recently made two 1840’s dresses with plain rectangle skirts, and I’m a bit bored with them. Not the shape, just the lack of trimming.

And the 30’s were famous from elaborately trimmed skirts, so I felt this project would be incomplete without something.

My first idea was pintucking the skirt, then decorating it with sunflowers. But the skirt would have been too short if I did that (I was working with the fabrics horizontal width for the skirt, about 45″).

Then I decided to trim the hem with large triangles, made from black velvet and piped with matching shantung. These could be stitched to the underside of the hem and turn outward, like petals. They could also serve as frames for hand made sunflowers. This idea is seen in my original sketch.

sunflowers (35 of 36)

I was pretty committed to this idea, so much so that I wasted 1/2 yard of my precious silk to create the piping. I also cut out a dozen velvet triangles, and  poly shantung for lining.

sunflowers (6 of 36)

The piping was stitched to the lining, with the wrong sides facing outward. Then velvet was pinned on top with the edges tucked inward, covering the frayed edges of the shantung.

These looked OK, but I didn’t love it. The velvet lacked texture since it was so dark, and the piping blended into the skirt. I thought it was too harsh and clashed with the bodice. sunflowers (33 of 36)

So I decided to dress the skirt up with lace instead. I had 12 yards of 7″ wide chantilly lace that I bought on etsy a while back. I figured I could sacrifice a few yards for this, and still have enough leftover for a civil war era gown (which I’m pretty sure was my original intention for it).

sunflowers (20 of 36)

Despite my intentions for something different, the skirt for this was just a rectangle. But I had a reason for it! On top of fabric limitations, this fabric has a very different sheen and coloring depending on the grain line. Cutting the skirt as a rectangle means the grain is the same all the way across, and ensures the sheen will look even.

The rectangle for this was 3.5 yards wide, and the full width of the fabric.

I marked a line two inches away from the selvedge, and ironed the lower edge up so it touched that line.

sunflowers (17 of 36)sunflowers (18 of 36)

Then I hemmed it with a super sloppy, very wide catch stitch.

sunflowers (19 of 36)

The chantilly lace was placed 6.5″ away from the finished hem, and stitched on by hand with running stitches. sunflowers (21 of 36)

The top edge was gathered down by hand to match the waist of the bodice, then stitched on by machine.

sunflowers (23 of 36)

After that, I turned the back edges inward. I had about 1.5″ of allowance on either edge, but I wanted them to overlap so I wouldn’t have to add a modesty panel. I also wanted to stitch boning into both edges without any visible topstitching.

I honestly don’t even remember how I went about doing this, but I know the end result was far from symmetrical and not too pretty in terms of construction. But it looked okay from the outside…which is all I can really ask for when making a dress in two days!

sunflowers (27 of 36)

I stitched hooks and bars into the back to serve as closures.sunflowers (26 of 36)

I also added a belt. I debated about this a lot, but strongly felt the dress needed something to break up the bodice and skirt. I pinned a velvet waistband on first, but wanted something with more texture. So I ended up making a waistband from black cotton sateen, then fussy cutting bits of beaded lace out and stitching them on.

This looks a bit messy up close since the lace has a large wandering floral pattern, and really isn’t made to be cut into tiny pieces. But from a distance it still has visible texture and adds a bit of sparkly!

sunflowers (25 of 36)

Now with my limited fabric and time remaining, I decided to make sunflowers. These were created from dozens of 4″ wide circles. Each one was cut out, then ironed into quarters. Like with the sleeves, the curved edge is gathered down.

Except this time they were sewn on to a circular base of interfacing.

sunflowers (24 of 36)

The bases were covered with velvet, and more butchered black lace. I wanted the centers to have a lot of texture to mimic sunflowers, but I didn’t have time (or enough black beads) to embellish the centers fully.

The lace was a way to quickly get the effect I wanted, and it worked perfectly!

The lace had to be stitched on by hand, and while I was at it I stitched on some larger black beads, and some gold sequins. The sequins were a random addition because I love sequins. But I’m so glad I decided to use them, the contrast of the gold against the black makes them look lit up, regardless of the lighting.sunflowers (22 of 36)

I pinned the sunflowers onto the dress while it was on my form, before sewing up the back seam. This way I could remove the dress from the form and stitch the flowers on while the skirt was completely flat.

Even though that made the sewing process easier, I didn’t do the best job of this. They were *really* roughly stitched on with whip stitches at the underside of the fabric. I tried to stitch through the edge of the interfacing centers, since that is the heaviest part of the flowers.

I wish the stitching was cleaner, but I’m actually pleased with the placement of the stitches. Since I didn’t tack down the petals, they flip outward slightly, making them look more natural. sunflowers (29 of 36)sunflowers (28 of 36)

That was the dress done! But I knew I wanted to make a headpiece too.

This ended up consisting of two gathered strips of the black mesh, and a bunch of the small flower “petals”. These were stitched into a a single strip.

sunflowers (30 of 36)

That I hot glued onto a headband and backed with boning and felt. Am I proud of the quantity of hot glue on this? No. But it looked good in photos and took less than 10 minutes to make.

The “finishing touches” included pinning my petticoats so they hung above my ankle. And pinning fabric sunflowers onto my funtasma shoes* so it was less obvious that I don’t have any 1830’s appropriate footwear.

1830’s footwear is supposedly the easiest to fake, since they wore square toed flats. But I do not own a single pair of flats because they make my feet look massive.

IMG_4757

And that was it! Also for those curious, this was worn over my recently completed 1840’s corset based on a pattern from Norah Waugh’s Corsets and Crinolines*. I have a couple  photos of this on instagram (here, here, and here) and I can vouch for this pattern being awesome – I love the shape of it, and it is pretty comfy!

For petticoats, I wore a cotton/net full length petti that I made a few years ago. It is full length, so I had to pin it up by about 6″ for this photoshoot. And that was stacked on top of two knee length tulle petticoats (specifically, this one).

I’ve been really unhappy with the volume in my other 40s/30s skirts and I thought this would be a good solution. And I was right, look at that poof!

resizeI’ll post the full photoset tomorrow.

And as always, thanks for reading! I hope you enjoyed!


1840’s Dotted Dress, Photos

I think this is my first costume photo set of the year. How wild is that?!

These were taken a location we visit often – conveniently right next to a busy street where people can stare, and unruly patches of poison ivy. But there is fence and sometimes cute horses, so sacrifices must be made.

These photos are of my 1840’s dotted dress, which I made over the course of a week and have spent the last month blogging about. You can read about the construction in more detail here, here, and here!

This project was based on examples from the 1840s, and made from eight yards of quilting cotton using a self drafted pattern.

Unfortunately my giant organza petticoat wasn’t done at the time I photographed this – so the skirt is lacking some of the fullness I had hoped for. But I don’t think that takes away from the pictures too much. Or at least I hope not!

1840.red.dot (2 of 13)

1840.red.dot (6 of 13)

1840.red.dot (7 of 13)

My least favorite part of this dress is the back – I feel like the fit problems I mentioned in my making of posts are a lot more obvious here. Taking it in at the back seam would help a lot, but the waistline should be raised slightly too.

Thanks to the way I stitched the skirt on, that would be an easy fix. I don’t like returning to “finished” dresses, but maybe when the weather cools down I’ll be  motivated to do that – and re photograph it with my fuller petticoat!

1840.red.dot (10 of 13)

1840.red.dot (1 of 13)

1840.red.dot (9 of 13)1840.red.dot (13 of 13)

Despite my annoyance with making the bonnet, I do love the profile it has!

1840.red.dot (12 of 13)

And I like this photo almost enough to ignore all the rippling at the back (okay, not quite, but close)!

1840.red.dot (11 of 13)

And that is it!

Thank you for reading, and for all the comments on my posts about making this. I’m looking forward to sharing some other photo sets (and progress posts) very soon!

1840’s Dotted Dress – Part Three

Today I have the final post about making my orange 1840’s dress to share! I planned on this going up sooner…but we all know how my blog plans go (the don’t).

However I can promise that this post will be followed by one with photos of the finished garment when worn!

The last post ended with a finished bodice – (if you missed that post, it can be read here) but there was more work to be done! Like making the skirt, and a matching headpiece.

Because you need a matching headpiece.

The skirt was really easy – it’s just three 42″ wide panels seamed together, hemmed, and gathered down to match the waist measurement of the bodice.

Resize (34 of 51)

After stitching the pieces together I folded the bottom edge inward by a half inch.

Resize (37 of 51)

Then I folded the bottom edge inward by three inches, and stitched it down by hand to avoid visible topstitching.

Resize (38 of 51)

Resize (41 of 51)

Since the skirt was three panels, and evenly gathered, a seam didn’t fall at the center back. So I had to slash one of the panels and finish the opening with bias binding. This will line up with the back opening of the bodice and allow me to easily get the dress on and off.

Resize (35 of 51)

The top edge was gathered down.

Resize (42 of 51)

I turned the bottom edge of the bodice inward by a half inch. Then topstitched the skirt to the right side of the bodice. The raw edges were all hidden by a band stitched to the outside of the bodice. This was visible on the extant garment I referenced, which is why I chose to do it this way.

lightroom (10 of 15)

I ended up sewing the skirt on kind of unevenly – but it was intentional! this way it rests a little higher at the front.

lightroom (5 of 15)

That finished off the dress! Overall, I’m happy with this. However the fit could use some work (I would say it is a full inch too big) and it really needs a modesty panel. Since I used hooks and loops, my foundations were slightly visible at the back.

But as I said in my last post, I’m going to resolve that by swapping the loops out with bars, and having the back edge overlap by an inch (this will fix the fit, too!).

lightroom (8 of 15)

lightroom (6 of 15)

I think my favorite part of this dress are the gathers – I love the effect of hand stitched, dense gathers, and they are plentiful on this dress!

lightroom (12 of 15)

I’m also happy that I’ve finally (somewhat) successfully executed the tiny piping which was so popular during this period. It makes me feel more confident about some 1810-1820s pieces I’ve wanted to make for a while!

lightroom (9 of 15)

And here is the hem after being ironed!

lightroom (15 of 15)

As far as headwear, I decided this dress needed a bonnet. I based mine on a few references…but I won’t share them, because it looks nothing like them!

I decided to use a cheap straw hat as a base (this one, to be exact), which meant the design had to conform to the existing shapes of the hat.

I used the cap for the back of the bonnet.

Resize (47 of 51)

And cut down the brim to form the front.

Resize (46 of 51)

I stitched wire into the edges of the pieces to make them posable. This was a nightmare, the straw kept cracking and it killed my fingers. I don’t think I will ever attempt hand sewing with this straw ever again.

Resize (48 of 51)

I lined it with a peachy colored silk dupioni. This wasn’t fun either, but there was less tension pulling on the silk so it was slightly more forgiving on my fingers.

Resize (49 of 51)

I used a rectangle of silk to make lining for the cap, too.

Resize (50 of 51)

Here the cap is attached to the brim – I mostly used glue for this, since my hand stitching kept tearing out.

Resize (51 of 51)

I added ties and flowers, and the bonnet was done! Visually this is fine, and it suits the costume well. But I despised making this. It sucked having to alter my vision to the shape of the straw, and the straw was so difficult to work with. I had to glue a lot of elements and the end result is less durable than I would have liked.

But it is cute. So there is that!

lightroom (4 of 15)lightroom (3 of 15)lightroom (1 of 15)lightroom (2 of 15)

Here is everything worn together! And as I said, a full post of photos will be up soon.

1840.red.dot (8 of 13)

1840.red.dot (10 of 13)

Thanks for reading!

1840’s Dotted Dress – Part Two

Today I have the second post about my 1840’s dress to share! This piece is made from a dotted cotton and based on an extant garment.

If you missed part one, it can be read here. We left off with a partially assembled bodice, and some fit problems in the shoulder.

Resize (21 of 51)

My solution for the problem was a patch that is about 2″ wide. All of its edges are piped, and its curvature matches the armscye so it doesn’t stick out *too* badly. This gave me enough room to easily get my arms into the bodice – with a bit of space to spare for the sleeves!

Resize (31 of 51)

With the pieces fully connected, I stitched piping into the armscye. Unlike the other methods used for this bodice, this time I sewed the piping to the bodice with the right sides facing each other. Then I turned the seam allowance of the piping inward and whip stitched it to the lining.

The raw edges were covered later on with bias binding.

I also stitched piping around the neckline, using the same method.

Resize (25 of 51)

Then I put the bodice on my dress form – with the the wrong side facing out. And I pinned the yoke lining into the bodice. This is the BEST way to line fitted garments that have some shape to them.

After removing it from the form I slip stitched the lining into position.

Resize (26 of 51)

Now onto sleeves! Sleeves are usually my nemesis, but the design for these doesn’t require a lot of fitting, so it was relatively painless.

Here you can see my mockup (top piece) and the two part pattern I ended up with. The top piece attaches to the bodice, and has ruffles stitched to the bottom edge. The second piece supports the second tier of ruffles.

Resize (23 of 51)

Speaking of ruffles – these were made from 42″ x 4.5″ strips of the cotton. I hemmed them by hand with slip stitches.

I had to hem four of these strips in total (two for each sleeve). But it was fun! I hadn’t had a simple hand sewing project in a long time, I really enjoyed zoning out in front of the tv while doing this.

Resize (24 of 51)

The ruffles were also gathered down by hand.

Resize (36 of 51)

Here is the top portion of the sleeve attached to the first ruffle. Piping was inserted into top piece of the sleeve before stitching the ruffles on…because that is the 1840’s for ya!

Resize (27 of 51)

Ruffle two sewn on to the second piece of the sleeve.

Resize (28 of 51)

The side seams for each piece were done independently, so they layers can move freely.

After stitching the side seams I whip stitched the pieces together from the inside.

Resize (32 of 51)

And that is the process of making pretty, ruffly sleeves. These were actually my favorite part of the project – I never thought I’d see the day when I say that about SLEEVES! But I guess if there are enough ruffles I’ll enjoy making anything.

Resize (33 of 51)

These were stitched on to the bodice by hand, and the seam allowance was whip stitched down.

The (almost) finished bodice looked like this!

Resize (39 of 51)

At some point along the way I turned the back edge inward, and stitched in hooks/eyes.

But I’m going to redo this at some point, since I realized after photographing this project that the bodice is too big.  I’m going to switch the hooks out with bars, and have the back edge overlap by 3/4″.

Resize (40 of 51)

And that is going to be the end of another post! I’m trying to keep these short so I can space them out somewhat. Next time I’ll talk a bit about the skirt and the matching bonnet!

Thanks for reading – and for the response to my first post about this dress. I appreciate the patience regarding my lack of updates!