
Here it is, the final post about my lacy 19th century confection! If you haven’t already, definitely check out the first few posts about this project. They can be found here, here, and here. They will make this post a lot easier to follow!
…
The final thing I had to make for my dress were bows. I didn’t have enough material left over to make them as large and frilly as I wanted, but they still turned out okay! The first step was cutting out the rectangles…

Then the slightly longer rectangles were trimmed so the sides ended in points.

I didn’t have very much lace left over, so I ended up trimming these pieces (which will be the tails) with the offcuts from cutting the lace to be more narrow. Not ideal but better than nothing!

And what little lace I had left went onto the rectangles that make up the bows. Since only one side will be visible I decided to only sew lace onto half of each rectangle.
 After it was sewn on I ironed the edges inward. Now this is where I should have hand sewed the edges down to finish them nicely.

But I didn’t do that because I was feeling lazy, so instead I used strips of fusible interfacing to keep the edges down. Not my best work, and I kind of regret not taking a few hours to sew these properly, but I had been working on this project for soo long at this point and saving an hour of time was too tempting to resist.

I gathered the tails down with two rows of stitching that are an inch apart.

The rectangles for the bows were folded in half, then sewn together and gathered down in the same way.
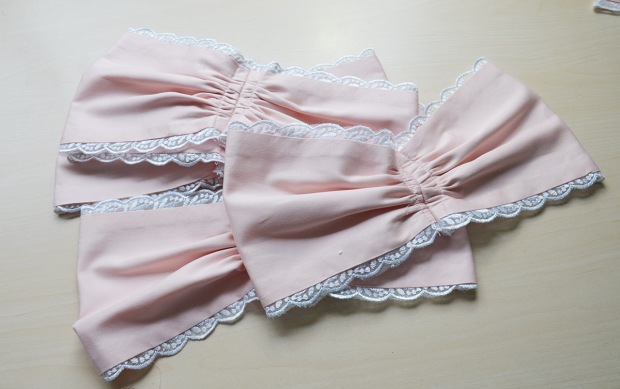
Then I pleated the bows to make the centers smaller.

Look at all of them!
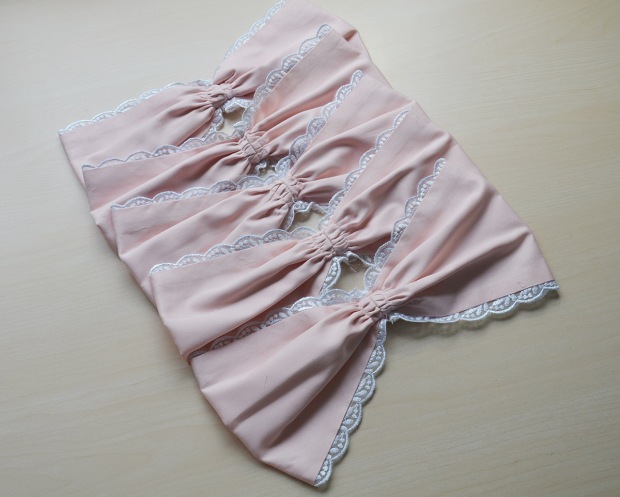
The tails were tacked onto the backs.

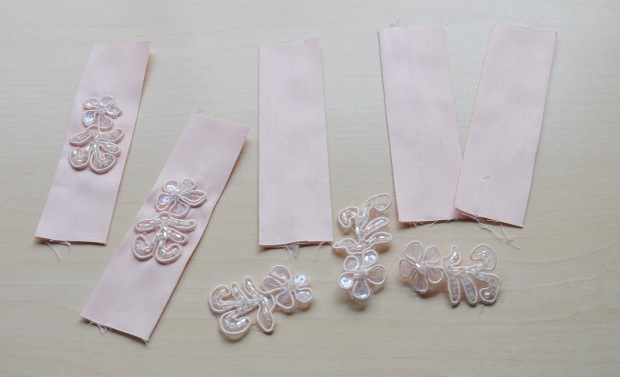
Then I cut much smaller rectangles out which will make up the centers of the bows. The edges of these were ironed inward and finished with interfacing (does that even count as finishing?). To make them a bit prettier I sewed on bits of alencon lace trim.
All finished! I love bows, they are cute.

Somewhere along the way I finished sewing on the scalloped panels, which left the skirt looking like this.
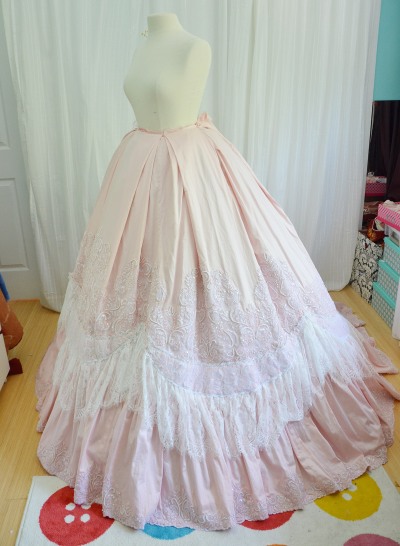
Then I trimmed twelve inches of fabric off the back of the skirt, since there was a big gab between the scalloped panels there that didn’t look good. I finished the raw edge of the back panels with lace tape, which was sewn on by hand since dragging this skirt through my sewing machine is really difficult (it weighs eight pounds!).
I also sewed up the back seam (this time I did use my machine) leaving the top ten inches open to make it easy to get on and off.

And now it was time for attaching the bows.

There was still a slight gap between the scalloped panels, but nothing a bit of lace and a bow can’t fix.

Here is a close up of it before the bow.

Tah dah! I used a bit of the leftover chantilly lace and sewed it between the panels. Then slapped a bow over it and it’s perfect!

I cut out the waistband from the skirt offcuts, then fused interfacing into it to keep it smooth. The edges were all turned inward by a half inch.

I sewed it on with a half inch seam allowance.

Then folded it over the raw edge and pinned the other side to the line of stitching. This means the bulk of the skirt will be in the waistband, but since the skirt was pleated (as opposed to being gathered) it doesn’t look too bad.

This edge was whip stitched down.

The skirt closed with four hooks and bars.

Quick fitting to make sure everything looks okay. The waistband was perfect, the only problem was a bit of visible petticoat the back seam where it was left open. To fix that I sewed in a modesty panel and the skirt was finished!


The skirt needing a modesty panel reminded me to add one to the bodice. Which reminded me that I still hadn’t finished sequining the bodice, nor had I fixed the gap in lace on the back of it. Luckily, much like with the skirt, a bow fixed the gap in lace and upped it’s cuteness factor!


And that’s it for the dress! But are we done yet? No. Of course not.

For accessories I bought a necklace (which probably isn’t accurate) from forever 21, and a pair of lacy shoes from Funtusma (definitely not accurate). Unfortunately the petticoat issue forced me to wear higher heels with this skirt instead of my pretty boots but i’m determined to wear them with a different costume someday.
The final thing I needed was a headpiece. In the 1860’s evening caps or headbands were the most popular. I made mine a combination of the two. It’s made from interfacing strips with wire sewn into the edges. It’s covered with bias tape made from the sateen and has a chantilly lace ruffle across the back.

I covered the top with alencon lace trim that was further embellished with sequins, faux pearls, and pink seed beads – the same beads used to detail the bodice and sleeves.

Then I used some fake flowers and metal beads to add volume to the sides.

Now it looked weird, which means it’s perfect because these headpieces were pretty weird.

And that’s actually it! Every piece is complete (and fits)! Which means it’s time for some worn photos. I’d love to get more photos of this in a better environment, because (shockingly) it against a white backdrop with dim lighting doesn’t really do it justice. But for now these will have to do!


Bonus: My dress compared to the one that inspired it.

And compared to the sketch I made before starting – it isn’t too far off!

That’s it for today – thanks for reading!

This is so amazing I can’t even
You are truly a talented young lady! I’m surprised Hollywood hasn’t snatched you up yet!
Beautiful workmanship
Sent from my iPad
>
Oh my goodness! It’s gorgeous! Probably my favourite thing you’ve ever made!
I am totally amazed at the amount of pure talent you express! Your work is fantastic.
I absolutely love your Christmas skirt w/ the lights. I can’t seem to forget about that wonderful piece. I would love to have one.
I always look forward to seeing your designs.
Angela you did it again! What an amazing dress. You look beeutiful!!! I can’t wait to see your next creation! 🙂 Thanks for sharing all of your projects!
WOW. I think this is my favorite thing you’ve ever made!
i always love your work 😍
This is simply stunning! It’s so fluffy, pink and lacy – all the things I adore in a gown; it’s probably my favourite of all the things you’ve made, though I do love everything that you make!
Fantastique! Vous avez des doigts de fée!
WOW! Just stumbled across this post and I’m blown away! Bravo!
That is absolutely spectacular. It’s like a Ph.D. in Costumery!
OMG! this ensemble took my breath away. It is beautiful, regal, elegant, royal, soft and feminine. Absolutely beautiful.
Absolutely beautiful!!!
You are so talented! I look forward to seeing what you come up with next. 🙂
OMG! The gown looks amazing! And so much work on it, I’m impressed. Fabulous work!!!
This is incredible! Wonderful work.
Stunningly beautiful💗
Absolutely gorgeous!!! You are extremely talented!! I so enjoy receiving your updates on anything you make.
This is just so so gorgeous–and the pink is perfect for your porcelain complexion! Beautiful work!
I’ve been following your creations since I saw your Merida cosplay on Tumblr, and I have to say, this had got to be one of the most phenomenal things you’ve ever created! It’s so sumptuously feminine and conveys the period so well. It heavily reminds me of Tchaikovsky’s ballets and the costumes often produced for those productions. So breathtaking!
absolutely breathtaking!!!
Jaw-droppingly gorgeous. I can’t believe the amount of detail work went into this gown!
I have been following you for years after finding the red Sakizo inspired historical gown on Tumbler. I mentioned you on this post explaining my painful attempt at making something for a Renn Fair. http://nndwyerartist.weebly.com/art-blah-blog/the-never-ending-renn-fair-costume-story-i
I appreciate your detailed descriptions of how you make things, especially the mistakes! It makes it so much more interesting.
Can I just say that your version is much more beautiful than the one you took inspiration from? 😀 I ABSOLUTELY ADORE this dress, it’s stunning and looks perfect on you! I wish I could make myself one of theese one day!
Amazing!!! Thanks for taking us alone while you built this gorgeous piece of wearable ART!!
Your work is so beautiful! I have to say that this dress is my favorite yet!
Stunning!! This is my absolute favorite!
You are truly nuts in a wonderful way! I love following your projects as they unfold.
Totally 100% my favorite thing you have made! WOW! I am just so in awe of how gorgeous it is that I want to cry! JUST WOW! You are truly gifted! So inspired by you!
Blessings,
Victoria
RufflesandGrace.com
My jaw is dropped!!!! This is the most beautiful dress! I love how it reflects the elegance and soft and the beauty and all the god stuff. “What a lady”! I’m in l❤️❤️❤️❤️Ve!!!! You are so talented!
Hi Angela! This dress is absolutley beautiful! I’m planning too sew a dress with a similar skirt, do you have an idea of how much fabric you used for it (approximately)?
//Emma
You said your petticoat collapsed, I was told in the 50s when they collapsed they would starch them with liquid starch to make them stiffer. That might help.