I’m resuming progress on my Isabel costume! This is part one of making the chemise, which will be worn underneath this dress. Today I am going to be talking about how I made the collar, it’s easily the most detailed and complicated part so it’s worthy of it’s own post. My next post will talk about basic assembly, and I should have another video to share as well!
…
The shape of this collar is a cross between a U and a rectangle. I drew out the shape on poster board and traced it onto the beige linen I chose for this project. Then I used a quilting ruler to measure a half inch seam allowance all the way around.
The pieces were sewn right-sides-together, then turned rightside out so there was a finished edge all the way around.
I hand stitched around the edge to tack it down and give more of an old timey look. Then I began drawing out the pattern for the beading and embroidery.
Though I have some minor experience in beading I had never created something with a repeating pattern, nor had I ever embroidered patterns. So I knew this project would be a huge adventure – and maybe a huge mess too.
I happened to have beads that would work on hand, leftover from my bracelet making days and previous costumes.
I believe I used 4mm glass pearls, 8mm glass pearls, 3mm white plastic pearls, 3mm red beads, and 2mm gold and red beads. I piled them all on a beading mat to keep things organized.
The first step was sewing the centermost beads on. This is by far the easiest and most enjoyable part – after finishing this step I was lulled into a false sense of security that this would be easy.
Step two is sewing all the connect-y bits with gold thread. The beads give a good guide which makes this part easier, but the thread was constantly getting caught on beads, getting, tangled, or pulling things loose.
Then I went through and added gold seed beads. Six get added to each section, two extend down from the 4mm pearls at the top and bottom, and one gets added to each side of the center section. The goal here was just to add more gold because it looked a bit sparse!
Then it came time to add the red. This was by far the most difficult part, the thread had to be looped four times to have enough bulk and it seemed to always get caught on beads, tangle, and need to be clipped. It took me several minutes to stitch each one (unless the thread tangled, then it would take twice as long), which doesn’t sound like a lot until you realize there are nearly ninety of them that have to be sewn!
I think in total I must have spent thirty hours beading this stupid thing. If I did it again I feel it would go much faster because now I have more experience with the process. I would probably do a much better job too – I did this thing one side at a time and the side I did last is much cleaner and more even then the first. Oops!
So that finishes off the collar, I added ties to it and a lining later on but that will be covered in the “basic assembly post”.
There there was another part of this costume that required more embroidery and beading, so I’ll go over that really quick too.
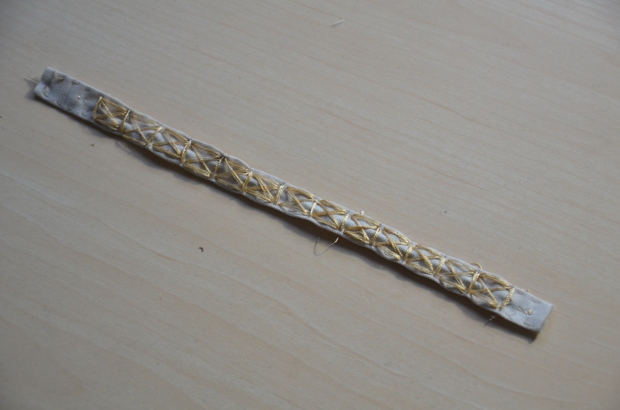
The cuffs on Isabel’s dress are tricky to see and end up looking “gold” from a distance, so I really didn’t have to bead these. But I thought it would be nice to have them match the neck piece.
I started by cutting small rectangles of linen, then marking out a half inch grid.
I sewed rectangles over the grid lines, then a cross in the middle that stretches from corner to corner.
Lastly I sewed some of my large 8mm pearls in the middle, and it was done!
Thanks for reading!
Related posts: Part One, Part Two, Part Three, Part Four, Part Five.


You have so much patience! I couldn’t deal with all of that hand beading. It looks beautiful though.
Wonderful work! I’m a tailor myself and I know how tricky and tiring it can be to sew beads on. But it looks phenomenal, so its always the worth the work 😀 Greets from Austria