Sorry for my lack of updates! I had my wisdom teeth out and my recovery wasn’t fun. It took me almost two weeks to get back to sewing, and then I got distracted by new projects…
But now i’m focused again and updates should be back to the regular two times a week!
…
A couple months ago I made a flower dress inspired by Spring and Summer, though I didn’t completely love the finished dress I did really enjoy making it. Before it was even finished I had ideas from more dresses using the same technique, so it’s not too surprising that I decided to make another very similar dress.
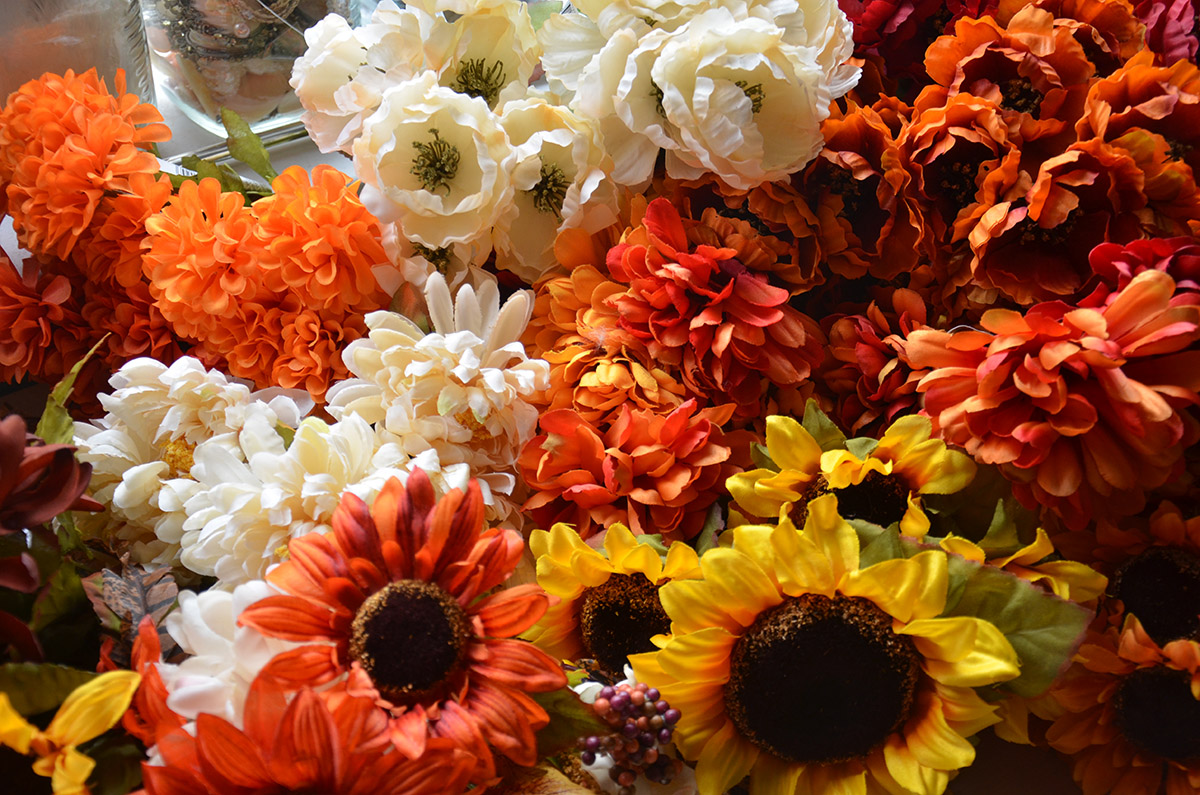
This time I’m going with an Autumn theme, using flowers from Ashlands fall collection.
I purchased these a few weeks ago when they were 40% off, but I had a 20% off the entire purchase coupon too. I was just in Michaels the other day and they were all 60% off which means they will be on clearance soon – if you are interested in getting fall flowers now is the time to do so!

Fall flowers are probably my favorite, even though I dislike orange and yellow I love how the warm rich tones look together. Fall in general is pretty great, it starts to cool off, candy corn becomes available, it’s the season of pumpkin pie, and it becomes socially acceptable to wear dark lipstick.

My original design for this dress looked like this! I wanted to make the bodice reminiscent of oak leaves, which was a neat idea in theory, but I later on decided I wanted the dress to have sleeves, so I changed it to be a simpler design. The skirt plan was pretty simple, a three quarter circle skirt with asymmetrical flower designs and a tulle overlay to create a bubble hem.

Step one was drafting the skirt. It’s a simple three eighths of a circle pattern, which will become a three quarter circle skirt when cut on a fold.

Then I cut the pattern out! For this project I decided to use golden mirror organza as the bottom layer, and two tone chiffon for the top.

Like last time, both of these layers were basted together by hand. Then I ironed them and sewed horsehair into the hem. I did a really terrible job on this hem because I decided I didn’t need to use pins. It won’t be visible in the end so I didn’t bother to redo it, but it’s pretty cringey!

There was also a slight ironing problem which led to me burning a massive hole into the chiffon layer.
But that’s okay! I’ll cover it with flowers and no one will even know.

Once the skirt was hemmed and pressed I laid it flat and organized my flowers around it.

Then it was time for flower arranging! This is my favorite part but also the most difficult. I got a lot of questions about it last time, so i’m going to go a bit more in depth about the process.
I worked in ten or twelve inch sections because that’s how big my glue proof surface was. I like working in small increments though, it makes it easier.
I like to start off by laying the big flowers first. In this case that was a yellow sunflower.

Then I pick a color scheme for that section and chose flowers with those tones – in this case I was going for orange and red. I place the medium flowers next, then fill extra space in with smaller ones. I lay every section out completely before gluing so I don’t get stuck with an arrangement I don’t like.
Also, if you are concerned about not having enough flowers, figure out ahead of time how many you can use per an increment. I counted up all my “statement” (large) flowers ahead of time to make sure I had enough to use at least three in each section.

Once you like how they look, glue them down. Remember to press each flower into the fabric for several seconds so the glue can bond to the material.
If there are any gaps in your arrangement fill them in with smaller flowers, petals, or leaves that match the flower colors.
(this isn’t the same section as above but I think you get the idea!)

At the very end I went through and bent each section, here you can really see the gaps.
Though things may look fine when flat that doesn’t mean they will look that way when draped over a skirt form, or manipulated in any way. The skirt is likely going to move at some point, so to make it look better I filled all of these in with more flowers.

This is what it looked like when it was mostly finished. I went back in later and added a few more to create more asymmetrical interest.

And on the dress form!

Now for the tulle! The tulle layer is a huge rectangle. The tulle length should be a little longer then the size of the skirt hem, and the width should be a bit more then twice the skirt length. Mine ended up being 44″x144″, and since I wanted the colors to be a bit more muted, I decided to use two layers of tulle instead of one.

To keep things easier to manage I basted my two layers of tulle together.

Then I gathered one edge and sewed it onto the waist of the skirt.
Oh, before I did this I removed all glue trails and lint from both layers of fabric.

Then the other edge gets gathered, looped over, and sewn to the other side of the skirt waist. Or if you’re like me and accidentally make the tulle layer too long, it may look like this…

After trimming the extra tulle my skirt looked like this!

And here it is with the matching bodice!


I love it so much. I like the colors I used this time around way more then the red and white. I think it looks far more interesting and way less juvenile.
Thanks for reading!
Also, I did create a video that shows the process of making this dress. If you are interested it can be watched below or accessed through this link!
(videos do not show up in most emails)

Beautiful as ever!
Hey the flower dress is so gorgeous!!!! I definitely want to try my hand at that one. Is there any way you could let me know how much of each fabric you purchased though? I didn’t see it anywhere😦 or just estimate for me? I never get enough fabric for any sewing project lol please help ASAP ??!!!!!???
This is soooooo adorable! Love it!
I am absolutely BLOWN away by the beauty you create.. The fact that ur almost completely self taught is Incredibly Amazing, YOU are incredibly Amazing!! 😆 I’m so very glad that I stumbled across ur blog, I’m a huge fan & follower already..
I’m glad ur feeling better and the tooth “drama” is behind you.. Good thing is u’ll only have to go through all that just the once..
Can’t wait for more of ur blogs
XOXOX
Hannah
So beautiful!!! love it so much
Oh my goodness this is the most incredible thing!! I’m going to our sixth form winter ball and would love a dress like this!!!!
I love this even more than the first! Those colors are gorgeous.
I’ve been noticing a better quality overall with your videos, but just want to say that I can definitely tell a difference between this video and the first one you made. You are getting a good ‘grip’ on the video side of things, keep up the good work. (And your dog is absolutely precious).
Did you wear a petticoat underneath this? How did the skirt hold it’s shape? 🙂
Your use of tulle over your flowers to soften the visual is truly brilliant. I haven’t worked as a tailor in quite a long time and you definitely have the patience that’s required to do all that hand stitchery. I tip my hat to you.
Thats a cute dress!
but somebody its copy you…. or you copy this site?
https://fbcdn-sphotos-c-a.akamaihd.net/hphotos-ak-xpa1/v/t1.0-9/1382315_1628770827349967_6139109262266599704_n.jpg?oh=f2d759fac1df2e630268fc7e06bf9a31&oe=54F46218&__gda__=1423574688_cdf7a129c36d0180ec672883d9c40071
Thank you! I looked it up and those photos were posted on October 28th…i’m not sure if it was inspired by my design or not, but I definitely didn’t copy them!
Angela Yes! they copy you!! cause you post this Sep 16….
Elle est magnifique vous avez beaucoup de talent…Bravo
This is so cute! I want to make something like it for my granddaughter who loves to dress up. I am having a little problem understanding your 3/8 circle turning into 3/4 circle —- been a while since I took geometry!!! Can you explain that a little more clearly please? Thanks so much. Annette
stunning! I love how you just work with what you have 🙂 I am a little confused on how you achieved the bubble skirt. I got lost! you take the “top” of the gathered tulle layer and sew it to the band… then do you fold it in half enclosing the bottom of the skirt and then back to the waist band on the other side and sew again?
Thank you! Yes it is done exactly the way you described. It is a bit confusing to photograph/write out but it becomes quite obvious when you are using the technique!
hi 🙂 this is amazing!
I didn’t understand in what fabrics you used and how much you bought from each of them..
hope you will help me soon!
shilat
This dress is absolutely beautiful ! I’m completely in love with it . My prom is next year and I was wondering if you would be able to re create something like this for it ? I would be so grateful as you designs are unique and stunning !
I want one aswell !
Hello, this dress would be amazing for my prom dress 💭😭
Hi Angela I want to ask you some things . How much cost you this dress ? (less than 100€ ?) And can I made by myslef this dress (because I love them and they will be amazing for one contest ,which will be this year – not as a design …. I am hairdresser and stylist )
Thanks for knwoing me 🙂
Keep going in your amazing work ♥
and I have one question 😀 Can you create (someday in future XD) a dress for me ? or you sell your design ?
Hello,
Last year, I made a coat with flower trim for my grandkid. The coat was inspired or copied from John Galliano.
I never thought to make a skirt with a floral hem layered with tulle. Im in the process but did you cut the tulle to shape the skirt like a circle or did you leave the tulle rectangular?
Thanks
This is beautiful. What an amazing idea.
Wow! Just beautiful!
Very good!!!
I love this dress
I just found this on Pinterest!!! I am so glad I did. This skirt is inspiring my daughters garden fairy outfit for her Disney race next month. Yay!!!
Hi Angela. Beautiful pictures! I totally love this dress and I’m busy preparing to make one myself (got everything at home, now just start). I was wondering.. when cutting out the pattern (first step) how many inches did you use for the inner drafted line (measured from the corner of the paper)? And what about the outer drafted line (measured from the inner drafted line, like you do in the tutorial)? My fabrics are 59x59inches. Thanks in advance for the advice :).
Angela,God has truly blessed you. I sewed a little quite a while ago and now my granddaughter wants me to make this for homecoming. oh me oh my!!!! I need measurements of fabric to be used I am really stumped. excuse my stupidity. Thank you so much, conny
http://www.tutumodelleri.com/2015/05/cicekli-peri-elbisesi-yapimi-tutuden-videolu-anlatim/ I share it. Because I liked very much successful. tütü etek nasıl yapılır
this is breathtaking! absolutely stunning! I’m looking for ideas for a Midsummer Night’s dream Costume party. I’m off to Michaels to look at leaves and flowers! Thank you for sharing this with us!
i made this for my halloween costume, and i was wondering how you make it flow out and not down, if that makes sense?
Magnifique
How much would you charge to make this for my daughter? She is going to be a flower girl at my cousins wedding in October.
Hi Angela,
It is very beautiful! My compliments!!
I was wondering, how did you close the opening/back of the skirt?
At what point did you sew them together?
Thank you! 🙂
Hello,
I am looking to get something like this done for my flower girl . Do you make these just for personal or are you able to make it for it to be purchased ?
Do you wear something like a petticoat under the dress ?
I was always wondering how it could be so voluminous with the flowers on the skirt.
But this dress just looks amazing. 💘
I have to make one ,too !💟💓💗
WHAT WIDTH FABRIC ARE YOU USING? CAN’T DETERMIN BROWN PAPER PATTERN THANKS.
Hiya! I love this idea, I really want to create a summer/spring look but I’m not great at making pieces of garments, I was wondering if you cajoled tell me the exact measurements you used to create the skirt? Thank you, if you can reply by email that would be fab!
I was on youtube and came across your tutorial. it was love at first sight, but I’m clueless about making the bodice. I get how to make the skirt but what pattern did you use for the bodice? I’m new to sewing and I don’t have a dress form but I wanted to try making something along these lines for a Renaissance fair. If you could even point me in the right direction that would be an amazing help.
How many yards did you use of the first two layers? How long was the length of the skirt? Mini or Midi?
I’m in love with this skirt, so I try to make it for a friend who want to be a fairy skirt…
Thanks a lot for your tuto ! It was really fun to do (even if I burned my fingers with hot glue :p)
http://www.lesfeestisseuses.com/t39640-Jupe-f-erique.htm#p490826