Last week I decided to make a Medieval Escoffin. They are a tall, usually elaborate, heart shaped headdress with a padded roll on top. I thought it would be a fun little project and unlike any of my previous headpieces.
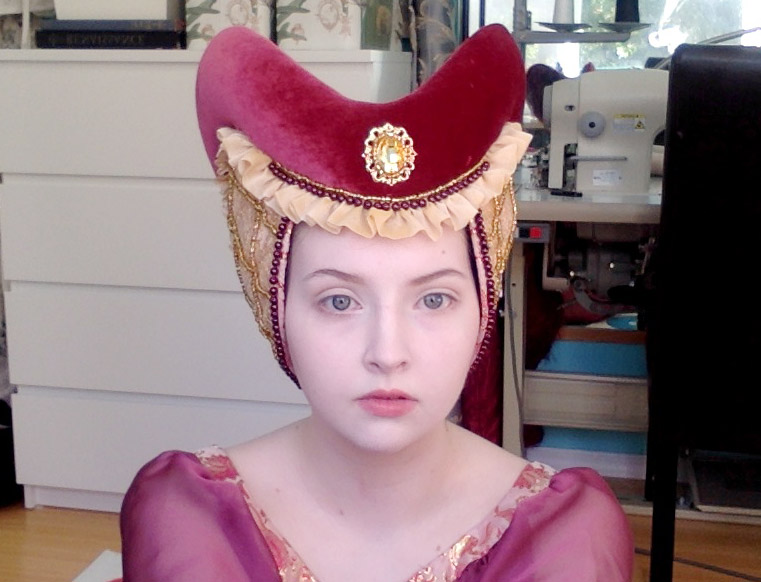
The finished piece looks like this – I’ll be taking better photos of it when I have the matching dress finished.

I’ve seen these headpieces in a lot of paintings and etchings, though they are usually just called heart shaped headpieces or heart shaped hennin. Fig. 50 from the page below was my main inspiration for this, since I thought the slightly wider shape would be more flattering on me than the completely upright ones (like Fig. 51). I didn’t intend for mine to look so similar to the drawing, it just sort of worked out that way.
Also this isn’t to go with the Damask Medieval Dress I’ve been working on – I just borrowed some materials from that piece.

Oh, and those drawings are all from this book. It’s really great for seeing the styles from various periods but it doesn’t have any information on the patterning or making of any headdresses. Which is totally fine with me – I like making that part up on my own.

I started doodling what the pattern might look like flat. Once I realized the curves in the headpiece could be created by adding batting to a flat pattern this became way easier.
My first few sketches kind of look like the Modius crowns from Ancient Egypt – in fact the shape of a lot of early European headpieces remind me of ones Egyptian Royalty wore. Which I wouldn’t have expected.

I started by drawing out the shape I thought it would have on newsprint. The right side is what it looked like originally and the left side is the one I altered. I took it in a lot, lowered he top arch, and raised the bottom. Then I drew out the various sections onto the newsprint so I could better visualize the proportions.
I kept holding it up to/putting it on my head and adjusting things until I liked the way it looked. It was surprisingly easy!

This is the pattern I ended up with. But I ended up raising the bottom portion since it was lower than I wanted.

I traced the pattern onto heavy felt weight interfacing and cut it out. I also drew on the separate sections so I would know where to put the padding.

Then I hand sewed wire around each edge. This makes the headpiece a lot more durable and shapeable. For the lower edge I stitched the wire about a quarter inch away from the edge. This will help reduce the bulk at the there, which is good since a lot of fabric will be layered there.
I also tried it on at this point to make sure everything looked okay – and it did, so I carried on.

Then it was time to pad the lower section (I’ve been calling these the “ears” but there is probably a proper name for it). I used circles of quilt batting which I cut up and layered until I had a nice rounded shape.

Here they are pinned on. I whip stitched the edges down shortly after taking this picture.

Then I covered the ears lower section with a damask print fabric. To jazz this fabric up a bit I covered it with a gold mesh – the damask fabric is from NYC and the mesh is from Joanns.


Then I sewed some home made brocade piping across the bottom edge. And I covered the lower edge of the felt interfacing at the centerfront with a scrap of red fabric. This part will eventually be hidden by a ruffle but I didn’t want the felt to be visible from any angle.

Here you can see the textures of these materials together, I really, really, love the combination.

I decided to line the interior before doing anything else. I used some red suiting for this.

Then I tried it on. I was happy with the way it was looking but I thought the lower panels looked a little empty.

So I started fiddling around with some beads and I realized I had enough of these gold glass beads to embellish the lower panels with a cross pattern.
I got these from Michaels (or maybe Joanns?) the pack of gold ones was on sale for $2. I also decided to stitch fake pearls across the bottom of the panels. For that i’m using super cheap 6mm ones by darice, I think these are 99c a strand.

I made up a paper template for the cross pattern, which looked like this.

I pinned them on and traced the edges of each strip with a yellow copic marker. If I did this again I would definitely draw this pattern onto the fabric before sewing the fabric over a dome. Because that make it way more difficult and the design isn’t even on both sides, which is a bummer.


Taking the fact I was trying to draw straight stripes on a dome into account, I think this looks pretty good!

But I still wanted it to have more details. So I decided to add a little ruffle. I had pink, red, and ivory chiffon, but none of them looked quite right with the damask material. I found this orange chiffon at the bottom of the stack and thought it was perfect, so I cut it into strips which got folded in half to create a finished edge.

I gathered that down and sewed it onto the escoffin. It looks a bit silly, but I was happy with it.

I started doing a little bit of the beading, as you can see on the right side. But the major difference here is the addition of batting to the top portion of the headpiece. This is seriously just a giant rectangle of quilt batting that I folded three times. Then it was pinned and draped inside the guidelines I had drawn.

Here it is after being sewn down!

Now I came to a little roadblock. I had no idea what fabric to use to cover the top portion. This is a spontaneous project, so I didn’t buy any materials with it in mind, I’m just using things I have around.
I figured if the fabric stretched that would give a smoother finish, and the only stretch fabrics I have are stretch velvets. So I raided that bin and luckily came across scraps of red velvet that I used for the cloak on my Christmas Costume in 2013.
I had just enough to cover the top portion. It took a lot of pins, stretching, and pricks to get it to lay smooth but I managed!

I had to cut centerfront to get it to lay flat. I didn’t want the raw edge to show so I covered it with a scrap of velvet.


With the assembly done I went ahead and finished the beading.
(I did this well watching American Ninja Warrior – that show is really addicting)


The last thing to do was add a gem to the front. I don’t actually have any gems, but I do have glass montees. I used a clear one and painted it with alcohol inks until it was a rich gold that matches the other materials used. Then I glued gold beads around the edge and set it into one of the brass cameo frames I got in NYC a few weeks ago.
I think it’s super pretty!

That got sewn onto the center front.


Then I did up the back and it was finished!

I love how this turned out. It’s one of my favorite pieces i’ve made in a while. That is probably because it’s so different from any of my other pieces. But I also really like all these materials together, I think they look quite stunning.
And this was really fun to make, which raises my opinion on it. I love figuring stuff out without any information other than what the finished thing should look like, and I definitely got to do that with this. So that was great.
No photos from the back yet. I think i’ll make a veil to hide my hair, because right now it’s visible from the back and doesn’t look great.

…
Cost Break Down:
1/4 yards of: velvet, damask fabric, gold mesh, chiffon, and suiting = $6
1/2 yard of interfacing & quilt batting = $5.00
Beads, cameo frame, glass montee = $6.00
It probably has fifteen hours of work into it. Maybe twenty. I was pretty damn focused on it for three days, and by the fourth day it was finished. But all the work was fun, I really enjoyed this project!
Thanks for reading!

Really beautiful piece!
This certainly wasn’t for the faint hearted to tackle…Youv’e done an amazing job . It looks lovely…I like your eye for colour and detail..I think this piece works well…..
Thank you so much!
You are SO TALENTED!!! Do you work for a movie production costuming enterprise? If not, you should!!! Better still, create your own business!!
Thank you! Unfortunately not – but maybe someday if i’m lucky 🙂
Wow. What patience 🙂 You really stepped it up on your game!
I love this! Your creativity astounds me. Beautiful work.
What a cool project. Pretty combination of fabric/colors. The jewel is the perfect touch to finish it off. I enjoyed reading your pattern process. I’ve done that many times and most of the time, I get good results. Looking for to seeing the next project. Thanks for sharing.
Thank you! I’ve patterned a few headpieces that way and it hasn’t failed me yet. Headpieces are so intimidating as a picture but once you get to patterning it breaks down into something simple, it’s really satisfying!
beautiful headpiece!!! you are so talented!!!
love it and thank you for sharing! Keep it up! You are inspiring me!
LOVE IT AND I HAVE TO SAY, YOU DID A GREAT JOB! IT SHOWS AND IT IS GORGEOUS! (SORRY MY CAPS LOCK IS ON!) ANNETTE
I love the details great job!
This is super duper gorgeous. I’m costuming Once Upon a Mattress for a high school and I was looking for a how to to create something like this for the queen. Thanks so much for posting this.
I really love it! I’ve been avoiding the 15th C, but you’ve finally done in all my good intentions! Thank you for documenting yr process. I’d have had NO WAY to even begin without.
I have absolutely no sewing skills and envy your talent. It turned out simply gorgeous! I would have NO clue how to even begin something like that. You should be so proud of your work!
Would you be willing to rent the pieces you make? or sell?
I think this is so beautiful, and you are very extremely talented.
This is an amazing tutoeial. It really suites you. Did you get your insparation from this website?
http://jezebel.com/5305524/earnestly-titled-womens-history-magazine-looks-awesome