
The sporting jacket continues! This post will cover the process of making some big leg-of-mutton sleeves and completing the jacket. If you missed it, part one can be read here, and I have videos about making this project, which can be watched here and here if you’re interested!
…
At this point I was happy with the fit and shape of the jacket, but I thought it was a little bland. As much as I like the wool herringbone, I felt the jacket needed another textile to break it up and make it a bit more interesting. So I decided to line the lapel with a contrasting fabric.
I was originally going to use a black cotton sateen, but it looked very stark against the grey. So instead I choose to use some plaid flannel instead (which will also be used to make the bloomers that go with this jacket).
I traced the lapel and collar onto the flannel, then cut out two pieces. I folded the edges inward by a half inch so the flannel sits a half inch away from the edge of the lapel. Then I redid it a bunch of times to get the plaid pattern symmetrical!

Then it was sewn in place with slip stitches.

With the lapel and collar finished I was finally able to sew up the shoulder and side seams.

I finished the armholes with strips of bias tape that were sewn on with the right sides of the material facing each other, then turned inward and sewn down. This was my lazy way of doing a facing since I didn’t want to draft a new pattern.

I turned the bottom edge of the jacket inward by a half inch and hemmed it with small running stitches.

Then I put the jacket on my dress form to see how it was looking – and I was really happy with what I saw! The side seams and hem added some shape to it, and I think the plaid lining made a huge difference. It really highlights the lapel and makes the design come to life!


Now I could move onto the sleeves! These were the part I was most excited about, but also the part I expected to go wrong. I’ve never made proper leg-of-mutton sleeves before and I figured getting the fit and shape right would be a challenge. Because of that I decided to use a pattern from the book 59 Authentic Turn-of-the-Century Fashion Patterns by Kristina Harris*.
I took a photo of the pattern I wanted, then resized it on my computer, used the screen as a lightbox, and traced the pattern onto newsprint.
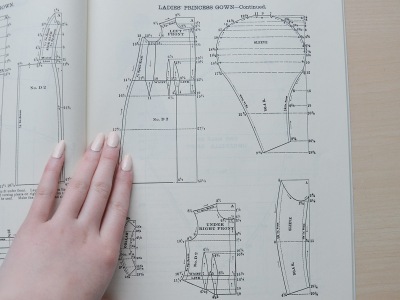
This pattern is huge – almost thirty three inches long. But believe it or not I probably would have added more volume to the top if i’d had enough material leftover. The finished sleeves don’t look nearly as massive as you’d expect based on the pattern.
But for the most part i’m really happy with this pattern. I had to take it in by an inch around the lower arm and that was it! Sort of loving this whole not drafting my own sleeves thing, it makes the process way easier.

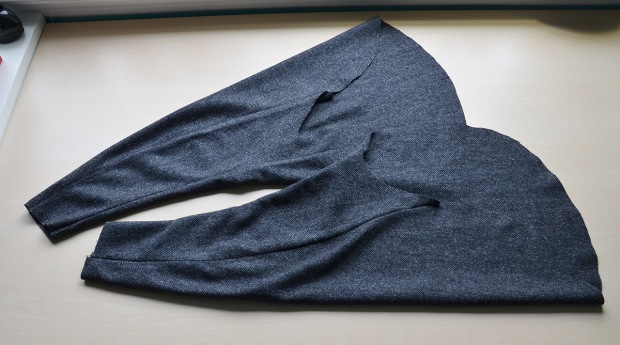
I ended up adding a half inch to the seam allowances to allow for french seams.
Then I attempted to stiffen the tops of the sleeves with netting, interfacing, fusible web, and some other stuff. I figured this would give me lots of effortless volume without the annoyance of sleeve supports. But it made the sleeves look horrible and didn’t really add to the shape of them since it weighed down the fabric. So I ripped all of that out, which luckily didn’t damage the material. But it did leave behind some glue residue on the interior which you can see below.
Once that failed attempt was taken care of I went ahead and sewed the french seams.

And I had two very odd looking sleeves!
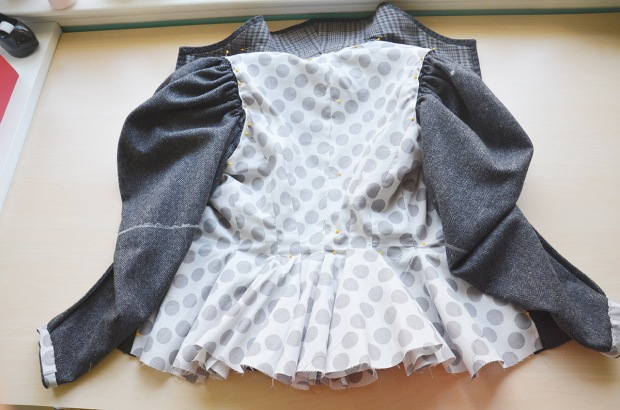
Then I gathered the tops of the sleeves down to fit the arm holes in my jacket. This was done by hand with running stitches, as per usual.

Then I pinned the sleeves onto my dress form to see what the shape was like. I think I stuffed them with a bit of quilt batting for these photos but I can’t remember. They hold their shape much better when they are worn (my arms bulk them up a bit, and the undershirt makes them less prone to collapsing) but the batting definitely helps exaggerate the leg-of-mutton effect!
Either way I was pretty thrilled with how they were coming along!


I finished the cuffs with strips of bias tape that were turned inward to hide the raw edge. These were sewn in place with hidden whip stitches.

And the top edge will be covered by the jackets lining, so I didn’t have to cover it.
Here are my finished sleeves~

They got pinned onto the jacket..

And sewn in place with two strands of thread and lots of tiny whip stitches.

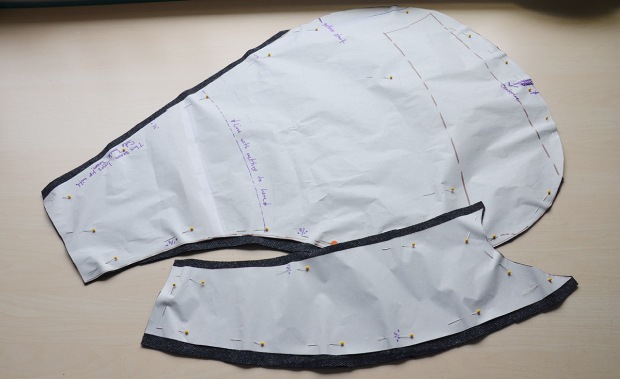
Then I pinned the lining in place. This was a huge pain, it took me hours which is ridiculous. I think if I made another jacket similar to this I would try flat lining the pieces and finishing the edges separately (which was often done during this period). It’s just too difficult to get the lining to match up with the jacket, and i’m always worried it will effect the fit.
I sewed it in with whip stitches – except for around the hem, I used running stitches for that.

And then the final step was sewing on buttons! I used La Mode buttons in the style 219. They are stitched one and a half inches apart and half an inch away from the seam line.

Here they are after being sewn on – part of me wishes I’d used larger buttons that don’t have a pattern, since these kind of get lost in the herringbone print. But I still really like them!

And that’s it! I’m so pleased with how this turned out. It fits really nicely, even without a closure method. And the sleeves look so good. I was really worried they would look silly or end up being too big, but they are actually quite fitted while still having lots of volume.

I love the plaid material at the lapel. I debated about whether to add that or not, and i’m so glad I did. In addition to making the jacket look better I think it will really tie the look together when it’s paired with matching bloomers.

I’m also happy with the back seaming on this jacket. When I ordered the wool for this I was a bit concerned it would be too heavy to pull off the seaming, but it worked perfectly!

And the thing i’m most happy with is that I learned from the mistakes I made on my last fitted jacket and managed to properly execute the collar and lapel.
The only things I wish I could change are related to fabric quantity – which is my own fault. If i’d ordered another yard I could have made the jacket longer, and the sleeves a bit bigger which would have made the silhouette more dramatic. But even without those changes I really like the end result. And I can’t wait to show you guys how it looks with the shirtwaist I made to go underneath it – but that will have to wait for another day!

And I wanted to mention that from now on a “*” after a link will indicate that it’s an affiliate link. I thought this would be a nice non-intrusive way of (potentially) making a bit of money off what I post here. I promise affiliate links will always be relevant to what i’m talking about and marked with an asterisk. As a reader I don’t think you will notice any difference, but I wanted to make sure you were aware!
That’s it for this post! Thanks for reading!

Do any of your videos go over how you add the collar/lapel?
I really love this jacket. I think you do a really great job of taking dynamic silhouettes and then pairing them with textures that make the garment seem real-world. I guess a lot of the historical costumes I see are from period films that probably aren’t super-accurate, so the costumes look very striking but also very… costume-y.
This silhouette is beautiful and dramatic! I cannot wait to see your finished project!
Just lovely. I have a question about affiliate links. Just before reading this, I actually ordered something from Amazon.
Had I read your post FIRST, clicked on the affiliate link, but then ordered something else, would you still get “credit” for taking me to Amazon?
I didn’t need to buy Ms. Harris’ book but I really did need to buy $56 of The World’s Best Cat Litter!
Thank you for sharing your talents and creativity. I have sewn for 40 years but I do not have your confidence and eye for beauty. I am amazed that you are not doing costume design for Broadway. I am glad you are using affiliate links and believe you should do more to compensate yourself. I hope that you use Amazon. Many of the blogs I follow make a living from just their Amazon link.
I don’t know if you would be interested but you could lead NYC fabric shopping tours for your readers.
Again, thank you for teaching me to attempt new things.
As always, Dell
Dell H. Ellis San Antonio, TX
>
Hi Angela! Love your work 👗👑❄. Do you use Twitter?
I love it! I love the details: the wide collar, the vertical ruffles in the back, the fitted hour-glass waist, the buttons in the front….Gorgeous! You did an amazing job!
I love this!! I can’t believe it took me this long to find your blog from YouTube. I love sewing, however I typically stick to quilts or handbags, you know the “one size fits all” type of projects. My husband got me a mannequin for Christmas and I’ve begun to work on it some, but I am still very new to it. I’m new to this whole blog thing, but I would love for you to check mine out!!
Hello. You do beautiful work. I can’t wait to see the final project.
I have a couple questions on your sleeves. Why did you choose to do French seams? And why did you choose to do the method of lining the armscye of the jacket and then attaching the sleeve by handstitching? Is this a period technique?
Thanks