
It’s taken me longer than I had hoped, but I’m finally back with a “Making of” post! And it focuses on a project I’m really excited about: a seventeenth century ensemble.
I’ve wanted to make something from this period for a long time. It’s not a popular period for historical re-creation, but I’ve been attracted to it since I first started researching historical fashion. The high waists, bright silks, full sleeves, and jeweled decorations really appealed to me. And now that I know more about fashion from the 1500s and 1700s, I find the mid 1600s even more interesting since they are so drastically different than what came before them.
It’s also the period depicted in most of of Rembrandt and Peter Paul Rubens work, who are some of my favorite artists.
Despite my interest in the era, I haven’t completed a costume from the mid 1600’s. I’ve made some attempts, and even gotten pretty far! But bad fabric choices, fit issues, and poorly thought out designs have led to failure every time.
But this time I was determined. And luckily things went a lot better.
…
My previous attempts were based on simpler dresses that were free of decoration. I’d still like to complete a dress of that style some day, but I thought success would be more likely if I went in a different direction.
Then I came across this painting and fell in love. I don’t like the mask, but textures, print, colors, and details really drew me in. I love the sheen on the dress, and how much depth it has. The amount of trim on it, and the paned sleeves looked like they would be a lot of fun to recreate. And I adore the hat, it helps balance out the proportions of the sleeves and skirt.

I couldn’t find a fabric deep enough in tone to match the painting, but I did find a lovely peach/orange/gold brocade in my price range. It’s from Fabric Express in NYC and cost $6/yd. I purchased eight yards but barely had enough material left to cut out the sleeves, so I should have bought more.

The trims are all from etsy. Seven yards of wide embroidered mesh trim (from HARMONYDIYLIFE), twenty yards of metallic embroidered mesh trim (from lacetrimwholesalers), and four yards of braided trim (from ddideas). I spent less than thirty dollars for the lot of them, and really lucked out in terms of color. They match the brocade perfectly.

Once my materials were sorted, I did a bit more research and came up with a complete design (since the painting that inspired me only shows the top half of the bodice). I mostly used references from In Fine Style: The Art of Tudor and Stuart Fashion*, which has some great images of paintings and extant garments from the period. This ensemble was also helpful to me (especially for the skirt), since it’s more complete than a lot of seventeenth century examples.
The Dreamstress and Before the Automobile have made dresses from this period, and I found their write ups helpful in terms of understanding the construction.
When it came to the pattern I discovered two in my collection – one in Patterns of Fashion*, by Janet Arnold, and another in The Cut of Women’s Clothes* by Norah Waugh. I ended up using the pattern from Norah Waugh’s book, with a few alterations.
I used a trick mentioned in one of the blog posts linked above, and fitted my first mock up over 18th century stays. I lowered the neckline, let out the waist, lowered the waistline, and made the front piece longer. I debated about cutting the front and sides as a single piece, but decided assembly would be easier with them separate, so that’s what I did!

Then I made the base layer. Which is effectively fully boned stays – there is so much boning in them. The channels were all marked onto cotton, then backed with medium weight twill and sewn by machine. I used plastic quarter inch boning to fill them, then assembled the bodice.
I did a fitting here, and realized the bodice was too big! Well, too big might be a stretch. but it wasn’t giving me the shape I wanted, so I removed a half inch of material from the side panels.

Then I cut out the top layer from the brocade which was backed with fusible interfacing. I wanted to avoid the bodice being thick, or heavy, but I also wanted the top fabric to be thick enough to hide the boning. I haven’t had any problems with that, so I’m glad I decided to interface it.

Lace was sewn into the seams (which were stitched by hand) and in a straight line on the back edge.

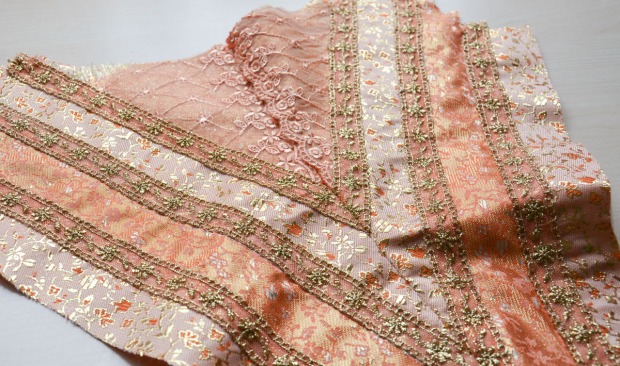
Lace was also sewn onto the front panels. A lot of lace. Three rows of embroidered mesh ribbon, with the wider embroidered trim near the neckline. I also cut out brocade strips from the “wrong side” of the fabric, sewed those down, and covered the edges with lace. This added more depth to the front of the bodice.

I basted the center front seam first, just to make sure everything lined up. Then sewed it by machine.

Then the side seams were sewn.
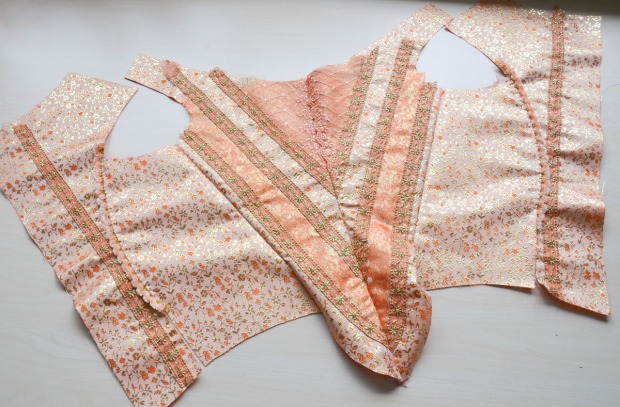
I pinned the top layer of fabric to the base layer. The tabs and neckline were cut without seam allowances, so I whip stitched the edges together. But the back edges, and the bottom edge of the front panel were folded over the base layer, then sewn down.

Now it was time to bind the tabs. I hate binding tabs. I always do a really terrible job – and that’s when working with lightweight cottons! I figured binding brocade would be impossible. Since I was already prepared for them to look bad, I decided to try a new technique and used half inch wide strips of leather.
(The Dreamstress did this for her 1660’s piece as well)
Both the top, and bottom edge were sewn by hand. I don’t think the end result looks great. But I liked doing it all by hand, and the leather curved around the edges better than I had expected. I also liked being able to snip the underside without worrying about fraying.
The underside.

And a close up. I cut the strips from a skin I bought on ebay a while back. I don’t think it was quite as soft/thin as the kid leather that is usually used for this, but it was easy to get a needle through. And my sewing room smelled like leather for days!
Next up was the lining – cut from two pieces of cotton and sewed together at the center front. There weren’t any raw edges on the tabs, so I didn’t bother lining them.
The lining was whip stitched to the base layer.

Then I sewed all the eyelets! It was a bad week for my fingers between these and the tabs, but the embroidery floss I bought matches the fabric really well and I’m happy with how they look.

And the lined interior. The back edge of the lining was sewn after I finished the eyelets so it would cover the loose threads.
I also fray checked the back of every eyelet, since brocade is prone to fraying.

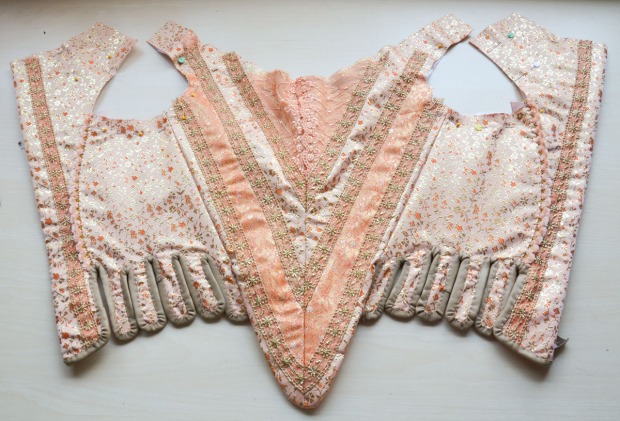
Now I had something that looked like this!


I sewed the shoulder seam, then did a fitting. Which went surprisingly well. The waist is a little tight, but there isn’t any gaping in the back. And it fits my shoulders nicely.

I was even happy with the neckline!

I finished the bodice off with more binding. I used quarter inch wide gold bias tape for the neckline, and half inch wide bias tape in matching brocade to finish the armscye.

And that’s it for this post!
Thanks for reading, I hope you enjoyed! I should be back with another one soon.
Part two of this post can be read here.

Thanks for sharing this post. The fabric is gorgeous. I love that color. Looking forward to the next post.
Marilyn
Great job!!!
I love the front lace and trim finishing to bodice.
That brocade gives me life. Can’t wait for the rest of it!
Beautiful so far. Can’t wait to see the finished product.
Beautiful! I can’t wait to see how it turns out when finished.
Great post!
Beautiful!
So do you wear stays with this? Or did you make the bodice strong enough to double as stays?
It’s worn without a support garment underneath. The base layer has more boning in it than my half boned stays!
Wow this is amazing! Can’t wait to see more of it
You are just freaking AMAZING!! I sew (painfully, slowly, and only using easy patterns) so I know what an incredible achievement even one piece of your gowns are. I don’t think I’ve seen anyone else who even approaches your level of skill and creativity. The best of luck to you in what will certainly be an exciting career!
Can I repost your article in Chinese Weibo?I will indicate that it comes form your blog.