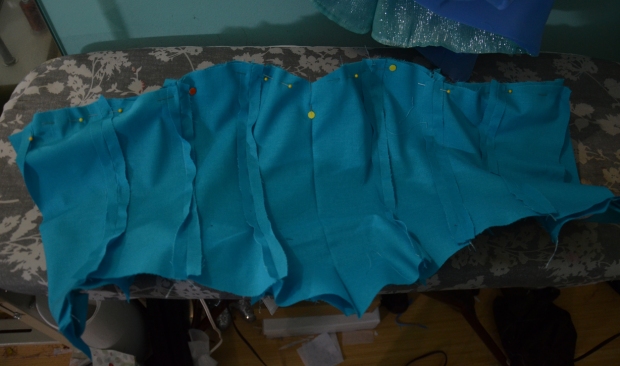
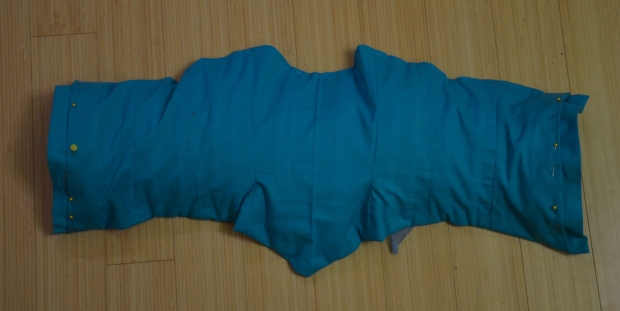
When I started this project I knew right away that the bodice would be the most challenging part of this entire costume (though not the most time consuming – that award will go to the cape, i’m sure). I thought about a lot of different methods, and had originally planned on buying a sequined material which I could use to imitate the squares on her bodice.
But after looking at a half dozen stores filled with sequins I realize that was the wrong route. Square sequins come in two different sizes, and a dozen shades of blue. But they were too sparkly to be accurate, and they weren’t rectangular enough to achieve the accurate texture of Elsa’s bodice.
I was trying to explain what I wanted outloud when I said “It’s almost like scales” and that was the Ah-ha moment! I actually know how to create scales (thanks to several ‘mermaid tail tutorials’), so although I couldn’t buy material with the design I wanted, I could make my own!
But I will talk about that more later on, my first order of business was to make the bodice.
I decided to make a mock corset, it looks like a corset, it laces like a corset, but it doesn’t have a busk and is filled with plastic boning. This way it’s more flexible then a metal boned corset and will sit on my dress form better (a requirement for adding texture later on).
I used the block drafting method, where you divide your measurements by four and create four pieces which end up being a half mock of your body. I did this last year for my RMT corset – but it went much better this time around!
I added seam allowances and cut my first mock up.
It was actually pretty decent, but a little to large in some places, and slightly small in others.
I made the required alterations, then cut the pattern down so it had a more accurate shape.
I was actually really happy with this, I just had to take a little off the waist.
I tore apart this mock up and marked all the alterations onto my paper pattern…it looks a lot different then when I started!
Then I went ahead and cut it out, twice. One for lining, one for the top material.
I sewed them all together and pressed my seams open, so I would get a very smooth finish. I added fourteen pieces of plastic boning to the lining, and then I sewed the top seam right-sides-together.
Once that was done I pinned the bottom so everything lined up, and sewed bias tape on.
The bias tape was hand sewed over so the edge (and interior) were finished nicely.
And after that, I was ready for texture!
I started by purchasing some odd things – acrylic paints, tacky glue, a half yard of cotton canvas, crappy paintbrushes, and flexible caulking.
My original plan was to press square shaped stamps into the caulking to get the right shapes. But that did not work at all. Plan number two was digging out channels with a toothpick…but it was impossible to get the lines straight.
Finally I realized I could cut pieces of fabric and apply caulking over them to get the effect I wanted.
Step one was was prepping the corset – I ironed, then lint rolled the whole thing. I wrapped plastic around my dress form and pinned the corset on as best I could.
 Then I cut the canvas into lot’s of strips, all of varying thicknesses. Some were under a quarter of an inch wide, others were over an inch.
I also squirted out a generous amount of glue (I used the entire bottle) into a plastic container, and got an even amount of water. My set up looked like this
I used a 75/25 ratio of glue to water, which I would brush onto the fabric. Then I would cut a piece of canvas, stick it to the fabric, and paint over it with a more watered down glue/water ratio to make sure the corners didn’t lift. Whenever I wasn’t using the brush, it would sit in the water so the glue residue wouldn’t dry.
Because I wasn’t drying the brush inbetween, the glue got more and more watered down as I went on.
Overall I didn’t have any issues. It’s sort of tricky since you have to be careful not to use too much water (takes ages to dry) but too much glue will really stiffen the fabric.
It’s also a really slow process.
Once I was finished I left it overnight to dry. The the next day I popped open the back of a bottle of caulking, and used a brush to pull it from the tube. Then I painted a thick layer over the entire corset, I also ran the brush around each square to make sure they were defined.
I found one layer was enough to cover the canvas texture, but still leave each square raised slightly from the material.
After that dried I used a sponge brush to apply a base coat of acrylic paint.
I’ve done a tiny bit of highlighting and lowlighting so far, but I still have a lot of painting to do (and a lot of glitter to add) before i’ll be happy with it. That’s something that will take me a while to complete, so the photos of it finished will be included in a later post.
I did end up adding grommets, seven on each side, and tied with blue satin ribbon. Overall i’m a little annoyed because it’s about an inch too large, it doesn’t give any sort of shape at all. I think I will end up taking it in an inch at the back, then adding new grommets.
But here is how it looks at the moment
I’m not happy with it yet, but i’m confident I will be by the time I label it “complete”
Thanks for reading!


Perfect!
I am so excited about this project! I haven’t seen Frozen, but this costume is gorgeous and you are doing an awesome job with it!!! I cannot wait to see the final results!
What a lot of creative talent to achieve a fantastic result. The products you think of using are amazing.
I haven’t seen yet a perfect Elsa costume, but I’m sure yours will be PERFECT!
I can’t wait to see the final result!
Do you know how much fabric is needed
This is quite an amazing solution to the problem. I’d have expected something like turquoise, rectangular glass beads… but I can imagine where you want to go.
Keep up the great work!
Wow! Truly gorgeous (and great idea at that!)
Did you put any boning into the bodice/corset?
Hi Angela, I’m totally new to making corsets and was wondering what you used to install grommets? My local fabric store has dritz grommet pliers but all the reviews on them are crap and I was looking for suggestions!
I use a set of heavy duty metal grommet pliers I was given by a relative. Unfortunately they don’t have a name on them, but prior to receiving them I was looking in to buying IIT eyelet pliers, which seem to be more sturdy and have better reviews then the dritz ones. You can get them on amazon for under $10, so it might be worth a try!
You are awesome!! The dresses you create are the stuff of dreams… Totally inspirational blog! (My daughter has just suggested you look at my website ( http://www.faerie-tailor.com) and see if you fancy having a go at one of my designs??? Been trying to find someone who could have a go for years and years.. you are certainly able for it!! 😉 )
Must love and nuff respect!!!!
Emily (Ireland)
Hi I have no idea what caulk is, never heard of it. What exactly is it and what does it do? Thanks from Tracy
Could you please please PLEASE upload an Elsa cosplay for dummies tutorial on how to make this dress, because I am dying to make it!
Hi ok I asked Dad what caulking is, and he has now explained, though he only knows how it works in DIY work tops and stuff. So I am still perplexed what exactly it does to the corset. I see the pic before just after you have left it glue over night, then you also explain about caulking and painting. So I just wondered to make it look like you can’t see the single squares anymore, is this done by the caulk thing or the paint? It looks absolutely fantastic, but without a video to see you doing it I am having trouble understanding just that part. Thanking you
Is that really canvas fabric? Like the one you use for paintings? 8o
can you show how to do it
How much material did you need
What were the measurements of the fabric
Parabéns seu trabalho é lindo e muito inspirador.
Congratulations your work is beautiful and inspiring
Hi Angela! Your dress is by far the best Elsa costume I have seen and I would like to know about how much fabric you used for the bodice and what type of fabric it is.
I have a question for Angela. Where did you get your body form? Cause I am wanting to make this dress and I just need one for differnt cosplays I’m making, and I think having a body form mannquien would help a lot. Thanks!
thank you for sharing your talent. I used ribbon and it work fine, I was able to find the right color of glitter and glue it to the ribbon then cut it in different sizes then I sewed to the top I aboid the ravel of the material by using the ribbon
Do you have a link or something to the block method you used?
Your Costume is amazing, I am impressed with your talent, you’re amazing. I wanted so much understand what you are writting in your tutorial, but It’s complicated for me because I speak in English, I wanted to do the same as you: ‘(
How well has the caulk stood up to wear and tear over time?
Reblogged this on hsamablog.