This was not originally going to be a part of the “stay study” series, but last week I came across a dress from the 1840s and I fell in love. Before I could even consider drafting anything similar, I needed some foundation garments to wear underneath it, so I started on this immediately.
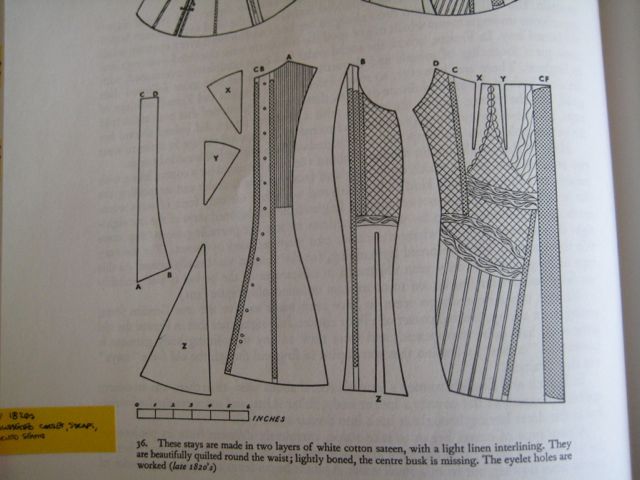
This design is also from Norah Waughs Corsets and Crinolines book which I speak more about in the first Stay Study post, which can be read here. The pattern I chose to go off of can be seen here.
This is a design from the 1820’s, most popular in the regency era, and are most often called (long) Regency Stays. These became less popular as the years went on and as smaller waists and open front busks came into fashion. But I did find evidence that a few survived into the mid eighteen hundreds, so I figured it would be passable to wear these under my future gown from the forties.
I don’t have anything against open front corsets – but i’ve made two before so this holds more appeal.
…
Before I get really into it I wanted to share this pintrest board which really helped me out, along with this auction which has very detailed photos, and Sidney Eileen’s amazing write up of making a corded corset.
If you are planning on making something similar, I would suggest looking (at least briefly) at those links.
…
I started by drafting the pattern shown in Norah Waugh’s book, the original pattern was made for someone much smaller then myself (or someone who likes a large gap of lacing) so from the start I added an inch at the back, and another at the side.


My first mock up was more successful then I had expected! Since I thought the pattern was aimed at someone with a twenty four inch waist, I figured they would be smaller in stature then me too. I was prepared to lengthen the waist, straps, make the gussets smaller, the hips larger and and sorts of stuff. But I didn’t have to do very much at all!

I took in the garment at the sides, hips, and bust, but left everything else alone.
The notes from Norah Waugh mention that the corset was made from cotton sateen – this worked out perfectly for me since I had several yards laying around. I didn’t have any spare linen to use as a base, so I substituted with a heavy poplin, and decided on peachskin for lining.
I marked out all the intricate stitch work with colored pencils.


And the straps – I made these from one layer of cotton sateen, and one layer of a cotton eyelet lace. I was given this (along with other laces of both fabric and trim variety) from my grandmother.

Then I started sewing! Every time you sew a row of stitching you are left with top threads. These have to be buried, which I did by threading each one through the eye of a needle, then pushing it through the fabric and onto the other side. Then you can tie the top thread and the bottom thread together, and clip the ends.


The is time consuming, but not nearly as slow as the cording process. I sewed 1/8th inch channels for the cording, which were just barely large enough for the cord I used (which was actually knitting wool shh)
I used a very large blunt needle to make it easier. I also used pliers to pull the needle through since it gets stuck very easily. By the time I was done I had broken one needle, and severely bent another.

Cording vs no cording on the back panels – ignore the wonky boning channels, I fixed those!

The process continued on the front.


After a lot longer then I would care to admit, the front panel was done! I used pink rayon thread for all my topstitching, since I figured if I was going to all that work it should be somewhat visible.

The back panels were finished soon after, I used plastic boning for everything but I think I will replace some of it with metal in the near future.
You can see here that I used the cotton eyelet fabric for the hip gussets as well.


Then I had to make the busk! I’m slightly fascinated by the intricately carved and beautifully stained wooden busks, but making one of those would be a a huge project for someone like myself (who has no woodworking experiences) and it wasn’t something I wanted to take on right now.
Instead I asked my dad to cut the wood for me, then I filed and rounded the edges before painting it with a white ink (ignore the paint shown below – I didn’t use it). A bit of the woodgrain does show through, but it’s opaque enough that it won’t show through the lightweight white fabric.

I also made piping – I used some leftover wool and a two inch wide strip of cotton sateen.

Here you can see the finished busk and piping together.

The busk was inserted and the piping was machine sewed on. Then I slip stitched all the piping down.

The second to last step was hand sewing all the eyelets. Out of all the things on this project, these were the most familiar to me – but I scr Once that was done I could try it on for the first time!
I’m really happy with how it fits in the bust (if it was too big there the garment wouldn’t be functional at all) but there are other things that annoy me. There is fabric that folds at the waist, probably caused by it being slightly too long in the waist, and the material not being stiff enough.
If I ever made something similar to this again, I would add four gussets in the hips instead of two. I would also start the gussets an inch higher – something that would also help eliminate the folds in the waist area.


Of course none of those things can be changed at this point. So I made note of them for next time, but forced myself to move on with the project.
Despite the care I took to tie all the threads nicely the interior of this was a mess!
 So I slip stitched in a lightweight lining. It makes it more comfortable and hides ugly edges.
 And that was it.
(I should have ironed it before taking these)


So that’s that! Definitely issues I wish I could change, but luckily none of them distort the shape or comfort of the garment. It should be perfect for beneath the dress I have in mind, so that’s good.
The straps still aren’t completely finished since I haven’t decided how to secure them – I was originally planning on using buttons but now i’m leaning towards eyelets. I might wait until the dress is finished, then see which gives the nicest shape beneath it.
…
Thanks for reading!
And thanks for all the input on short vs. long posts, I think I will stick with lengthy posts but not limit myself when it comes to writing shorter ones.

That is and incredibly nice corset. And thank you for the amount of detain in the post.
ps, for the strap, use eyelets and ribbon, but that is just my opinion
I am in awe of the work you do. Your dedication to your craft is impressive and the research you undertake gives you an expertise that I suspect is not found in many seamstresses. I have passed on your blog to a few sewing friends of mine and a couple of family studies teachers. I believe you would be very inspirational to high school fashion students. Keep up the amazing work. I will be waiting impatiently for your next posting.
Such amazing work! You really inspire me to work on my craft more. The detailing on this piece is impeccable! I stared at it for 10 mins straight. I was tempted to print it out and put it on my wall haha!
So impressive! This looks amazing 🙂
I’m excited to see how you’ve tackled it, because I’m also working on making this same pattern from C&C. I’ve changed it about though, and am “updating” it to be much shorter, and with a split busk, so it’s been challenging to redesign the cording and embroidery to fit in the available space.