
This weeks post is about another new project, but this time i’m venturing into an era I haven’t sewn from in a while – the 1830’s! I went through a phase a couple years ago where I made three dresses inspired by this period, and I had so much fun making them. But for some reason I never revisited the period until now.
For Christmas I got Fashion: A History from the 18th to the 20th Century*, and looking at the silly 1830’s dresses featured in it reminded me how much I love the period. The dresses make me so happy, with the bold prints, large skirts, ridiculous sleeves, and delicate accessories. I still can’t get on board with the crazy headpieces, but I love everything else.
So when I was in Pennsylvania and came across a bright cotton plaid I knew it was time to make a boldly printed ridiculous 1830’s dress. This is the material was four dollars a yard, and I bought seven yards.

I’m going to pair it with the orange taffeta leftover from my 1890’s Dress, and some berry colored velvet I got in NYC a while back.
When it comes to design I was a little bit conflicted. I originally wanted to make something based on this kooky dress, but the neckline and sleeves are quite similar to a dress I made in the past so that seemed kind of boring. And most of the other dresses I found were better suited for a less busy fabric.
I ended up mixing the dress linked above with the bodice design of this dress – I really like the piping, basque waist, the neckline, and the more elaborate sleeves. All those things make it more time consuming to make, but you know how much I love time consuming projects…
Here is my weird sketch which I didn’t really end up following (oops)

I draped the pattern on my dress form, then transferred it to paper. The bodice is made up of 8 pieces, with an additional 4 pieces for the collar.
In the past when doing pleated collars I’ve pleated a rectangle of fabric, then cut it down to the shape I want. This time around I cut it down to the right size before pleating – which was kind of scary, since I was sure it would turn out the wrong shape. But it totally worked and made the process a lot easier, so i’m definitely doing it this way from now on!
I marked the pleat pattern onto the collar with chalk.

Then used my iron to crease the tops of the pleats.

Then actually pleated them and pinned everything in place! This is the front.

And this is the back.

The front panels were carefully pinned, then sewn together. It was unintentional, but the horizontal pattern ended up being almost symmetrical on these panels. They didn’t match up the first time I sewed it, but they were so close that I ripped the seam out and redid it so they match!

The shoulder of the collar pieces were done up with piping sewn into the seam. The bottom edge was hemmed by eye, and the top edge was turned inward by a half inch. Then I hand stitched some piping around the neckline.

To keep the pleats in place I loosely tacked them down from the underside. This was trickier to do than I was expecting. Since the fabric is so thin I couldn’t feel how many layers I was stitching through, and I ended up sewing through the front of the fabric a few times. Those stitches are pretty obvious since I used dark purple thread, which doesn’t match 80% of the colors in the bodice.
Luckily the crazy print also works to my benefit – your eye skips over the visible stitches and assumes it’s part of the chaos that is this fabric!

With the collar done the bodice assembly began! I made this more difficult by adding piping to every seam (something I’ve never done before). And I chose to use yarn as piping cord, which was way too thin and looked flat after being ironed. Not my best decision, but I kind of made it work!
These are the front panels…

More front panels.

And the back panels!

The arm openings were finished with facings.

And then the collar was sewn on! This was done by hand to avoid any visible topstitching.
After a quick fitting to check the length I hemmed the bottom edge and trimmed it with more piping.

And now it was time for lining! This was assembled completely by machine and is made from muslin.

It took me ages to get it pinned in properly – somehow the lining was too short, so it kept causing the front layer of fabric to bunch up. But I managed eventually, and sewed it in place by hand.

I finished one of the back edges with bias tape (leftover from my 1890’s dress), then finished the other edge with a strip of bias tape that was turned inward and sewn down so it isn’t visible from the outside.
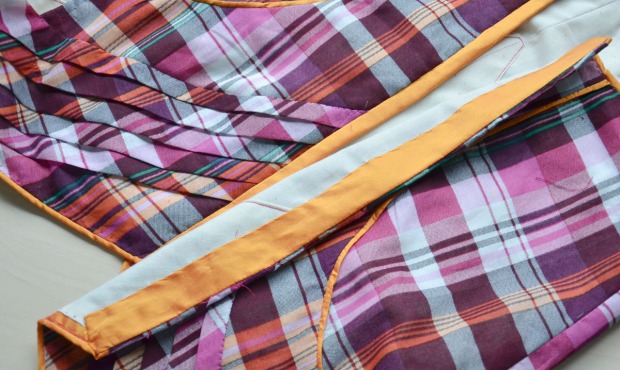
The back closure consists of hooks and loops, which were sewn to the strips of taffeta.

Unfortunately the print on the back of the bodice doesn’t line up perfectly, but it’s close-ish!

Here is the front.

And a close up of the pretty pleats! So far i’m happy with how this looks, though i’m second guessing my decision to go for a more complicated design. I think it might be a bit too busy – but the 1830’s were famous for being crazy, so maybe it works?

That’s it for today! The next post will be about sleeves. I’m not sure if it will be about my 1890’s dress or this one, but it will definitely involve sleeves haha!
Thanks for reading!

_1836_-_1840.jpg)
This is fabulous!!!!! 🙂 I can’t wait to see what it looks like when it’s done!!
As far as design, I think you picked a perfect one; it reminds me sooo much of this one: http://pin.it/bxVSNQ1
Lovely job!! I always love reading your posts!
I just would like to tell you how much I enjoy reading your blog. Whenever I see you have a new post, I am so happy! You make such beautiful art – thank you for sharing your passion!
Wow! Just WOW on the pleats. I’m really impressed!
Can you start adding on your blogs or at the bottom of videos, the books you are referencing (in detail) there have been 3,4 or 5 that I really want to get myself. Or if you could email me screen shots of cover & first pages. (I live in a small town so I’ll have to get them online. Lol )
Wish we lived closer & could have “stitch & bitches. That’s what we lovingly called our sewing nights. But that can’t happen geographically. Lol love watching your creations unfold. You are doing amazing work & extremely advanced pieces. You go girl! 😊 my email is Highlandslassie@aol.com if you’d give me details on the books. Please give me a mailing address so I can send you a thank you goodie bag as a thank you! (All good stuff I promiss!) Keep up the great work. Your youtube is my favorite by far. Happy sewing & creating!
I must say, I LOVE, LOVE, LOVE the orange piping with the plaid! So loud and wonderful! Also, the pleated plaid looks really interesting. I do sculpted fabric landscapes; now I think I need to do this with some of the plaids I’ve collected. Ideas taking shape as I type . . .
Leia, I checked out your fiber art on Etsy; you are very talented. Your pieces are fascinating.
Beautiful, beautiful work.
Could you please tell us how you draft a pattern from the sketch? With this plaid bodice, it seems to happen invisibly!
Thank you, Janet
Great work. I always wonder. Where do you wear these amazing costumes.
Angela, I am mesmerized by that pleated plaid bodice; I love how it came together. I can’t tell where the bias fabric begins and ends and the way everything is pieced together fascinates me. This bodice is a work of art, in more ways than one.
I just love the pumkin piping.. Also I love the way the plaid pleats add so much interest to the bodice. I was uncertain about that plaid but it totally works and now I’m looking for a plaid for fall. I never wear plaid. This is huge.