If you clicked on this post thinking that title is an exaggeration, then you have severely underestimated me and the things I will buy on etsy.

I discovered beetlewing embroidery several years ago, when I was still really active on tumblr and this picture came across my dashboard. I thought it was stunning, and the fact that all the detail work was made from bugs fascinated me. But at the time I wasn’t doing a lot of hand work, and it never crossed my mind that I could make anything similar.
Over the past few months I’ve come across pictures of more extant garments that feature this technique. And after my tiny embroidery project earlier in the year (a stomacher), and an elaborate 1860’s dress under my belt, I felt like I could actually take this on.
Beetlewing embroidery goes back hundreds of years, and from what I can tell, originated in China, Thailand, and India. I’m not sure how it came to be popular in Europe in the mid 1800’s, but it was, and the results are stunning. This pinterest board has lots of lovely examples.
…
My first “step” was buying the wings. I ordered 2,000 from this seller, which I’m really hoping will be enough.

The wings feel (and look) a bit like press on nails, but are a bit thicker and more brittle. Though they are wings, they aren’t like dragonfly wings – these are a firm shell.

A few other bloggers have made dresses featuring them, and they mentioned steaming the wings to make them flexible enough to poke holes in, where others used drills. I found this prospect kind of terrifying because I had a lot of wings, but luckily mine haven’t required either method. A sharp (large) needle goes through them and creates a big enough hole to get a smaller needle and a few strands of embroidery floss through.

The more time consuming part has been cutting off the point where the wings connected to the body of the beetle. It’s also sort of gross even though it’s all dried out.


As for fabric, I’ll be using 12 yards of lightweight cotton which I got from Hamed Fabrics.

The design isn’t fully figured out yet, but I know it will consist of a skirt, an evening bodice, and a day bodice. Which is very common for designs in the mid 19th century.
My inspiration for the bodice shapes, and the sleeves, is this ensemble – the skirt design is still kind of a mystery, but I’ll figure it out once the upper half is done. The embroidery pattern is made up, but influenced a lot but every other example I could find online.

The first step was draping – draping loose fitting bodices is always a pain, but I did the best I could.

I tried to change it up a little bit, so instead of the shoulder seam sitting at the top of the shoulder, it’s further back and gathered to add volume to the bust.

Here is one of the front pieces, with the shoulder gathered.

The back pieces, stitched together with french seams.

And here they are sewn together.
 The side seams were done up as well, then the collar and hem were bound with bias tape made from green silk shantung. The front edges were also turned inward to finish them off nicely.

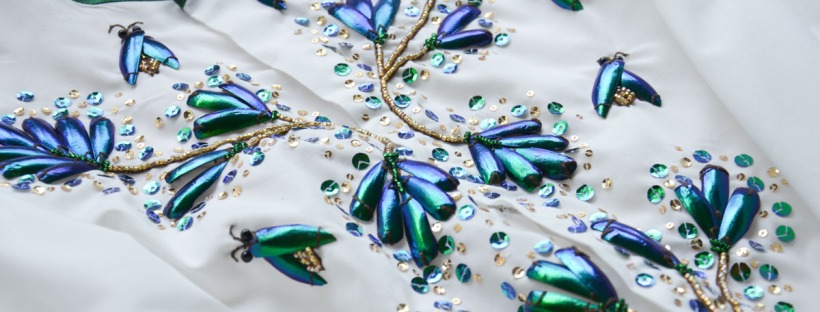
Now for the fun part – the beetles! I designed the embroidery pattern on paper, and fiddled around with the wings until I liked the shapes they made.


The paper was then placed underneath the fabric. I traced the stem design onto the right side of the fabric with a wash away pen.

And then the embroidery began! I didn’t do a great job documenting this, since I wasn’t sure it would work. I’ll make sure to take more photos of the skirt during these steps.
The stems were sewn with a split stitch. I outlined each one with two parallel lines of stitching, with a small gap between them, which is where I sewed gold seed beads. Then the wings were sewn on, and the “gaps” between the wings, as well as the base of them, were covered with green seed beads to make them look more like foliage.
I did as much of this as I could with a hoop.
 Then I sewed sequins around the design – a mixture of flat gold ones, faceted gold ones, and some that match the wings almost perfectly.

Here is one section done!

However when it was all done, it felt a little sparse. So I added bugs. The bodies were made from embroidery floss and gold beads, with the beetle wings making up the wings. Then I embroidered on antennas and used faux black pearls as eyes.
I may make a video showing this process at some point!

After the embellishing was done I sewed in hook/bar closures, and gathered the waistline. However after a fitting I realized the waist was too small, so the gathering was ripped out and re-done.

Now time for the sleeves! It looks like a relatively normal sleeve pattern, but the twist is a rectangle gathered every 4″ to create puffs, which is sewn between these two pieces.
The top piece is the front (ignore the writing saying otherwise) – it’s narrower, so the puffs are more visible from the front and side of the sleeves when they are worn.

Here are the puffed portions after being gathered.

I sewed them onto a smaller piece of material so they held their shape.

Then that was sewn to the other pieces.

They looked okay, but were obviously missing bugs.
(I will never say that about anything else if my life)
I placed the bugs in the center of the gathering points, surrounded by sequins.


The side seam was done up, but I left the bottom few inches open to allow me to get the sleeves on and off. Then I turned the seam allowance inward with whip stitches to hide the raw edges.
The cuffs are made from interfaced cotton, with green silk piping trimming the edges. They are lined with more cotton, and close with two hooks/bars. Weirdly, these gave me a lot of trouble. I cut them the wrong length the first time, and had to re-do them. Then I gathered the sleeves to be too small and didn’t realize until after the cuffs were sewn on and the lining was in…cue me having to re-do it, again.

Here you can see the difference between the front and backs of the sleeves.

They were sewn on by machine, and that’s it!


And here are some worn photos – I don’t love the fit, I feel like it should be a little looser to provide more mobility of the arms. But I also really like how it looks.
(note, the ribbon is a placeholder to imitate the waistband of the skirt, it isn’t part of the bodice)

I think the proportion of the embroidery at the front is really nice, and I love the sleeves, the bugs with the gathering is really charming to me.


One things I’ll have to do before labeling this costume complete is make a corset cover. My corset is bright red, which doesn’t pair well with sheer white fabrics.

And that’s it! I’m not sure when the next post about this project will be done, since the skirt isn’t even started and the evening bodice is missing sleeves. But hopefully it will all come together nicely in the near future!
Thanks for reading!

I love this! The embroidery is so amazing and unique! I’ve been following you for a little while, and your posts always inspire me to design and sew more intricate, challenging, and diverse costumes. And it’s encouraging when you talk about things you are unsure about or mistakes you made; it makes me feel like I’m not the only one 🙂
Stunning! I would be so afraid to wear it or move my arms, terrified that I’d break the embellishment! Looks fantastic (as always!)
So beautiful as always! I especially love the sleeves – so delicate.
Amazing! Never thought I would think bugs look pretty, but these do!
How would a person go about having this washed?
Oh my gosh! What an incredible and beautiful project! Well done.
Wow, a thing of beauty. The details are so perfectly designed, and what colours! I love the way plain lightweight cotton can become something exquisite.
This is so cool! I think your day bodice looks really cute – the beetle wings look lovely, and your design for them is really striking and effective. I’d like to see another little bug on the back of your shoulder, since the back of the bodice looks so plain in comparison… But bodices often do look a little plain without the skirt on. I’m really excited to see what you do for the other bodice!
This is really gorgeous. I love the designs. The beetles on the sleeves are my favorite.
It’s incredibly beautiful!
I don’t know about the whole “wearing bugs” thing but that is gorgeous!
it’s gorgeous, I love the color and sheen of the beetle wings. well done, as always!
Fascinating practice, never heard of beetlewing work before.
Those little bugs are just about the cutest damn thing I’ve ever seen. I’ve always wanted to work with beetle wings, maybe I’ll try it now that you’ve inspired me!
I’m amazed. I’ve never heard before about beetlewing embroidery, but it looks fabulous.
The easiest way to embroidery big pieces is to frame them uncut on a rectangular frame (like used for tambour beading).
Stunning, as always! Who knew you could get beetle wings in this day and age?
Stunning!
Stunning as always!
You must have the patience of Job!!! Beautiful garment made from your nimble fingers. Thank you for taking the time to share.
I love it!! I am picky about designs but this is great. The bug parts doesn’t bother me. Wonderful work.
Great embroidery with the beetle wings and very creative. Have you found the costume books by Janet Arnold. she has some fabulous scaled drawing of period dresses. I really helped me in getting the fit correct. Dresses of that period restricted the way that you used your arms and how far you could lift them up.
It’s absolutely beautiful. You’ve inspired me to make something quite similar but as a full dress with blue light cotton fabric.
Amazing as always :”>>
This is lovely. I was not aware of this Beetlewing. Thanks for sharing. i look forward to the finished product.
Marilyn
Your work is stunning but I wonder, have you ever considered to develop a project about Regency/Jane Austen Era style? I would love you to!!! 😀
Very nice job, but one thing struck my eye – there is one less bug on one side (in the front of the bodice), is it intentional?
Hi Angela! Not related to this post (which is awesome and so beautiful), but I found this today and immediately thought you needed to see it!
Angela, ever since I found out about your work I have followed your blog with so much enjoyment. I have loved period clothing for so long. I’ve been collecting patterns and Godey’s Lady’s books and plates forever. I particularly love the Victorian period’s mourning costumes and jewelry. I have never been able to see so much as a button. Despite my love for such clothing for many years, I never thought I coukd make such things. But following you has inspired me. I’ve been looking over some sewing classes here in NYC, deciding where to start this summer. I want to learn. Thank you for inspiring me to create something I’ve loved for so long! Your talent amazes me.
I must admit that you spark creativity in all who follow you. I just ordered 100 beetle wings to do embroidery on my crazy quilt purses. Love the blouse….you are so talented!!
Hi Angela,
My name is Anuj Agarwal. I’m Founder of Feedspot.
I would like to personally congratulate you as your blog Angela Clayton’s Costumery & Creations has been selected by our panelist as one of the Top 100 Dressmaking Blogs on the web.
http://blog.feedspot.com/dressmaking_blogs/
I personally give you a high-five and want to thank you for your contribution to this world. This is the most comprehensive list of Top 100 Dressmaking Blogs on the internet and I’m honored to have you as part of this!
Also, you have the honor of displaying the badge on your blog.
Best,
Anuj
That’s BEAUTIFUL!! I’ve never seen this sort of embroidery before.